Instruction Manual
Page 3
... 50-51 Focus Lock...52 4 EXPOSURE MODE 53-62 Auto-Multi Program 54-55 Shutter-Priority Auto Exposure Mode 56-57 Aperture-Priority Auto Exposure Mode 58-59 Manual Exposure Mode 60-61 Long Time Exposure 62 ADVANCED OPERATION 63-70 Exposure Compensation 64-65 Auto Exposure Bracketing 66-68 Multiple Exposure 69-70 OTHER FUNCTIONS 71-74 Film Rewind...72 Dioptre Adjustment/Viewfinder Accessories 73 Available Mode Combinations 74 FLASH PHOTOGRAPHY 75-85 Built-In Speedlight/Ready-Light 76-77 Flash Sync Mode Features 78...
... 50-51 Focus Lock...52 4 EXPOSURE MODE 53-62 Auto-Multi Program 54-55 Shutter-Priority Auto Exposure Mode 56-57 Aperture-Priority Auto Exposure Mode 58-59 Manual Exposure Mode 60-61 Long Time Exposure 62 ADVANCED OPERATION 63-70 Exposure Compensation 64-65 Auto Exposure Bracketing 66-68 Multiple Exposure 69-70 OTHER FUNCTIONS 71-74 Film Rewind...72 Dioptre Adjustment/Viewfinder Accessories 73 Available Mode Combinations 74 FLASH PHOTOGRAPHY 75-85 Built-In Speedlight/Ready-Light 76-77 Flash Sync Mode Features 78...
Instruction Manual
Page 7
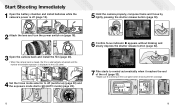
... lens and turn the power switch on (page 18). 3 Open the camera back and install the film (page 20). • When the camera back is closed, the film is automatically advanced and the number of available exposures is displayed in the LCD panel. 4 Set the focus mode selector to AF (autofocus) (page 26) and the exposure mode dial to a (AUTO mode) (page 28). 6 Confirm focus indicator / appears without blinking and slowly depress the shutter release button...
... lens and turn the power switch on (page 18). 3 Open the camera back and install the film (page 20). • When the camera back is closed, the film is automatically advanced and the number of available exposures is displayed in the LCD panel. 4 Set the focus mode selector to AF (autofocus) (page 26) and the exposure mode dial to a (AUTO mode) (page 28). 6 Confirm focus indicator / appears without blinking and slowly depress the shutter release button...
Instruction Manual
Page 9
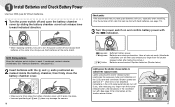
... recommend that can be sure to turn off and replace both batteries at the same time. Always use fresh batteries of children's reach. Have a fresh set ready. (Viewfinder indications turn off and open the battery chamber cover by sliding the battery chamber cover lock release lever toward indicated direction. 1 Install Batteries and Check Battery Power Use two CR2-type 3V lithium batteries. 1 Turn the power switch off .) See page 24 for information on and confirm battery power with the ´ and...
... recommend that can be sure to turn off and replace both batteries at the same time. Always use fresh batteries of children's reach. Have a fresh set ready. (Viewfinder indications turn off and open the battery chamber cover by sliding the battery chamber cover lock release lever toward indicated direction. 1 Install Batteries and Check Battery Power Use two CR2-type 3V lithium batteries. 1 Turn the power switch off .) See page 24 for information on and confirm battery power with the ´ and...
Instruction Manual
Page 11
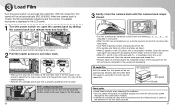
...-coded film With DX-coded film, film speed will be loaded smoothly if inserted from the bottom. • Make sure to the red index mark; Film speed is set up, a shutter sound is not properly installed. Open the camera back again and reload film by sliding the camera back lock release lever and load film. • Film cartridge can check the number of the film frame position. 21 PREPARATION 3 Load Film Turn the power switch on the film roll and film speed through the film...
...-coded film With DX-coded film, film speed will be loaded smoothly if inserted from the bottom. • Make sure to the red index mark; Film speed is set up, a shutter sound is not properly installed. Open the camera back again and reload film by sliding the camera back lock release lever and load film. • Film cartridge can check the number of the film frame position. 21 PREPARATION 3 Load Film Turn the power switch on the film roll and film speed through the film...
Instruction Manual
Page 13
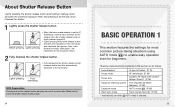
...AUTO mode (a) (P. 28) Flash sync mode Front-Curtain Sync (fi)* (P. 78) * Automatically set to AF (autofocus), camera starts to focus on the exposure meter.) 2 Fully depress the shutter release button. • Fully depressing the shutter release button releases shutter and film automatically advances to enable easy operation even for approx. 5 sec. Before pressing Lightly pressing • When the focus mode selector is set when a AUTO mode is lightly pressed (page 30). • Lightly pressing the shutter release button activates the indications in picture blur. Lightly...
...AUTO mode (a) (P. 28) Flash sync mode Front-Curtain Sync (fi)* (P. 78) * Automatically set to AF (autofocus), camera starts to focus on the exposure meter.) 2 Fully depress the shutter release button. • Fully depressing the shutter release button releases shutter and film automatically advances to enable easy operation even for approx. 5 sec. Before pressing Lightly pressing • When the focus mode selector is set when a AUTO mode is lightly pressed (page 30). • Lightly pressing the shutter release button activates the indications in picture blur. Lightly...

Instruction Manual
Page 14
... for details.) Turn the power switch on and set the focus mode selector to AF (autofocus). • Make sure to turn the focus mode selector until it unnecessary to switch the focus area. 26 Scenes with pronounced differences in brightness within the focus brackets located at the same distance, use focus lock (page 52) then recompose. BASIC OPERATION 1 NOTE: AF focus mode Do not rotate the lens focusing ring manually when the focus mode selector is wearing...
... for details.) Turn the power switch on and set the focus mode selector to AF (autofocus). • Make sure to turn the focus mode selector until it unnecessary to switch the focus area. 26 Scenes with pronounced differences in brightness within the focus brackets located at the same distance, use focus lock (page 52) then recompose. BASIC OPERATION 1 NOTE: AF focus mode Do not rotate the lens focusing ring manually when the focus mode selector is wearing...
Instruction Manual
Page 15
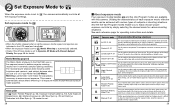
... operating instructions and details. g Sports Continuous P. 38 Use this mode to take pictures of fast-moving subject using a fast shutter speed or blur the subject using other settings, such as flowers or insects. h Night Portrait P. 39 P Auto-Multi Program P. 54 Use this mode to take sports pictures. S Shutter-Priority Auto P. 56 You set the desired aperture, and the camera selects the correct shutter speed. Matrix Metering (page 34) The Matrix Meter employed in the F55/F55D uses...
... operating instructions and details. g Sports Continuous P. 38 Use this mode to take pictures of fast-moving subject using a fast shutter speed or blur the subject using other settings, such as flowers or insects. h Night Portrait P. 39 P Auto-Multi Program P. 54 Use this mode to take sports pictures. S Shutter-Priority Auto P. 56 You set the desired aperture, and the camera selects the correct shutter speed. Matrix Metering (page 34) The Matrix Meter employed in the F55/F55D uses...
Instruction Manual
Page 16
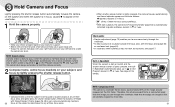
... adjustment (page 73) enables you see through the viewfinder. • To take a picture of a subject outside the focus area, shift the focus area (page 48) or use your left hand to cradle the camera (or lens). See page 40 for details. • Compose frame so that the edges of a negative film are partially cropped by lightly pressing the shutter release button. • When shutter release button...
... adjustment (page 73) enables you see through the viewfinder. • To take a picture of a subject outside the focus area, shift the focus area (page 48) or use your left hand to cradle the camera (or lens). See page 40 for details. • Compose frame so that the edges of a negative film are partially cropped by lightly pressing the shutter release button. • When shutter release button...
Instruction Manual
Page 18
... in the viewfinder. Using G- Knowing the characteristics of each factor helps you can manually set to other than Manual and Centre Partial Metering is detected by adding distance information to choose from the subject passes through the lens and exposes the film. With the F55/F55D, Matrix Metering is automatically selected when the exposure mode is set aperture and the camera automatically sets the proper shutter speed. In Shutter-Priority Auto exposure mode (page...
... in the viewfinder. Using G- Knowing the characteristics of each factor helps you can manually set to other than Manual and Centre Partial Metering is detected by adding distance information to choose from the subject passes through the lens and exposes the film. With the F55/F55D, Matrix Metering is automatically selected when the exposure mode is set aperture and the camera automatically sets the proper shutter speed. In Shutter-Priority Auto exposure mode (page...
Instruction Manual
Page 19
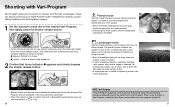
... overall picture, whether the subject is near or far, is sharply focused. BASIC OPERATION 2 Shooting with Vari-Program Vari-Program gives you the option to choose from Portrait, Landscape, CloseUp, Sports Continuous or Night Portrait mode-designed for specific picturetaking situations and photographic images. 1 Set the exposure mode dial to the desired Vari-Program, then lightly press the shutter release button. • Centre the focus brackets...
... overall picture, whether the subject is near or far, is sharply focused. BASIC OPERATION 2 Shooting with Vari-Program Vari-Program gives you the option to choose from Portrait, Landscape, CloseUp, Sports Continuous or Night Portrait mode-designed for specific picturetaking situations and photographic images. 1 Set the exposure mode dial to the desired Vari-Program, then lightly press the shutter release button. • Centre the focus brackets...

Instruction Manual
Page 20
... ISO 400 or faster film speed is recommended. • A tripod is recommended when using a zoom lens, use . BASIC OPERATION 2 Shooting with an evening or night background. Use of self-timer also helps to focus on the subject without foreground subject. • Use of subjects such as the shutter release button is fully depressed. • Built-in use telephoto zoom position. • For more professional uses, Micro-Nikkor lenses are automatically selected...
... ISO 400 or faster film speed is recommended. • A tripod is recommended when using a zoom lens, use . BASIC OPERATION 2 Shooting with an evening or night background. Use of self-timer also helps to focus on the subject without foreground subject. • Use of subjects such as the shutter release button is fully depressed. • Built-in use telephoto zoom position. • For more professional uses, Micro-Nikkor lenses are automatically selected...
Instruction Manual
Page 22
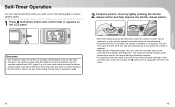
... cancel the self-timer mode or the self-timer during self-timer operation, either turn the power switch off, or press the v button until V disappears from stray light and achieve correct exposure. • Do not stand in front of the lens when setting the self-timer in autofocus mode. • Self-timer shooting cannot be performed unless the camera's shutter can be released (i.e. The selftimer lamp will release in the photograph or reduce camera shake. 1 Press v (self-timer) button and confirm...
... cancel the self-timer mode or the self-timer during self-timer operation, either turn the power switch off, or press the v button until V disappears from stray light and achieve correct exposure. • Do not stand in front of the lens when setting the self-timer in autofocus mode. • Self-timer shooting cannot be performed unless the camera's shutter can be released (i.e. The selftimer lamp will release in the photograph or reduce camera shake. 1 Press v (self-timer) button and confirm...
Instruction Manual
Page 31
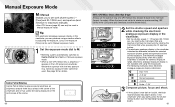
... #$ +1/2 EV $ Correct exposure $ % -1/2 EV % Under -1 EV 3 Compose picture, focus and shoot. • If the subject is too dark or backlit, the flash recommended indication fi blinks in the viewfinder indicates the difference between the selected exposure (shutter speed and aperture) and the correct exposure. When the lens is not set to its minimum aperture setting, ƒEE blinks in the LCD panel and viewfinder, and the shutter locks. 2 Set the shutter speed and aperture while checking...
... #$ +1/2 EV $ Correct exposure $ % -1/2 EV % Under -1 EV 3 Compose picture, focus and shoot. • If the subject is too dark or backlit, the flash recommended indication fi blinks in the viewfinder indicates the difference between the selected exposure (shutter speed and aperture) and the correct exposure. When the lens is not set to its minimum aperture setting, ƒEE blinks in the LCD panel and viewfinder, and the shutter locks. 2 Set the shutter speed and aperture while checking...
Instruction Manual
Page 32
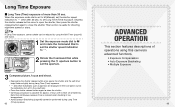
...fresh set Long Time (Time) exposure. Tip In Long Time exposure, camera shake can be performed during Long Time (Time) exposure. • -- Long Time Exposure • Long Time (Time) exposure of batteries. Depress the shutter release button once to open the shutter, then press the shutter release button again to close the shutter. • Continuous exposure is set to M (Manual), set the shutter speed indication to -- (next after 30 sec.) to set the aperture. 3 Compose picture, focus and shoot. • Depressing the shutter release button once opens the shutter and the self-timer...
...fresh set Long Time (Time) exposure. Tip In Long Time exposure, camera shake can be performed during Long Time (Time) exposure. • -- Long Time Exposure • Long Time (Time) exposure of batteries. Depress the shutter release button once to open the shutter, then press the shutter release button again to close the shutter. • Continuous exposure is set to M (Manual), set the shutter speed indication to -- (next after 30 sec.) to set the aperture. 3 Compose picture, focus and shoot. • Depressing the shutter release button once opens the shutter and the self-timer...
Instruction Manual
Page 45
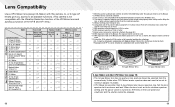
... Centre Partial*1 R - or slower, the exposure meter cannot be used . *11 With exposure mode set to Manual and shutter speed set to all available functions. (This camera is turned on, ƒEE blinks in combination with this camera. or D-type AF lenses give you access to Manual. R*7 R R R Non-G or D-type AF Nikkor (except AF Nikkor R for the lens to its minimum aperture setting and the power switch is not compatible with the Vibration...
... Centre Partial*1 R - or slower, the exposure meter cannot be used . *11 With exposure mode set to Manual and shutter speed set to all available functions. (This camera is turned on, ƒEE blinks in combination with this camera. or D-type AF lenses give you access to Manual. R*7 R R R Non-G or D-type AF Nikkor (except AF Nikkor R for the lens to its minimum aperture setting and the power switch is not compatible with the Vibration...
Instruction Manual
Page 47
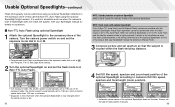
... optional Speedlight to the accessory shoe of the camera. MISCELLANEOUS • Programmed Auto Flash is performed when the exposure mode dial is set to a, Vari-Program, P or S. when a shutter speed faster than 1/90 sec. Turn the camera power switch on operation. • Non-TTL Auto Flash using the optional Speedlight's light sensor). When the optional Speedlight is set aperture so that flash synchronisation is automatically set the zoom-head position manually. 93 NOTE: Standby...
... optional Speedlight to the accessory shoe of the camera. MISCELLANEOUS • Programmed Auto Flash is performed when the exposure mode dial is set to a, Vari-Program, P or S. when a shutter speed faster than 1/90 sec. Turn the camera power switch on operation. • Non-TTL Auto Flash using the optional Speedlight's light sensor). When the optional Speedlight is set aperture so that flash synchronisation is automatically set the zoom-head position manually. 93 NOTE: Standby...

Instruction Manual
Page 52
... service centre. ƒ-- With a 19, attached or lens is not non-CPU lens, set to aperture. blinks ƒ-- However, battery power may not function properly with new ones. its minimum aperture. M appears - • Batteries are exhausted • Turn the power off, 72 during film rewind. is not correctly • Reload film. 20 installed. Do not leave • Use two CR2-type 3V lithium batteries Use two CR2-type 3V lithium batteries. • Change the batteries...
... service centre. ƒ-- With a 19, attached or lens is not non-CPU lens, set to aperture. blinks ƒ-- However, battery power may not function properly with new ones. its minimum aperture. M appears - • Batteries are exhausted • Turn the power off, 72 during film rewind. is not correctly • Reload film. 20 installed. Do not leave • Use two CR2-type 3V lithium batteries Use two CR2-type 3V lithium batteries. • Change the batteries...
Instruction Manual
Page 54
... performed with the aperture, film speed, etc. The F55/F55D's flash sync speed is controlled by the effective aperture opening. The standard numbers for available light but are 1, 1.4, 2, 2.8, 4, 5.6, 8, 11, 16, 22, 32, etc. With some zoom lenses, aperture varies depending on the focal length setting. EV Exposure Value: A number representing the available combinations of the exposure meter. The camera can effectively provide light. Automatic exposure bracketing is fired in dim light. Flexible Program Flexible...
... performed with the aperture, film speed, etc. The F55/F55D's flash sync speed is controlled by the effective aperture opening. The standard numbers for available light but are 1, 1.4, 2, 2.8, 4, 5.6, 8, 11, 16, 22, 32, etc. With some zoom lenses, aperture varies depending on the focal length setting. EV Exposure Value: A number representing the available combinations of the exposure meter. The camera can effectively provide light. Automatic exposure bracketing is fired in dim light. Flexible Program Flexible...
Instruction Manual
Page 56
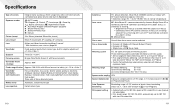
... locked when the subject is in use (manual not selectable) • Film speed range: DX: ISO 25-5000, automatically set to infinity (at -1.0m-1) Focusing screen B-type Clear Matte Screen V with focus brackets Viewfinder frame coverage Approx. 89% Finder magnification Approx. 0.68-0.60x with 50mm lens set to +0.8m-1) Viewfinder information (with illuminator) Focus indications, focus area, shutter speed, aperture, electronic analogue exposure display/Exposure Compensation value display, Exposure Compensation, flash ready-light/flash recommended/full flash output Three sets of shots...
... locked when the subject is in use (manual not selectable) • Film speed range: DX: ISO 25-5000, automatically set to infinity (at -1.0m-1) Focusing screen B-type Clear Matte Screen V with focus brackets Viewfinder frame coverage Approx. 89% Finder magnification Approx. 0.68-0.60x with 50mm lens set to +0.8m-1) Viewfinder information (with illuminator) Focus indications, focus area, shutter speed, aperture, electronic analogue exposure display/Exposure Compensation value display, Exposure Compensation, flash ready-light/flash recommended/full flash output Three sets of shots...
Instruction Manual
Page 57
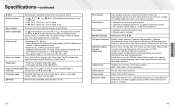
... turned on 112 113 after power is closed Film advance • Automatic advance with built-in motor • Continuous shooting possible in g Sports Continuous mode • Film advance speed: approx. 1.5 fps (fresh batteries) Film rewind • Automatic rewind with built-in motor • Mid-roll rewind available Multiple Exposure Selectable in P, S, A, M LCD panel information Shutter speed, aperture, Exposure Compensation, Exposure Compensation value, Auto Exposure Bracketing, Multiple Exposure, flash sync mode, focus area, battery power, frame counter, self-timer Date/time...
... turned on 112 113 after power is closed Film advance • Automatic advance with built-in motor • Continuous shooting possible in g Sports Continuous mode • Film advance speed: approx. 1.5 fps (fresh batteries) Film rewind • Automatic rewind with built-in motor • Mid-roll rewind available Multiple Exposure Selectable in P, S, A, M LCD panel information Shutter speed, aperture, Exposure Compensation, Exposure Compensation value, Auto Exposure Bracketing, Multiple Exposure, flash sync mode, focus area, battery power, frame counter, self-timer Date/time...


