Product Manual
Page 5
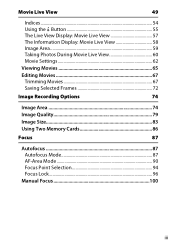
Movie Live View 49 Indices...54 Using the b Button 55 The Live View Display: Movie Live View 57 The Information Display: Movie Live View 58 Image Area 59 Taking Photos During Movie Live View 60 Movie Settings 62 Viewing Movies 65 Editing Movies 67 Trimming Movies 67 Saving Selected Frames 72 Image Recording Options 74 Image Area 74 Image Quality 79 Image Size 83 Using Two Memory Cards 86 Focus 87 Autofocus 87 Autofocus Mode 87 AF-Area Mode 90 Focus Point Selection 94 Focus Lock 96 Manual Focus 100 iii
Movie Live View 49 Indices...54 Using the b Button 55 The Live View Display: Movie Live View 57 The Information Display: Movie Live View 58 Image Area 59 Taking Photos During Movie Live View 60 Movie Settings 62 Viewing Movies 65 Editing Movies 67 Trimming Movies 67 Saving Selected Frames 72 Image Recording Options 74 Image Area 74 Image Quality 79 Image Size 83 Using Two Memory Cards 86 Focus 87 Autofocus 87 Autofocus Mode 87 AF-Area Mode 90 Focus Point Selection 94 Focus Lock 96 Manual Focus 100 iii
Product Manual
Page 8
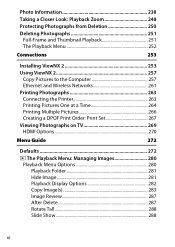
Photo Information 238 Taking a Closer Look: Playback Zoom 248 Protecting Photographs from Deletion 250 Deleting Photographs 251 Full-Frame and Thumbnail Playback 251 The Playback Menu ...
Photo Information 238 Taking a Closer Look: Playback Zoom 248 Protecting Photographs from Deletion 250 Deleting Photographs 251 Full-Frame and Thumbnail Playback 251 The Playback Menu ...
Product Manual
Page 12
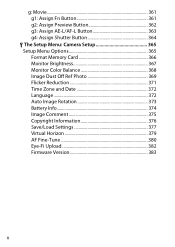
g: Movie 361 g1: Assign Fn Button 361 g2: Assign Preview Button 362 g3: Assign AE-L/AF-L Button 363 g4: Assign Shutter Button 364 B The Setup Menu: Camera Setup 365 Setup Menu Options 365 Format Memory Card 366 Monitor Brightness 367 Monitor Color Balance 368 Image Dust Off Ref Photo 369 Flicker Reduction 371 Time Zone and Date 372 Language 372 Auto Image Rotation 373 Battery Info 374 Image Comment 375 Copyright Information 376 Save/Load Settings 377 Virtual Horizon 379 AF Fine-Tune 380 Eye-Fi Upload 382 Firmware Version 383 x
g: Movie 361 g1: Assign Fn Button 361 g2: Assign Preview Button 362 g3: Assign AE-L/AF-L Button 363 g4: Assign Shutter Button 364 B The Setup Menu: Camera Setup 365 Setup Menu Options 365 Format Memory Card 366 Monitor Brightness 367 Monitor Color Balance 368 Image Dust Off Ref Photo 369 Flicker Reduction 371 Time Zone and Date 372 Language 372 Auto Image Rotation 373 Battery Info 374 Image Comment 375 Copyright Information 376 Save/Load Settings 377 Virtual Horizon 379 AF Fine-Tune 380 Eye-Fi Upload 382 Firmware Version 383 x
Product Manual
Page 46
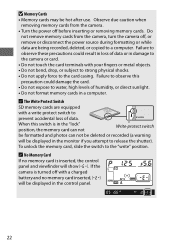
... are equipped with a charged battery and no memory card is in the "lock" position, the memory card can not Write-protect switch be formatted and photos can not be deleted or recorded (a warning will be displayed in the monitor if you attempt to the card casing. Do not remove memory cards...
... are equipped with a charged battery and no memory card is in the "lock" position, the memory card can not Write-protect switch be formatted and photos can not be deleted or recorded (a warning will be displayed in the monitor if you attempt to the card casing. Do not remove memory cards...

Product Manual
Page 65
To magnify the view in the monitor for an improved focus preview during focus preview, aperture will return to the original value before the photo is taken. 41 To return aperture to take a picture during live view photography, press the Pv button. To choose an AF-area mode, press the ...
To magnify the view in the monitor for an improved focus preview during focus preview, aperture will return to the original value before the photo is taken. 41 To return aperture to take a picture during live view photography, press the Pv button. To choose an AF-area mode, press the ...
Product Manual
Page 67
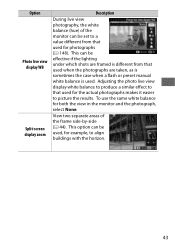
Option Photo live view display WB Split-screen display zoom Description During live view display white balance to produce a similar effect to that used for the actual ... results. To use the same white balance for photographs (0 148). This option can be used, for example, to a value different from that used . Adjusting the photo live view photography, the white balance (hue) of the frame side-by-side (0 44). View two separate areas of the monitor can be set to...
Option Photo live view display WB Split-screen display zoom Description During live view display white balance to produce a similar effect to that used for the actual ... results. To use the same white balance for photographs (0 148). This option can be used, for example, to a value different from that used . Adjusting the photo live view photography, the white balance (hue) of the frame side-by-side (0 44). View two separate areas of the monitor can be set to...
Product Manual
Page 69
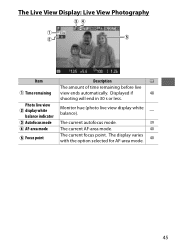
The Live View Display: Live View Photography Item Description 0 The amount of time remaining before live view display white balance). - The display varies with the option selected for AF-area mode. 40 45 Displayed if 48 shooting will end in 30 s or less. e Autofocus mode The current autofocus mode. 39 r AF-area mode The current AF-area mode. 40 t Focus point The current focus point. Photo live view w display white balance indicator Monitor hue (photo live q Time remaining view ends automatically.
The Live View Display: Live View Photography Item Description 0 The amount of time remaining before live view display white balance). - The display varies with the option selected for AF-area mode. 40 45 Displayed if 48 shooting will end in 30 s or less. e Autofocus mode The current autofocus mode. 39 r AF-area mode The current AF-area mode. 40 t Focus point The current focus point. Photo live view w display white balance indicator Monitor hue (photo live q Time remaining view ends automatically.
Product Manual
Page 84
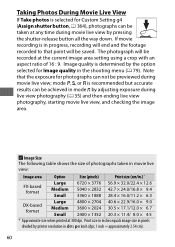
... mode h by pressing the shutter-release button all the way down. A Image Size The following table shows the size of 16 : 9. Taking Photos During Movie Live View If Take photos is selected for Custom Setting g4 (Assign shutter button, 0 364), photographs can be taken at any time during movie live view by...
... mode h by pressing the shutter-release button all the way down. A Image Size The following table shows the size of 16 : 9. Taking Photos During Movie Live View If Take photos is selected for Custom Setting g4 (Assign shutter button, 0 364), photographs can be taken at any time during movie live view by...
Product Manual
Page 97
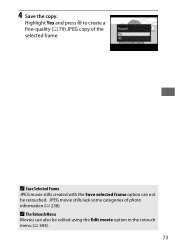
Highlight Yes and press J to create a fine-quality (0 79) JPEG copy of photo information (0 238). 4 Save the copy. A The Retouch Menu Movies can not be edited using the Edit movie option in the retouch menu (0 384). 73 A Save Selected Frame JPEG movie stills created with the Save selected frame option can also be retouched. JPEG movie stills lack some categories of the selected frame.
Highlight Yes and press J to create a fine-quality (0 79) JPEG copy of photo information (0 238). 4 Save the copy. A The Retouch Menu Movies can not be edited using the Edit movie option in the retouch menu (0 384). 73 A Save Selected Frame JPEG movie stills created with the Save selected frame option can also be retouched. JPEG movie stills lack some categories of the selected frame.
Product Manual
Page 104
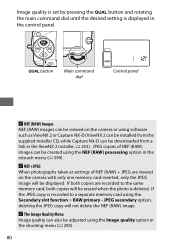
A NEF+JPEG When photographs taken at settings of NEF (RAW) images can also be erased when the photo is deleted. If both copies will be adjusted using the NEF (RAW) processing option in the ViewNX 2 installer; 0 253). Image quality is set by pressing ...
A NEF+JPEG When photographs taken at settings of NEF (RAW) images can also be erased when the photo is deleted. If both copies will be adjusted using the NEF (RAW) processing option in the ViewNX 2 installer; 0 253). Image quality is set by pressing ...
Product Manual
Page 110
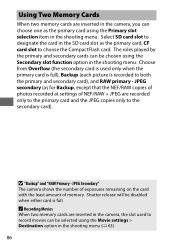
... as the primary card using the Primary slot selection item in the SD card slot as for Backup, except that the NEF/RAW copies of photos recorded at settings of memory. Choose from Overflow (the secondary card is full. A Recording Movies When two memory cards are inserted in the camera, you...
... as the primary card using the Primary slot selection item in the SD card slot as for Backup, except that the NEF/RAW copies of photos recorded at settings of memory. Choose from Overflow (the secondary card is full. A Recording Movies When two memory cards are inserted in the camera, you...
Product Manual
Page 130
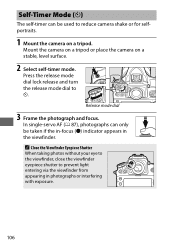
A Close the Viewfinder Eyepiece Shutter When taking photos without your eye to the viewfinder, close the viewfinder eyepiece shutter to E. In single-servo AF (0 87), photographs can be taken if the in-focus (I) ...
A Close the Viewfinder Eyepiece Shutter When taking photos without your eye to the viewfinder, close the viewfinder eyepiece shutter to E. In single-servo AF (0 87), photographs can be taken if the in-focus (I) ...
Product Manual
Page 132
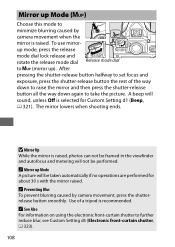
... button halfway to set focus and exposure, press the shutter-release button the rest of a tripod is raised. D Mirror Up While the mirror is raised, photos can not be taken automatically if no operations are performed for Custom Setting d1 (Beep, 0 321). A See Also For information on using the electronic front...
... button halfway to set focus and exposure, press the shutter-release button the rest of a tripod is raised. D Mirror Up While the mirror is raised, photos can not be taken automatically if no operations are performed for Custom Setting d1 (Beep, 0 321). A See Also For information on using the electronic front...
Product Manual
Page 182
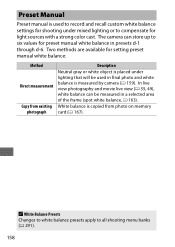
... menu banks (0 291). 158 Two methods are available for setting preset manual white balance: Method Direct measurement Copy from photo on memory card (0 167). The camera can be used in final photo and white balance is used to record and recall custom white balance settings for preset manual white balance in a selected...
... menu banks (0 291). 158 Two methods are available for setting preset manual white balance: Method Direct measurement Copy from photo on memory card (0 167). The camera can be used in final photo and white balance is used to record and recall custom white balance settings for preset manual white balance in a selected...

Product Manual
Page 190
A Measuring Preset Manual White Balance (Live View) Preset manual white balance can not be measured when Record movies is rotated to 1. Preset manual white balance can not be set while an HDR exposure is in progress (0 184) or when a setting other than None is selected for Custom Setting g4 (Assign shutter button, 0 364) and the live view selector is selected for photo live view display white balance (monitor hue; 0 43). 166
A Measuring Preset Manual White Balance (Live View) Preset manual white balance can not be measured when Record movies is rotated to 1. Preset manual white balance can not be set while an HDR exposure is in progress (0 184) or when a setting other than None is selected for Custom Setting g4 (Assign shutter button, 0 364) and the live view selector is selected for photo live view display white balance (monitor hue; 0 43). 166
Product Manual
Page 209
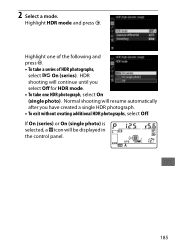
Highlight HDR mode and press 2. If On (series) or On (single photo) is selected, a y icon will resume automatically after you select Off for HDR mode. • To take one of the following and press J. • To take a series of HDR photographs, select 0 On (series). 2 Select a mode. Normal shooting will be displayed in the control panel. 185 HDR shooting will continue until you have created a single HDR photograph. • To exit without creating additional HDR photographs, select Off. Highlight one HDR photograph, select On (single photo).
Highlight HDR mode and press 2. If On (series) or On (single photo) is selected, a y icon will resume automatically after you select Off for HDR mode. • To take one of the following and press J. • To take a series of HDR photographs, select 0 On (series). 2 Select a mode. Normal shooting will be displayed in the control panel. 185 HDR shooting will continue until you have created a single HDR photograph. • To exit without creating additional HDR photographs, select Off. Highlight one HDR photograph, select On (single photo).
Product Manual
Page 211
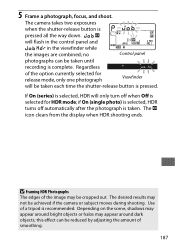
... from the display when HDR shooting ends. Depending on the scene, shadows may appear around dark objects; 5 Frame a photograph, focus, and shoot. if On (single photo) is selected, HDR turns off when Off is recommended. this effect can be achieved if the camera or subject moves during shooting. no Control panel...
... from the display when HDR shooting ends. Depending on the scene, shadows may appear around dark objects; 5 Frame a photograph, focus, and shoot. if On (single photo) is selected, HDR turns off when Off is recommended. this effect can be achieved if the camera or subject moves during shooting. no Control panel...
Product Manual
Page 212
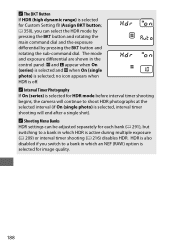
...command dial. The mode and exposure differential are shown in the control panel: y and F appear when On (series) is selected and y when On (single photo) is selected for each bank (0 291), but switching to a bank in which an NEF (RAW) option is selected; no icon appears when HDR is ...On (series) is selected for Custom Setting f8 (Assign BKT button; 0 350), you switch to shoot HDR photographs at the selected interval (if On (single photo) is off. A The D Button If HDR (high dynamic range) is selected for HDR mode before interval timer shooting begins, the camera will end after a...
...command dial. The mode and exposure differential are shown in the control panel: y and F appear when On (series) is selected and y when On (single photo) is selected for each bank (0 291), but switching to a bank in which an NEF (RAW) option is selected; no icon appears when HDR is ...On (series) is selected for Custom Setting f8 (Assign BKT button; 0 350), you switch to shoot HDR photographs at the selected interval (if On (single photo) is off. A The D Button If HDR (high dynamic range) is selected for HDR mode before interval timer shooting begins, the camera will end after a...
Product Manual
Page 232
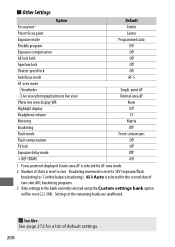
... lock Off Shutter speed lock Off Autofocus mode AF-S AF-area mode Viewfinder Single-point AF Live view photography/movie live view Normal-area AF Photo live view display WB None Highlight display Off Headphone volume 15 Metering Matrix Bracketing Off 2 Flash mode Front-curtain sync Flash compensation Off FV lock...
... lock Off Shutter speed lock Off Autofocus mode AF-S AF-area mode Viewfinder Single-point AF Live view photography/movie live view Normal-area AF Photo live view display WB None Highlight display Off Headphone volume 15 Metering Matrix Bracketing Off 2 Flash mode Front-curtain sync Flash compensation Off FV lock...
Product Manual
Page 234
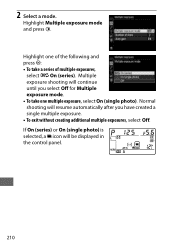
Highlight Multiple exposure mode and press 2. If On (series) or On (single photo) is selected, a n icon will resume automatically after you select Off for Multiple exposure mode. • To take a series of multiple exposures, select 0 On (series). 2 Select a ... shooting will be displayed in the control panel. 210 Highlight one of the following and press J: • To take one multiple exposure, select On (single photo).
Highlight Multiple exposure mode and press 2. If On (series) or On (single photo) is selected, a n icon will resume automatically after you select Off for Multiple exposure mode. • To take a series of multiple exposures, select 0 On (series). 2 Select a ... shooting will be displayed in the control panel. 210 Highlight one of the following and press J: • To take one multiple exposure, select On (single photo).


