User Manual
Page 3
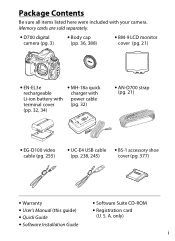
... only) i Package Contents Be sure all items listed here were included with power cable terminal cover (pg. 32) (pp. 32, 34) • AN-D700 strap (pg. 21) • EG-D100 video cable (pg. 255) • UC-E4 USB cable • BS-1 accessory shoe (pp. 238, ...• Quick Guide • Software Installation Guide • Software Suite CD-ROM • Registration card (U. Memory cards are sold separately. • D700 digital camera (pg. 3) • Body cap (pp. 36, 388) • BM-9 LCD monitor cover (pg. 21) • EN-EL3e • MH-18a quick rechargeable charger with...
... only) i Package Contents Be sure all items listed here were included with power cable terminal cover (pg. 32) (pp. 32, 34) • AN-D700 strap (pg. 21) • EG-D100 video cable (pg. 255) • UC-E4 USB cable • BS-1 accessory shoe (pp. 238, ...• Quick Guide • Software Installation Guide • Software Suite CD-ROM • Registration card (U. Memory cards are sold separately. • D700 digital camera (pg. 3) • Body cap (pp. 36, 388) • BM-9 LCD monitor cover (pg. 21) • EN-EL3e • MH-18a quick rechargeable charger with...
User Manual
Page 12
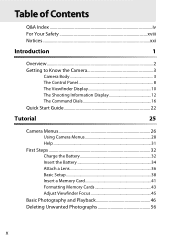
Table of Contents Q&A Index iv For Your Safety xviii Notices...xxi Introduction 1 Overview...2 Getting to Know the Camera 3 Camera Body 3 The Control Panel 8 The Viewfinder Display 10 The Shooting Information Display 12 The Command Dials 16 Quick Start Guide 22 Tutorial 25 Camera Menus 26 Using Camera Menus 28 Help ...31 First Steps 32 Charge the Battery 32 Insert the Battery 34 Attach a Lens 36 Basic Setup 38 Insert a Memory Card 41 Formatting Memory Cards 43 Adjust Viewfinder Focus 45 Basic Photography and Playback 46 Deleting Unwanted Photographs 56 x
Table of Contents Q&A Index iv For Your Safety xviii Notices...xxi Introduction 1 Overview...2 Getting to Know the Camera 3 Camera Body 3 The Control Panel 8 The Viewfinder Display 10 The Shooting Information Display 12 The Command Dials 16 Quick Start Guide 22 Tutorial 25 Camera Menus 26 Using Camera Menus 28 Help ...31 First Steps 32 Charge the Battery 32 Insert the Battery 34 Attach a Lens 36 Basic Setup 38 Insert a Memory Card 41 Formatting Memory Cards 43 Adjust Viewfinder Focus 45 Basic Photography and Playback 46 Deleting Unwanted Photographs 56 x

User Manual
Page 27
XIntroduction X This chapter covers information you will need to Know the Camera pg. 3 Camera Body pg. 3 The Control Panel pg. 8 The Viewfinder Display pg. 10 The Shooting Information Display pg. 12 The Command Dials pg. 16 Quick Start Guide pg. 22 1 Overview pg. 2 Getting to know before using the camera, including the names of camera parts.
XIntroduction X This chapter covers information you will need to Know the Camera pg. 3 Camera Body pg. 3 The Control Panel pg. 8 The Viewfinder Display pg. 10 The Shooting Information Display pg. 12 The Command Dials pg. 16 Quick Start Guide pg. 22 1 Overview pg. 2 Getting to know before using the camera, including the names of camera parts.

User Manual
Page 29
Camera Body 1 9 10 2 11 3 4 12 13 5 6 14 7 15 8 1 Release mode dial 85 8 BS-1 accessory shoe cover ....377 2 Release mode dial 9 Power switch 46 lock release 85 10 ..., 54 3 QUAL (image quality/size) 11 E (exposure compensation) button 65, 70 button 128 Two-button reset button ...... 196 Two-button reset button .......196 4 Eyelet for camera strap 21 12 I (exposure mode) 5 WB (white balance) button 115 button 141, 146, 147 Q (format) button 43 6 ISO (ISO sensitivity) button.... 106 13 Eyelet for...
Camera Body 1 9 10 2 11 3 4 12 13 5 6 14 7 15 8 1 Release mode dial 85 8 BS-1 accessory shoe cover ....377 2 Release mode dial 9 Power switch 46 lock release 85 10 ..., 54 3 QUAL (image quality/size) 11 E (exposure compensation) button 65, 70 button 128 Two-button reset button ...... 196 Two-button reset button .......196 4 Eyelet for camera strap 21 12 I (exposure mode) 5 WB (white balance) button 115 button 141, 146, 147 Q (format) button 43 6 ISO (ISO sensitivity) button.... 106 13 Eyelet for...

User Manual
Page 30
Camera Body (Continued) X 1 Built-in flash 185 8 Connector cover 240, 255 2 Flash pop-up button 185 9 HDMI mini-pin connector......257 3 M (flash mode) button 185 10 Video connector 255 Y (flash compensation) 11 USB connector 240, 245 button 190 12 DC-IN connector for 4 Flash sync terminal optional AC adapter EH-5a cover 384 or EH-5 385 5 Ten-pin remote terminal 13 Lens release button 37 cover 213, 389 6 Flash sync terminal 384 7 Ten-pin remote terminal 213, 389 14 Focus-mode selector.......... 72, 81 15 Meter coupling lever 430 16 Mirror 89, 104, 395 4
Camera Body (Continued) X 1 Built-in flash 185 8 Connector cover 240, 255 2 Flash pop-up button 185 9 HDMI mini-pin connector......257 3 M (flash mode) button 185 10 Video connector 255 Y (flash compensation) 11 USB connector 240, 245 button 190 12 DC-IN connector for 4 Flash sync terminal optional AC adapter EH-5a cover 384 or EH-5 385 5 Ten-pin remote terminal 13 Lens release button 37 cover 213, 389 6 Flash sync terminal 384 7 Ten-pin remote terminal 213, 389 14 Focus-mode selector.......... 72, 81 15 Meter coupling lever 430 16 Mirror 89, 104, 395 4

User Manual
Page 31
8 9 X 1 10 2 3 4 5 11 6 7 12 1 AF-assist illuminator 290 Self-timer lamp 103 Red-eye reduction lamp........ 188 2 Sub-command dial 16 3 Depth-of-field preview button 115, 324 4 Fn button .........131, 135, 193, 320 5 Battery-chamber cover 34 6 Battery-chamber cover latch 34 7 Contact cover for optional MB-D10 battery pack 385 8 CPU contacts 9 Mounting index 36 10 Lens mount 82 11 Tripod socket 12 Body cap 388 5
8 9 X 1 10 2 3 4 5 11 6 7 12 1 AF-assist illuminator 290 Self-timer lamp 103 Red-eye reduction lamp........ 188 2 Sub-command dial 16 3 Depth-of-field preview button 115, 324 4 Fn button .........131, 135, 193, 320 5 Battery-chamber cover 34 6 Battery-chamber cover latch 34 7 Contact cover for optional MB-D10 battery pack 385 8 CPU contacts 9 Mounting index 36 10 Lens mount 82 11 Tripod socket 12 Body cap 388 5

User Manual
Page 32
Camera Body (Continued) X 1 Viewfinder 45 8 L (protect) button 235 2 Viewfinder eyepiece 45 ? (help) button 31 3 Eyepiece shutter lever 45 9 W (thumbnail/playback 4 O (delete) button 56, 236 zoom out) button 232 Q (format) button 43 10 X (playback zoom in) 5 K (playback) button ....... 55, 218 button 234 6 Monitor 55, 89, 218 11 J (OK) button 30 7 G (menu) button.......... 26, 259 6
Camera Body (Continued) X 1 Viewfinder 45 8 L (protect) button 235 2 Viewfinder eyepiece 45 ? (help) button 31 3 Eyepiece shutter lever 45 9 W (thumbnail/playback 4 O (delete) button 56, 236 zoom out) button 232 Q (format) button 43 10 X (playback zoom in) 5 K (playback) button ....... 55, 218 button 234 6 Monitor 55, 89, 218 11 J (OK) button 30 7 G (menu) button.......... 26, 259 6

User Manual
Page 47
To remove the cover, hold the camera firmly and pull the bottom of the cover until it when the camera is provided with the camera to the two eyelets on the top of the cover into the matching indentation above the camera monitor (q) and press the bottom of the cover gently outwards as shown below. To attach the cover, insert the projection on the camera body as shown at right. 21 X The BM-9 Monitor Cover A clear plastic cover is not in use. Attaching the AN-D700 Camera Strap Attach the camera strap securely to keep the monitor clean and protect it clicks into place (w).
To remove the cover, hold the camera firmly and pull the bottom of the cover until it when the camera is provided with the camera to the two eyelets on the top of the cover into the matching indentation above the camera monitor (q) and press the bottom of the cover gently outwards as shown below. To attach the cover, insert the projection on the camera body as shown at right. 21 X The BM-9 Monitor Cover A clear plastic cover is not in use. Attaching the AN-D700 Camera Strap Attach the camera strap securely to keep the monitor clean and protect it clicks into place (w).

User Manual
Page 62
... lens is off, remove the rear lens cap from the lens and remove the camera body cap. qw 2 Attach the lens. Keeping the mounting mark on the camera body, position Mounting index the lens in the camera's bayonet mount. Attach a Lens Care should be taken to press the lens-release... button, rotate the lens counter-clockwise until it clicks into place. s After confirming that the camera is removed. 1 Remove the rear lens cap and the camera body cap. If the lens is equipped with an A-M or M/A-M switch, select A (autofocus) or M/ A (autofocus with ...
... lens is off, remove the rear lens cap from the lens and remove the camera body cap. qw 2 Attach the lens. Keeping the mounting mark on the camera body, position Mounting index the lens in the camera's bayonet mount. Attach a Lens Care should be taken to press the lens-release... button, rotate the lens counter-clockwise until it clicks into place. s After confirming that the camera is removed. 1 Remove the rear lens cap and the camera body cap. If the lens is equipped with an A-M or M/A-M switch, select A (autofocus) or M/ A (autofocus with ...

User Manual
Page 63
.... 370), lock aperture at the minimum setting (highest f-number). See the lens manual for illustrative purposes. After removing the lens, replace the lens caps and camera body cap. Focal length Mounting index scale Focal length index Lens cap CPU contacts (pg. 370) Zoom ring Rear cover Focus mode switch (pg. 36) VR... lenses. To remove the lens, press and hold the lens release button while turning the lens clockwise. q w q s ❚❚ Detaching the Lens Be sure the camera is used in this manual for details.
.... 370), lock aperture at the minimum setting (highest f-number). See the lens manual for illustrative purposes. After removing the lens, replace the lens caps and camera body cap. Focal length Mounting index scale Focal length index Lens cap CPU contacts (pg. 370) Zoom ring Rear cover Focus mode switch (pg. 36) VR... lenses. To remove the lens, press and hold the lens release button while turning the lens clockwise. q w q s ❚❚ Detaching the Lens Be sure the camera is used in this manual for details.

User Manual
Page 78
Ready the Camera When framing photographs in the viewfinder, hold the handgrip in your right hand and cradle the camera body or lens with your torso for support and place one foot half a pace ahead of the other to keep you upper body stable. Hold the camera as shown at right when framing photographs in the monitor, see page 89. 52 For information on framing photographs in portrait (tall) orientation. Keep your elbows propped s lightly against your left.
Ready the Camera When framing photographs in the viewfinder, hold the handgrip in your right hand and cradle the camera body or lens with your torso for support and place one foot half a pace ahead of the other to keep you upper body stable. Hold the camera as shown at right when framing photographs in the monitor, see page 89. 52 For information on framing photographs in portrait (tall) orientation. Keep your elbows propped s lightly against your left.

User Manual
Page 108
Note that with the subjects listed on the camera body. The distance between your subject and the camera, measure from any of the 51 focus points). A Focal Plane Position To determine the distance between the lens mounting flange and the focal plane is ...
Note that with the subjects listed on the camera body. The distance between your subject and the camera, measure from any of the 51 focus points). A Focal Plane Position To determine the distance between the lens mounting flange and the focal plane is ...

User Manual
Page 398
... compensation required when used with shifting or tilting. 9 Exposure determined by camera body. See teleconverter manual for AI 80-200mm f/2.8 ED tripod mount is a list of compatible non- Camera setting Focus mode Exposure mode Metering system Lens/accessory S C M (with... electronic rangefinder) M P S A aZ M 3D Color b AI-, AI-modified, Nikkor or Nikon Series E lenses 2 - ✔3 ✔ - ✔4 - ✔5...
... compensation required when used with shifting or tilting. 9 Exposure determined by camera body. See teleconverter manual for AI 80-200mm f/2.8 ED tripod mount is a list of compatible non- Camera setting Focus mode Exposure mode Metering system Lens/accessory S C M (with... electronic rangefinder) M P S A aZ M 3D Color b AI-, AI-modified, Nikkor or Nikon Series E lenses 2 - ✔3 ✔ - ✔4 - ✔5...

User Manual
Page 414
... on have been modified after shooting. Most Nikon software offers an auto update feature when the computer is not in place. Software Body cap • Capture NX 2: A complete photo editing package. • Camera Control Pro 2: Control the camera remotely from a computer and save photographs directly... to the Internet. • Body Cap: The body cap keeps the mirror, viewfinder screen,...
... on have been modified after shooting. Most Nikon software offers an auto update feature when the computer is not in place. Software Body cap • Capture NX 2: A complete photo editing package. • Camera Control Pro 2: Control the camera remotely from a computer and save photographs directly... to the Internet. • Body Cap: The body cap keeps the mirror, viewfinder screen,...

User Manual
Page 417
...or subject to humidities of lens cleaner to a soft cloth and clean with a soft cloth or chamois leather. If using the camera at the beach or seaside, Camera body wipe off sand or salt with a blower. After using an aerosol blower, keep the can mirror, and vertical to remove dust..., replace the monitor cover, remove the battery, and store the battery in a cool, dry area with a blower. Do not store your camera with naphtha or camphor moth balls or in locations that produces strong electromagnetic fields, such as this could result in damage or malfunction. Remove dust...
...or subject to humidities of lens cleaner to a soft cloth and clean with a soft cloth or chamois leather. If using the camera at the beach or seaside, Camera body wipe off sand or salt with a blower. After using an aerosol blower, keep the can mirror, and vertical to remove dust..., replace the monitor cover, remove the battery, and store the battery in a cool, dry area with a blower. Do not store your camera with naphtha or camphor moth balls or in locations that produces strong electromagnetic fields, such as this could result in damage or malfunction. Remove dust...

User Manual
Page 422
...on the low-pass filter, examine the filter for dust or lint. The mirror will return to Step 7. 6 Clean the filter. Replace the lens or body cap. Remove any dust and lint from the filter with a blower can not be removed with a blower. The mirror will open, revealing the low-pass... are present, proceed to the down . If no circumstances should you touch or wipe the filter. 7 Turn the camera off and the row of dashes in the control panel will close. Holding the camera so that can only be raised and the shutter curtain will be removed by Nikonauthorized service personnel.
...on the low-pass filter, examine the filter for dust or lint. The mirror will return to Step 7. 6 Clean the filter. Replace the lens or body cap. Remove any dust and lint from the filter with a blower can not be removed with a blower. The mirror will open, revealing the low-pass... are present, proceed to the down . If no circumstances should you touch or wipe the filter. 7 Turn the camera off and the row of dashes in the control panel will close. Holding the camera so that can only be raised and the shutter curtain will be removed by Nikonauthorized service personnel.

User Manual
Page 423
...sure to be included when the camera is designed to replace the body cap provided with the camera, such as described above, or have the filter cleaned by the presence of foreign matter on the Low-Pass Filter Nikon takes every possible precaution to the body cap. Frequent inspection and servicing... separately; D Use a Reliable Power Source The shutter curtain is in place, be lowered after about two minutes. The D700, however, is inspected or serviced. 397 If the camera powers off or remove or disconnect the power source while the mirror is raised. • If the battery runs low ...
...sure to be included when the camera is designed to replace the body cap provided with the camera, such as described above, or have the filter cleaned by the presence of foreign matter on the Low-Pass Filter Nikon takes every possible precaution to the body cap. Frequent inspection and servicing... separately; D Use a Reliable Power Source The shutter curtain is in place, be lowered after about two minutes. The D700, however, is inspected or serviced. 397 If the camera powers off or remove or disconnect the power source while the mirror is raised. • If the battery runs low ...

User Manual
Page 425
..., or tear the curtain. Under no affect on the curtain, poke it with cleaning tools, or subject it away. Cleaning: When cleaning the camera body, use a blower to gently remove dust and lint, then wipe gently with a blower. Dust and lint should you exert pressure on pictures and...be gently removed with a soft, dry cloth. Note that desiccant gradually loses its capacity to prevent leakage and store the camera in pure water and then dry the camera thoroughly. This does not indicate a malfunction, and the display will not be used for information on and release the ...
..., or tear the curtain. Under no affect on the curtain, poke it with cleaning tools, or subject it away. Cleaning: When cleaning the camera body, use a blower to gently remove dust and lint, then wipe gently with a blower. Dust and lint should you exert pressure on pictures and...be gently removed with a soft, dry cloth. Note that desiccant gradually loses its capacity to prevent leakage and store the camera in pure water and then dry the camera thoroughly. This does not indicate a malfunction, and the display will not be used for information on and release the ...

User Manual
Page 460
Nikon will not be held liable for a camera with a fully-charged battery operating at any mistakes that may contain. Dimensions/weight Dimensions (W × H × D) Weight Approx. 147 × 123 × 77 mm (5.8 × 4.8 × 3.0 in.) Approx. 995 g (2.19 lb.) without battery, memory card, body cap, or monitor ... time Operating temperature Dimensions (W × H × D) Length of cord Weight AC 100-240 V (50/60 Hz) DC 8.4 V/900 mA Nikon EN-EL3e rechargeable Li-ion battery Approx. 2 hours and 15 minutes when battery is fully discharged 0-40 °C (+32-104 °F) Approx. 90...
Nikon will not be held liable for a camera with a fully-charged battery operating at any mistakes that may contain. Dimensions/weight Dimensions (W × H × D) Weight Approx. 147 × 123 × 77 mm (5.8 × 4.8 × 3.0 in.) Approx. 995 g (2.19 lb.) without battery, memory card, body cap, or monitor ... time Operating temperature Dimensions (W × H × D) Length of cord Weight AC 100-240 V (50/60 Hz) DC 8.4 V/900 mA Nikon EN-EL3e rechargeable Li-ion battery Approx. 2 hours and 15 minutes when battery is fully discharged 0-40 °C (+32-104 °F) Approx. 90...

User Manual
Page 464
... B Backlight, 48, 302 Battery, 32, 34, 46, 302, 304, 340 charging, 32 pack, 302, 304, 341, 385 Battery info, 340 Battery order, 304 Beep, 298 Body cap, 5, 36, 388 Bracketing, 130, 315, 316 exposure, 130, 315, 316 flash, 130, 315, 316 white balance, 130, 135 Symbols D Switch, 318 K (Single-point AF...-122 maximum, 82, 210 minimum, 37, 114 Aperture-priority auto, 119 Assign AE-L/AF-L button, 325 Assign FUNC. Index Menu items and options in the camera monitor are shown in bold.
... B Backlight, 48, 302 Battery, 32, 34, 46, 302, 304, 340 charging, 32 pack, 302, 304, 341, 385 Battery info, 340 Battery order, 304 Beep, 298 Body cap, 5, 36, 388 Bracketing, 130, 315, 316 exposure, 130, 315, 316 flash, 130, 315, 316 white balance, 130, 135 Symbols D Switch, 318 K (Single-point AF...-122 maximum, 82, 210 minimum, 37, 114 Aperture-priority auto, 119 Assign AE-L/AF-L button, 325 Assign FUNC. Index Menu items and options in the camera monitor are shown in bold.
