
Reference Manual
Page 2
...the product. Digitutor "Digitutor", a series of "watch and learn" manuals in this manual assume that should be read before using the camera for help on menu items and other pages in movie form, is available from the following symbols and conventions are used . Where to...the safety instructions in bold. Menu items, options, and messages displayed in the camera monitor are used : D This icon marks cautions; To get the most from : i The Table of a Nikon single-lens reflex (SLR) digital camera. information that default settings are shown in "For Your Safety" (0 x-xv)....
...the product. Digitutor "Digitutor", a series of "watch and learn" manuals in this manual assume that should be read before using the camera for help on menu items and other pages in movie form, is available from the following symbols and conventions are used . Where to...the safety instructions in bold. Menu items, options, and messages displayed in the camera monitor are used : D This icon marks cautions; To get the most from : i The Table of a Nikon single-lens reflex (SLR) digital camera. information that default settings are shown in "For Your Safety" (0 x-xv)....

Reference Manual
Page 3
... of the lens kit option should confirm that the package contains the following items: BS-1 accessory shoe cover DK-20 rubber eyecup D5200 camera BF-1B body cap EN-EL14 rechargeable Li-ion battery (with terminal cover) MH-24 battery charger (plug adapter supplied in English and... Japanese only; Cameras purchased in Japan display menus and messages in countries or regions where required; other languages are sold separately (0 211). i Memory cards are...
... of the lens kit option should confirm that the package contains the following items: BS-1 accessory shoe cover DK-20 rubber eyecup D5200 camera BF-1B body cap EN-EL14 rechargeable Li-ion battery (with terminal cover) MH-24 battery charger (plug adapter supplied in English and... Japanese only; Cameras purchased in Japan display menus and messages in countries or regions where required; other languages are sold separately (0 211). i Memory cards are...

Reference Manual
Page 4
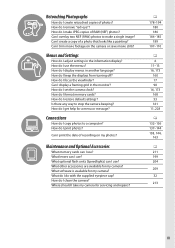
... needed? How do I get more information about a photo? Can I use special effects during shooting? How can I view photographs on the camera? How do I delete unwanted photos? 0 118 119-122 130 145-147 126 127-129 ii Can I reduce shutter noise in an automatic...I quickly adjust settings for printing at a time or in shadows and highlights? How do I protect photos from firing? Can I choose how the camera focuses? Can I take snapshots? i Deletion How do I adjust shutter speed to take pictures for different scenes? Can I preserve details in quick ...
... needed? How do I get more information about a photo? Can I use special effects during shooting? How can I view photographs on the camera? How do I delete unwanted photos? 0 118 119-122 130 145-147 126 127-129 ii Can I reduce shutter noise in an automatic...I quickly adjust settings for printing at a time or in shadows and highlights? How do I protect photos from firing? Can I choose how the camera focuses? Can I take snapshots? i Deletion How do I adjust shutter speed to take pictures for different scenes? Can I preserve details in quick ...
Reference Manual
Page 5
...Can I display a framing grid in the information display? How do I set the camera clock? How do I display menus in another language? Where should I take my camera for my camera? Can I overlay two NEF (RAW) photos to stop the camera beeping? How do I print photos? What lenses can I use ? What do ...and Settings How do with the supplied eyepiece cap? Maintenance and Optional Accessories What memory cards can I use ? How do I clean the camera? Is there any way to make JPEG copies of photos? How do I focus the viewfinder? Connections How do I restore default settings? What...
...Can I display a framing grid in the information display? How do I set the camera clock? How do I display menus in another language? Where should I take my camera for my camera? Can I overlay two NEF (RAW) photos to stop the camera beeping? How do I print photos? What lenses can I use ? What do ...and Settings How do with the supplied eyepiece cap? Maintenance and Optional Accessories What memory cards can I use ? How do I clean the camera? Is there any way to make JPEG copies of photos? How do I focus the viewfinder? Connections How do I restore default settings? What...

Reference Manual
Page 6
... Contents Package Contents...i Q&A Index ...ii For Your Safety ...x Notices...xii Introduction 1 Getting to Know the Camera 1 The Camera Body ...1 The Mode Dial...3 The Viewfinder...4 The Monitor ...5 The Information Display...6 The Command Dial ...8 Camera Menus: An Overview 11 Using Camera Menus ...12 First Steps ...14 Basic Photography 20 Battery Level and Card Capacity 20 "Point...
... Contents Package Contents...i Q&A Index ...ii For Your Safety ...x Notices...xii Introduction 1 Getting to Know the Camera 1 The Camera Body ...1 The Mode Dial...3 The Viewfinder...4 The Monitor ...5 The Information Display...6 The Command Dial ...8 Camera Menus: An Overview 11 Using Camera Menus ...12 First Steps ...14 Basic Photography 20 Battery Level and Card Capacity 20 "Point...

Reference Manual
Page 9
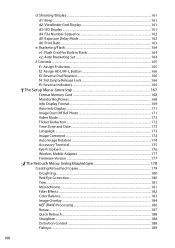
... Pictures 140 Creating a DPOF Print Order: Print Set 143 Viewing Photographs on TV 145 Standard Definition Devices 145 High-Definition Devices ...146 Camera Menus 148 D The Playback Menu: Managing Images 148 Playback Folder...148 Playback Display Options 149 Image Review ...149 Rotate Tall ...149 C... Distortion Control 151 Color Space...152 Long Exposure NR...153 High ISO NR ...153 ISO Sensitivity Settings 153 A Custom Settings: Fine-Tuning Camera Settings 155 Reset Custom Settings 156 a: Autofocus ...157 a1: AF-C Priority Selection 157 a2: Number of Focus Points 157 a3: Built...
... Pictures 140 Creating a DPOF Print Order: Print Set 143 Viewing Photographs on TV 145 Standard Definition Devices 145 High-Definition Devices ...146 Camera Menus 148 D The Playback Menu: Managing Images 148 Playback Folder...148 Playback Display Options 149 Image Review ...149 Rotate Tall ...149 C... Distortion Control 151 Color Space...152 Long Exposure NR...153 High ISO NR ...153 ISO Sensitivity Settings 153 A Custom Settings: Fine-Tuning Camera Settings 155 Reset Custom Settings 156 a: Autofocus ...157 a1: AF-C Priority Selection 157 a2: Number of Focus Points 157 a3: Built...
Reference Manual
Page 10
... ...165 f2: Assign AE-L/AF-L Button 166 f3: Reverse Dial Rotation 166 f4: Slot Empty Release Lock 166 f5: Reverse Indicators...166 B The Setup Menu: Camera Setup 167 Format Memory Card ...168 Monitor Brightness...168 Info Display Format ...169 Auto Info Display...171 Image Dust Off Ref Photo 171 Video Mode...
... ...165 f2: Assign AE-L/AF-L Button 166 f3: Reverse Dial Rotation 166 f4: Slot Empty Release Lock 166 f5: Reverse Indicators...166 B The Setup Menu: Camera Setup 167 Format Memory Card ...168 Monitor Brightness...168 Info Display Format ...169 Auto Info Display...171 Image Dust Off Ref Photo 171 Video Mode...

Reference Manual
Page 11
... 199 Compatible Lenses...199 Compatible CPU Lenses ...199 Compatible Non-CPU Lenses 201 Optional Flash Units (Speedlights 204 The Nikon Creative Lighting System (CLS 205 Other Accessories ...209 Approved Memory Cards 211 Attaching a Power Connector and AC Adapter 212 Caring for the... Camera...213 Storage...213 Cleaning ...213 The Low-Pass Filter...214 Caring for the Camera and Battery: Cautions 218 Caring for the Camera ...218 Caring for the Battery ...219 Available Settings ...221 Exposure Program (Mode ...
... 199 Compatible Lenses...199 Compatible CPU Lenses ...199 Compatible Non-CPU Lenses 201 Optional Flash Units (Speedlights 204 The Nikon Creative Lighting System (CLS 205 Other Accessories ...209 Approved Memory Cards 211 Attaching a Power Connector and AC Adapter 212 Caring for the... Camera...213 Storage...213 Cleaning ...213 The Low-Pass Filter...214 Caring for the Camera and Battery: Cautions 218 Caring for the Camera ...218 Caring for the Battery ...219 Available Settings ...221 Exposure Program (Mode ...

Reference Manual
Page 12
...that small parts constitute a choking hazard. Should a child swallow any part of a motor vehicle Failure to avoid burns. Sunlight focused into the camera when the sun is in or close to observe the precautions listed in use the product will read the following symbol: A This icon marks warnings...all those who use Parts of flammable gas, as the result of children Failure to the viewfinder, care should be taken not to a Nikon-authorized service center for extended periods may result in their entirety before using this section are on or in this equipment. A Keep out ...
...that small parts constitute a choking hazard. Should a child swallow any part of a motor vehicle Failure to avoid burns. Sunlight focused into the camera when the sun is in or close to observe the precautions listed in use the product will read the following symbol: A This icon marks warnings...all those who use Parts of flammable gas, as the result of children Failure to the viewfinder, care should be taken not to a Nikon-authorized service center for extended periods may result in their entirety before using this section are on or in this equipment. A Keep out ...

Reference Manual
Page 13
...• Keep dry. If you notice any changes in the battery, such as necklaces or hairpins. • Batteries are using the flash • Using the camera with the flash in this product: • Use only batteries approved for use only the cables provided or sold by... Nikon for an extended period. Before removing the battery turn the camera off before replacing the battery. Particular care should be observed when photographing infants, when the flash should you are prone to...
...• Keep dry. If you notice any changes in the battery, such as necklaces or hairpins. • Batteries are using the flash • Using the camera with the flash in this product: • Use only batteries approved for use only the cables provided or sold by... Nikon for an extended period. Before removing the battery turn the camera off before replacing the battery. Particular care should be observed when photographing infants, when the flash should you are prone to...

Reference Manual
Page 16
... paper money, coins, securities, government bonds, or local government bonds, even if such copies or reproductions are to infringe copyright laws. Disposing of a scanner, digital camera, or other data storage devices does not completely erase the original image data. Ensuring the privacy of empty sky). Be sure to also replace any...
... paper money, coins, securities, government bonds, or local government bonds, even if such copies or reproductions are to infringe copyright laws. Disposing of a scanner, digital camera, or other data storage devices does not completely erase the original image data. Ensuring the privacy of empty sky). Be sure to also replace any...

Reference Manual
Page 17
... the latest product information, tips, answers to operate within its operational and safety requirements. D Use Only Nikon Brand Accessories Only Nikon brand accessories certified by Nikon specifically for contact information: http://imaging.nikon.com/ xv Nikon recommends that the camera be available from product malfunction. Frequent inspection and servicing are designed to ensure that fees apply...
... the latest product information, tips, answers to operate within its operational and safety requirements. D Use Only Nikon Brand Accessories Only Nikon brand accessories certified by Nikon specifically for contact information: http://imaging.nikon.com/ xv Nikon recommends that the camera be available from product malfunction. Frequent inspection and servicing are designed to ensure that fees apply...
Reference Manual
Page 18
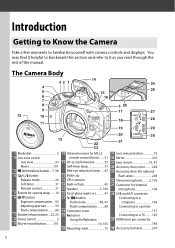
...it helpful to bookmark this section and refer to familiarize yourself with camera controls and displays. Introduction Getting to Know the Camera Take a few moments to it as you read through the rest of the manual. The Camera Body 14 32 1 24 4 5 25 15 6 16 7... switch Live view 93 Movie 101 3 R (information) button... 7, 98 4 I/E/# button Release mode 29 Self-timer 31 Remote control 31 5 Eyelets for camera strap ...... 14 6 E/N button Exposure compensation... 66 Adjusting aperture 59 Flash compensation ......... 68 7 Shutter-release button ...22, 23 8 Power switch 2 9 Movie...
...it helpful to bookmark this section and refer to familiarize yourself with camera controls and displays. Introduction Getting to Know the Camera Take a few moments to it as you read through the rest of the manual. The Camera Body 14 32 1 24 4 5 25 15 6 16 7... switch Live view 93 Movie 101 3 R (information) button... 7, 98 4 I/E/# button Release mode 29 Self-timer 31 Remote control 31 5 Eyelets for camera strap ...... 14 6 E/N button Exposure compensation... 66 Adjusting aperture 59 Flash compensation ......... 68 7 Shutter-release button ...22, 23 8 Power switch 2 9 Movie...

Reference Manual
Page 19
... .........125 Help 11 22 Battery latch 14, 18 D The Microphone and Speaker Do not place the microphone or speaker in close proximity to turn the camera on the magnetic devices. Rotate the power switch as shown to observe this precaution could affect the data recorded on . Failure to turn the...
... .........125 Help 11 22 Battery latch 14, 18 D The Microphone and Speaker Do not place the microphone or speaker in close proximity to turn the camera on the magnetic devices. Rotate the power switch as shown to observe this precaution could affect the data recorded on . Failure to turn the...

Reference Manual
Page 20
... a choice of the following shooting modes: P, S, A, and M Modes Select these modes for full control over camera settings. • P-Programmed auto (0 56) • S-Shutter-priority auto (0 57) • A-Aperture-priority auto (0 58) • M-Manual ... 3 Low key (0 113) Auto Modes Select these modes for simple, point-andshoot photography. • i Auto (0 21) • j Auto (flash off) (0 21) Scene Modes The camera automatically optimizes settings to the scene being photographed. • k Portrait (0 24) • m Sports (0 25) • l Landscape (0 24) • n Close up (0 25) &#...
... a choice of the following shooting modes: P, S, A, and M Modes Select these modes for full control over camera settings. • P-Programmed auto (0 56) • S-Shutter-priority auto (0 57) • A-Aperture-priority auto (0 58) • M-Manual ... 3 Low key (0 113) Auto Modes Select these modes for simple, point-andshoot photography. • i Auto (0 21) • j Auto (flash off) (0 21) Scene Modes The camera automatically optimizes settings to the scene being photographed. • k Portrait (0 24) • m Sports (0 25) • l Landscape (0 24) • n Close up (0 25) &#...

Reference Manual
Page 22
...for information on framing photographs in the final picture. High-angle shots Frame live view shots with the camera close to observe these precautions could damage the connection between the monitor and the camera body. The monitor shows a mirror image of what will appear in the monitor (0 93). 5 Do... not use force. To protect the monitor when the camera is recommended for self-portraits in use, fold it back face down against the camera face out. Low-angle shots Frame live view shots while holding the camera over your head. The Monitor The monitor can be angled and ...
...for information on framing photographs in the final picture. High-angle shots Frame live view shots with the camera close to observe these precautions could damage the connection between the monitor and the camera body. The monitor shows a mirror image of what will appear in the monitor (0 93). 5 Do... not use force. To protect the monitor when the camera is recommended for self-portraits in use, fold it back face down against the camera face out. Low-angle shots Frame live view shots while holding the camera over your head. The Monitor The monitor can be angled and ...

Reference Manual
Page 23
Highlight items using the multi selector and press J to settings. The Information Display Camera settings can be viewed and adjusted in the information display. Press the P button once to view settings, and again to make changes to view options ...
Highlight items using the multi selector and press J to settings. The Information Display Camera settings can be viewed and adjusted in the information display. Press the P button once to view settings, and again to make changes to view options ...

Reference Manual
Page 28
Camera Menus: An Overview Most shooting, playback, and setup options can be accessed from the following menus: • D: Playback (0 148) • C: Shooting (0 150) • A: Custom Settings (0 ... to Recent settings; 0 195) Slider shows position in current menu. Menu options Options in current menu. Press 1 or 3 to the menus. Tabs Choose from the camera menus. W (Q) button 11 Current settings are shown by pressing the W (Q) button. To view the menus, press the G button. d If a d icon appears at the bottom left...
Camera Menus: An Overview Most shooting, playback, and setup options can be accessed from the following menus: • D: Playback (0 148) • C: Shooting (0 150) • A: Custom Settings (0 ... to Recent settings; 0 195) Slider shows position in current menu. Menu options Options in current menu. Press 1 or 3 to the menus. Tabs Choose from the camera menus. W (Q) button 11 Current settings are shown by pressing the W (Q) button. To view the menus, press the G button. d If a d icon appears at the bottom left...

Reference Manual
Page 29
Move cursor up J button: select highlighted item Cancel and return to previous menu Select highlighted item or display sub-menu Move cursor down Follow the steps below to select the desired menu. Press 1 or 3 to navigate the menus. 1 Display the menus. Press 4 to highlight the icon for the current menu. G button 12 Press the G button to navigate the camera menus. Using Camera Menus The multi selector and J button are used to display the menus. 2 Highlight the icon for the current menu. 3 Select a menu.
Move cursor up J button: select highlighted item Cancel and return to previous menu Select highlighted item or display sub-menu Move cursor down Follow the steps below to select the desired menu. Press 1 or 3 to navigate the menus. 1 Display the menus. Press 4 to highlight the icon for the current menu. G button 12 Press the G button to navigate the camera menus. Using Camera Menus The multi selector and J button are used to display the menus. 2 Highlight the icon for the current menu. 3 Select a menu.

Reference Manual
Page 31
... the charger in place when the battery is fully inserted. Battery charging Charging complete 3 Insert the battery. Battery latch 14 First Steps Always turn the camera off before inserting or removing batteries or memory cards. 1 Attach the strap. If a plug adapter is supplied, raise the wall plug and connect the plug... exhausted battery will fully charge in the orientation shown, using the battery to keep the orange battery latch pressed to the two eyelets on the camera body as shown below . 2 Charge the battery. Attach the strap securely to one side.
... the charger in place when the battery is fully inserted. Battery charging Charging complete 3 Insert the battery. Battery latch 14 First Steps Always turn the camera off before inserting or removing batteries or memory cards. 1 Attach the strap. If a plug adapter is supplied, raise the wall plug and connect the plug... exhausted battery will fully charge in the orientation shown, using the battery to keep the orange battery latch pressed to the two eyelets on the camera body as shown below . 2 Charge the battery. Attach the strap securely to one side.


