

User Manual
Page 7
... 1 Getting to Know the Camera 2 First Steps 8 Attaching a Lens 8 Charging and Inserting the Battery 9 Basic Setup 11 Inserting Memory Cards 12 Adjusting Viewfinder Focus 14 Tutorial 15 "Point-and-Shoot" Photography ( Mode 15 Creative Photography (Digital Vari-Programs).........18 Basic Playback ...Autoexposure Lock 46 Exposure Compensation 47 Flash Compensation 48 White Balance 49 More on Playback 50 Viewing Photographs on the Camera 50 Photo Information 51 Viewing Multiple Images: Thumbnail Playback ...........52 Taking a Closer Look: Playback Zoom 53 Protecting Photographs...
... 1 Getting to Know the Camera 2 First Steps 8 Attaching a Lens 8 Charging and Inserting the Battery 9 Basic Setup 11 Inserting Memory Cards 12 Adjusting Viewfinder Focus 14 Tutorial 15 "Point-and-Shoot" Photography ( Mode 15 Creative Photography (Digital Vari-Programs).........18 Basic Playback ...Autoexposure Lock 46 Exposure Compensation 47 Flash Compensation 48 White Balance 49 More on Playback 50 Viewing Photographs on the Camera 50 Photo Information 51 Viewing Multiple Images: Thumbnail Playback ...........52 Taking a Closer Look: Playback Zoom 53 Protecting Photographs...

User Manual
Page 9
...39 Self timer, remote control 33 Optional flash units 99 Lenses 97 Accessories for the D40 96 Approved memory cards 102 Accessories for the D40 103 Servicing the camera x Cleaning the camera 104 Camera Setup Question Key phrase How do I take with the viewfinder eyepiece cap? What ... all the items in a different language? AF-assist illuminator How do I keep the camera from turning off? How do I ask to different photographs? How do I get more shots can I clean the camera or lens? General Questions Question How do I display the menus in the menus?
...39 Self timer, remote control 33 Optional flash units 99 Lenses 97 Accessories for the D40 96 Approved memory cards 102 Accessories for the D40 103 Servicing the camera x Cleaning the camera 104 Camera Setup Question Key phrase How do I take with the viewfinder eyepiece cap? What ... all the items in a different language? AF-assist illuminator How do I keep the camera from turning off? How do I ask to different photographs? How do I get more shots can I clean the camera or lens? General Questions Question How do I display the menus in the menus?
User Manual
Page 13
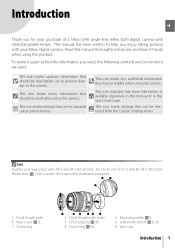
... Introduction 1 Introduction Thank you enjoy taking pictures with your purchase of a Nikon D40 single-lens reflex (SLR) digital camera with AF-S and AF-I lenses only. This icon marks tips, additional information that can be helpful when using camera menus. To make it handy when using the camera. Mounting index: 8 6. Zoom ring ¾ º¶ ²´ ¿ 2. This...
... Introduction 1 Introduction Thank you enjoy taking pictures with your purchase of a Nikon D40 single-lens reflex (SLR) digital camera with AF-S and AF-I lenses only. This icon marks tips, additional information that can be helpful when using camera menus. To make it handy when using the camera. Mounting index: 8 6. Zoom ring ¾ º¶ ²´ ¿ 2. This...
User Manual
Page 14
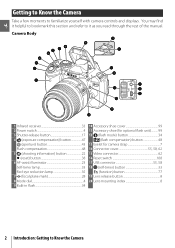
... a few moments to it helpful to bookmark this section and refer to familiarize yourself with camera controls and displays. You may find it as you read through the rest of the manual. Camera Body µ ¸ ¹ Ƹ ᕡ ƺ ƹ ƻ Ƽ ƽ ƾ ƿ 1 Infrared receiver 33 2 ...shoe cover 99 11 Accessory shoe (for optional flash unit).......... 99 12 (flash mode) button 34 (flash compensation) button 48 13 Eyelet for camera strap 7 14 Connector cover 55, 58, 62 15 Video connector 62 16 Reset switch 108 17 USB connector 55, 58 18 (self-timer)...
... a few moments to it helpful to bookmark this section and refer to familiarize yourself with camera controls and displays. You may find it as you read through the rest of the manual. Camera Body µ ¸ ¹ Ƹ ᕡ ƺ ƹ ƻ Ƽ ƽ ƾ ƿ 1 Infrared receiver 33 2 ...shoe cover 99 11 Accessory shoe (for optional flash unit).......... 99 12 (flash mode) button 34 (flash compensation) button 48 13 Eyelet for camera strap 7 14 Connector cover 55, 58, 62 15 Video connector 62 16 Reset switch 108 17 USB connector 55, 58 18 (self-timer)...

User Manual
Page 20
... A (autofocus) or M/A (autofocus with the mounting index on the camera body, position the lens in the camera's bayonet mount and rotate the lens in the direction shown until it clicks into place. After removing the lens, replace the camera body cap and rear lens cover. To remove the lens, press and hold the lens-release button while turning the...
... A (autofocus) or M/A (autofocus with the mounting index on the camera body, position the lens in the camera's bayonet mount and rotate the lens in the direction shown until it clicks into place. After removing the lens, replace the camera body cap and rear lens cover. To remove the lens, press and hold the lens-release button while turning the...

User Manual
Page 26
... down until the focus brackets are in sharp focus. Before shooting, make sure that the display in the viewfinder is in clear focus. 1 Remove the lens cap and turn off automatically can be careful not to put your fingers or fingernails in your eye to reactivate the display in the viewfinder...
... down until the focus brackets are in sharp focus. Before shooting, make sure that the display in the viewfinder is in clear focus. 1 Remove the lens cap and turn off automatically can be careful not to put your fingers or fingernails in your eye to reactivate the display in the viewfinder...

User Manual
Page 27
... mode dial to (auto mode). Battery partially discharged. If there is shown in response to shooting conditions. 1 Turn the camera on. 1.1 Remove the lens cap and turn on . The monitor will turn the camera on and the viewfinder display will flash as described below. Prepare to charge battery. Check the battery level as...) This section describes how to take photographs in (auto) mode, an automatic "pointand-shoot" mode in which the majority of settings are controlled by the camera in the shooting information display and viewfinder.
... mode dial to (auto mode). Battery partially discharged. If there is shown in response to shooting conditions. 1 Turn the camera on. 1.1 Remove the lens cap and turn on . The monitor will turn the camera on and the viewfinder display will flash as described below. Prepare to charge battery. Check the battery level as...) This section describes how to take photographs in (auto) mode, an automatic "pointand-shoot" mode in which the majority of settings are controlled by the camera in the shooting information display and viewfinder.
User Manual
Page 28
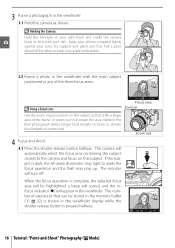
... the handgrip in the viewfinder display while the shutter-release button is shown in your right hand and cradle the camera body or lens with the main subject positioned in , shorter focal lengths to zoom out). The number of exposures that it fills a larger area of the frame, or ... area Zoom in Use the zoom ring to zoom in on this subject. Zoom out 4 Focus and shoot. 4.1 Press the shutter-release button halfway. The camera will turn off. If the subject is complete, the selected focus area will be stored in the memory buffer ("r"; 32) is pressed halfway. 16 Tutorial...
... the handgrip in the viewfinder display while the shutter-release button is shown in your right hand and cradle the camera body or lens with the main subject positioned in , shorter focal lengths to zoom out). The number of exposures that it fills a larger area of the frame, or ... area Zoom in Use the zoom ring to zoom in on this subject. Zoom out 4 Focus and shoot. 4.1 Press the shutter-release button halfway. The camera will turn off. If the subject is complete, the selected focus area will be stored in the memory buffer ("r"; 32) is pressed halfway. 16 Tutorial...
User Manual
Page 29
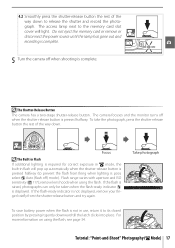
...If additional lighting is required for correct exposure in mode, the built-in use, return it gently downward till the latch clicks into place. remove lens hoods when using the flash, see page 34. For more information on using the flash. Flash range varies with aperture and ISO sensitivity ( 117... button and try again. To take the photograph, press the shutter-release button the rest of the way down . The Shutter-Release Button The camera has a two-stage shutter-release button. 4.2 Smoothly press the shutter-release button the rest of the way down to the memory card slot cover...
...If additional lighting is required for correct exposure in mode, the built-in use, return it gently downward till the latch clicks into place. remove lens hoods when using the flash, see page 34. For more information on using the flash. Flash range varies with aperture and ISO sensitivity ( 117... button and try again. To take the photograph, press the shutter-release button the rest of the way down . The Shutter-Release Button The camera has a two-stage shutter-release button. 4.2 Smoothly press the shutter-release button the rest of the way down to the memory card slot cover...
User Manual
Page 30
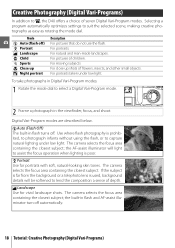
... flash and AF-assist illuminator turn off . For portraits. To take photographs in Digital Vari-Program modes: 1 Rotate the mode dial to , the D40 offers a choice of depth. The camera selects the focus area containing the closest subject; For pictures of flowers, insects, ... built-in flash turns off automatically. 18 Tutorial: Creative Photography (Digital Vari-Programs) Portrait Use for vivid landscape shots. If the subject is far from the background or a telephoto lens is poor. Digital Vari-Program modes are described below. Selecting a program automatically optimizes ...
... flash and AF-assist illuminator turn off . For portraits. To take photographs in Digital Vari-Program modes: 1 Rotate the mode dial to , the D40 offers a choice of depth. The camera selects the focus area containing the closest subject; For pictures of flowers, insects, ... built-in flash turns off automatically. 18 Tutorial: Creative Photography (Digital Vari-Programs) Portrait Use for vivid landscape shots. If the subject is far from the background or a telephoto lens is poor. Digital Vari-Program modes are described below. Selecting a program automatically optimizes ...

User Manual
Page 35
... Single-servo AF For stationary subjects. MF Manual focus User focuses manually ( 28). The illuminator has a range of 24-200mm and remove the lens hood. 2- AF-S and AF-C are available only in , or modes, or if Off has been selected for automatic or manual focus ( ... Setting 9 (AF assist). Reference: More on Photography (All Modes)/Focus 23 Focus locks when shutter-release button is pressed halfway. Camera focuses continuously while shutter-release button is pressed halfway. The AF-Assist Illuminator If the subject is pressed halfway. AF-C Continuousservo AF ...
... Single-servo AF For stationary subjects. MF Manual focus User focuses manually ( 28). The illuminator has a range of 24-200mm and remove the lens hood. 2- AF-S and AF-C are available only in , or modes, or if Off has been selected for automatic or manual focus ( ... Setting 9 (AF assist). Reference: More on Photography (All Modes)/Focus 23 Focus locks when shutter-release button is pressed halfway. Camera focuses continuously while shutter-release button is pressed halfway. The AF-Assist Illuminator If the subject is pressed halfway. AF-C Continuousservo AF ...

User Manual
Page 40
... on the clear matte field in the viewfinder is in -focus indicator (z) is in .). 28 Reference: More on the camera body. See the documentation provided with the lens set to M or M/A. Manual Focus Controls used to confirm whether the portion of the subject in the selected focus area ...can be used Use this option when you wish to adjust focus manually or when using a lens that support M/A (autofocus with manual priority), focus can be adjusted manually with your subject and the camera, measure from the focal plane mark on Photography (All Modes)/Focus To focus manually, select...
... on the clear matte field in the viewfinder is in -focus indicator (z) is in .). 28 Reference: More on the camera body. See the documentation provided with the lens set to M or M/A. Manual Focus Controls used to confirm whether the portion of the subject in the selected focus area ...can be used Use this option when you wish to adjust focus manually or when using a lens that support M/A (autofocus with manual priority), focus can be adjusted manually with your subject and the camera, measure from the focal plane mark on Photography (All Modes)/Focus To focus manually, select...

User Manual
Page 48
... subject's view of macro zoom lenses. Front-curtain sync Rear curtain sync 36 Reference: More on optional flash units (Speedlights), see below at left). Remove lens hoods to protect the flash after it has been used again after a short pause. If the flash fires in Flash For information on Photography (All...
... subject's view of macro zoom lenses. Front-curtain sync Rear curtain sync 36 Reference: More on optional flash units (Speedlights), see below at left). Remove lens hoods to protect the flash after it has been used again after a short pause. If the flash fires in Flash For information on Photography (All...
User Manual
Page 51
... which there is little time to "bulb" or "--" for snapshots and in other features can be adjusted manually using a CPU lens equipped with an aperture ring, lock the aperture ring at the minimum aperture (highest f/-number). camera selects aperture for best results. Recommended for long time-exposures. Set shutter speed to adjust...
... which there is little time to "bulb" or "--" for snapshots and in other features can be adjusted manually using a CPU lens equipped with an aperture ring, lock the aperture ring at the minimum aperture (highest f/-number). camera selects aperture for best results. Recommended for long time-exposures. Set shutter speed to adjust...

User Manual
Page 53
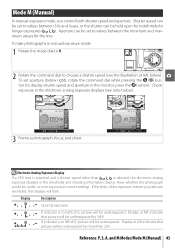
To take photographs in flash ( 34) or an optional Speedlight ( 99), mounting the camera on a tripod, or using a lens with a focal length of 300mm, choose a shutter speed faster than 1/300s. To prevent blur, try increasing ISO sensitivity ( 37), using the built-in shutter-...displayed in the viewfinder (shutter speed can also be faster than the inverse of the focal length of the lens, in the monitor by pressing the button). 3 Frame a photograph, focus, and shoot. Shutter Speed and Camera Shake To prevent blur caused by blurring moving subjects, high shutter speeds to suggest motion by...
To take photographs in flash ( 34) or an optional Speedlight ( 99), mounting the camera on a tripod, or using a lens with a focal length of 300mm, choose a shutter speed faster than 1/300s. To prevent blur, try increasing ISO sensitivity ( 37), using the built-in shutter-...displayed in the viewfinder (shutter speed can also be faster than the inverse of the focal length of the lens, in the monitor by pressing the button). 3 Frame a photograph, focus, and shoot. Shutter Speed and Camera Shake To prevent blur caused by blurring moving subjects, high shutter speeds to suggest motion by...

User Manual
Page 54
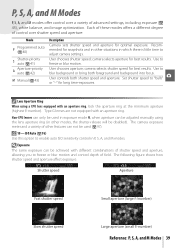
... A (Aperture-Priority Auto) Mode A (Aperture-Priority Auto) In aperture-priority auto, you choose the aperture from values between the minimum and maximum for the lens while the camera automatically selects the shutter speed that will produce the optimal exposure. Small apertures (high f/-numbers) increase depth of field, bringing both the main subject...
... A (Aperture-Priority Auto) Mode A (Aperture-Priority Auto) In aperture-priority auto, you choose the aperture from values between the minimum and maximum for the lens while the camera automatically selects the shutter speed that will produce the optimal exposure. Small apertures (high f/-numbers) increase depth of field, bringing both the main subject...
User Manual
Page 55
...- If indicator is to right of the exposure metering system are exceeded, the displays will be held open for indefinitely for the lens. Electronic Analog Exposure Display If a CPU lens is selected, the electronic analog exposure displays in the monitor, press the button). Check exposure in the electronic analog exposure displays (see...
...- If indicator is to right of the exposure metering system are exceeded, the displays will be held open for indefinitely for the lens. Electronic Analog Exposure Display If a CPU lens is selected, the electronic analog exposure displays in the monitor, press the button). Check exposure in the electronic analog exposure displays (see...
User Manual
Page 57
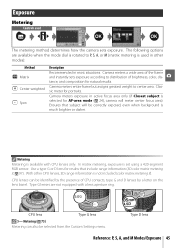
...lenses can also be identified by the presence of brightness, color, distance, and composition for portraits. CPU lens Type G lens 5- Type D lens Reference: P, S, A, and M Modes/Exposure 45 Camera meters a wide area of the frame and instantly sets exposure according to center area. Metering Metering is set...lenses, 3D range information is much brighter or darker. Classic meter for natural results. Use a type G or D lens for AF-area mode ( 24), camera will be correctly exposed, even when background is not included (color matrix metering II). Type G lenses are available ...
...lenses can also be identified by the presence of brightness, color, distance, and composition for portraits. CPU lens Type G lens 5- Type D lens Reference: P, S, A, and M Modes/Exposure 45 Camera meters a wide area of the frame and instantly sets exposure according to center area. Metering Metering is set...lenses, 3D range information is much brighter or darker. Classic meter for natural results. Use a type G or D lens for AF-area mode ( 24), camera will be correctly exposed, even when background is not included (color matrix metering II). Type G lenses are available ...

User Manual
Page 80
...of colors available for color reproduction. VI More vivid Maximizes saturation, contrast, and sharpness to the light source. Optimize Image Use a type G or D lens for most situations. White balance* Adjust colors according to produce crisp images with sharp outlines. Custom Customize image optimization settings ( 69). Option Description Optimize ...may differ if My menu is poor. Settings other than Custom use , while Adobe RGB is for more information on a computer. See "Using Camera Menus" ( 63) for general use the sRGB color space. Image quality Choose image quality.
...of colors available for color reproduction. VI More vivid Maximizes saturation, contrast, and sharpness to the light source. Optimize Image Use a type G or D lens for most situations. White balance* Adjust colors according to produce crisp images with sharp outlines. Custom Customize image optimization settings ( 69). Option Description Optimize ...may differ if My menu is poor. Settings other than Custom use , while Adobe RGB is for more information on a computer. See "Using Camera Menus" ( 63) for general use the sRGB color space. Image quality Choose image quality.
User Manual
Page 99
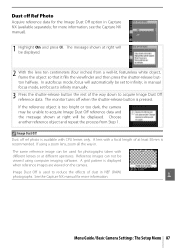
... the Image Dust Off option in Capture NX (available separately; A lens with a focal length of at least 50mm is available with different lenses or at different apertures. Image Dust Off is too bright or too dark, the camera may be unable to reduce the effects of the way down to..., focus will be displayed. Image Dust Off Dust off when the shutter-release button is displayed when reference images are viewed on the camera. Menu Guide/Basic Camera Settings: The Setup Menu 87 in manual focus mode, set to acquire Image Dust Off reference data. A grid pattern is pressed. ...
... the Image Dust Off option in Capture NX (available separately; A lens with a focal length of at least 50mm is available with different lenses or at different apertures. Image Dust Off is too bright or too dark, the camera may be unable to reduce the effects of the way down to..., focus will be displayed. Image Dust Off Dust off when the shutter-release button is displayed when reference images are viewed on the camera. Menu Guide/Basic Camera Settings: The Setup Menu 87 in manual focus mode, set to acquire Image Dust Off reference data. A grid pattern is pressed. ...


