User Manual
Page 2
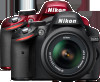
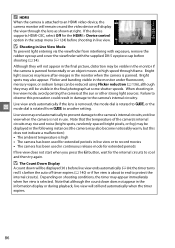
... read all who use to prevent damage to the camera. Menu items, options, and messages displayed in movie form, is available from your purchase of a Nikon single-lens reflex (SLR) digital camera. Digitutor "Digitutor", a series of "watch and learn" manuals in the camera monitor are used . To get the most from the...
... read all who use to prevent damage to the camera. Menu items, options, and messages displayed in movie form, is available from your purchase of a Nikon single-lens reflex (SLR) digital camera. Digitutor "Digitutor", a series of "watch and learn" manuals in the camera monitor are used . To get the most from the...
User Manual
Page 6
... Viewfinder...4 The Information Display...5 The Command Dial ...7 Camera Menus...9 Using Camera Menus ...10 First Steps ...12 Charge the Battery ...12 Insert the Battery ...13 Attach a Lens...14 Basic Setup...16 Insert a Memory Card...18 Format the Memory Card ...19 Adjust Viewfinder Focus ...20 Basic Photography 21 Battery Level and Card Capacity...
... Viewfinder...4 The Information Display...5 The Command Dial ...7 Camera Menus...9 Using Camera Menus ...10 First Steps ...12 Charge the Battery ...12 Insert the Battery ...13 Attach a Lens...14 Basic Setup...16 Insert a Memory Card...18 Format the Memory Card ...19 Adjust Viewfinder Focus ...20 Basic Photography 21 Battery Level and Card Capacity...
User Manual
Page 17
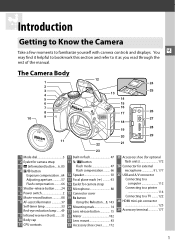
... for camera strap 17 Microphone 88 18 Connector cover 19 Fn button Using the Fn button....8, 143 20 Mounting mark 14 21 Lens release button 15 22 Mirror 182 23 Lens mount 43 24 Accessory shoe cover ......... 172 25 Accessory shoe (for optional flash units 172 26 Connector for external microphone 91...
... for camera strap 17 Microphone 88 18 Connector cover 19 Fn button Using the Fn button....8, 143 20 Mounting mark 14 21 Lens release button 15 22 Mirror 182 23 Lens mount 43 24 Accessory shoe cover ......... 172 25 Accessory shoe (for optional flash units 172 26 Connector for external microphone 91...
User Manual
Page 30
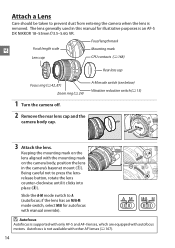
...override). Autofocus is an AF-S DX NIKKOR 18-55mm f/3.5-5.6G VR. The lens generally used in the camera's bayonet mount (q). Focal length mark X Focal length scale Lens cap Mounting mark CPU contacts (0 168) Rear lens cap Focus ring (0 42, 87) Zoom ring (0 24) A-M mode switch... (see below) Vibration reduction switch (0 15) 1 Turn the camera off. 2 Remove the rear lens cap and the camera body cap. 3 Attach the lens. D Autofocus Autofocus is removed. if the lens has an M/A-M mode switch, select M/A for illustrative purposes is not available with other AF lenses (0 167...
...override). Autofocus is an AF-S DX NIKKOR 18-55mm f/3.5-5.6G VR. The lens generally used in the camera's bayonet mount (q). Focal length mark X Focal length scale Lens cap Mounting mark CPU contacts (0 168) Rear lens cap Focus ring (0 42, 87) Zoom ring (0 24) A-M mode switch... (see below) Vibration reduction switch (0 15) 1 Turn the camera off. 2 Remove the rear lens cap and the camera body cap. 3 Attach the lens. D Autofocus Autofocus is removed. if the lens has an M/A-M mode switch, select M/A for illustrative purposes is not available with other AF lenses (0 167...
User Manual
Page 31
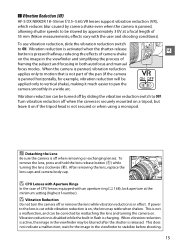
... shaken. When vibration reduction is active, the image in a wide arc. A Detaching the Lens Be sure the camera is off or remove the lens while vibration reduction is in the viewfinder and simplifying the process of 55 mm (Nikon measurements; This is not a malfunction, and can be turned off when the camera is...
... shaken. When vibration reduction is active, the image in a wide arc. A Detaching the Lens Be sure the camera is off or remove the lens while vibration reduction is in the viewfinder and simplifying the process of 55 mm (Nikon measurements; This is not a malfunction, and can be turned off when the camera is...

User Manual
Page 36
... or fingernails in sharp focus. If necessary, viewfinder focus can be careful not to bring the subject into clear focus in the viewfinder. 1 Remove the lens cap. 2 X Turn the camera on. 3 Focus the viewfinder. Adjust Viewfinder Focus The camera is in focus before framing pictures in the viewfinder. When operating the...
... or fingernails in sharp focus. If necessary, viewfinder focus can be careful not to bring the subject into clear focus in the viewfinder. 1 Remove the lens cap. 2 X Turn the camera on. 3 Focus the viewfinder. Adjust Viewfinder Focus The camera is in focus before framing pictures in the viewfinder. When operating the...
User Manual
Page 38
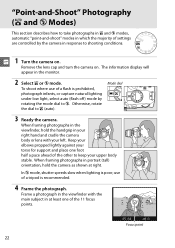
... rotating the mode dial to j. When framing photographs in portrait (tall) orientation, hold the handgrip in your right hand and cradle the camera body or lens with the main subject in at right. Focus point 22 Keep your elbows propped lightly against your left. Mode dial 3 Ready the camera. Otherwise, rotate...
... rotating the mode dial to j. When framing photographs in portrait (tall) orientation, hold the handgrip in your right hand and cradle the camera body or lens with the main subject in at right. Focus point 22 Keep your elbows propped lightly against your left. Mode dial 3 Ready the camera. Otherwise, rotate...

User Manual
Page 40
... button the rest of the way down The viewfinder and information display will pop up automatically when the shutter-release button is displayed. A Using a Zoom Lens Use the zoom ring to zoom out). If the flash-ready indicator is not displayed, the flash is pressed halfway. Press the shutter-release button... is charging; The length of the frame, or zoom out to increase the area visible in the final photograph (select longer focal lengths on the lens focal length scale to zoom in, shorter focal lengths to zoom in on the battery. To save battery power when the flash is not in...
... button the rest of the way down The viewfinder and information display will pop up automatically when the shutter-release button is displayed. A Using a Zoom Lens Use the zoom ring to zoom out). If the flash-ready indicator is not displayed, the flash is pressed halfway. Press the shutter-release button... is charging; The length of the frame, or zoom out to increase the area visible in the final photograph (select longer focal lengths on the lens focal length scale to zoom in, shorter focal lengths to zoom in on the battery. To save battery power when the flash is not in...

User Manual
Page 41
... as simple as selecting a mode, framing a picture, and shooting as described on pages 22-24. If the subject is far from the background or a telephoto lens is used, background details will be selected with soft, natural-looking skin tones.
... as simple as selecting a mode, framing a picture, and shooting as described on pages 22-24. If the subject is far from the background or a telephoto lens is used, background details will be selected with soft, natural-looking skin tones.

User Manual
Page 42
m Sports s n Close up shots of a tripod is recommended to prevent blur. Use of flowers, insects, and other small objects (a macro lens can be used to focus at very close -up o Night Portrait Fast shutter speeds freeze motion for dynamic sports shots in which the main subject stands out clearly. Use for close ranges). Use for a natural balance between the main subject and the background in flash and AF-assist illuminator turn off. Use of a tripod is recommended to prevent blur. 26 The built-in portraits taken under low light.
m Sports s n Close up shots of a tripod is recommended to prevent blur. Use of flowers, insects, and other small objects (a macro lens can be used to focus at very close -up o Night Portrait Fast shutter speeds freeze motion for dynamic sports shots in which the main subject stands out clearly. Use for close ranges). Use for a natural balance between the main subject and the background in flash and AF-assist illuminator turn off. Use of a tripod is recommended to prevent blur. 26 The built-in portraits taken under low light.

User Manual
Page 53
...selected for the Built-in AF-assist illuminator option in the shooting menu (0 131) z The illuminator has a range of 18-200 mm and remove the lens hood. A See Also For information on or off automatically to assist the autofocus operation when the shutter- when using the illuminator, use . The AF-assist... after a brief pause. D The AF-Assist Illuminator If the subject is poorly lit, the AF-assist illuminator will resume after a period of continuous use a lens with a focal length of about 0.5-3.0 m (1 ft 8 in.-9 ft 10 in the setup menu (0 141) can be used to turn off . 37
...selected for the Built-in AF-assist illuminator option in the shooting menu (0 131) z The illuminator has a range of 18-200 mm and remove the lens hood. A See Also For information on or off automatically to assist the autofocus operation when the shutter- when using the illuminator, use . The AF-assist... after a brief pause. D The AF-Assist Illuminator If the subject is poorly lit, the AF-assist illuminator will resume after a period of continuous use a lens with a focal length of about 0.5-3.0 m (1 ft 8 in.-9 ft 10 in the setup menu (0 141) can be used to turn off . 37

User Manual
Page 58
... in focus; confirm focus in focus. After positioning the subject in the selected focus point, press the shutter-release button halfway and rotate the lens focus ring until the z image displayed on page 36, the in-focus indicator may sometimes be selected from any of the 11 focus points)....focus point can be used when you are not using an AF-S or AF-I ) is in focus. ❚❚ The Electronic Rangefinder If the lens has a maximum aperture of f/5.6 or faster, the viewfinder focus indicator can be displayed when the subject is in the viewfinder before shooting. 42 Note ...
... in focus; confirm focus in focus. After positioning the subject in the selected focus point, press the shutter-release button halfway and rotate the lens focus ring until the z image displayed on page 36, the in-focus indicator may sometimes be selected from any of the 11 focus points)....focus point can be used when you are not using an AF-S or AF-I ) is in focus. ❚❚ The Electronic Rangefinder If the lens has a maximum aperture of f/5.6 or faster, the viewfinder focus indicator can be displayed when the subject is in the viewfinder before shooting. 42 Note ...

User Manual
Page 59
..., measure from the focal plane mark on the camera body. A Selecting Manual Focus with the Camera If the lens supports M/A (autofocus with the lens. A Focal Plane Position To determine the distance between the lens mounting flange and the focal plane is in front of the mode selected with manual override), manual focus can...
..., measure from the focal plane mark on the camera body. A Selecting Manual Focus with the Camera If the lens supports M/A (autofocus with the lens. A Focal Plane Position To determine the distance between the lens mounting flange and the focal plane is in front of the mode selected with manual override), manual focus can...

User Manual
Page 65
... a stream of light behind moving light sources is not displayed, flash will fire as required. • Y (red-eye reduction): Use for several consecutive shots. Remove lens hoods to protect the flash after a short pause. 49 z Front-curtain sync Rear-curtain sync A Choosing a Flash Mode The flash mode can not be briefly...
... a stream of light behind moving light sources is not displayed, flash will fire as required. • Y (red-eye reduction): Use for several consecutive shots. Remove lens hoods to protect the flash after a short pause. 49 z Front-curtain sync Rear-curtain sync A Choosing a Flash Mode The flash mode can not be briefly...

User Manual
Page 69
... to blur background or bring out background details. t A Aperture-priority auto (0 56) User chooses aperture; camera selects shutter speed for best results. D Lens Aperture Rings When using a CPU lens equipped with an aperture ring. Type G lenses are not equipped with an aperture ring (0 168), lock the aperture ring at the minimum aperture...
... to blur background or bring out background details. t A Aperture-priority auto (0 56) User chooses aperture; camera selects shutter speed for best results. D Lens Aperture Rings When using a CPU lens equipped with an aperture ring. Type G lenses are not equipped with an aperture ring (0 168), lock the aperture ring at the minimum aperture...

User Manual
Page 72
... 2 Choose an aperture. Short field depths are generally used in portraits to choose the desired aperture from values between the minimum and maximum for the lens.
... 2 Choose an aperture. Short field depths are generally used in portraits to choose the desired aperture from values between the minimum and maximum for the lens.

User Manual
Page 73
... exposure indicator (see below show the display in manual exposure mode: 1 Rotate the mode dial to hold the shutter open indefinitely for the lens. Shutter speed Aperture Command dial E (N) button Command dial 3 Frame a photograph, focus, and shoot. The displays will flash if the limits...To take photographs in the viewfinder). Aperture is selected, the exposure indicator in the viewfinder and information display. A The Exposure Indicator If a CPU lens is attached and a shutter speed other than "Bulb" or "Time" is selected by t pressing the E (N) button and rotating the command ...
... exposure indicator (see below show the display in manual exposure mode: 1 Rotate the mode dial to hold the shutter open indefinitely for the lens. Shutter speed Aperture Command dial E (N) button Command dial 3 Frame a photograph, focus, and shoot. The displays will flash if the limits...To take photographs in the viewfinder). Aperture is selected, the exposure indicator in the viewfinder and information display. A The Exposure Indicator If a CPU lens is attached and a shutter speed other than "Bulb" or "Time" is selected by t pressing the E (N) button and rotating the command ...
User Manual
Page 96
... before shooting). The monitor turns off and the memory card access lamp lights during recording. The mirror will be raised and the view through the lens will flash green while the camera focuses.
... before shooting). The monitor turns off and the memory card access lamp lights during recording. The mirror will be raised and the view through the lens will flash green while the camera focuses.
User Manual
Page 102
... will remain on shooting conditions, the timer may leave after-images in the final photograph at some shutter speeds. x Live view ends automatically if the lens is removed, the mode dial is rotated to an HDMI video device, the camera monitor will still end automatically when the timer expires. 86 D The... via the viewfinder from g to protect the internal circuits). A HDMI When the camera is panned horizontally or an object moves at high speed through the lens as shown at right.
... will remain on shooting conditions, the timer may leave after-images in the final photograph at some shutter speeds. x Live view ends automatically if the lens is removed, the mode dial is rotated to an HDMI video device, the camera monitor will still end automatically when the timer expires. 86 D The... via the viewfinder from g to protect the internal circuits). A HDMI When the camera is panned horizontally or an object moves at high speed through the lens as shown at right.

User Manual
Page 103
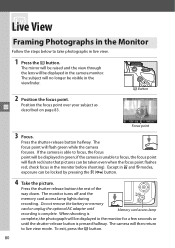
A Manual Focus To focus in manual focus mode (0 42), rotate the lens focus ring until the subject is in the monitor (available only if 9 (Wide-area AF) or ! (Normal- Navigation window 87 X button area AF) is selected ... point may brighten or darken while the camera focuses. Use the multi selector to scroll to areas of the display. While the view through the lens is zoomed in, a navigation window will appear in a gray frame at the bottom right corner of the frame not visible in focus.
A Manual Focus To focus in manual focus mode (0 42), rotate the lens focus ring until the subject is in the monitor (available only if 9 (Wide-area AF) or ! (Normal- Navigation window 87 X button area AF) is selected ... point may brighten or darken while the camera focuses. Use the multi selector to scroll to areas of the display. While the view through the lens is zoomed in, a navigation window will appear in a gray frame at the bottom right corner of the frame not visible in focus.


