
User Manual
Page 8
... Monitor 4 The MV-12 COOL-STATION 6 The EH-63 AC Adapter 6 First Steps 7 Inserting the Battery 7 Charging the Battery 8 Inserting Memory Cards 10 Turning the Camera On 12 Basic Setup 12 Basic Photography 14 Step 1-Select Mode 14 Step 2-Frame the Picture 15 Step 3-Focus and Shoot 16 Step 4-View the ... Other Scenes 28 Voice Recordings 33 Movies 36 Movie Mode 36 Recording Movies 38 Viewing Movies 40 More on Playback 41 Viewing Pictures on the Camera 41 Viewing Pictures on TV 45 Viewing Pictures on a Computer 46 Printing Pictures 50 vi
... Monitor 4 The MV-12 COOL-STATION 6 The EH-63 AC Adapter 6 First Steps 7 Inserting the Battery 7 Charging the Battery 8 Inserting Memory Cards 10 Turning the Camera On 12 Basic Setup 12 Basic Photography 14 Step 1-Select Mode 14 Step 2-Frame the Picture 15 Step 3-Focus and Shoot 16 Step 4-View the ... Other Scenes 28 Voice Recordings 33 Movies 36 Movie Mode 36 Recording Movies 38 Viewing Movies 40 More on Playback 41 Viewing Pictures on the Camera 41 Viewing Pictures on TV 45 Viewing Pictures on a Computer 46 Printing Pictures 50 vi

User Manual
Page 12
... indicators Auto ( 14) A simple "point-and-shoot" mode in which the majority of the Camera Speaker Self-timer lamp ( 20) / Power-on lamp ( 12, 14) Microphone ( ( 33...Eyelet for creating audio recordings ( 33). An additional voice recording mode is available for camera strap Lens ( 84, 95) Introduction Memory card slot/ Batterychamber cover ( 7, 10, 11) Sliding lens cover closed Sliding lens cover ( 12) Built-in fl...;ash ( 18) Memory card slot ( 10−11) Battery chamber ( 7) Battery latch ( 7) Movie ( 36) Choose from fi...
... indicators Auto ( 14) A simple "point-and-shoot" mode in which the majority of the Camera Speaker Self-timer lamp ( 20) / Power-on lamp ( 12, 14) Microphone ( ( 33...Eyelet for creating audio recordings ( 33). An additional voice recording mode is available for camera strap Lens ( 84, 95) Introduction Memory card slot/ Batterychamber cover ( 7, 10, 11) Sliding lens cover closed Sliding lens cover ( 12) Built-in fl...;ash ( 18) Memory card slot ( 10−11) Battery chamber ( 7) Battery latch ( 7) Movie ( 36) Choose from fi...

User Manual
Page 14
Introduction The Monitor The following indicators may appear in the monitor during shooting and playback (actual display varies with current camera settings): Shooting 20 21 23 4 1 5 6 19 7 8 10 9 10 +1.0 11 AUTO 999 18 17 16 14 12 AUTO 15 13 Playback 19 01.01.2005 18 00:00 100NIKON 1 9999.JPG 2 3 17 16 15 14 4 5 6 9999/9999 9 13 12 10 7 :START 11 8 4
Introduction The Monitor The following indicators may appear in the monitor during shooting and playback (actual display varies with current camera settings): Shooting 20 21 23 4 1 5 6 19 7 8 10 9 10 +1.0 11 AUTO 999 18 17 16 14 12 AUTO 15 13 Playback 19 01.01.2005 18 00:00 100NIKON 1 9999.JPG 2 3 17 16 15 14 4 5 6 9999/9999 9 13 12 10 7 :START 11 8 4

User Manual
Page 15
... 15 4 Focus indicator2 16 5 Battery level indicator3 14 6 Internal memory/memory card indicator 14, 16 7 Camera shake icon4 .......... 19, 28, 78 8 "Date not set" indicator5 13 9 Time zone indicator 74 10 Self-timer indicator 20 11 Date imprint/date counter 77 1 Displayed when zoom button is pressed. 2 Displayed when... mode 21 20 White balance 60 21 Color option 64 4 Appears at slow shutter speeds to warn that pictures may be blurred. 5 Appears when camera clock has not been set. 1 Current folder 93-94 2 File number and type 93-94 3 Internal memory/memory card indicator 14, 16, ...
... 15 4 Focus indicator2 16 5 Battery level indicator3 14 6 Internal memory/memory card indicator 14, 16 7 Camera shake icon4 .......... 19, 28, 78 8 "Date not set" indicator5 13 9 Time zone indicator 74 10 Self-timer indicator 20 11 Date imprint/date counter 77 1 Displayed when zoom button is pressed. 2 Displayed when... mode 21 20 White balance 60 21 Color option 64 4 Appears at slow shutter speeds to warn that pictures may be blurred. 5 Appears when camera clock has not been set. 1 Current folder 93-94 2 File number and type 93-94 3 Internal memory/memory card indicator 14, 16, ...

User Manual
Page 20
... inserting or removing memory cards. 2 Open the memory card slot/battery-chamber cover Slide the cover in the camera's internal memory (approximately 12 MB) or on removable Secure Digital (SD) memory cards. To insert a memory card: 1 Confirm that the power-on lamp is inserted, pictures ...are stored in the direction shown (ᕡ) until it opens (ᕢ). ᕡ ᕢ 10 The memory card must be formatted or used ...
... inserting or removing memory cards. 2 Open the memory card slot/battery-chamber cover Slide the cover in the camera's internal memory (approximately 12 MB) or on removable Secure Digital (SD) memory cards. To insert a memory card: 1 Confirm that the power-on lamp is inserted, pictures ...are stored in the direction shown (ᕡ) until it opens (ᕢ). ᕡ ᕢ 10 The memory card must be formatted or used ...
User Manual
Page 23
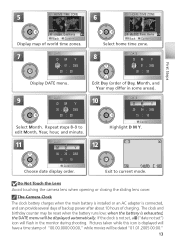
...Avoid touching the camera lens when opening or closing the sliding lens cover. The clock and birthday counter may differ in the monitor during shooting. Repeat steps 8-9 to current mode. If the clock is connected, and can provide several days of backup power after about 10 hours of ... movies will flash in some areas). 10 DATE DM Y 20 . 04 . 2005 15 : 10 Confirm Highlight D M Y. 12 AUTO 10 Exit to edit Month, Year, hour, and minute. 11 DATE MD Y 04 . 20 . 2005 15 : 10 Confirm Choose date display order. The Camera Clock The clock battery charges when the main battery...
...Avoid touching the camera lens when opening or closing the sliding lens cover. The clock and birthday counter may differ in the monitor during shooting. Repeat steps 8-9 to current mode. If the clock is connected, and can provide several days of backup power after about 10 hours of ... movies will flash in some areas). 10 DATE DM Y 20 . 04 . 2005 15 : 10 Confirm Highlight D M Y. 12 AUTO 10 Exit to edit Month, Year, hour, and minute. 11 DATE MD Y 04 . 20 . 2005 15 : 10 Confirm Choose date display order. The Camera Clock The clock battery charges when the main battery...

User Manual
Page 24
...seven-item shooting menu gives full control over such settings as white balance and exposure compensation ( 58). 14 The camera is used ( 59). Number of exposures remaining: depends on capacity of digital cameras. Shooting Options (auto) mode offers flash ( 18), self-timer ( 20), and macro close-up ... The camera will light. Battery indicator: appears when battery is displayed in (auto) mode, an automatic, "point-and-shoot" mode recommended for first-time users of internal memory or memory card and on lamp will turn off while flash recharges. AUTO 10 Flash ...
...seven-item shooting menu gives full control over such settings as white balance and exposure compensation ( 58). 14 The camera is used ( 59). Number of exposures remaining: depends on capacity of digital cameras. Shooting Options (auto) mode offers flash ( 18), self-timer ( 20), and macro close-up ... The camera will light. Battery indicator: appears when battery is displayed in (auto) mode, an automatic, "point-and-shoot" mode recommended for first-time users of internal memory or memory card and on lamp will turn off while flash recharges. AUTO 10 Flash ...

User Manual
Page 25
..., press until the zoom indicator turns white. Zo m out in Indicator shows amount of zoom AUTO 10 Digital zoom AUTO 10 Digital Zoom In digital zoom, data from the camera's image sensor are simply enlarged, producing a slightly "grainy" image. Don't Block the Shot To avoid muffled ...down for a total of the frame. • When the camera is tightly closed before using the camera. 15 Instead, details visible at maximum optical zoom are processed digitally, enlarging the center portion of detail visible in which digital processing is used to further magnify the image up to 3 ...
..., press until the zoom indicator turns white. Zo m out in Indicator shows amount of zoom AUTO 10 Digital zoom AUTO 10 Digital Zoom In digital zoom, data from the camera's image sensor are simply enlarged, producing a slightly "grainy" image. Don't Block the Shot To avoid muffled ...down for a total of the frame. • When the camera is tightly closed before using the camera. 15 Instead, details visible at maximum optical zoom are processed digitally, enlarging the center portion of detail visible in which digital processing is used to further magnify the image up to 3 ...

User Manual
Page 26
...prevent blur, press the shutter-release button down to take the picture. The camera can continue to take pictures until the (wait) icon is displayed. Blinks red Flash is taken. Focus indicator AUTO 10 Indicator lamp (flash lamp) During Recording While pictures are being recorded, ...the internal memory/memory card indicator ( or ) will automatically focus on the subject at slow shutter speeds; 78). Focus indicator Camera unable to focus even when the...
...prevent blur, press the shutter-release button down to take the picture. The camera can continue to take pictures until the (wait) icon is displayed. Blinks red Flash is taken. Focus indicator AUTO 10 Indicator lamp (flash lamp) During Recording While pictures are being recorded, ...the internal memory/memory card indicator ( or ) will automatically focus on the subject at slow shutter speeds; 78). Focus indicator Camera unable to focus even when the...

User Manual
Page 28
... flash combined with red-eye reduction intensity before main flash; ground at low-intensity flashes. Not recom- is taken. If (camera shake) icon appears, care should be taken to reduce red-eye if required mended when quick shutter response ( 19). Anytime Flash (fill fl...;re even when dim light or where use it works When to capture both subject and back- Auto with slow Use to use of display. 10 18 to avoid blurring. Use to capture natural lighting under dim light. 1 Flash :Confirm 2 Flash :Confirm AUTO Display flash-mode menu. ...
... flash combined with red-eye reduction intensity before main flash; ground at low-intensity flashes. Not recom- is taken. If (camera shake) icon appears, care should be taken to reduce red-eye if required mended when quick shutter response ( 19). Anytime Flash (fill fl...;re even when dim light or where use it works When to capture both subject and back- Auto with slow Use to use of display. 10 18 to avoid blurring. Use to capture natural lighting under dim light. 1 Flash :Confirm 2 Flash :Confirm AUTO Display flash-mode menu. ...

User Manual
Page 29
Red-eye Reduction The COOLPIX S2 uses advanced red-eye reduction. Default Flash Mode When the camera is zoomed all ( 80) resets the flash to AUTO ( mode) or to contract before the flash fires. When the camera is turned on Photography 19 As a result, the flash may...varies with zoom position. This is displayed. if red-eye is recommended. Dust or Mist AUTO 10 Light from the flash reflected from particles of time needed to reduce its effects ("In-Camera Red-Eye Fix"). When taking close-ups, play each picture. Use of less than 0.3 ...
Red-eye Reduction The COOLPIX S2 uses advanced red-eye reduction. Default Flash Mode When the camera is zoomed all ( 80) resets the flash to AUTO ( mode) or to contract before the flash fires. When the camera is turned on Photography 19 As a result, the flash may...varies with zoom position. This is displayed. if red-eye is recommended. Dust or Mist AUTO 10 Light from the flash reflected from particles of time needed to reduce its effects ("In-Camera Red-Eye Fix"). When taking close-ups, play each picture. Use of less than 0.3 ...

User Manual
Page 30
.... When using the self-timer, mount the camera on a tripod (recommended) or rest it on a flat, level surface. 1 2 Self-timer OFF OFF ON Display self-timer menu. AUTO 10 Set focus and exposure. 5 Start timer; OFF :Confirm 3 4 10 10 AUTO 10 Exit menu (to exit without changing mode,... wait two seconds). display in display. AUTO 10 The self-timer lamp on the front of the camera will blink until one second before ...
.... When using the self-timer, mount the camera on a tripod (recommended) or rest it on a flat, level surface. 1 2 Self-timer OFF OFF ON Display self-timer menu. AUTO 10 Set focus and exposure. 5 Start timer; OFF :Confirm 3 4 10 10 AUTO 10 Exit menu (to exit without changing mode,... wait two seconds). display in display. AUTO 10 The self-timer lamp on the front of the camera will blink until one second before ...

User Manual
Page 31
...not pressed halfway. 21 Minimum focus distance varies with zoom position; In macro close-up mode, the camera focuses continuously, even when the shutter-release button is shown by icon in display. AUTO 10 4 Frame picture. Exit menu (to light the entire subject at distance of 4 cm/1.6˝. if...733;). 1 OFF 2 OFF Macro close-up OFF :Confirm ON Macro close-up OFF ON :Confirm Display macro close-up menu. 3 Highlight ON. AUTO 10 More on Photography Macro Close-up Mode The flash may not be able to exit without changing mode, wait two seconds). Easy Close-ups...
...not pressed halfway. 21 Minimum focus distance varies with zoom position; In macro close-up mode, the camera focuses continuously, even when the shutter-release button is shown by icon in display. AUTO 10 4 Frame picture. Exit menu (to light the entire subject at distance of 4 cm/1.6˝. if...733;). 1 OFF 2 OFF Macro close-up OFF :Confirm ON Macro close-up OFF ON :Confirm Display macro close-up menu. 3 Highlight ON. AUTO 10 More on Photography Macro Close-up Mode The flash may not be able to exit without changing mode, wait two seconds). Easy Close-ups...

User Manual
Page 32
... ( 59). • (voice recording): Create a voice recording ( 33). Exit Confirm Help Display scene menu. To display the scene menu: 1 2 PARTY/INDOOR 10 Press mode button until orange -mode indicator lights. Camera settings are not satisfactory, choose (auto) mode and try again. High(2592 ) ) Normal(2048) PC screen(1024) TV screen(640) Exit... mode. Scene Mode Help For help on your subject, scene mode may not always produce the desired results. If results are automatically optimized for all camera menus. Scene Mode Scene mode offers a choice of the multi selector.
... ( 59). • (voice recording): Create a voice recording ( 33). Exit Confirm Help Display scene menu. To display the scene menu: 1 2 PARTY/INDOOR 10 Press mode button until orange -mode indicator lights. Camera settings are not satisfactory, choose (auto) mode and try again. High(2592 ) ) Normal(2048) PC screen(1024) TV screen(640) Exit... mode. Scene Mode Help For help on your subject, scene mode may not always produce the desired results. If results are automatically optimized for all camera menus. Scene Mode Scene mode offers a choice of the multi selector.

User Manual
Page 33
..., restrictions may apply to flash mode ( ; 18), the self-timer ( ; 20), or macro close-up ( ; 21). button. 4 Exit Confirm Help 10 Highlight composition type. Scene Mode Using the Guides Your subject does not have to compose pictures with the help of framing guides displayed in framing... guides and take picture. 10 Depending on the pages that allow you to fit exactly in the framing guides. 23 Framing guides displayed in monitor. 5 Position subject...
..., restrictions may apply to flash mode ( ; 18), the self-timer ( ; 20), or macro close-up ( ; 21). button. 4 Exit Confirm Help 10 Highlight composition type. Scene Mode Using the Guides Your subject does not have to compose pictures with the help of framing guides displayed in framing... guides and take picture. 10 Depending on the pages that allow you to fit exactly in the framing guides. 23 Framing guides displayed in monitor. 5 Position subject...

User Manual
Page 38
... both hands and brace elbows against body Use tripod: Use tripod or rest camera on flat, level surface 28 To select a scene from the scene menu ( 22): 1 PARTY/INDOOR 2 Exit Confirm Help Highlight scene. 10 Return to a common subject type, such as a backlit subject, sunset, or interior shot. Other Scenes In...
... both hands and brace elbows against body Use tripod: Use tripod or rest camera on flat, level surface 28 To select a scene from the scene menu ( 22): 1 PARTY/INDOOR 2 Exit Confirm Help Highlight scene. 10 Return to a common subject type, such as a backlit subject, sunset, or interior shot. Other Scenes In...

User Manual
Page 42
...that white balance and exposure settings for a Panorama 1 PANORAMA ASSIST 2 AE-L Exit Confirm Help Highlight (Panorama assist) in scene menu ( 22). 10 Default pan direction displayed. 3 Right to left side of monitor). previous picture. Pan direction displayed in white. About 1/3 of multi selector again).... This is the direction in which camera will be Top to panned after each shot. AE-L icon turns white to show that white balance and exposure will appear on view...
...that white balance and exposure settings for a Panorama 1 PANORAMA ASSIST 2 AE-L Exit Confirm Help Highlight (Panorama assist) in scene menu ( 22). 10 Default pan direction displayed. 3 Right to left side of monitor). previous picture. Pan direction displayed in white. About 1/3 of multi selector again).... This is the direction in which camera will be Top to panned after each shot. AE-L icon turns white to show that white balance and exposure will appear on view...

User Manual
Page 52
...; 768 ( ), 640 × 480 ( ), 320 × 240 ( ), or 160 × 120 ( ) pixels in size. Use multi selector to scroll to a maximum of (T) 10 ×. Cancel zoom Cancel zoom and return to create new picture contain- Con- firmation dialog displayed; To cancel zoom, zoom picture out until entire... pictures ( 70). :Scroll :Zoom To Zoom in , icon and zoom ratio are stored ( 93-94). Create cropped copy Save portion of Nikon camera. Copies can only be made separately. Save this image as the original, but any changes to transfer marking or to separate file. Playback...
...; 768 ( ), 640 × 480 ( ), 320 × 240 ( ), or 160 × 120 ( ) pixels in size. Use multi selector to scroll to a maximum of (T) 10 ×. Cancel zoom Cancel zoom and return to create new picture contain- Con- firmation dialog displayed; To cancel zoom, zoom picture out until entire... pictures ( 70). :Scroll :Zoom To Zoom in , icon and zoom ratio are stored ( 93-94). Create cropped copy Save portion of Nikon camera. Copies can only be made separately. Save this image as the original, but any changes to transfer marking or to separate file. Playback...

User Manual
Page 56
... Professional Windows Millennium Edition (Me) Windows 98 Second Edition (SE) Mac OS X 10.1.5 or later Pictures transferred using the USB tor ( / button) item in the camera setup menu. played. age is Mass Storage. The default option is selected. Be sure... and PictureProject software can be used to view photographs and movies on a computer. Center of multi selecing table, select the appropriate option using : Camera multi selector PictureProject ( / button) button Choose Mass Storage. 1, 2 Choose PTP. Choose Mass Storage 1 or PTP. 1 The center of ...
... Professional Windows Millennium Edition (Me) Windows 98 Second Edition (SE) Mac OS X 10.1.5 or later Pictures transferred using the USB tor ( / button) item in the camera setup menu. played. age is Mass Storage. The default option is selected. Be sure... and PictureProject software can be used to view photographs and movies on a computer. Center of multi selecing table, select the appropriate option using : Camera multi selector PictureProject ( / button) button Choose Mass Storage. 1, 2 Choose PTP. Choose Mass Storage 1 or PTP. 1 The center of ...

User Manual
Page 61
... printed, the number of prints, and the information to 9). More on Playback "Print Set" and Digital Print Order Format (DPOF) Print set creates a "print order" in the current print order. 1/...prints to a PictBridge-compatible printer or by removing the memory card from the camera and inserting it in print order. • Info: Print shutter speed and aperture on all...and press center of multi selector. Note that if the Print set num- Current pic- Back Confirm 10 PRINT SET Done Done Date Info Exit Confirm Display print options. 7 PRINT SELECTION 8 PRINT SELECTION ...
... printed, the number of prints, and the information to 9). More on Playback "Print Set" and Digital Print Order Format (DPOF) Print set creates a "print order" in the current print order. 1/...prints to a PictBridge-compatible printer or by removing the memory card from the camera and inserting it in print order. • Info: Print shutter speed and aperture on all...and press center of multi selector. Note that if the Print set num- Current pic- Back Confirm 10 PRINT SET Done Done Date Info Exit Confirm Display print options. 7 PRINT SELECTION 8 PRINT SELECTION ...


