

L18 / L16 User's Manual
Page 2
... of the SD Card Association. • PictBridge is a trademark. • All other trade names mentioned in this manual or the other documentation provided with your Nikon product are trademarks or registered trademarks of their respective holders.
... of the SD Card Association. • PictBridge is a trademark. • All other trade names mentioned in this manual or the other documentation provided with your Nikon product are trademarks or registered trademarks of their respective holders.

L18 / L16 User's Manual
Page 3
Introduction First Steps G Basic Photography and Playback: Easy Auto Mode A Auto Mode C Shooting Suited for the Scene c More on Playback D Movies Connecting to Televisions, Computers and Printers d Shooting, Playback and Setup Menus Technical Notes i
Introduction First Steps G Basic Photography and Playback: Easy Auto Mode A Auto Mode C Shooting Suited for the Scene c More on Playback D Movies Connecting to Televisions, Computers and Printers d Shooting, Playback and Setup Menus Technical Notes i
L18 / L16 User's Manual
Page 4
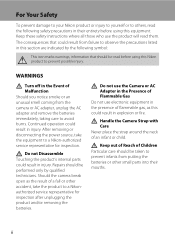
For Your Safety To prevent damage to your Nikon product or injury to yourself or to others, read the following symbol: This icon marks ... the product will read before using this equipment. After removing or disconnecting the power source, take the product to a Nikon-authorized service representative for inspection after unplugging the product and/or removing the batteries. Handle the Camera Strap with Care Never...off in the presence of a fall or other small parts into their entirety before using this Nikon product to observe the precautions listed in explosion or fire.
For Your Safety To prevent damage to your Nikon product or injury to yourself or to others, read the following symbol: This icon marks ... the product will read before using this equipment. After removing or disconnecting the power source, take the product to a Nikon-authorized service representative for inspection after unplugging the product and/or removing the batteries. Handle the Camera Strap with Care Never...off in the presence of a fall or other small parts into their entirety before using this Nikon product to observe the precautions listed in explosion or fire.

L18 / L16 User's Manual
Page 5
...; Dust on or near the battery charger during lightning storms. Failure to a Nikonauthorized service representative for use each of different makes or types. • If Nikon rechargeable EN-MH1 NiMH batteries are using an AC adapter, be sure it to remove the batteries when no charge remains. • Discontinue use could...
...; Dust on or near the battery charger during lightning storms. Failure to a Nikonauthorized service representative for use each of different makes or types. • If Nikon rechargeable EN-MH1 NiMH batteries are using an AC adapter, be sure it to remove the batteries when no charge remains. • Discontinue use could...

L18 / L16 User's Manual
Page 6
... (39 in burns or fire. Observe caution when using the flash Using the flash close to your fingers or other objects are not pinched by Nikon for the purpose, to maintain compliance with product regulations. Handle moving parts. CD-ROMs The CD-ROMs supplied with care Be careful that your subject...
... (39 in burns or fire. Observe caution when using the flash Using the flash close to your fingers or other objects are not pinched by Nikon for the purpose, to maintain compliance with product regulations. Handle moving parts. CD-ROMs The CD-ROMs supplied with care Be careful that your subject...
L18 / L16 User's Manual
Page 7
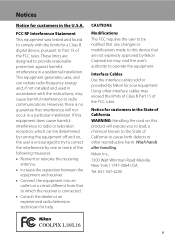
... receiver. • Connect the equipment into an outlet on , the user is encouraged to try to correct the interference by Nikon Corporation may void the user's authority to provide reasonable protection against harmful interference in the U.S.A. If this device that interference will ...connected. • Consult the dealer or an experienced radio/television technician for your equipment. Nikon Inc., 1300 Walt Whitman Road Melville, New York 11747-3064 USA Tel: 631-547-4200 COOLPIX L18/L16 v Interface Cables Use the interface cables sold or provided by turning the equipment off ...
... receiver. • Connect the equipment into an outlet on , the user is encouraged to try to correct the interference by Nikon Corporation may void the user's authority to provide reasonable protection against harmful interference in the U.S.A. If this device that interference will ...connected. • Consult the dealer or an experienced radio/television technician for your equipment. Nikon Inc., 1300 Walt Whitman Road Melville, New York 11747-3064 USA Tel: 631-547-4200 COOLPIX L18/L16 v Interface Cables Use the interface cables sold or provided by turning the equipment off ...

L18 / L16 User's Manual
Page 8
ATTENTION Cet appareil numéique de la classe B est conforme à la norme NMB-003 du Canada. Do not dispose of as household waste. • For more information, contact the retailer or the local authorities in Canada CAUTION This Class B digital apparatus complies with Canadian ICES-003. vi Symbol for Separate Collection in European countries: • This product is to be collected separately. Notices Notice for customers in charge of waste management. The following apply only to users in European Countries This symbol indicates that this product is designated for ...
ATTENTION Cet appareil numéique de la classe B est conforme à la norme NMB-003 du Canada. Do not dispose of as household waste. • For more information, contact the retailer or the local authorities in Canada CAUTION This Class B digital apparatus complies with Canadian ICES-003. vi Symbol for Separate Collection in European countries: • This product is to be collected separately. Notices Notice for customers in charge of waste management. The following apply only to users in European Countries This symbol indicates that this product is designated for ...
L18 / L16 User's Manual
Page 9
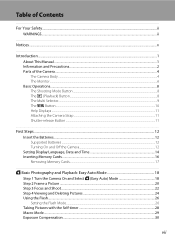
Table of Contents For Your Safety ...ii WARNINGS...ii Notices...v Introduction ...1 About This Manual ...1 Information and Precautions...2 Parts of the Camera...4 The Camera Body ...4 The Monitor...6 Basic Operations...8 The Shooting Mode Button ...8 The c (Playback) Button...8 The Multi Selector...9 The d Button...10 Help Displays...11 Attaching the Camera Strap ...11 Shutter-release Button ...11 First Steps ...12 Insert the Batteries...12 Supported Batteries ...12 Turning On and Off the Camera...12 Setting Display Language, Date and Time 14 Inserting Memory Cards ...16 Removing Memory Cards...
Table of Contents For Your Safety ...ii WARNINGS...ii Notices...v Introduction ...1 About This Manual ...1 Information and Precautions...2 Parts of the Camera...4 The Camera Body ...4 The Monitor...6 Basic Operations...8 The Shooting Mode Button ...8 The c (Playback) Button...8 The Multi Selector...9 The d Button...10 Help Displays...11 Attaching the Camera Strap ...11 Shutter-release Button ...11 First Steps ...12 Insert the Batteries...12 Supported Batteries ...12 Turning On and Off the Camera...12 Setting Display Language, Date and Time 14 Inserting Memory Cards ...16 Removing Memory Cards...

L18 / L16 User's Manual
Page 10
Table of Contents A Auto Mode...31 Shooting in the Auto Mode...31 C Shooting Suited for the Scene 32 Shooting in the Scene Mode ...32 Setting the Scene Mode...32 Features ...33 c More on Playback...40 Viewing Multiple Pictures: Thumbnail Playback 40 Taking a Closer Look: Playback Zoom 41 Editing Pictures...42 Enhancing Brightness and Contrast: D-Lighting 43 Creating a Cropped Copy: Crop ...44 g Resizing Pictures: Small Picture ...45 D Movies ...46 Recording Movies ...46 The Movie Menu...47 Selecting Movie Options...47 Movie Playback ...48 Deleting Movie Files...48 viii
Table of Contents A Auto Mode...31 Shooting in the Auto Mode...31 C Shooting Suited for the Scene 32 Shooting in the Scene Mode ...32 Setting the Scene Mode...32 Features ...33 c More on Playback...40 Viewing Multiple Pictures: Thumbnail Playback 40 Taking a Closer Look: Playback Zoom 41 Editing Pictures...42 Enhancing Brightness and Contrast: D-Lighting 43 Creating a Cropped Copy: Crop ...44 g Resizing Pictures: Small Picture ...45 D Movies ...46 Recording Movies ...46 The Movie Menu...47 Selecting Movie Options...47 Movie Playback ...48 Deleting Movie Files...48 viii

L18 / L16 User's Manual
Page 11
Table of Contents Connecting to Televisions, Computers and Printers 49 Connecting to a TV...49 Connecting to a Computer...50 Before Connecting the Camera...50 Transferring Pictures from the Camera to a Computer 51 Connecting to a Printer...54 Connecting the Camera and Printer...55 Printing Pictures One at a Time ...56 Printing Multiple Pictures ...57 Creating a DPOF Print Order: Print Set 60 d Shooting, Playback and Setup Menus 62 Shooting Options: The Shooting Menu 62 Displaying the Shooting Menu...62 A Image Mode ...63 B White Balance...65 C Continuous ...67 F Color Options...68 ...
Table of Contents Connecting to Televisions, Computers and Printers 49 Connecting to a TV...49 Connecting to a Computer...50 Before Connecting the Camera...50 Transferring Pictures from the Camera to a Computer 51 Connecting to a Printer...54 Connecting the Camera and Printer...55 Printing Pictures One at a Time ...56 Printing Multiple Pictures ...57 Creating a DPOF Print Order: Print Set 60 d Shooting, Playback and Setup Menus 62 Shooting Options: The Shooting Menu 62 Displaying the Shooting Menu...62 A Image Mode ...63 B White Balance...65 C Continuous ...67 F Color Options...68 ...
L18 / L16 User's Manual
Page 12
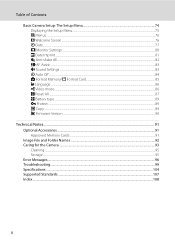
Table of Contents Basic Camera Setup: The Setup Menu 74 Displaying the Setup Menu...75 a Menus ...76 c Welcome Screen...76 d Date...77 e Monitor Settings ...80 f Date Imprint...81 U Anti-shake AE...82 h AF Assist ...83 i Sound Settings ...83 k Auto Off ...84 l Format Memory/m Format Card ...85 n Language ...86 o Video mode...86 p Reset All ...87 s Battery type...89 d Protect ...89 h Copy ...89 r Firmware Version ...90 Technical Notes...91 Optional Accessories ...91 Approved Memory Cards ...91 Image File and Folder Names...92 Caring for the Camera ...93 Cleaning ...95 Storage ...95 Error ...
Table of Contents Basic Camera Setup: The Setup Menu 74 Displaying the Setup Menu...75 a Menus ...76 c Welcome Screen...76 d Date...77 e Monitor Settings ...80 f Date Imprint...81 U Anti-shake AE...82 h AF Assist ...83 i Sound Settings ...83 k Auto Off ...84 l Format Memory/m Format Card ...85 n Language ...86 o Video mode...86 p Reset All ...87 s Battery type...89 d Protect ...89 h Copy ...89 r Firmware Version ...90 Technical Notes...91 Optional Accessories ...91 Approved Memory Cards ...91 Image File and Folder Names...92 Caring for the Camera ...93 Cleaning ...95 Storage ...95 Error ...

L18 / L16 User's Manual
Page 13
... Read this manual thoroughly before use, and keep it where all new pictures will be stored in this manual, the product names "COOLPIX L18" and "COOLPIX L16" may sometimes be read before using the camera. This icon marks notes, information C that should be abbreviated as the "default setting."...SD) memory card is referred to as a "memory card." • The setting at the time of a Nikon COOLPIX L18/COOLPIX L16 digital camera. Product Names In this manual are used to as "L18" and "L16". If a memory card is referred to store, delete or view pictures. 1 The memory card must be ...
... Read this manual thoroughly before use, and keep it where all new pictures will be stored in this manual, the product names "COOLPIX L18" and "COOLPIX L16" may sometimes be read before using the camera. This icon marks notes, information C that should be abbreviated as the "default setting."...SD) memory card is referred to as a "memory card." • The setting at the time of a Nikon COOLPIX L18/COOLPIX L16 digital camera. Product Names In this manual are used to as "L18" and "L16". If a memory card is referred to store, delete or view pictures. 1 The memory card must be ...
L18 / L16 User's Manual
Page 14
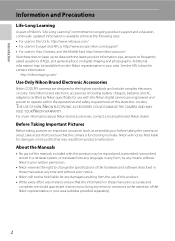
... contact information: http://nikonimaging.com/ Use Only Nikon Brand Electronic Accessories Nikon COOLPIX cameras are engineered and proven to operate within the operational and safety requirements of this Nikon digital camera are designed to the highest standards and include complex electronic circuitry. THE USE OF NON-NIKON ELECTRONIC ACCESSORIES COULD DAMAGE THE CAMERA AND MAY...
... contact information: http://nikonimaging.com/ Use Only Nikon Brand Electronic Accessories Nikon COOLPIX cameras are engineered and proven to operate within the operational and safety requirements of this Nikon digital camera are designed to the highest standards and include complex electronic circuitry. THE USE OF NON-NIKON ELECTRONIC ACCESSORIES COULD DAMAGE THE CAMERA AND MAY...
L18 / L16 User's Manual
Page 15
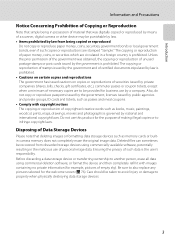
Before discarding a data storage device or transferring ownership to another person, erase all data using commercially available software, potentially resulting in possession of material that was obtained, the copying or reproduction of such data is prohibited. Care should be punishable by law. • Items prohibited by the government is the user's responsibility. Introduction Information and Precautions Notice Concerning Prohibition of Copying or Reproduction Note that simply being copied or reproduced Do not copy or reproduce paper money, coins, securities, government ...
Before discarding a data storage device or transferring ownership to another person, erase all data using commercially available software, potentially resulting in possession of material that was obtained, the copying or reproduction of such data is prohibited. Care should be punishable by law. • Items prohibited by the government is the user's responsibility. Introduction Information and Precautions Notice Concerning Prohibition of Copying or Reproduction Note that simply being copied or reproduced Do not copy or reproduce paper money, coins, securities, government ...
L18 / L16 User's Manual
Page 16
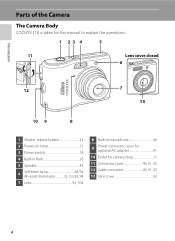
Introduction Parts of the Camera The Camera Body COOLPIX L18 is taken for this manual to explain the operations. 1 23 4 5 11 Lens cover closed 6 12 7 13 10 9 8 1 Shutter-release button 22 2 Power-on lamp 12 3 Power switch 18 4 Built-in flash 26 5 Speaker 48 6 Self-timer lamp 28, 94 AF-assist illuminator 23, 33, 83, 94 7 Lens 93, 104 8 Built-in microphone 46 9 Power connector cover for optional AC adapter 91 10 Eyelet for camera strap 11 11 Connector cover 49, 51, 55 12 Cable connector 49, 51, 55 13 Lens cover 93 4
Introduction Parts of the Camera The Camera Body COOLPIX L18 is taken for this manual to explain the operations. 1 23 4 5 11 Lens cover closed 6 12 7 13 10 9 8 1 Shutter-release button 22 2 Power-on lamp 12 3 Power switch 18 4 Built-in flash 26 5 Speaker 48 6 Self-timer lamp 28, 94 AF-assist illuminator 23, 33, 83, 94 7 Lens 93, 104 8 Built-in microphone 46 9 Power connector cover for optional AC adapter 91 10 Eyelet for camera strap 11 11 Connector cover 49, 51, 55 12 Cable connector 49, 51, 55 13 Lens cover 93 4
L18 / L16 User's Manual
Page 17
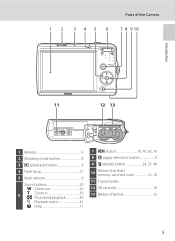
1 2 345 6 Parts of the Camera 7 8 9 10 Introduction 11 12 13 1 Monitor 6 2 Shooting mode button 8 3 c (playback) button 8 4 Flash lamp 27 5 Multi selector 9 Zoom buttons 20 f : Zoom out 20 6 g : Zoom in 20 h : Thumbnail playback 40 i : Playback zoom 41 j : Help 11 7 d button 10, 47, 62, 70 8 k (apply selection) button 9 9 l (delete) button 24, 25, 48 10 Battery-chamber/ memory card slot cover 12, 16 11 Tripod socket 12 SD card slot 16 13 Battery-chamber 12 5
1 2 345 6 Parts of the Camera 7 8 9 10 Introduction 11 12 13 1 Monitor 6 2 Shooting mode button 8 3 c (playback) button 8 4 Flash lamp 27 5 Multi selector 9 Zoom buttons 20 f : Zoom out 20 6 g : Zoom in 20 h : Thumbnail playback 40 i : Playback zoom 41 j : Help 11 7 d button 10, 47, 62, 70 8 k (apply selection) button 9 9 l (delete) button 24, 25, 48 10 Battery-chamber/ memory card slot cover 12, 16 11 Tripod socket 12 SD card slot 16 13 Battery-chamber 12 5
L18 / L16 User's Manual
Page 18
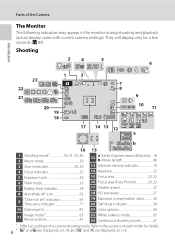
... the sections on each mode for a few seconds (A 80). They will display only for details. 6 2 z and y are displayed on L18, and M and d are displayed on L16.
... the sections on each mode for a few seconds (A 80). They will display only for details. 6 2 z and y are displayed on L18, and M and d are displayed on L16.
L18 / L16 User's Manual
Page 19
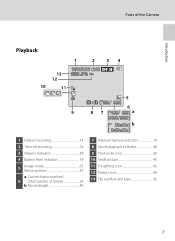
Introduction Parts of the Camera Playback 1 2 34 13 12 15/05/2008 12:00 9999.JPG 10 11 5 999 999 6 9 8 7 999 999 a 9999 9999 59m59s b 9h59m59s 1 Date of recording 14 2 Time of recording 14 3 Volume indicator 48 4 Battery level indicator 18 5 Image mode 63 Movie options 47 a Current frame number/ 6 total number of frames 24 b Movie length 48 7 Internal memory indicator 19 8 Movie playback indicator 48 9 Print-order icon 60 10 Small picture 45 11 D-Lighting icon 43 12 Protect icon 89 13 File number and type 92 7
Introduction Parts of the Camera Playback 1 2 34 13 12 15/05/2008 12:00 9999.JPG 10 11 5 999 999 6 9 8 7 999 999 a 9999 9999 59m59s b 9h59m59s 1 Date of recording 14 2 Time of recording 14 3 Volume indicator 48 4 Battery level indicator 18 5 Image mode 63 Movie options 47 a Current frame number/ 6 total number of frames 24 b Movie length 48 7 Internal memory indicator 19 8 Movie playback indicator 48 9 Print-order icon 60 10 Small picture 45 11 D-Lighting icon 43 12 Protect icon 89 13 File number and type 92 7

L18 / L16 User's Manual
Page 20
Introduction Basic Operations The Shooting Mode Button • Press the shooting mode button in playback mode to enter shooting mode. • Press the shooting mode button in shooting mode to enter playback mode. 8 The Shooting-mode Selection Menu In the shooting-mode selection menu, use the multi selector to the shooting mode while the shooting-mode selection menu is displayed, press the shooting mode button again. Easy auto mode G Easy auto mode (A 18) D Movie (A 46) C Scene (A 32) A Auto mode (A 31) • The shooting-mode selection menu is continuously displayed until you ...
Introduction Basic Operations The Shooting Mode Button • Press the shooting mode button in playback mode to enter shooting mode. • Press the shooting mode button in shooting mode to enter playback mode. 8 The Shooting-mode Selection Menu In the shooting-mode selection menu, use the multi selector to the shooting mode while the shooting-mode selection menu is displayed, press the shooting mode button again. Easy auto mode G Easy auto mode (A 18) D Movie (A 46) C Scene (A 32) A Auto mode (A 31) • The shooting-mode selection menu is continuously displayed until you ...

L18 / L16 User's Manual
Page 21
Move cursor down . Display o (exposure compensation) (A 30) menu. Display p (macro mode) (A 29) menu or move cursor up , down, left and right of the multi selector to select modes, select menu options and to the next screen). Return to the next screen (Apply selection). Apply selection. Display the next picture. 44 For the Menu Screen Move cursor up Exit C Notes on the Multi Selector Multiple operations are available with the multi selector but no detailed operation is shown as H, I, J and K. 9 In the manual, the button indicating up . Display n (self-timer) (A...
Move cursor down . Display o (exposure compensation) (A 30) menu. Display p (macro mode) (A 29) menu or move cursor up , down, left and right of the multi selector to select modes, select menu options and to the next screen). Return to the next screen (Apply selection). Apply selection. Display the next picture. 44 For the Menu Screen Move cursor up Exit C Notes on the Multi Selector Multiple operations are available with the multi selector but no detailed operation is shown as H, I, J and K. 9 In the manual, the button indicating up . Display n (self-timer) (A...
