
Reference Manual
Page 21
... latch 14, 18 14 Battery-chamber/ memory card slot cover 14, 18 15 Power connector cover (for connection with an optional AC Adapter) .....E91 16 Tripod socket 3
... latch 14, 18 14 Battery-chamber/ memory card slot cover 14, 18 15 Power connector cover (for connection with an optional AC Adapter) .....E91 16 Tripod socket 3
Reference Manual
Page 25
...mode 61 7 Battery level indicator 20 Eye-Fi communication 8 indicator 102, E83 9 Vibration reduction icon 101 10 GPS reception (COOLPIX S9300 only).....96 11 Log display (COOLPIX S9300 only 98 12 Motion detection icon 101 13 Wind noise reduction 91 14 Print date 100 15 "Date not set" indicator 23... (HDR 41 39 Hand-held/Tripod 40, 43 40 Continuous shooting mode 48, 53 41 Self-timer 63 42 Smile timer 50 43 Pet portrait auto release 48 Compass display (Direction gauge) 44 (COOLPIX S9300 only 98 Compass display (Compass) (COOLPIX 45 S9300 only 98 Location name information (...
...mode 61 7 Battery level indicator 20 Eye-Fi communication 8 indicator 102, E83 9 Vibration reduction icon 101 10 GPS reception (COOLPIX S9300 only).....96 11 Log display (COOLPIX S9300 only 98 12 Motion detection icon 101 13 Wind noise reduction 91 14 Print date 100 15 "Date not set" indicator 23... (HDR 41 39 Hand-held/Tripod 40, 43 40 Continuous shooting mode 48, 53 41 Self-timer 63 42 Smile timer 50 43 Pet portrait auto release 48 Compass display (Direction gauge) 44 (COOLPIX S9300 only 98 Compass display (Compass) (COOLPIX 45 S9300 only 98 Location name information (...
Reference Manual
Page 44
..., the focus area is automatically raised. When shooting in the telephoto zoom position • To take a picture with the camera attached to a tripod, set Vibration reduction in a dark location or with the flash mode (A61) set to Off. Position the main subject near the center of ...pictures in portrait ("tall") orientation, turn the camera so that face is framed by single borders. 29m 0s 1140 • When taking pictures of a tripod is above the lens. C ISO Sensitivity E (ISO sensitivity, A6) may be displayed on the shooting screen. The Basics of Shooting and Playback 2 ...
..., the focus area is automatically raised. When shooting in the telephoto zoom position • To take a picture with the camera attached to a tripod, set Vibration reduction in a dark location or with the flash mode (A61) set to Off. Position the main subject near the center of ...pictures in portrait ("tall") orientation, turn the camera so that face is framed by single borders. 29m 0s 1140 • When taking pictures of a tripod is above the lens. C ISO Sensitivity E (ISO sensitivity, A6) may be displayed on the shooting screen. The Basics of Shooting and Playback 2 ...
Reference Manual
Page 57
...; Depending upon shooting conditions, the camera may not select the desired scene mode. Set Vibration reduction in the setup menu (A100) to Off when using a tripod to that can be set using the d button: The combination of the flash mode setting and the camera shoots a single picture at slow shutter speeds...
...; Depending upon shooting conditions, the camera may not select the desired scene mode. Set Vibration reduction in the setup menu (A100) to Off when using a tripod to that can be set using the d button: The combination of the flash mode setting and the camera shoots a single picture at slow shutter speeds...
Reference Manual
Page 58
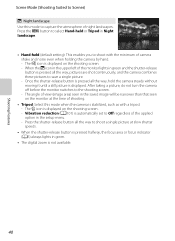
...in green. • The digital zoom is pressed all the way, pictures are shot continuously, and the camera combines these pictures to shoot with a tripod. - Once the shutter-release button is not available. 40 The angle of camera shake and noise even when holding the camera by hand. - Press... the shutter-release button all the way to capture the atmosphere of shooting. • Tripod: Select this mode to shoot a single picture at the time of night landscapes. Press the d button to select Hand-held (default setting): This ...
...in green. • The digital zoom is pressed all the way, pictures are shot continuously, and the camera combines these pictures to shoot with a tripod. - Once the shutter-release button is not available. 40 The angle of camera shake and noise even when holding the camera by hand. - Press... the shutter-release button all the way to capture the atmosphere of shooting. • Tripod: Select this mode to shoot a single picture at the time of night landscapes. Press the d button to select Hand-held (default setting): This ...
Reference Manual
Page 59
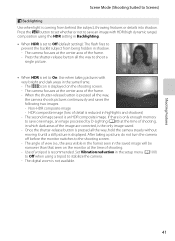
... image saved is displayed on the monitor at the center area of detail is displayed. After taking pictures with HDR (high dynamic range) composition using a tripod to stabilize the camera. - The P icon is an HDR composite image. Non-HDR composite image - Once the shutter-release button is pressed all the ... the time of shooting, in the setup menu (A100) to save one image, an image processed by D-Lighting (A80) at the center area of a tripod is coming from being hidden in Backlighting. • When HDR is set to On: Use when taking a picture, do not turn the camera off before...
... image saved is displayed on the monitor at the center area of detail is displayed. After taking pictures with HDR (high dynamic range) composition using a tripod to stabilize the camera. - The P icon is an HDR composite image. Non-HDR composite image - Once the shutter-release button is pressed all the ... the time of shooting, in the setup menu (A100) to save one image, an image processed by D-Lighting (A80) at the center area of a tripod is coming from being hidden in Backlighting. • When HDR is set to On: Use when taking a picture, do not turn the camera off before...
Reference Manual
Page 61
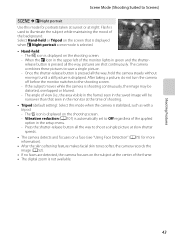
... 43 Shooting Features Scene Mode (Shooting Suited to Scenes) y M e Night portrait Use this mode when the camera is stabilized, such as with a tripod. - Once the shutter-release button is pressed all the way, hold the camera steady without moving it until a still picture is used to shoot a...all the way to illuminate the subject while maintaining the mood of the applied option in the monitor at the center of shooting. • Tripod (default setting): Select this mode for more information). • After the skin softening feature makes facial skin tones softer, the camera records ...
... 43 Shooting Features Scene Mode (Shooting Suited to Scenes) y M e Night portrait Use this mode when the camera is stabilized, such as with a tripod. - Once the shutter-release button is pressed all the way, hold the camera steady without moving it until a still picture is used to shoot a...all the way to illuminate the subject while maintaining the mood of the applied option in the monitor at the center of shooting. • Tripod (default setting): Select this mode for more information). • After the skin softening feature makes facial skin tones softer, the camera records ...
Reference Manual
Page 62
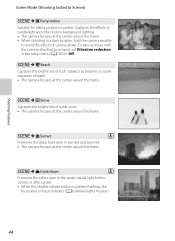
.... • The camera focuses at the center area of camera shake. y M h Sunset O Preserves the deep hues seen in a dark location, hold the camera steadily to a tripod, set Vibration reduction in green. 44 To take a picture with the camera attached to avoid the effects of the frame. y M z Snow Captures the brightness of...
.... • The camera focuses at the center area of camera shake. y M h Sunset O Preserves the deep hues seen in a dark location, hold the camera steadily to a tripod, set Vibration reduction in green. 44 To take a picture with the camera attached to avoid the effects of the frame. y M z Snow Captures the brightness of...
Reference Manual
Page 79
... night or under dim light. Y Slow sync Auto is . Available Flash Modes U Auto Flash fires automatically when lighting is recommended to avoid the effects of a tripod is dim. slow shutter speeds are met. • Auto flash (U auto, V auto with a slow shutter speed. Use to "fill-in a dark location. Suitable for portraits...
... night or under dim light. Y Slow sync Auto is . Available Flash Modes U Auto Flash fires automatically when lighting is recommended to avoid the effects of a tripod is dim. slow shutter speeds are met. • Auto flash (U auto, V auto with a slow shutter speed. Use to "fill-in a dark location. Suitable for portraits...
Reference Manual
Page 81
... the Multi Selector Using the Self-timer The camera is equipped with a self-timer that occur when you press the shutter-release button. When using a tripod to stabilize the camera. 1 Press J (n self-timer) on the multi selector. Self-timer • If the k button is not pressed within a few ...• Set the focus and exposure. 4 Press the shutter-release button all the way. 9 • The self-timer starts, and the number of a tripod is taken, press the shutter-release button again. 63 About one second before the shutter is released, the lamp stops flashing and remains lit. •...
... the Multi Selector Using the Self-timer The camera is equipped with a self-timer that occur when you press the shutter-release button. When using a tripod to stabilize the camera. 1 Press J (n self-timer) on the multi selector. Self-timer • If the k button is not pressed within a few ...• Set the focus and exposure. 4 Press the shutter-release button all the way. 9 • The self-timer starts, and the number of a tripod is taken, press the shutter-release button again. 63 About one second before the shutter is released, the lamp stops flashing and remains lit. •...
Reference Manual
Page 119
... sound is not detected. The r indicator lights in green when the camera detects camera shake or subject movement and increases shutter speed. • When using a tripod to stabilize the camera, set to Auto (default setting), the AF-assist illuminator (A29) lights when shooting in dark surroundings to help the camera focus...
... sound is not detected. The r indicator lights in green when the camera detects camera shake or subject movement and increases shutter speed. • When using a tripod to stabilize the camera, set to Auto (default setting), the AF-assist illuminator (A29) lights when shooting in dark surroundings to help the camera focus...
Reference Manual
Page 193
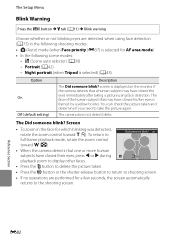
... zoom position or slow shutter speed. (default setting) Camera shake is displayed on the monitor (A6). k Off Vibration Reduction is not enabled. • When using a tripod to stabilize the camera, set to Off. • When On is selected, an icon for this setting is also compensated when recording movies as well... completely eliminate the effects of camera shake in some situations. • When the j (Night landscape) or Night portrait scene mode is set vibration reduction to Tripod, vibration reduction is turned Off.
... zoom position or slow shutter speed. (default setting) Camera shake is displayed on the monitor (A6). k Off Vibration Reduction is not enabled. • When using a tripod to stabilize the camera, set to Off. • When On is selected, an icon for this setting is also compensated when recording movies as well... completely eliminate the effects of camera shake in some situations. • When the j (Night landscape) or Night portrait scene mode is set vibration reduction to Tripod, vibration reduction is turned Off.
Reference Manual
Page 202
... the l button to delete the picture taken. • Press the k button or the shutter-release button to return to the shooting screen. Night portrait (when Tripod is framed by a yellow border. Portrait (A42) - x (Scene auto selector) (A39) - To return to take the picture again.
... the l button to delete the picture taken. • Press the k button or the shutter-release button to return to the shooting screen. Night portrait (when Tripod is framed by a yellow border. Portrait (A42) - x (Scene auto selector) (A39) - To return to take the picture again.
Reference Manual
Page 205
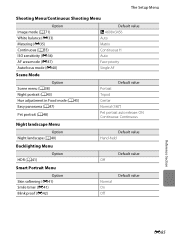
... priority Single AF Option Scene menu (A38) Night portrait (A43) Hue adjustment in Food mode (A45) Easy panorama (A47) Pet portrait (A48) Default value Portrait Tripod Center Normal (180°) Pet portrait auto release: ON Continuous: Continuous Night landscape Menu Option Night landscape (A40) Default value Hand-held Backlighting Menu HDR...
... priority Single AF Option Scene menu (A38) Night portrait (A43) Hue adjustment in Food mode (A45) Easy panorama (A47) Pet portrait (A48) Default value Portrait Tripod Center Normal (180°) Pet portrait auto release: ON Continuous: Continuous Night landscape Menu Option Night landscape (A40) Default value Hand-held Backlighting Menu HDR...
Reference Manual
Page 229
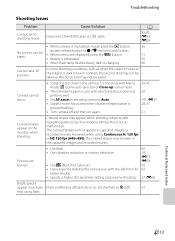
... menus are blurred. • Use flash. 60 • Use vibration reduction or motion detection. 101, E73, E74 • Use D (Best Shot Selector). 56 • Use a tripod to the camera. recorded movies. Set the flash to Auto. • Subject not in focus area when shutter-release button is one with the self...
... menus are blurred. • Use flash. 60 • Use vibration reduction or motion detection. 101, E73, E74 • Use D (Best Shot Selector). 56 • Use a tripod to the camera. recorded movies. Set the flash to Auto. • Subject not in focus area when shutter-release button is one with the self...
Reference Manual
Page 236
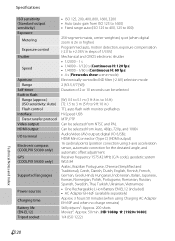
....) (ISO sensitivity: Auto) Flash control Interface Data transfer protocol Video output HDMI output I /O (USB); digital I /O terminal Electronic compass (COOLPIX S9300 only) GPS (COOLPIX S9300 only) Supported languages Power sources Charging time Battery life (EN-EL12) Tripod socket • ISO 125, 200, 400, 800, 1600, 3200 • Auto (auto gain from Auto, 480p, 720p, and 1080i...
....) (ISO sensitivity: Auto) Flash control Interface Data transfer protocol Video output HDMI output I /O (USB); digital I /O terminal Electronic compass (COOLPIX S9300 only) GPS (COOLPIX S9300 only) Supported languages Power sources Charging time Battery life (EN-EL12) Tripod socket • ISO 125, 200, 400, 800, 1600, 3200 • Auto (auto gain from Auto, 480p, 720p, and 1080i...
Reference Manual
Page 242
..., E39 Sunset h 44 T Telephoto zoom 27 Thumbnail playback 31 Time difference E68, E69 Time zone 22, E67, E69 Time zone and date 22, 100, E67 Tripod socket 3 TV 82 TV settings 102, E79 U USB cable 16, 82, E26, E91 USB/audio/video output connector 16, 82, E23, E26 V Vibration reduction 101...
..., E39 Sunset h 44 T Telephoto zoom 27 Thumbnail playback 31 Time difference E68, E69 Time zone 22, E67, E69 Time zone and date 22, 100, E67 Tripod socket 3 TV 82 TV settings 102, E79 U USB cable 16, 82, E26, E91 USB/audio/video output connector 16, 82, E23, E26 V Vibration reduction 101...