
Reference Manual
Page 10
...the monitor break, care should be played back on a television, monitor, or other moving parts with the flash window touching a person or object Failure to another or with wet hands. Also, before boarding an airplane,...cause eye strain, nausea, or discomfort. Particular care should be observed if photographing infants, when the flash should be sure to prevent liquid crystal from the subject. If using inside an airplane or the ...inverters. Cease use only the cables provided or sold by Nikon for extended periods, whether on audio CD equipment. Failure to OFF (COOLPIX S9300).
...the monitor break, care should be played back on a television, monitor, or other moving parts with the flash window touching a person or object Failure to another or with wet hands. Also, before boarding an airplane,...cause eye strain, nausea, or discomfort. Particular care should be observed if photographing infants, when the flash should be sure to prevent liquid crystal from the subject. If using inside an airplane or the ...inverters. Cease use only the cables provided or sold by Nikon for extended periods, whether on audio CD equipment. Failure to OFF (COOLPIX S9300).
Reference Manual
Page 15
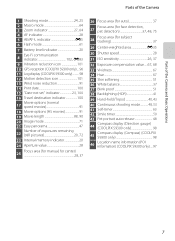
... Each Special Effect ...57 Changing Special Effects Mode Settings 58 Features That Can Be Set Using the Multi Selector 59 Available Functions ...59 Using the Flash (Flash Modes) ...60 Using the Self-timer ...63 Using Macro Mode ...64 Adjusting Brightness (Exposure Compensation), Vividness, and Hue (Creative Slider) ...65 Adjusting Brightness (Exposure Compensation...
... Each Special Effect ...57 Changing Special Effects Mode Settings 58 Features That Can Be Set Using the Multi Selector 59 Available Functions ...59 Using the Flash (Flash Modes) ...60 Using the Self-timer ...63 Using Macro Mode ...64 Adjusting Brightness (Exposure Compensation), Vividness, and Hue (Creative Slider) ...65 Adjusting Brightness (Exposure Compensation...
Reference Manual
Page 20
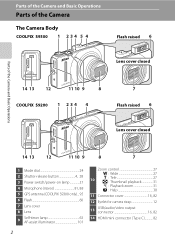
Parts of the Camera and Basic Operations Parts of the Camera The Camera Body COOLPIX S9300 1 2 3 4 5 4 Flash raised 6 Lens cover closed Parts of the Camera and Basic Operations 14 13 12 11 10 9 8 COOLPIX S9200 1 2 3 4 4 7 Flash raised 6 Lens cover closed 14 13 12 11 10 9 8 7 1 Mode ...dial 24 2 Shutter-release button 4, 28 3 Power switch/power-on lamp 21 4 Microphone (stereo 81, 88 5 GPS antenna (COOLPIX S9300 only)... 95 6 Flash 60 7 Lens cover 8 Lens 9 Self-timer lamp 63 AF-assist illuminator 101 Zoom control 27 f : Wide 27 10 g : Tele 27 h: ...
Parts of the Camera and Basic Operations Parts of the Camera The Camera Body COOLPIX S9300 1 2 3 4 5 4 Flash raised 6 Lens cover closed Parts of the Camera and Basic Operations 14 13 12 11 10 9 8 COOLPIX S9200 1 2 3 4 4 7 Flash raised 6 Lens cover closed 14 13 12 11 10 9 8 7 1 Mode ...dial 24 2 Shutter-release button 4, 28 3 Power switch/power-on lamp 21 4 Microphone (stereo 81, 88 5 GPS antenna (COOLPIX S9300 only)... 95 6 Flash 60 7 Lens cover 8 Lens 9 Self-timer lamp 63 AF-assist illuminator 101 Zoom control 27 f : Wide 27 10 g : Tele 27 h: ...
Reference Manual
Page 21
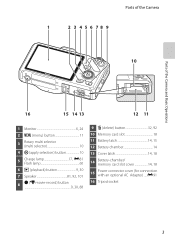
... 16 15 14 13 12 11 1 Monitor 6, 24 2 d (menu) button 11 3 Rotary multi selector (multi selector 10 4 k (apply selection) button 10 5 Charge lamp 17, E81 Flash lamp 60 6 c (playback) button 9, 30 7 Speaker 81, 92, 101 8 b (e movie-record) button 9, 30, 88 9 l (delete) button 32, 92 10 Memory card slot 18 11 Battery...
... 16 15 14 13 12 11 1 Monitor 6, 24 2 d (menu) button 11 3 Rotary multi selector (multi selector 10 4 k (apply selection) button 10 5 Charge lamp 17, E81 Flash lamp 60 6 c (playback) button 9, 30 7 Speaker 81, 92, 101 8 b (e movie-record) button 9, 30, 88 9 l (delete) button 32, 92 10 Memory card slot 18 11 Battery...
Reference Manual
Page 25
...64 3 Zoom indicator 27, 64 4 AF indicator 28 5 AE/AF-L indicator E5 6 Flash mode 61 7 Battery level indicator 20 Eye-Fi communication 8 indicator 102, E83 9 Vibration reduction icon 101 10 GPS reception (COOLPIX S9300 only).....96 11 Log display (COOLPIX S9300 only 98 12 Motion detection icon 101 13 Wind noise reduction 91 14...Continuous shooting mode 48, 53 41 Self-timer 63 42 Smile timer 50 43 Pet portrait auto release 48 Compass display (Direction gauge) 44 (COOLPIX S9300 only 98 Compass display (Compass) (COOLPIX 45 S9300 only 98 Location name information (POI 46 information...
...64 3 Zoom indicator 27, 64 4 AF indicator 28 5 AE/AF-L indicator E5 6 Flash mode 61 7 Battery level indicator 20 Eye-Fi communication 8 indicator 102, E83 9 Vibration reduction icon 101 10 GPS reception (COOLPIX S9300 only).....96 11 Log display (COOLPIX S9300 only 98 12 Motion detection icon 101 13 Wind noise reduction 91 14...Continuous shooting mode 48, 53 41 Self-timer 63 42 Smile timer 50 43 Pet portrait auto release 48 Compass display (Direction gauge) 44 (COOLPIX S9300 only 98 Compass display (Compass) (COOLPIX 45 S9300 only 98 Location name information (POI 46 information...
Reference Manual
Page 28
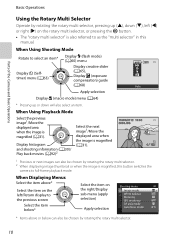
... Select the previous image1/Move the displayed area when the image is magnified, this manual. When Using Shooting Mode Rotate to select an item* Display m (flash mode) (A60) menu Display creative slider Display n (Selftimer) menu (A63) (A65), Display o (exposure compensation) guide (A68) Auto Apply selection Display D (macro mode) menu (A64) * Pressing...
... Select the previous image1/Move the displayed area when the image is magnified, this manual. When Using Shooting Mode Rotate to select an item* Display m (flash mode) (A60) menu Display creative slider Display n (Selftimer) menu (A63) (A65), Display o (exposure compensation) guide (A68) Auto Apply selection Display D (macro mode) menu (A64) * Pressing...
Reference Manual
Page 34
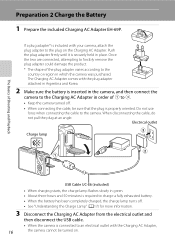
... connected to the country or region in order of Shooting and Playback 3 16 USB Cable UC-E6 (included) • When charging starts, the charge lamp flashes slowly in place. Preparation 2 Charge the Battery 1 Prepare the included Charging AC Adapter EH-69P.
... connected to the country or region in order of Shooting and Playback 3 16 USB Cable UC-E6 (included) • When charging starts, the charge lamp flashes slowly in place. Preparation 2 Charge the Battery 1 Prepare the included Charging AC Adapter EH-69P.
Reference Manual
Page 35
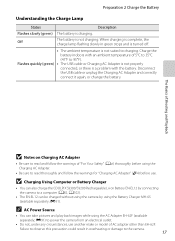
... separately; Flashes quickly (green) • The USB cable or Charging AC Adapter is not properly connected, or there is a problem with an ambient temperature of AC adapter other than EH-62F. B Charging Using Computer or Battery Charger • You can also charge the COOLPIX S9300/S9200 Rechargeable...Failure to observe this precaution could result in green stops and is turned off. • The ambient temperature is complete, the charge lamp flashing slowly in overheating or damage to power the camera from an electrical outlet. • Do not, under any circumstances, use . Charge the...
... separately; Flashes quickly (green) • The USB cable or Charging AC Adapter is not properly connected, or there is a problem with an ambient temperature of AC adapter other than EH-62F. B Charging Using Computer or Battery Charger • You can also charge the COOLPIX S9300/S9200 Rechargeable...Failure to observe this precaution could result in green stops and is turned off. • The ambient temperature is complete, the charge lamp flashing slowly in overheating or damage to power the camera from an electrical outlet. • Do not, under any circumstances, use . Charge the...
Reference Manual
Page 39
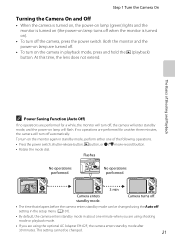
...; Press the power switch, shutter-release button, c button, or b (e movie-record) button. • Rotate the mode dial. To turn off automatically. Flashes No operations performed. Camera turns off. • The time that elapses before the camera enters standby mode can be changed using the optional AC Adapter...3 min 4 11404 Camera enters standby mode. Both the monitor and the power-on lamp are performed for another three minutes, the camera will flash. Step 1 Turn the Camera On Turning the Camera On and Off • When the camera is turned on, the power-on lamp (green...
...; Press the power switch, shutter-release button, c button, or b (e movie-record) button. • Rotate the mode dial. To turn off automatically. Flashes No operations performed. Camera turns off. • The time that elapses before the camera enters standby mode can be changed using the optional AC Adapter...3 min 4 11404 Camera enters standby mode. Both the monitor and the power-on lamp are performed for another three minutes, the camera will flash. Step 1 Turn the Camera On Turning the Camera On and Off • When the camera is turned on, the power-on lamp (green...
Reference Manual
Page 41
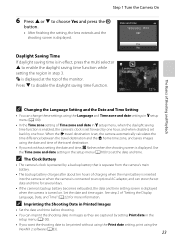
...; In the Time zone setting of the travel destination. • If you want the shooting date to be printed without setting the date and time, O flashes when the shooting screen is set the date and time. Use the Time zone and date setting in the setup menu (A100). • If you...
...; In the Time zone setting of the travel destination. • If you want the shooting date to be printed without setting the date and time, O flashes when the shooting screen is set the date and time. Use the Time zone and date setting in the setup menu (A100). • If you...
Reference Manual
Page 43
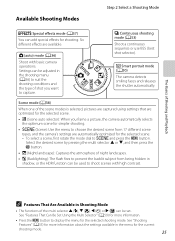
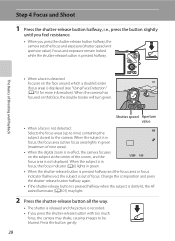
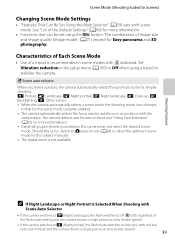
... Mode • The functions of the multi selector H (m), I , and then press the k button. • j (Night landscape): Captures the atmosphere of night landscapes. • W (Backlighting): The flash fires to prevent the backlit subject from being hidden in the shooting menu (A36) to suit the shooting conditions and the type of shot you...
... Mode • The functions of the multi selector H (m), I , and then press the k button. • j (Night landscape): Captures the atmosphere of night landscapes. • W (Backlighting): The flash fires to prevent the backlit subject from being hidden in the shooting menu (A36) to suit the shooting conditions and the type of shot you...
Reference Manual
Page 44
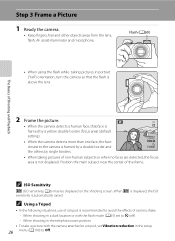
... center of Shooting and Playback 2 Frame the picture. • When the camera detects a human face, that the flash is not displayed. Flash (A60) • When using the flash while taking pictures in portrait ("tall") orientation, turn the camera so that face is framed by a yellow double border... to a tripod, set to Off. Step 3 Frame a Picture 1 Ready the camera. • Keep fingers, hair and other objects away from the lens, flash, AF assist-illuminator and microphone. When shooting in the setup 26 menu (A100) to W (off) - C ISO Sensitivity E (ISO sensitivity, A6) may ...
... center of Shooting and Playback 2 Frame the picture. • When the camera detects a human face, that the flash is not displayed. Flash (A60) • When using the flash while taking pictures in portrait ("tall") orientation, turn the camera so that face is framed by a yellow double border... to a tripod, set to Off. Step 3 Frame a Picture 1 Ready the camera. • Keep fingers, hair and other objects away from the lens, flash, AF assist-illuminator and microphone. When shooting in the setup 26 menu (A100) to W (off) - C ISO Sensitivity E (ISO sensitivity, A6) may ...
Reference Manual
Page 46
... areas). • When the digital zoom is in green. 1 / 2 5 0 F 3.5 • When the shutter-release button is pressed halfway and the focus area or focus indicator flashes red, the subject is not detected: Selects the focus areas (up to nine) containing the subject closest to be blurred.
... areas). • When the digital zoom is in green. 1 / 2 5 0 F 3.5 • When the shutter-release button is pressed halfway and the focus area or focus indicator flashes red, the subject is not detected: Selects the focus areas (up to nine) containing the subject closest to be blurred.
Reference Manual
Page 47
...up automatically when you press the shutter-release button all the way without first pressing it down . When not taking pictures, lower the flash. In some rare cases, the subject may not perform as the actual desired subject, and use focus lock (A76). B Autofocus ... pressing the shutter-release button halfway to the camera or the memory card. default setting). See "Using the Flash (Flash Modes)" (A60) for more information. • Lower the flash by gently pushing it halfway. Doing this could result in loss of similarly shaped windows, etc.) • Subject...
...up automatically when you press the shutter-release button all the way without first pressing it down . When not taking pictures, lower the flash. In some rare cases, the subject may not perform as the actual desired subject, and use focus lock (A76). B Autofocus ... pressing the shutter-release button halfway to the camera or the memory card. default setting). See "Using the Flash (Flash Modes)" (A60) for more information. • Lower the flash by gently pushing it halfway. Doing this could result in loss of similarly shaped windows, etc.) • Subject...
Reference Manual
Page 54
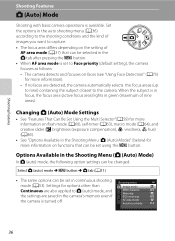
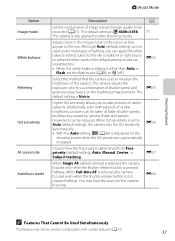
... Detection" (A75) for more information). - Changing A (Auto) Mode Settings • See "Features That Can Be Set Using the Multi Selector"(A59) for more information on flash mode (A60), self-timer (A63), macro mode (A64), and creative slider (o brightness (exposure compensation), G vividness, F hue) (A65). • See "Options Available in the Shooting Menu...
... Detection" (A75) for more information). - Changing A (Auto) Mode Settings • See "Features That Can Be Set Using the Multi Selector"(A59) for more information on flash mode (A60), self-timer (A63), macro mode (A64), and creative slider (o brightness (exposure compensation), G vividness, F hue) (A65). • See "Options Available in the Shooting Menu...
Reference Manual
Page 55
The default setting is determined from Face priority (default setting), Auto, Manual, Center, or Subject tracking. When ISO sensitivity is set the flash mode (A60) to W (off ). E36 Choose how the focus area is Matrix. Although Auto (default setting) can be used in the ... to achieve better results if the default setting results are unsatisfactory. • When the white balance setting is also applied to other than Auto or Flash, set to Auto (default setting), the camera sets the ISO sensitivity automatically. • With the Auto setting, E (A26) is automatically increased. ...
The default setting is determined from Face priority (default setting), Auto, Manual, Center, or Subject tracking. When ISO sensitivity is set the flash mode (A60) to W (off ). E36 Choose how the focus area is Matrix. Although Auto (default setting) can be used in the ... to achieve better results if the default setting results are unsatisfactory. • When the white balance setting is also applied to other than Auto or Flash, set to Auto (default setting), the camera sets the ISO sensitivity automatically. • With the Auto setting, E (A26) is automatically increased. ...
Reference Manual
Page 57
... the camera shoots a single picture at slow shutter speeds. • If the camera switches to h (Night portrait), the flash mode switches to slow sync with scene mode. See "List of the Default Settings" (A69) for Easy panorama and 3D photography). ... Night Landscape or Night Portrait Is Selected When Shooting with Scene Auto Selector • If the camera switches to g (Night landscape), the flash switches to off (W (off)) regardless of the flash mode setting and the camera shoots a single picture at slow shutter speeds. 39 e: Portrait, f: Landscape, h: Night portrait, g: Night ...
... the camera shoots a single picture at slow shutter speeds. • If the camera switches to h (Night portrait), the flash mode switches to slow sync with scene mode. See "List of the Default Settings" (A69) for Easy panorama and 3D photography). ... Night Landscape or Night Portrait Is Selected When Shooting with Scene Auto Selector • If the camera switches to g (Night landscape), the flash switches to off (W (off)) regardless of the flash mode setting and the camera shoots a single picture at slow shutter speeds. 39 e: Portrait, f: Landscape, h: Night portrait, g: Night ...
Reference Manual
Page 59
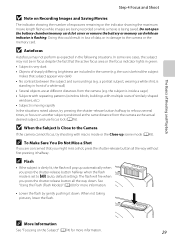
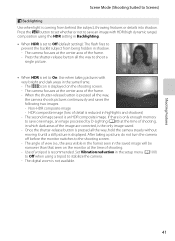
... to prevent the backlit subject from behind the subject, throwing features or details into shadow. Press the d button to set to Off (default setting): The flash fires to save one image, an image processed by D-Lighting (A80) at the time of a tripod is not available. 41
... to prevent the backlit subject from behind the subject, throwing features or details into shadow. Press the d button to set to Off (default setting): The flash fires to save one image, an image processed by D-Lighting (A80) at the time of a tripod is not available. 41
Reference Manual
Page 61
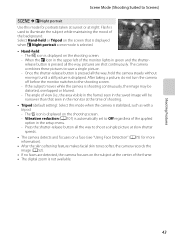
... menu. - The Y icon is selected. • Hand-held or Tripod on the screen that seen in the saved image will be distorted, overlapped or blurred. - Flash is automatically set to the shooting screen. -
... menu. - The Y icon is selected. • Hand-held or Tripod on the screen that seen in the saved image will be distorted, overlapped or blurred. - Flash is automatically set to the shooting screen. -

Reference Manual
Page 63
.... • You can adjust the hue by pressing the multi selector H or I. To adjust the following settings, press the k button to move the focus area. Flash mode - y M u Food Use this mode to photograph flowers, insects, and other small objects at close range. • Macro mode (A64) is set to ON and...
.... • You can adjust the hue by pressing the multi selector H or I. To adjust the following settings, press the k button to move the focus area. Flash mode - y M u Food Use this mode to photograph flowers, insects, and other small objects at close range. • Macro mode (A64) is set to ON and...


