Reference Manual
Page 4
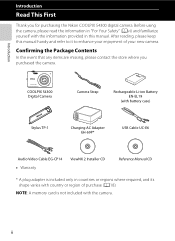
NOTE: A memory card is included only in this manual handy and refer to it to enhance your enjoyment of purchase (A18). COOLPIX S4300 Digital Camera Camera Strap Rechargeable Li-ion Battery EN-EL19 (with battery case) Stylus TP-1 Charging AC Adapter EH-69P* USB Cable UC-E6 ... with the camera. Confirming the Package Contents In the event that any items are missing, please contact the store where you for purchasing the Nikon COOLPIX S4300 digital camera. Introduction Introduction Read This First Thank you purchased the camera. After reading, please keep this manual. ii
NOTE: A memory card is included only in this manual handy and refer to it to enhance your enjoyment of purchase (A18). COOLPIX S4300 Digital Camera Camera Strap Rechargeable Li-ion Battery EN-EL19 (with battery case) Stylus TP-1 Charging AC Adapter EH-69P* USB Cable UC-E6 ... with the camera. Confirming the Package Contents In the event that any items are missing, please contact the store where you for purchasing the Nikon COOLPIX S4300 digital camera. Introduction Introduction Read This First Thank you purchased the camera. After reading, please keep this manual. ii

Reference Manual
Page 5
... that should be read before use, to prevent damage to the camera. E: F "Reference Section", F: "Technical Notes and Index." • SD, SDHC, and SDXC memory cards are referred to as "memory cards" in this manual. • The setting at the time of purchase is referred to start using the camera. To learn about the parts...
... that should be read before use, to prevent damage to the camera. E: F "Reference Section", F: "Technical Notes and Index." • SD, SDHC, and SDXC memory cards are referred to as "memory cards" in this manual. • The setting at the time of purchase is referred to start using the camera. To learn about the parts...

Reference Manual
Page 7
... is governed by national and international copyright laws. Be sure to also replace any errors or omissions to the attention of the Nikon representative in your area (address provided separately). Unless the prior permission of the government was digitally copied or reproduced by means of... has issued cautions on copies or reproductions of securities issued by public agencies and private groups, ID cards and tickets, such as memory cards or builtin camera memory does not completely erase the original image data. Deleted files can sometimes be recovered from discarded storage ...
... is governed by national and international copyright laws. Be sure to also replace any errors or omissions to the attention of the Nikon representative in your area (address provided separately). Unless the prior permission of the government was digitally copied or reproduced by means of... has issued cautions on copies or reproductions of securities issued by public agencies and private groups, ID cards and tickets, such as memory cards or builtin camera memory does not completely erase the original image data. Deleted files can sometimes be recovered from discarded storage ...

Reference Manual
Page 13
... Camera Strap ...13 Basic Steps for Shooting and Playback 15 Preparation 1 Insert the Battery...16 Preparation 2 Charge the Battery 18 Preparation 3 Insert a Memory Card 20 Internal Memory and Memory Cards ...21 Approved Memory Cards ...21 Step 1 Turn the Camera On ...22 Turning the Camera On and Off...23 Setting the Display Language, Date and Time 24 Step...
... Camera Strap ...13 Basic Steps for Shooting and Playback 15 Preparation 1 Insert the Battery...16 Preparation 2 Charge the Battery 18 Preparation 3 Insert a Memory Card 20 Internal Memory and Memory Cards ...21 Approved Memory Cards ...21 Step 1 Turn the Camera On ...22 Turning the Camera On and Off...23 Setting the Display Language, Date and Time 24 Step...

Reference Manual
Page 16
...E49 d Protect ...E51 a Print Order (Creating a DPOF Print Order E53 f Rotate Image...E57 E Voice Memo...E58 h Copy (Copy Between Internal Memory and Memory Card E60 The Movie Menu...E62 D Movie Options...E62 n Movie AF Mode ...E62 Y Wind Noise Reduction ...E63 The Setup Menu ...E64 c Welcome ... g Vibration Reduction...E71 U Motion Detection ...E72 h AF Assist ...E73 u Digital Zoom ...E73 i Sound Settings ...E74 k Auto Off ...E75 l/m Format Memory/Format Card E76 n Language ...E77 o Video Mode ...E77 V Charge by Computer ...E78 d Blink Warning...E80 b Eye-Fi Upload...E82 p Reset All...E83 r...
...E49 d Protect ...E51 a Print Order (Creating a DPOF Print Order E53 f Rotate Image...E57 E Voice Memo...E58 h Copy (Copy Between Internal Memory and Memory Card E60 The Movie Menu...E62 D Movie Options...E62 n Movie AF Mode ...E62 Y Wind Noise Reduction ...E63 The Setup Menu ...E64 c Welcome ... g Vibration Reduction...E71 U Motion Detection ...E72 h AF Assist ...E73 u Digital Zoom ...E73 i Sound Settings ...E74 k Auto Off ...E75 l/m Format Memory/Format Card E76 n Language ...E77 o Video Mode ...E77 V Charge by Computer ...E78 d Blink Warning...E80 b Eye-Fi Upload...E82 p Reset All...E83 r...
Reference Manual
Page 17
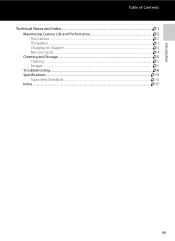
Introduction Table of Contents Technical Notes and Index...F1 Maximizing Camera Life and Performance F2 The Camera ...F2 The Battery...F3 Charging AC Adapter...F4 Memory Cards ...F4 Cleaning and Storage ...F5 Cleaning ...F5 Storage ...F5 Troubleshooting...F6 Specifications ...F13 Supported Standards ...F16 Index ...F17 xv
Introduction Table of Contents Technical Notes and Index...F1 Maximizing Camera Life and Performance F2 The Camera ...F2 The Battery...F3 Charging AC Adapter...F4 Memory Cards ...F4 Cleaning and Storage ...F5 Cleaning ...F5 Storage ...F5 Troubleshooting...F6 Specifications ...F13 Supported Standards ...F16 Index ...F17 xv

Reference Manual
Page 21
Parts of the Camera Parts of the Camera and Basic Operations 1 2 3 4 5 Under the connector cover 6 7 8 9 10 11 12 13 1 Monitor/touch panel 6 2 b (e movie-record) button 82 3 Charge lamp 19, E79 Flash lamp 55 4 A (shooting mode) button.......... 10, 26 5 c (playback) button 10, 32, 73 6 USB/audio/video output connector 18, 76, E27, E30 7 Tripod socket 8 Speaker 86, E59 9 Connector cover 18, 76, E27, E30 10 Battery-chamber/ memory card slot cover 16, 20 11 Memory card slot 20 12 Battery chamber 16 13 Battery latch 16, 17 3
Parts of the Camera Parts of the Camera and Basic Operations 1 2 3 4 5 Under the connector cover 6 7 8 9 10 11 12 13 1 Monitor/touch panel 6 2 b (e movie-record) button 82 3 Charge lamp 19, E79 Flash lamp 55 4 A (shooting mode) button.......... 10, 26 5 c (playback) button 10, 32, 73 6 USB/audio/video output connector 18, 76, E27, E30 7 Tripod socket 8 Speaker 86, E59 9 Connector cover 18, 76, E27, E30 10 Battery-chamber/ memory card slot cover 16, 20 11 Memory card slot 20 12 Battery chamber 16 13 Battery latch 16, 17 3

Reference Manual
Page 33
Basic Steps for Shooting and Playback Basic Steps for Shooting and Playback Preparation Preparation 1 Insert the Battery 16 Preparation 2 Charge the Battery 18 Preparation 3 Insert a Memory Card 20 Shooting Step 1 Turn the Camera On 22 Setting the Display Language, Date and Time (First Use After Purchase) ...24 Step 2 Select a Shooting Mode 26 Step 3 Frame a Picture ...28 Step 4 Focus and Shoot...30 Playback Step 5 Play Back Images ...32 Step 6 Delete Unwanted Images 34 15
Basic Steps for Shooting and Playback Basic Steps for Shooting and Playback Preparation Preparation 1 Insert the Battery 16 Preparation 2 Charge the Battery 18 Preparation 3 Insert a Memory Card 20 Shooting Step 1 Turn the Camera On 22 Setting the Display Language, Date and Time (First Use After Purchase) ...24 Step 2 Select a Shooting Mode 26 Step 3 Frame a Picture ...28 Step 4 Focus and Shoot...30 Playback Step 5 Play Back Images ...32 Step 6 Delete Unwanted Images 34 15

Reference Manual
Page 34
... battery (2). • When the battery is properly inserted, the battery latch will lock it is in the correct orientation. 3 Close the battery-chamber/memory card slot cover. • Charge the battery before first use or when it in place. See page 18 for Shooting and Playback Preparation 1 Insert the ...Battery 1 Open the battery-chamber/memory card slot cover. 2 Insert the included Rechargeable Li-ion Battery EN-EL19. • Use the edge of the battery to check that the battery ...
... battery (2). • When the battery is properly inserted, the battery latch will lock it is in the correct orientation. 3 Close the battery-chamber/memory card slot cover. • Charge the battery before first use or when it in place. See page 18 for Shooting and Playback Preparation 1 Insert the ...Battery 1 Open the battery-chamber/memory card slot cover. 2 Insert the included Rechargeable Li-ion Battery EN-EL19. • Use the edge of the battery to check that the battery ...

Reference Manual
Page 35
Pull the battery straight out of the camera (2); Observe caution when removing the battery or memory card. do not pull it at an angle. Basic Steps for Shooting and Playback B Note About the Battery Be sure to partially eject the battery. Preparation 1 ... arrow (1), to read and follow the warnings for the battery on lamp and the monitor have turned off and open the battery-chamber/memory card slot cover. B High Temperature Caution The camera, battery, and memory card may be sure that the power-on page vii and the section, "The Battery" (F3), before use. 17
Pull the battery straight out of the camera (2); Observe caution when removing the battery or memory card. do not pull it at an angle. Basic Steps for Shooting and Playback B Note About the Battery Be sure to partially eject the battery. Preparation 1 ... arrow (1), to read and follow the warnings for the battery on lamp and the monitor have turned off and open the battery-chamber/memory card slot cover. B High Temperature Caution The camera, battery, and memory card may be sure that the power-on page vii and the section, "The Battery" (F3), before use. 17

Reference Manual
Page 38
... them before opening the cover. 2 Insert the memory card. • Slide the memory card in correctly until it with the memory card, as well as "Memory Cards" (F4) in 20 "Maximizing Camera Life and Performance". B Inserting the Memory Card Inserting the memory card upside down or backwards could damage the camera or the memory card. B Note About Memory Cards Refer to the documentation included with this...
... them before opening the cover. 2 Insert the memory card. • Slide the memory card in correctly until it with the memory card, as well as "Memory Cards" (F4) in 20 "Maximizing Camera Life and Performance". B Inserting the Memory Card Inserting the memory card upside down or backwards could damage the camera or the memory card. B Note About Memory Cards Refer to the documentation included with this...

Reference Manual
Page 39
... sure that the device supports SDHC. 3 SDXC compliant. Observe caution when removing the battery or memory card. When using memory cards made by other manufacturers. 21 Gently push the memory card into the camera (1) to partially eject the card. Basic Steps for Shooting and Playback Preparation 3 Insert a Memory Card Removing Memory Cards Turn the camera off and open the battery-chamber...
... sure that the device supports SDHC. 3 SDXC compliant. Observe caution when removing the battery or memory card. When using memory cards made by other manufacturers. 21 Gently push the memory card into the camera (1) to partially eject the card. Basic Steps for Shooting and Playback Preparation 3 Insert a Memory Card Removing Memory Cards Turn the camera off and open the battery-chamber...

Reference Manual
Page 40
...number of exposures remaining depends on the camera. • If you are 50 or fewer exposures remaining. • C is displayed when no memory card is inserted in this manual is high. Description The battery level is for Shooting and Playback Battery level indicator D B N Battery exhausted. Recharge ... Number of remaining exposures shown in the illustrations in the camera, and images will turn on the remaining capacity of the internal memory or memory card, and the image quality and image size (image mode) (A65). • The number of exposures remaining 80 50 Basic Steps...
...number of exposures remaining depends on the camera. • If you are 50 or fewer exposures remaining. • C is displayed when no memory card is inserted in this manual is high. Description The battery level is for Shooting and Playback Battery level indicator D B N Battery exhausted. Recharge ... Number of remaining exposures shown in the illustrations in the camera, and images will turn on the remaining capacity of the internal memory or memory card, and the image quality and image size (image mode) (A65). • The number of exposures remaining 80 50 Basic Steps...

Reference Manual
Page 48
... halfway. • When a face is not detected: The camera has nine focus areas, and automatically selects the focus areas containing the subject closest to the memory card or internal memory. • If you press the shutter-release button halfway, the camera sets focus and exposure (shutter speed and aperture value).
... halfway. • When a face is not detected: The camera has nine focus areas, and automatically selects the focus areas containing the subject closest to the memory card or internal memory. • If you press the shutter-release button halfway, the camera sets focus and exposure (shutter speed and aperture value).

Reference Manual
Page 49
...the alternate subject is at different distances from the camera as expected in the scene (e.g. Do not open the battery-chamber/memory card slot cover or remove the battery or memory card while an indicator is very dark • Objects of sharply differing brightness are included in the following situations. In some ... is pressed halfway. The Touch shutter option can be changed to the Touch AF/AE option, which allows the camera to the camera or the memory card. C To Make Sure You Do Not Miss a Shot If you might miss a shot, press the shutter-release button all the way down. B Subjects...
...the alternate subject is at different distances from the camera as expected in the scene (e.g. Do not open the battery-chamber/memory card slot cover or remove the battery or memory card while an indicator is very dark • Objects of sharply differing brightness are included in the following situations. In some ... is pressed halfway. The Touch shutter option can be changed to the Touch AF/AE option, which allows the camera to the camera or the memory card. C To Make Sure You Do Not Miss a Shot If you might miss a shot, press the shutter-release button all the way down. B Subjects...

Reference Manual
Page 50
... (A75). Step 5 Play Back Images 1 Press the c (playback) button. • When you switch from the camera to play back images saved in the camera's internal memory. JPG 15/05/2012 15:30 • Images may be displayed briefly at low resolution immediately after switching to the next or previous image. •... image, drag the image to the left or tap H. • Tap and hold G or H to scroll backward or forward through the images. • Remove the memory card from shooting mode to playback mode, the last image saved will also return the camera to the right or tap G. 0004.
... (A75). Step 5 Play Back Images 1 Press the c (playback) button. • When you switch from the camera to play back images saved in the camera's internal memory. JPG 15/05/2012 15:30 • Images may be displayed briefly at low resolution immediately after switching to the next or previous image. •... image, drag the image to the left or tap H. • Tap and hold G or H to scroll backward or forward through the images. • Remove the memory card from shooting mode to playback mode, the last image saved will also return the camera to the right or tap G. 0004.

Reference Manual
Page 62
... of still images that allow you to clearly see detailed movements in dark conditions. You may vary depending upon the current image mode setting, the memory card used, or shooting condition. • Continuous shooting is set to Scenes) d Sports Use this mode for portraits taken at sunset or at night. • The...
... of still images that allow you to clearly see detailed movements in dark conditions. You may vary depending upon the current image mode setting, the memory card used, or shooting condition. • Continuous shooting is set to Scenes) d Sports Use this mode for portraits taken at sunset or at night. • The...

Reference Manual
Page 67
... disabled, up to 6 pictures can be continuously taken at a time. - On (default setting): The shutter is automatically released when the focus is full. Internal memory or the memory card is acquired on the face and automatically releases the shutter (pet portrait auto release) 3 times at which the pet is moving may prevent the...
... disabled, up to 6 pictures can be continuously taken at a time. - On (default setting): The shutter is automatically released when the focus is full. Internal memory or the memory card is acquired on the face and automatically releases the shutter (pet portrait auto release) 3 times at which the pet is moving may prevent the...

Reference Manual
Page 82
... of image size and compression ratio that can be printed, but limiting the number of images that is used and the capacity of the internal memory or memory card. The higher the image mode setting, the larger the size at which images will be used when saving images. r 2272×1704 q 1600×...
... of image size and compression ratio that can be printed, but limiting the number of images that is used and the capacity of the internal memory or memory card. The higher the image mode setting, the larger the size at which images will be used when saving images. r 2272×1704 q 1600×...

Reference Manual
Page 83
In addition, this setting cannot be stored in internal memory and on a 4 GB memory card. Print sizes are calculated by 2.54 cm (1 in.). However, at the same image size, images printed at higher resolutions will print smaller than the size .... 3 Print size at lower resolutions will differ depending on the make of pixels by printer resolution (dpi) and multiplying by dividing the number of memory card, even when the memory cards have the same specified capacity. Shooting Features 65 C Number of Exposures Remaining The following table lists the approximate number of the image (due...
In addition, this setting cannot be stored in internal memory and on a 4 GB memory card. Print sizes are calculated by 2.54 cm (1 in.). However, at the same image size, images printed at higher resolutions will print smaller than the size .... 3 Print size at lower resolutions will differ depending on the make of pixels by printer resolution (dpi) and multiplying by dividing the number of memory card, even when the memory cards have the same specified capacity. Shooting Features 65 C Number of Exposures Remaining The following table lists the approximate number of the image (due...


