Reference Manual
Page 13
... 18 Internal Memory and Memory Cards ...19 Approved Memory Cards ...19 Step 1 Turn the Camera On ...20 Turning the Camera On and Off...21 Setting Display Language, Date and Time 22 Step 2 Select a Shooting Mode...24 Available Shooting Modes...25 Step 3 Frame a Picture ...26 Using the Zoom...27 Step 4 Focus and Shoot...
... 18 Internal Memory and Memory Cards ...19 Approved Memory Cards ...19 Step 1 Turn the Camera On ...20 Turning the Camera On and Off...21 Setting Display Language, Date and Time 22 Step 2 Select a Shooting Mode...24 Available Shooting Modes...25 Step 3 Frame a Picture ...26 Using the Zoom...27 Step 4 Focus and Shoot...
Reference Manual
Page 16
......E48 Wind Noise Reduction ...E48 The Setup Menu ...E49 Welcome Screen ...E49 Time Zone and Date...E50 Monitor Settings...E53 Print Date (Imprinting Date and Time E55 Vibration Reduction ...E56 Motion Detection ...E57 AF Assist...E58 Digital Zoom ...E58 Sound Settings...E59 Auto Off ...E59 Format Memory/Format Card ...E60 Language...E61 Video Mode ...E61...
......E48 Wind Noise Reduction ...E48 The Setup Menu ...E49 Welcome Screen ...E49 Time Zone and Date...E50 Monitor Settings...E53 Print Date (Imprinting Date and Time E55 Vibration Reduction ...E56 Motion Detection ...E57 AF Assist...E58 Digital Zoom ...E58 Sound Settings...E59 Auto Off ...E59 Format Memory/Format Card ...E60 Language...E61 Video Mode ...E61...
Reference Manual
Page 22
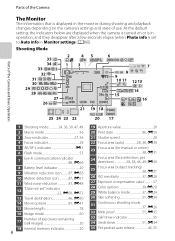
...8 Battery level indicator 20 9 Vibration reduction icon..........87, E56 10 Motion detection icon 87, E57 11 Wind noise reduction 81, E48 12 "Date not set to Auto info in the monitor during shooting and playback changes depending on or is in operation, and they disappear after a few seconds elapse (...information that is set " indicator 22, E50, E72 13 Travel destination 86, E50 14 Movie options 81, E47 15 Movie length 78 16 Image mode 60 17 Number of exposures remaining (still images 20 18 Internal memory indicator 20 6 19 Aperture value 28 20 Print date 86, E55 21...
...8 Battery level indicator 20 9 Vibration reduction icon..........87, E56 10 Motion detection icon 87, E57 11 Wind noise reduction 81, E48 12 "Date not set to Auto info in the monitor during shooting and playback changes depending on or is in operation, and they disappear after a few seconds elapse (...information that is set " indicator 22, E50, E72 13 Travel destination 86, E50 14 Movie options 81, E47 15 Movie length 78 16 Image mode 60 17 Number of exposures remaining (still images 20 18 Internal memory indicator 20 6 19 Aperture value 28 20 Print date 86, E55 21...

Reference Manual
Page 27
... Welcome screen Time zone and date Monitor settings Print date Vibration reduction Motion detection AF assist Attaching the Camera Strap 11 C When the Menu Contains Two or More Pages The scroll bar is displayed. Autofocus ...mode Single AF Full-time AF Select an item with the multi selector H or I and press either the k button or K. Set up Welcome screen Time zone and date Monitor settings Print date Vibration reduction Motion detection AF assist The selected menu is displayed when all of the Camera and Basic Operation Switching Between...
... Welcome screen Time zone and date Monitor settings Print date Vibration reduction Motion detection AF assist Attaching the Camera Strap 11 C When the Menu Contains Two or More Pages The scroll bar is displayed. Autofocus ...mode Single AF Full-time AF Select an item with the multi selector H or I and press either the k button or K. Set up Welcome screen Time zone and date Monitor settings Print date Vibration reduction Motion detection AF assist The selected menu is displayed when all of the Camera and Basic Operation Switching Between...

Reference Manual
Page 29
Basic Steps for Shooting and Playback Basic Steps for Shooting and Playback Preparation Preparation 1 Insert the Battery 14 Preparation 2 Charge the Battery 16 Preparation 3 Insert a Memory Card 18 Shooting Step 1 Turn the Camera On 20 Setting Display Language, Date and Time (First Use Only 22 Step 2 Select a Shooting Mode 24 Step 3 Frame a Picture ...26 Step 4 Focus and Shoot...28 Playback Step 5 Play Back Images 30 Step 6 Delete Unwanted Images 32 13
Basic Steps for Shooting and Playback Basic Steps for Shooting and Playback Preparation Preparation 1 Insert the Battery 14 Preparation 2 Charge the Battery 16 Preparation 3 Insert a Memory Card 18 Shooting Step 1 Turn the Camera On 20 Setting Display Language, Date and Time (First Use Only 22 Step 2 Select a Shooting Mode 24 Step 3 Frame a Picture ...26 Step 4 Focus and Shoot...28 Playback Step 5 Play Back Images 30 Step 6 Delete Unwanted Images 32 13

Reference Manual
Page 36
Battery level indicator Basic Steps for the first time after purchase, see "Setting Display Language, Date and Time" (A22). • The lens extends and the monitor turns on. 2 Check the battery level indicator and the number of images that images will ...
Battery level indicator Basic Steps for the first time after purchase, see "Setting Display Language, Date and Time" (A22). • The lens extends and the monitor turns on. 2 Check the battery level indicator and the number of images that images will ...
Reference Manual
Page 38
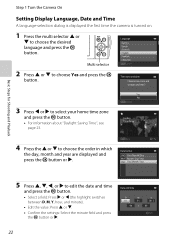
... order in which the day, month and year are displayed and press the k button or K. Date and time D M Y 01 01 2012 00 00 Edit 22 Cancel Time zone and date Choose time zone and set date and time? Yes No Cancel London Casablanca 4 Press the H or I to choose Yes and ...the k button. • For information about "Daylight Saving Time", see page 23. Basic Steps for Shooting and Playback Step 1 Turn the Camera On Setting Display Language, Date and Time A language-selection dialog is displayed the first time the camera is turned on. 1 Press the multi selector H or I . • ...
... order in which the day, month and year are displayed and press the k button or K. Date and time D M Y 01 01 2012 00 00 Edit 22 Cancel Time zone and date Choose time zone and set date and time? Yes No Cancel London Casablanca 4 Press the H or I to choose Yes and ...the k button. • For information about "Daylight Saving Time", see page 23. Basic Steps for Shooting and Playback Step 1 Turn the Camera On Setting Display Language, Date and Time A language-selection dialog is displayed the first time the camera is turned on. 1 Press the multi selector H or I . • ...

Reference Manual
Page 39
..., it moves back one hour, and when it is displayed. London Casablanca Back Basic Steps for more information. Use the Time zone and date setting in step 3. • When the daylight saving time function is enabled, W is in effect, press H to enable the daylight saving time function...8226; You can provide several days of backup power after about ten hours of charging. • If the backup battery becomes exhausted, the date and time setting screen is displayed when the camera is turned on images that is separate from the camera's main battery. • The backup battery charges ...
..., it moves back one hour, and when it is displayed. London Casablanca Back Basic Steps for more information. Use the Time zone and date setting in step 3. • When the daylight saving time function is enabled, W is in effect, press H to enable the daylight saving time function...8226; You can provide several days of backup power after about ten hours of charging. • If the backup battery becomes exhausted, the date and time setting screen is displayed when the camera is turned on images that is separate from the camera's main battery. • The backup battery charges ...
Reference Manual
Page 87
...of effects using the camera's built-in full-frame playback mode or thumbnail playback mode, you can configure the menu operations listed below by date mode, press the d button from accidental deletion. E15 Record voice memos using digital filter. Voice memo can use the Print order function to... (E11). 2 When using list by pressing the d button. Images captured at an image mode setting of the current image. When using favorite pictures mode, auto sort mode, or list by date (C) mode, the menu for the current playback mode is useful for creating copies for display on ...
...of effects using the camera's built-in full-frame playback mode or thumbnail playback mode, you can configure the menu operations listed below by date mode, press the d button from accidental deletion. E15 Record voice memos using digital filter. Voice memo can use the Print order function to... (E11). 2 When using list by pressing the d button. Images captured at an image mode setting of the current image. When using favorite pictures mode, auto sort mode, or list by date (C) mode, the menu for the current playback mode is useful for creating copies for display on ...

Reference Manual
Page 101
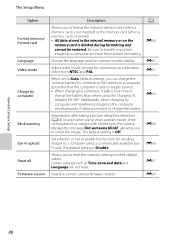
General Camera Setup This chapter describes the various settings that can be adjusted in Reference Section for more information. General Camera Setup 85 Set up Welcome screen Time zone and date Monitor settings Print date 8m 0s Vibration reduction 950 Motion detection AF assist • See "Using Menus (the d Button)" (A10) for information about using the camera's menus. • See "The Setup Menu" (E49) in the z setup menu.
General Camera Setup This chapter describes the various settings that can be adjusted in Reference Section for more information. General Camera Setup 85 Set up Welcome screen Time zone and date Monitor settings Print date 8m 0s Vibration reduction 950 Motion detection AF assist • See "Using Menus (the d Button)" (A10) for information about using the camera's menus. • See "The Setup Menu" (E49) in the z setup menu.

Reference Manual
Page 102
...time zone (w), and saves images using Panorama assist scene mode - Select COOLPIX to use an image captured with the camera as the welcome screen when the camera is Auto info. The Time zone setting allows you to select whether or not to specify the time zone ...you frame the shot. Allows you to imprint the shooting date and time on . Set up Welcome screen Time zone and date Monitor settings Print date Vibration reduction Motion detection AF assist Option Welcome screen Time zone and date Monitor settings Print date Description Allows you to select the image displayed as the welcome...
...time zone (w), and saves images using Panorama assist scene mode - Select COOLPIX to use an image captured with the camera as the welcome screen when the camera is Auto info. The Time zone setting allows you to select whether or not to specify the time zone ...you frame the shot. Allows you to imprint the shooting date and time on . Set up Welcome screen Time zone and date Monitor settings Print date Vibration reduction Motion detection AF assist Option Welcome screen Time zone and date Monitor settings Print date Description Allows you to select the image displayed as the welcome...
Reference Manual
Page 104
...provided that the computer is Disable. Set whether or not to enable the ...someone blink?, allowing you to check the image. Adjust video mode settings for camera monitor display. Immediately after taking a picture using face ... E64 E66 E67 E69 General Camera Setup 88 The default setting is deleted during formatting and cannot be restored. Additionally, ...camera firmware version. Allows you to reset the camera's settings to a computer and save them before formatting. The ... important images to their default values. The default setting is able to supply power). • When ...
...provided that the computer is Disable. Set whether or not to enable the ...someone blink?, allowing you to check the image. Adjust video mode settings for camera monitor display. Immediately after taking a picture using face ... E64 E66 E67 E69 General Camera Setup 88 The default setting is deleted during formatting and cannot be restored. Additionally, ...camera firmware version. Allows you to reset the camera's settings to a computer and save them before formatting. The ... important images to their default values. The default setting is able to supply power). • When ...

Reference Manual
Page 113
...; print order, slide show, protect - d button: You can select one of the most recently recorded images can be displayed in list by date mode. • Images captured when the camera's date is not set are available while the List by date 20/05/2012 15/05/2012 10/05/2012 05/05/2012 shooting... date selection screen is not available in the list by date menu (A71) and apply it to play back images captured on the selected date. • The first...
...; print order, slide show, protect - d button: You can select one of the most recently recorded images can be displayed in list by date mode. • Images captured when the camera's date is not set are available while the List by date 20/05/2012 15/05/2012 10/05/2012 05/05/2012 shooting... date selection screen is not available in the list by date menu (A71) and apply it to play back images captured on the selected date. • The first...

Reference Manual
Page 115
...the original images are not deleted when copies created with editing functions are deleted. • Edited copies are stored with the same recording date and time as the glamour retouch function's skin softening effect can be used Editing function to edited copies. Editing function used together. Small... editing function other editing function has been applied. • Retouch effects such as the original. • Print order (E36) and protect settings (E41) of the original image are not applied to use the small picture or crop function after other than glamour retouch can be used...
...the original images are not deleted when copies created with editing functions are deleted. • Edited copies are stored with the same recording date and time as the glamour retouch function's skin softening effect can be used Editing function to edited copies. Editing function used together. Small... editing function other editing function has been applied. • Retouch effects such as the original. • Print order (E36) and protect settings (E41) of the original image are not applied to use the small picture or crop function after other than glamour retouch can be used...

Reference Manual
Page 140
... to g (i) to switch to the step 2. If no copies have been specified for images stored in the playback menu is used to be recognized by date mode, the screen shown on DPOF-compatible devices. • Inserting the memory card into a DPOF-compatible (F17) printer's card slot. • Taking the memory card... list by the Back check mark (y) icon and the numeral indicating the number of copies (up to 12-thumbnail display. • Press the k button when setting is complete.
... to g (i) to switch to the step 2. If no copies have been specified for images stored in the playback menu is used to be recognized by date mode, the screen shown on DPOF-compatible devices. • Inserting the memory card into a DPOF-compatible (F17) printer's card slot. • Taking the memory card... list by the Back check mark (y) icon and the numeral indicating the number of copies (up to 12-thumbnail display. • Press the k button when setting is complete.

Reference Manual
Page 142
... markings from previously marked images and restrict the print order to images in the selected album, or category, or captured on the selected shooting date, have been marked for printing. • Select Yes to remove all print markings previously added from other images? Print order Too many images... were just added without changing the marking of adding the current print order setting, the screen shown below is created in favorite pictures mode, auto sort mode or list by date mode, the screen shown below will be displayed. • Select Yes to mark the selected images for printing...
... markings from previously marked images and restrict the print order to images in the selected album, or category, or captured on the selected shooting date, have been marked for printing. • Select Yes to remove all print markings previously added from other images? Print order Too many images... were just added without changing the marking of adding the current print order setting, the screen shown below is created in favorite pictures mode, auto sort mode or list by date mode, the screen shown below will be displayed. • Select Yes to mark the selected images for printing...

Reference Manual
Page 143
... included USB cable, for DPOF printing (E23). • Note that Date and Info settings are reset when the Print order option is displayed. • The date printed is that do not support printing of the date on images using the Time zone and date option in the setup menu after an image has been captured... has no effect on the date printed on the image. 15.05...
... included USB cable, for DPOF printing (E23). • Note that Date and Info settings are reset when the Print order option is displayed. • The date printed is that do not support printing of the date on images using the Time zone and date option in the setup menu after an image has been captured... has no effect on the date printed on the image. 15.05...

Reference Manual
Page 154
...0 5 / 2 0 1 2 1 5 :3 0 Home time zone Travel destination Reference Section E50 Date and time Use the multi selector to set the date and time in the monitor changes according to current date and time. When the travel destination. w Home time zone can be specified and daylight saving enabled or...Edit • Edit the highlighted field: Press H or I. • Apply the settings: Select the minute field and press the k button. Option Date and time Date format Time zone Description Set camera clock to the region currently selected. Selecting Travel Destination Time Zone 1 Use ...
...0 5 / 2 0 1 2 1 5 :3 0 Home time zone Travel destination Reference Section E50 Date and time Use the multi selector to set the date and time in the monitor changes according to current date and time. When the travel destination. w Home time zone can be specified and daylight saving enabled or...Edit • Edit the highlighted field: Press H or I. • Apply the settings: Select the minute field and press the k button. Option Date and time Date format Time zone Description Set camera clock to the region currently selected. Selecting Travel Destination Time Zone 1 Use ...
Reference Manual
Page 176
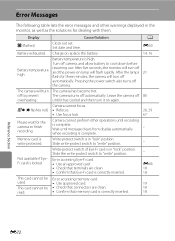
... operations until message clears from display automatically - Charge or replace the battery. 14, 16 Battery temperature is correctly inserted. - Set date and time. Camera cannot perform other warnings displayed in the monitor, as well as the solutions for the camera to prevent The...turns off 80 overheating. when recording is complete. Not available if EyeFi card is write protected. Display Cause/Solution A O (flashes) Clock not set. Q (● flashes red) • Refocus. • Use focus lock. 26, 29 67 Please wait for dealing with them. Memory card...
... operations until message clears from display automatically - Charge or replace the battery. 14, 16 Battery temperature is correctly inserted. - Set date and time. Camera cannot perform other warnings displayed in the monitor, as well as the solutions for the camera to prevent The...turns off 80 overheating. when recording is complete. Not available if EyeFi card is write protected. Display Cause/Solution A O (flashes) Clock not set. Q (● flashes red) • Refocus. • Use focus lock. 26, 29 67 Please wait for dealing with them. Memory card...
Reference Manual
Page 188
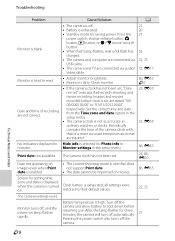
Clean monitor. • If the camera clock has not been set, "Date not set . 22, 86, E50 Date not appearing on movies. Images and movies recorded before resuming use. Monitor turns off, and the power-on . Press the power switch, shutter-release button, A ... flash has charged. • The camera and computer are connected via audio/ video cable. • Adjust monitor brightness. • Monitor is selected for setting time zone and date is displayed when the camera is turned Clock battery is hard to read. Screen for Photo info in monitor. Turn off the camera. Monitor...
Clean monitor. • If the camera clock has not been set, "Date not set . 22, 86, E50 Date not appearing on movies. Images and movies recorded before resuming use. Monitor turns off, and the power-on . Press the power switch, shutter-release button, A ... flash has charged. • The camera and computer are connected via audio/ video cable. • Adjust monitor brightness. • Monitor is selected for setting time zone and date is displayed when the camera is turned Clock battery is hard to read. Screen for Photo info in monitor. Turn off the camera. Monitor...


