

Reference Manual
Page 26
... Date and Time E39 Brightness E40 Print Date E41 Electronic VR E42 AF Assist E43 Format Memory/Format Card E44 Language E45 Menu Background E46 Video Mode E46 Reset All E47 Firmware Version E49 Connections E50 Connecting the Camera to a TV E50 Connecting the Camera to a Printer... E53 Printing Individual Images...
... Date and Time E39 Brightness E40 Print Date E41 Electronic VR E42 AF Assist E43 Format Memory/Format Card E44 Language E45 Menu Background E46 Video Mode E46 Reset All E47 Firmware Version E49 Connections E50 Connecting the Camera to a TV E50 Connecting the Camera to a Printer... E53 Printing Individual Images...

Reference Manual
Page 29
2 3 1 4 5 6 11 10 9 8 7 Parts of the Camera and Basic Operations 1 Flexible buttons 7, 32, 66 2 Monitor 5 3 Flash lamp 35 Multi selector 4 H: Telephoto 23 I: Wide-angle 23 5 c (shooting/playback mode) button.... 26 6 Battery-chamber/ memory card slot cover 12, 14 7 Battery chamber 12 8 Memory card slot 14 9 USB/audio/video output connector.......68 10 Waterproof packing xvi, xvii 11 Tripod socket F19 3
2 3 1 4 5 6 11 10 9 8 7 Parts of the Camera and Basic Operations 1 Flexible buttons 7, 32, 66 2 Monitor 5 3 Flash lamp 35 Multi selector 4 H: Telephoto 23 I: Wide-angle 23 5 c (shooting/playback mode) button.... 26 6 Battery-chamber/ memory card slot cover 12, 14 7 Battery chamber 12 8 Memory card slot 14 9 USB/audio/video output connector.......68 10 Waterproof packing xvi, xvii 11 Tripod socket F19 3

Reference Manual
Page 94
USB/audio/video output connector 1 2 3 How to an external device, make sure the remaining battery level is sufficient and turn the camera off. Insert the plug straight. Playback Features 68 Connecting the Camera to a TV, Computer, or Printer You can enhance your enjoyment of images and movies by connecting the camera to a TV, computer, or printer. • Before connecting the camera to open the cover. For information about the connection methods and subsequent operations, refer to the documentation included with the device in addition to this document.
USB/audio/video output connector 1 2 3 How to an external device, make sure the remaining battery level is sufficient and turn the camera off. Insert the plug straight. Playback Features 68 Connecting the Camera to a TV, Computer, or Printer You can enhance your enjoyment of images and movies by connecting the camera to a TV, computer, or printer. • Before connecting the camera to open the cover. For information about the connection methods and subsequent operations, refer to the documentation included with the device in addition to this document.

Reference Manual
Page 95
... a computer, you can perform simple retouching and manage image data in addition to the TV's input jacks. Connection method: Connect the video and audio plugs of the optional audio/video cable to playing back images and movies. Connection method: Connect the camera directly to the printer's USB input jack with the included...
... a computer, you can perform simple retouching and manage image data in addition to the TV's input jacks. Connection method: Connect the video and audio plugs of the optional audio/video cable to playing back images and movies. Connection method: Connect the camera directly to the printer's USB input jack with the included...

Reference Manual
Page 100
... File using Windows 7 If the dialog shown at right is displayed, follow the steps below to select Nikon Transfer 2. 1 Under Import pictures and videos, click Change program. If the memory card contains a large number of Nikon Transfer 2 (1). • Click Start Transfer (2). 1 2 • At default settings, all the images on the memory card will...
... File using Windows 7 If the dialog shown at right is displayed, follow the steps below to select Nikon Transfer 2. 1 Under Import pictures and videos, click Change program. If the memory card contains a large number of Nikon Transfer 2 (1). • Click Start Transfer (2). 1 2 • At default settings, all the images on the memory card will...
Reference Manual
Page 110
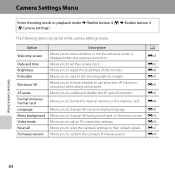
... in the camera settings menu: Option Welcome screen Date and time Brightness Print date Electronic VR AF assist Format memory/ Format card Language Menu background Video mode Reset all Firmware version Description Allows you to select whether or not the welcome screen is displayed when the camera is turned on. Allows...
... in the camera settings menu: Option Welcome screen Date and time Brightness Print date Electronic VR AF assist Format memory/ Format card Language Menu background Video mode Reset all Firmware version Description Allows you to select whether or not the welcome screen is displayed when the camera is turned on. Allows...

Reference Manual
Page 156
...) Adjust settings for a menu screen or thumbnail playback mode. • Press the multi selector J or K to a TV. Reference Section E46 Video Mode Enter shooting mode or playback mode M flexible button 4 (l) M flexible button 4 (l Camera settings) M press I twice M flexible button 4 (Q Menu background) Select one of five background designs ...
...) Adjust settings for a menu screen or thumbnail playback mode. • Press the multi selector J or K to a TV. Reference Section E46 Video Mode Enter shooting mode or playback mode M flexible button 4 (l) M flexible button 4 (l Camera settings) M press I twice M flexible button 4 (Q Menu background) Select one of five background designs ...

Reference Manual
Page 158
... the memory card and saves images using the next available file number. Camera settings menu: Welcome screen (E38), Date and time (E39), Language (E45), and Video mode (E46) Reference Section E48 To reset file numbering to "0001", delete all also resets the camera's file numbering (E61).
... the memory card and saves images using the next available file number. Camera settings menu: Welcome screen (E38), Date and time (E39), Language (E45), and Video mode (E46) Reference Section E48 To reset file numbering to "0001", delete all also resets the camera's file numbering (E61).

Reference Manual
Page 160
Reference Section E50 Connecting the Camera to a TV Connect the camera to a TV using an optional audio/video cable (E63) to play back images or movies on the TV. 1 Turn off the camera. 2 Connect the camera to the TV. • Connect the yellow plug of the audio/video cable to the video-in jack and the white plug to the audio-in jack on the TV. 1 2 3 Yellow White 3 Set the TV's input to external video input. • See your TV's documentation for details.
Reference Section E50 Connecting the Camera to a TV Connect the camera to a TV using an optional audio/video cable (E63) to play back images or movies on the TV. 1 Turn off the camera. 2 Connect the camera to the TV. • Connect the yellow plug of the audio/video cable to the video-in jack and the white plug to the audio-in jack on the TV. 1 2 3 Yellow White 3 Set the TV's input to external video input. • See your TV's documentation for details.

Reference Manual
Page 161
... an angle, and do not insert the cable at an angle. B Notes About Connecting the Cable When connecting the cable, be sure that the camera's Video mode (E46) setting in the camera settings menu conforms to the standard used by your TV. E51 Reference Section B If the Images Are Not Displayed...
... an angle, and do not insert the cable at an angle. B Notes About Connecting the Cable When connecting the cable, be sure that the camera's Video mode (E46) setting in the camera settings menu conforms to the standard used by your TV. E51 Reference Section B If the Images Are Not Displayed...

Reference Manual
Page 173
If the cord is pulled, the connection between the camera and power source is interrupted, and the camera turns off. Optional Accessories AC Adapter EH-62F (connect as shown) AC adapter Audio/video cable Fully insert the cord of the AC adapter. Do not pull the cord of the AC adapter into the slot in the AC adapter, then insert the AC adapter in the battery chamber. • While using the AC adapter, the battery-chamber/memory card slot cover cannot be closed. Reference Section E63 Audio Video Cable EG-CP14 Accessories are not waterproof.
If the cord is pulled, the connection between the camera and power source is interrupted, and the camera turns off. Optional Accessories AC Adapter EH-62F (connect as shown) AC adapter Audio/video cable Fully insert the cord of the AC adapter. Do not pull the cord of the AC adapter into the slot in the AC adapter, then insert the AC adapter in the battery chamber. • While using the AC adapter, the battery-chamber/memory card slot cover cannot be closed. Reference Section E63 Audio Video Cable EG-CP14 Accessories are not waterproof.

Reference Manual
Page 189
... flash lamp flashes, wait until flash has charged. • Camera and computer are connected via USB cable. • Camera and TV are connected via audio/video cable. 21 20 2, 21 36 68, 73 68, E50 • Adjust monitor brightness. • Monitor is not displayed during playback. The shooting date and time...
... flash lamp flashes, wait until flash has charged. • Camera and computer are connected via USB cable. • Camera and TV are connected via audio/video cable. 21 20 2, 21 36 68, 73 68, E50 • Adjust monitor brightness. • Monitor is not displayed during playback. The shooting date and time...

Reference Manual
Page 193
Images are not displayed on TV. • Video mode is not correctly set in on image. • Playback zoom cannot be used with another make or model of digital camera. - 66, E17 48 ...
Images are not displayed on TV. • Video mode is not correctly set in on image. • Playback zoom cannot be used with another make or model of digital camera. - 66, E17 48 ...

Reference Manual
Page 196
...) Exposure Metering mode Exposure control Shutter Speed Aperture Range Self-timer Built-in flash Range (approx.) (ISO sensitivity: Auto) Flash control Interface Data transfer protocol Video output Internal memory (approx. 26 MB), SD/SDHC/SDXC memory card DCF, Exif 2.3, and DPOF compliant Still pictures: JPEG Voice messages: WAV Movies: AVI (Motion...
...) Exposure Metering mode Exposure control Shutter Speed Aperture Range Self-timer Built-in flash Range (approx.) (ISO sensitivity: Auto) Flash control Interface Data transfer protocol Video output Internal memory (approx. 26 MB), SD/SDHC/SDXC memory card DCF, Exif 2.3, and DPOF compliant Still pictures: JPEG Voice messages: WAV Movies: AVI (Motion...

Reference Manual
Page 197
... pictures underwater up to a depth of 5 m (16.4 ft) and for recording)2 Tripod socket Dimensions (W × H × D) Weight Operating environment Temperature Humidity Waterproof Dustproof Shockproof Audio/video (A/V) output; digital I /O terminal Supported languages Power sources Battery life1 Still pictures Movies (actual battery life for 60 minutes JIS/IEC protection class 6 (IP6X) equivalent (under...
... pictures underwater up to a depth of 5 m (16.4 ft) and for recording)2 Tripod socket Dimensions (W × H × D) Weight Operating environment Temperature Humidity Waterproof Dustproof Shockproof Audio/video (A/V) output; digital I /O terminal Supported languages Power sources Battery life1 Still pictures Movies (actual battery life for 60 minutes JIS/IEC protection class 6 (IP6X) equivalent (under...
Reference Manual
Page 202
..., E11 Add starbursts E7, E10 Adding images to favorites E19 AF-assist illuminator 2, 84, E43 Always fire flash 35 Aperture value 25 Audio/video cable........ 69, E50, E63 Audio/video-in jack 69, E50 Auto flash 35 Auto off 21 Autofocus 62 B Battery 10, 12, 19 Battery chamber 3 Battery charger 10 Battery...
..., E11 Add starbursts E7, E10 Adding images to favorites E19 AF-assist illuminator 2, 84, E43 Always fire flash 35 Aperture value 25 Audio/video cable........ 69, E50, E63 Audio/video-in jack 69, E50 Auto flash 35 Auto off 21 Autofocus 62 B Battery 10, 12, 19 Battery chamber 3 Battery charger 10 Battery...

Reference Manual
Page 205
... Q 47 Thumbnail display 65 Toy camera E7 Tripod socket 3, F19 TV 69, E50 U USB cable 69, 73, E54 USB/audio/video output connector 3, 68, 73, E50, E54 Using skin softening 41 V Video mode 84, E46 View 66, E26 View by date 67, E27 View favorites 67, E29 View movie 66, E26 ViewNX...
... Q 47 Thumbnail display 65 Toy camera E7 Tripod socket 3, F19 TV 69, E50 U USB cable 69, 73, E54 USB/audio/video output connector 3, 68, 73, E50, E54 Using skin softening 41 V Video mode 84, E46 View 66, E26 View by date 67, E27 View favorites 67, E29 View movie 66, E26 ViewNX...


