

Reference Manual
Page 21
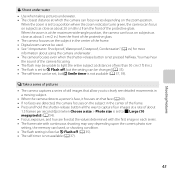
... in the well-ventilated and shady place. • Place the camera on a dry cloth to dry it. Wipe off the camera with freshwater for about 10 minutes. • If the buttons or switches do not operate properly, foreign substances may have adhered to malfunction; xix Introduction 1. If the waterproof packing or...
... in the well-ventilated and shady place. • Place the camera on a dry cloth to dry it. Wipe off the camera with freshwater for about 10 minutes. • If the buttons or switches do not operate properly, foreign substances may have adhered to malfunction; xix Introduction 1. If the waterproof packing or...

Reference Manual
Page 23
...8226; The camera is moved from a cold place to the ambient temperature. • If the fogging does not clear, consult your retailer or Nikon-authorized service representative. If the microphone or speaker openings are frozen, they may not operate smoothly. - b Clearing the fogging • Open ...(condensation) may be produced. • When snow or water droplets adhere to the exterior of this camera has been tested at temperatures -10°C - +40°C (14°F-104°F). xxi Introduction Notes About Operating Temperature and Humidity and Condensation The operation of the ...
...8226; The camera is moved from a cold place to the ambient temperature. • If the fogging does not clear, consult your retailer or Nikon-authorized service representative. If the microphone or speaker openings are frozen, they may not operate smoothly. - b Clearing the fogging • Open ...(condensation) may be produced. • When snow or water droplets adhere to the exterior of this camera has been tested at temperatures -10°C - +40°C (14°F-104°F). xxi Introduction Notes About Operating Temperature and Humidity and Condensation The operation of the ...

Reference Manual
Page 24
... Body 2 Attaching the Camera Strap 4 The Monitor 5 Shooting Mode 5 Playback Mode 6 Using the Flexible Buttons 7 The Basics of Shooting and Playback .... 9 Preparation 1 Charge the Battery 10 Preparation 2 Insert the Battery 12 Preparation 3 Insert a Memory Card.......... 14 Internal Memory and Memory Cards......... 15 Preparation 4 Set the Display Language, Date, and Time 16...
... Body 2 Attaching the Camera Strap 4 The Monitor 5 Shooting Mode 5 Playback Mode 6 Using the Flexible Buttons 7 The Basics of Shooting and Playback .... 9 Preparation 1 Charge the Battery 10 Preparation 2 Insert the Battery 12 Preparation 3 Insert a Memory Card.......... 14 Internal Memory and Memory Cards......... 15 Preparation 4 Set the Display Language, Date, and Time 16...

Reference Manual
Page 29
2 3 1 4 5 6 11 10 9 8 7 Parts of the Camera and Basic Operations 1 Flexible buttons 7, 32, 66 2 Monitor 5 3 Flash lamp 35 Multi selector 4 H: Telephoto 23 I: Wide-angle 23 5 c (shooting/playback mode) button.... 26 6 Battery-chamber/ memory card slot cover 12, 14 7 Battery chamber 12 8 Memory card slot 14 9 USB/audio/video output connector.......68 10 Waterproof packing xvi, xvii 11 Tripod socket F19 3
2 3 1 4 5 6 11 10 9 8 7 Parts of the Camera and Basic Operations 1 Flexible buttons 7, 32, 66 2 Monitor 5 3 Flash lamp 35 Multi selector 4 H: Telephoto 23 I: Wide-angle 23 5 c (shooting/playback mode) button.... 26 6 Battery-chamber/ memory card slot cover 12, 14 7 Battery chamber 12 8 Memory card slot 14 9 USB/audio/video output connector.......68 10 Waterproof packing xvi, xvii 11 Tripod socket F19 3

Reference Manual
Page 31
Shooting Mode 5 12 346 10 7 8 30s 1m 5m 9 1 / 2 5 0 F 3.3 10 10 11 999 29m 0s 12 18 17 9999 29m 0s 16 999 29m 0s 14 13 15 1 Flexible icons 7 2 "Date not set" indicator...........19, 84, ... 3 Shutter speed 25 4 Aperture value 25 5 Flash mode 35 6 Change colors icon 49 7 Self-timer indicator 37 8 Smile timer 39 9 Shoot at intervals icon 44 10 Battery level indicator 20 11 Zoom indicator 23 12 Shooting mode 34, 42 13 Movie recording time 57, 78 14 Number of use. Parts of...
Shooting Mode 5 12 346 10 7 8 30s 1m 5m 9 1 / 2 5 0 F 3.3 10 10 11 999 29m 0s 12 18 17 9999 29m 0s 16 999 29m 0s 14 13 15 1 Flexible icons 7 2 "Date not set" indicator...........19, 84, ... 3 Shutter speed 25 4 Aperture value 25 5 Flash mode 35 6 Change colors icon 49 7 Self-timer indicator 37 8 Smile timer 39 9 Shoot at intervals icon 44 10 Battery level indicator 20 11 Zoom indicator 23 12 Shooting mode 34, 42 13 Movie recording time 57, 78 14 Number of use. Parts of...
Reference Manual
Page 32
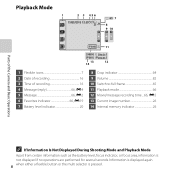
Parts of the Camera and Basic Operations Playback Mode 1 2 3 456 15/05/2013 15:30 7 8 9 10 999 11 9999 999 13 14 29m 0s 29m 0s 12 1 Flexible icons 7 2 Date of recording 16 3 Time of recording 16 4 Message (reply 66, E4 5 ...Message 66, E2 6 Favorites indicator 66, E19 7 Battery level indicator 20 8 Crop indicator 64 9 Volume 82 10 Switch to full-frame 65 11 Playback mode 66 12 Movie/message recording time... 66, E5 13 Current image number 26 14 Internal memory indicator...
Parts of the Camera and Basic Operations Playback Mode 1 2 3 456 15/05/2013 15:30 7 8 9 10 999 11 9999 999 13 14 29m 0s 29m 0s 12 1 Flexible icons 7 2 Date of recording 16 3 Time of recording 16 4 Message (reply 66, E4 5 ...Message 66, E2 6 Favorites indicator 66, E19 7 Battery level indicator 20 8 Crop indicator 64 9 Volume 82 10 Switch to full-frame 65 11 Playback mode 66 12 Movie/message recording time... 66, E5 13 Current image number 26 14 Internal memory indicator...

Reference Manual
Page 35
The Basics of Shooting and Playback The Basics of Shooting and Playback Preparation Preparation 1 Charge the Battery 10 Preparation 2 Insert the Battery 12 Preparation 3 Insert a Memory Card 14 Preparation 4 Set the Display Language, Date, and Time 16 Shooting Step 1 Turn the Camera On 20 Step 2 Frame a Picture ...22 Step 3 Focus and Shoot...24 Playback Step 4 Play Back Images ...26 Step 5 Delete Images...28 9
The Basics of Shooting and Playback The Basics of Shooting and Playback Preparation Preparation 1 Charge the Battery 10 Preparation 2 Insert the Battery 12 Preparation 3 Insert a Memory Card 14 Preparation 4 Set the Display Language, Date, and Time 16 Shooting Step 1 Turn the Camera On 20 Step 2 Frame a Picture ...22 Step 3 Focus and Shoot...24 Playback Step 4 Play Back Images ...26 Step 5 Delete Images...28 9

Reference Manual
Page 36
... is complete, the CHARGE lamp lights. • See "Understanding the CHARGE Lamp" (A 11). 3 When charging is complete, remove the battery, and then unplug the charger. 10
... is complete, the CHARGE lamp lights. • See "Understanding the CHARGE Lamp" (A 11). 3 When charging is complete, remove the battery, and then unplug the charger. 10

Reference Manual
Page 38
... battery latch will lock the battery in the direction indicated by the arrow (1), and fully insert the battery (2). • When the battery is running low (A 10). 12 Battery latch B Inserting the Battery Correctly Inserting the battery upside down or backwards could damage the camera. Preparation 2 Insert the Battery 1 Open the battery...
... battery latch will lock the battery in the direction indicated by the arrow (1), and fully insert the battery (2). • When the battery is running low (A 10). 12 Battery latch B Inserting the Battery Correctly Inserting the battery upside down or backwards could damage the camera. Preparation 2 Insert the Battery 1 Open the battery...

Reference Manual
Page 45
... inserted into the camera or when the camera is connected to an optional AC adapter, and can provide several days of backup power after about 10 hours of Shooting and Playback C Changing the Language Setting, the Date and Time Setting, and the Menu Background Setting • You can change the Language...
... inserted into the camera or when the camera is connected to an optional AC adapter, and can provide several days of backup power after about 10 hours of Shooting and Playback C Changing the Language Setting, the Date and Time Setting, and the Menu Background Setting • You can change the Language...

Reference Manual
Page 58
You can release the shutter about 10 seconds after you press the shutterrelease button. Seven different frames are 48 available. Allows you to add a frame around your pictures and turn the rest ...
You can release the shutter about 10 seconds after you press the shutterrelease button. Seven different frames are 48 available. Allows you to add a frame around your pictures and turn the rest ...

Reference Manual
Page 63
... want to be in the picture you are set. Self-timer 10 s Smile timer O ff 1 / 2 5 0 F 3.3 10 Shooting Features 37 Using the Self-timer The camera's self-timer can release the shutter about 10 seconds after you press the shutterrelease button. When using the self-...shake that occur when you press the shutterrelease button. Enter shooting mode M flexible button 2 (Z) M flexible button 3 (i Self-timer) 1 Press flexible button 2 (j 10 s). • M is displayed. • When Y Smile timer is selected, the camera uses face detection to avoid the effects of a tripod is detected (A 39...
... want to be in the picture you are set. Self-timer 10 s Smile timer O ff 1 / 2 5 0 F 3.3 10 Shooting Features 37 Using the Self-timer The camera's self-timer can release the shutter about 10 seconds after you press the shutterrelease button. When using the self-...shake that occur when you press the shutterrelease button. Enter shooting mode M flexible button 2 (Z) M flexible button 3 (i Self-timer) 1 Press flexible button 2 (j 10 s). • M is displayed. • When Y Smile timer is selected, the camera uses face detection to avoid the effects of a tripod is detected (A 39...

Reference Manual
Page 65
... button 2 (Z) M flexible button 3 (i Self-timer) 1 Press flexible button 3 (Y Smile timer). • U is automatically released without pressing the shutter-release button. Shooting Features 39 Self-timer 10 s Smile timer O ff 2 Frame the picture. • Point the camera at a person's face. ➝ "Using Face Detection" (A 60) 3 Wait for the subject to b Off. Do...
... button 2 (Z) M flexible button 3 (i Self-timer) 1 Press flexible button 3 (Y Smile timer). • U is automatically released without pressing the shutter-release button. Shooting Features 39 Self-timer 10 s Smile timer O ff 2 Frame the picture. • Point the camera at a person's face. ➝ "Using Face Detection" (A 60) 3 Wait for the subject to b Off. Do...
Reference Manual
Page 71
... detected, the camera focuses on the subject in the center of about 1.5 frames per second (fps) (when Choose a size > Photo size is set to D Large (10 megapixels)) (A 54). • Focus, exposure, and hue are fixed at the values determined with continuous shooting may be used , or shooting condition. • The flash...
... detected, the camera focuses on the subject in the center of about 1.5 frames per second (fps) (when Choose a size > Photo size is set to D Large (10 megapixels)) (A 54). • Focus, exposure, and hue are fixed at the values determined with continuous shooting may be used , or shooting condition. • The flash...

Reference Manual
Page 80
...style and Change colors. 54 • When Decorate (A 48) is used with other functions (A 58). Example: D Large (10 megapixels) = approx. 10 megapixels, 3648 × 2736 pixels 2 Print size at lower resolutions will be used when saving images. Choose a Photo Size You...2272 × 1704 approx. 1:8 4:3 approx. 19 × 14/ 7.5 × 5.6 F Small (2 megapixels) 1600 × 1200 approx. 1:8 4:3 approx. 13 × 10/ 5.3 × 4 1 The total number of pixels captured, and the number of pictures (still images) and movies. B Features That Cannot Be Used Simultaneously Some settings cannot...
...style and Change colors. 54 • When Decorate (A 48) is used with other functions (A 58). Example: D Large (10 megapixels) = approx. 10 megapixels, 3648 × 2736 pixels 2 Print size at lower resolutions will be used when saving images. Choose a Photo Size You...2272 × 1704 approx. 1:8 4:3 approx. 19 × 14/ 7.5 × 5.6 F Small (2 megapixels) 1600 × 1200 approx. 1:8 4:3 approx. 13 × 10/ 5.3 × 4 1 The total number of pixels captured, and the number of pictures (still images) and movies. B Features That Cannot Be Used Simultaneously Some settings cannot...

Reference Manual
Page 81
...) (default setting) E Medium (4 megapixels) F Small (2 megapixels) Number of images that can be saved (4 GB) 780 3820 7250 • If the number of exposures remaining is 10,000 or more, the number of exposures remaining display shows "9999". • To confirm the number of images that can be saved on a 4 GB memory...
...) (default setting) E Medium (4 megapixels) F Small (2 megapixels) Number of images that can be saved (4 GB) 780 3820 7250 • If the number of exposures remaining is 10,000 or more, the number of exposures remaining display shows "9999". • To confirm the number of images that can be saved on a 4 GB memory...

Reference Manual
Page 90
... captured, press H, I, J, or K to display a different face. Playback Zoom Press the multi selector H during playback. • As the area to be zoomed up to approx. 10×. • To move the displayed area, press flexible button 3 (G) to lock the zoom ratio, and then press H, I, J, or K. If the camera detected multiple faces...
... captured, press H, I, J, or K to display a different face. Playback Zoom Press the multi selector H during playback. • As the area to be zoomed up to approx. 10×. • To move the displayed area, press flexible button 3 (G) to lock the zoom ratio, and then press H, I, J, or K. If the camera detected multiple faces...

Reference Manual
Page 96
Install ViewNX 2 using the included ViewNX 2 CD-ROM. Compatible Operating Systems Windows Windows 8, Windows 7, Windows Vista, Windows XP Macintosh Mac OS X 10.6, 10.7, 10.8 Refer to transfer, view, edit and share images. Using ViewNX 2 ViewNX 2 is required. Your Imaging Toolbox ViewNX 2™ Playback Features Installing ViewNX 2 • An Internet connection is an all-in-one software package which enables you to the Nikon website for details on system requirements, including the latest information on operating system compatibility. 70
Install ViewNX 2 using the included ViewNX 2 CD-ROM. Compatible Operating Systems Windows Windows 8, Windows 7, Windows Vista, Windows XP Macintosh Mac OS X 10.6, 10.7, 10.8 Refer to transfer, view, edit and share images. Using ViewNX 2 ViewNX 2 is required. Your Imaging Toolbox ViewNX 2™ Playback Features Installing ViewNX 2 • An Internet connection is an all-in-one software package which enables you to the Nikon website for details on system requirements, including the latest information on operating system compatibility. 70

Reference Manual
Page 105
... during movie recording and playback. The amount of multi selector operation, autofocus lens drive movement, and aperture operation when brightness changes may stop recording after 10 seconds. Avoiding bright objects such as the sun, reflections of the sun, and electric lights is recommended. • Depending on the distance to the subject...
... during movie recording and playback. The amount of multi selector operation, autofocus lens drive movement, and aperture operation when brightness changes may stop recording after 10 seconds. Avoiding bright objects such as the sun, reflections of the sun, and electric lights is recommended. • Depending on the distance to the subject...

Reference Manual
Page 106
... close-ups (A 43), Photograph food (A 43), Shoot under water (A 45), Brighter/darker (A 51), or More vivid/less vivid (A 51) is enabled, the camera starts recording 10 seconds after you press the b (e movie-record) button. • The flash does not fire. • You can be used. When the self-timer is applied...
... close-ups (A 43), Photograph food (A 43), Shoot under water (A 45), Brighter/darker (A 51), or More vivid/less vivid (A 51) is enabled, the camera starts recording 10 seconds after you press the b (e movie-record) button. • The flash does not fire. • You can be used. When the self-timer is applied...


