
P90 User's Manual
Page 2
... of the SD Card Association. • PictBridge is a trademark. • All other trade names mentioned in this manual or the other documentation provided with your Nikon product are trademarks or registered trademarks of their respective holders.
... of the SD Card Association. • PictBridge is a trademark. • All other trade names mentioned in this manual or the other documentation provided with your Nikon product are trademarks or registered trademarks of their respective holders.

P90 User's Manual
Page 3
Introduction First Steps A Basic Photography and Playback: Auto Mode y/x Shooting Suited for the Scenes a/y Automatic Shooting of Smiling Faces d Sport Continuous Mode Shoot pictures using A, B, C, D, E and F c More on Playback D Movies E Voice Recordings Connecting to Televisions, Computers and Printers d Shooting, Playback and Setup Menus Technical Notes i
Introduction First Steps A Basic Photography and Playback: Auto Mode y/x Shooting Suited for the Scenes a/y Automatic Shooting of Smiling Faces d Sport Continuous Mode Shoot pictures using A, B, C, D, E and F c More on Playback D Movies E Voice Recordings Connecting to Televisions, Computers and Printers d Shooting, Playback and Setup Menus Technical Notes i
P90 User's Manual
Page 4
... listed in this section are indicated by qualified technicians. ii After removing or disconnecting the power source, take the product to a Nikon-authorized service representative for inspection. Continued operation could result in explosion or fire. Keep out of reach of children Particular care should ... unplug the AC adapter and remove the battery immediately, taking care to avoid burns. For Your Safety To prevent damage to your Nikon product or injury to yourself or to others, read the following symbol: This icon marks warnings, information that should be taken to...
... listed in this section are indicated by qualified technicians. ii After removing or disconnecting the power source, take the product to a Nikon-authorized service representative for inspection. Continued operation could result in explosion or fire. Keep out of reach of children Particular care should ... unplug the AC adapter and remove the battery immediately, taking care to avoid burns. For Your Safety To prevent damage to your Nikon product or injury to yourself or to others, read the following symbol: This icon marks warnings, information that should be taken to...

P90 User's Manual
Page 5
Observe the following precautions when handling the battery charger • Keep dry. Failure to observe this precaution could result in this precaution could result in or expose to observe this product: • Before replacing the battery, turn the product off. Failure to water. • Replace the terminal cover when transporting the battery. If you notice any change in the battery, such as necklaces or hairpins. • The battery is unplugged. • Use only a Rechargeable Li-ion Battery EN-EL5 (supplied). Do not transport or store with a dry cloth. To avoid ...
Observe the following precautions when handling the battery charger • Keep dry. Failure to observe this precaution could result in this precaution could result in or expose to observe this product: • Before replacing the battery, turn the product off. Failure to water. • Replace the terminal cover when transporting the battery. If you notice any change in the battery, such as necklaces or hairpins. • The battery is unplugged. • Use only a Rechargeable Li-ion Battery EN-EL5 (supplied). Do not transport or store with a dry cloth. To avoid ...

P90 User's Manual
Page 6
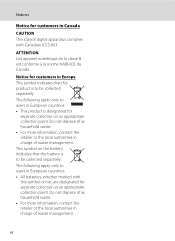
Playing CD-ROMs on audio CD equipment. Avoid contact with liquid crystal Should the monitor break, care should be taken to avoid injury caused by Nikon for the purpose, to maintain compliance with product regulations. Turn the power off when using the flash Using the flash close to observe this device ...
Playing CD-ROMs on audio CD equipment. Avoid contact with liquid crystal Should the monitor break, care should be taken to avoid injury caused by Nikon for the purpose, to maintain compliance with product regulations. Turn the power off when using the flash Using the flash close to observe this device ...

P90 User's Manual
Page 7
...harmful interference to radio or television reception, which the receiver is no guarantee that are designed to radio communications. Wash hands after handling. COOLPIX P90 CAUTIONS Modifications The FCC requires the user to be determined by turning the equipment off and on, the user is encouraged to try ...equipment generates, uses, and can be notified that any changes or modifications made to this product will not occur in a particular installation. Nikon Inc., 1300 Walt Whitman Road Melville, New York 11747-3064 USA Tel: 631-547-4200 v These limits are not expressly approved by...
...harmful interference to radio or television reception, which the receiver is no guarantee that are designed to radio communications. Wash hands after handling. COOLPIX P90 CAUTIONS Modifications The FCC requires the user to be determined by turning the equipment off and on, the user is encouraged to try ...equipment generates, uses, and can be notified that any changes or modifications made to this product will not occur in a particular installation. Nikon Inc., 1300 Walt Whitman Road Melville, New York 11747-3064 USA Tel: 631-547-4200 v These limits are not expressly approved by...
P90 User's Manual
Page 8
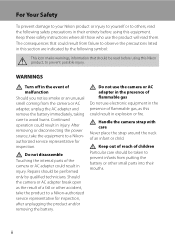
vi Notice for customers in Europe This symbol indicates that the battery is to be collected separately. Do not dispose of as household waste. • For more information, contact the retailer or the local authorities in charge of waste management. Notices Notice for customers in Canada CAUTION This Class B digital apparatus complies with this product is to be collected separately. This symbol on the battery indicates that this symbol or not, are designated for separate collection at an appropriate collection point. Do not dispose of as household waste. • For ...
vi Notice for customers in Europe This symbol indicates that the battery is to be collected separately. Do not dispose of as household waste. • For more information, contact the retailer or the local authorities in charge of waste management. Notices Notice for customers in Canada CAUTION This Class B digital apparatus complies with this product is to be collected separately. This symbol on the battery indicates that this symbol or not, are designated for separate collection at an appropriate collection point. Do not dispose of as household waste. • For ...

P90 User's Manual
Page 9
Table of Contents For Your Safety ...ii WARNINGS ...ii Notices ...v Introduction ...1 About This Manual ...1 Information and Precautions ...2 Parts of the Camera ...4 The Camera Body...4 Changing the Angle of the Monitor ...6 Raising and Lowering the Built-in Flash 7 Attaching the Camera Strap and Lens Cap 7 The Monitor...8 Basic Operations...10 The Mode Dial...10 The Command Dial...11 The Multi Selector ...12 The d Button...13 Switching Between Tabs...13 Help Displays ...14 The x (monitor) Button ...14 The s (display) Button ...15 First Steps ...16 Charging the Battery ...16 Inserting the ...
Table of Contents For Your Safety ...ii WARNINGS ...ii Notices ...v Introduction ...1 About This Manual ...1 Information and Precautions ...2 Parts of the Camera ...4 The Camera Body...4 Changing the Angle of the Monitor ...6 Raising and Lowering the Built-in Flash 7 Attaching the Camera Strap and Lens Cap 7 The Monitor...8 Basic Operations...10 The Mode Dial...10 The Command Dial...11 The Multi Selector ...12 The d Button...13 Switching Between Tabs...13 Help Displays ...14 The x (monitor) Button ...14 The s (display) Button ...15 First Steps ...16 Charging the Battery ...16 Inserting the ...

P90 User's Manual
Page 10
Table of Contents Using Focus Mode ...36 Setting the Focus Mode ...37 Using Manual Focus...38 Exposure Compensation ...39 y/x Shooting Suited for the Scenes 40 Shooting in Scene Mode ...40 Setting the Scene Mode...40 Features...41 Taking Pictures in Food Mode ...48 Taking Pictures for a Panorama ...50 Shooting in the Scene Mode Selected by the Camera (Scene Auto Selector 52 a/y Automatic Shooting of Smiling Faces 54 Using Smile Timer/Blink Proof...54 Notes on Blink Proof...55 d Sport Continuous Mode ...56 Shooting in Sport Continuous Mode 56 Sport Continuous Menu ...58 Shoot pictures using...
Table of Contents Using Focus Mode ...36 Setting the Focus Mode ...37 Using Manual Focus...38 Exposure Compensation ...39 y/x Shooting Suited for the Scenes 40 Shooting in Scene Mode ...40 Setting the Scene Mode...40 Features...41 Taking Pictures in Food Mode ...48 Taking Pictures for a Panorama ...50 Shooting in the Scene Mode Selected by the Camera (Scene Auto Selector 52 a/y Automatic Shooting of Smiling Faces 54 Using Smile Timer/Blink Proof...54 Notes on Blink Proof...55 d Sport Continuous Mode ...56 Shooting in Sport Continuous Mode 56 Sport Continuous Menu ...58 Shoot pictures using...

P90 User's Manual
Page 11
Comp...125 ix Table of Contents Playing Voice Memos ...80 Deleting Voice Memos...80 D Movies ...81 Recording Movies ...81 The Movie Menu...82 D Selecting Movie Options ...82 I Autofocus Mode ...83 w Electronic VR...84 Time-Lapse Movies...84 Movie Playback ...86 Deleting Movie Files...86 E Voice Recordings...87 Making Voice Recordings...87 Playing Voice Recordings ...89 Deleting Sound Files...90 Copying Voice Recordings ...91 Connecting to Televisions, Computers and Printers 92 Connecting to a TV...92 Connecting to a Computer...93 Before Connecting the Camera ...93 Transferring Pictures from ...
Comp...125 ix Table of Contents Playing Voice Memos ...80 Deleting Voice Memos...80 D Movies ...81 Recording Movies ...81 The Movie Menu...82 D Selecting Movie Options ...82 I Autofocus Mode ...83 w Electronic VR...84 Time-Lapse Movies...84 Movie Playback ...86 Deleting Movie Files...86 E Voice Recordings...87 Making Voice Recordings...87 Playing Voice Recordings ...89 Deleting Sound Files...90 Copying Voice Recordings ...91 Connecting to Televisions, Computers and Printers 92 Connecting to a TV...92 Connecting to a Computer...93 Before Connecting the Camera ...93 Transferring Pictures from ...

P90 User's Manual
Page 12
Table of Contents M Noise Reduction...126 Q Distortion Control ...126 Functions that Cannot be Applied Simultaneously 127 Playback Options: The Playback Menu 129 Displaying the Playback Menu...129 b Slide Show...131 c Delete...132 d Protect ...132 f Rotate Image...133 i Hide Image...133 h Copy...134 Basic Camera Setup: The Setup Menu 135 Displaying the Setup Menu...136 c Welcome Screen...137 d Date...138 e Monitor Settings ...141 f Date Imprint ...142 g Vibration Reduction...143 U Motion Detection...144 h AF Assist ...145 u Digital Zoom ...145 i Sound Settings ...146 k Auto Off...146 l/m ...
Table of Contents M Noise Reduction...126 Q Distortion Control ...126 Functions that Cannot be Applied Simultaneously 127 Playback Options: The Playback Menu 129 Displaying the Playback Menu...129 b Slide Show...131 c Delete...132 d Protect ...132 f Rotate Image...133 i Hide Image...133 h Copy...134 Basic Camera Setup: The Setup Menu 135 Displaying the Setup Menu...136 c Welcome Screen...137 d Date...138 e Monitor Settings ...141 f Date Imprint ...142 g Vibration Reduction...143 U Motion Detection...144 h AF Assist ...145 u Digital Zoom ...145 i Sound Settings ...146 k Auto Off...146 l/m ...

P90 User's Manual
Page 13
...more A information is available elsewhere in this manual or in the Quick Start Guide. C Memory Cards Pictures taken with your purchase of a Nikon COOLPIX P90 digital camera. Symbols and Conventions To make it easier to find the information you need, the following symbols and conventions are used to store ... should be read it where all those who use , to prevent damage to the camera. This manual was written to help you for your Nikon digital camera. Notations • A Secure Digital (SD) memory card is referred to the pictures on removable memory cards. The memory card must...
...more A information is available elsewhere in this manual or in the Quick Start Guide. C Memory Cards Pictures taken with your purchase of a Nikon COOLPIX P90 digital camera. Symbols and Conventions To make it easier to find the information you need, the following symbols and conventions are used to store ... should be read it where all those who use , to prevent damage to the camera. This manual was written to help you for your Nikon digital camera. Notations • A Secure Digital (SD) memory card is referred to the pictures on removable memory cards. The memory card must...

P90 User's Manual
Page 14
... every effort was made to the highest standards and include complex electronic circuitry. See the URL below for contact information: http://imaging.nikon.com/ Use Only Nikon Brand Electronic Accessories Nikon COOLPIX cameras are engineered and proven to operate within the operational and safety requirements of third-party rechargeable Li-ion batteries not bearing...
... every effort was made to the highest standards and include complex electronic circuitry. See the URL below for contact information: http://imaging.nikon.com/ Use Only Nikon Brand Electronic Accessories Nikon COOLPIX cameras are engineered and proven to operate within the operational and safety requirements of third-party rechargeable Li-ion batteries not bearing...

P90 User's Manual
Page 15
Care should be punishable by law. • Items prohibited by law from discarded storage devices using commercial deletion software, or format the device and then completely refill it with copyright notices The copying or reproduction of copyrighted creative works such as memory cards or built-in camera memory does not completely erase the original image data. Also, do not copy or reproduce passports issued by the government, licenses issued by public agencies and private groups, ID cards and tickets, such as passes and meal coupons. • Comply with images containing no ...
Care should be punishable by law. • Items prohibited by law from discarded storage devices using commercial deletion software, or format the device and then completely refill it with copyright notices The copying or reproduction of copyrighted creative works such as memory cards or built-in camera memory does not completely erase the original image data. Also, do not copy or reproduce passports issued by the government, licenses issued by public agencies and private groups, ID cards and tickets, such as passes and meal coupons. • Comply with images containing no ...

P90 User's Manual
Page 16
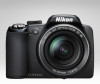
Introduction Parts of the Camera The Camera Body 12 6 7 8 Built-in flash raised 3 45 9 10 11 12 13 1 Power switch/Power-on lamp 19, 146 2 Mode dial 10 3 Built-in microphone 80, 81, 87 4 Built-in flash 7, 32 5 m (Flash pop-up) button 7, 33 6 Eyelet for camera strap (at 2 places 7 7 Connector cover 92, 94, 98 8 Cable connector 92, 94, 98 9 Power connector cover 155 10 Shutter-release button 28 Zoom control 27 f : Wide 27 11 g : Tele 27 h : Thumbnail playback 71 i : Playback zoom 73 j : Help 14 12 Self-timer lamp 35 AF-assist illuminator 145 13 Lens ...
Introduction Parts of the Camera The Camera Body 12 6 7 8 Built-in flash raised 3 45 9 10 11 12 13 1 Power switch/Power-on lamp 19, 146 2 Mode dial 10 3 Built-in microphone 80, 81, 87 4 Built-in flash 7, 32 5 m (Flash pop-up) button 7, 33 6 Eyelet for camera strap (at 2 places 7 7 Connector cover 92, 94, 98 8 Cable connector 92, 94, 98 9 Power connector cover 155 10 Shutter-release button 28 Zoom control 27 f : Wide 27 11 g : Tele 27 h : Thumbnail playback 71 i : Playback zoom 73 j : Help 14 12 Self-timer lamp 35 AF-assist illuminator 145 13 Lens ...

P90 User's Manual
Page 17
Introduction Parts of the Camera 12 34 5 13 14 15 6 7 8 9 10 11 12 16 17 18 1 x (monitor) button 14 2 Diopter adjustment control 14 3 Electronic viewfinder 14 4 s (display) button 15 5 Command dial 11 6 Speaker 80, 86, 89 7 Monitor 8, 15, 25 8 c (playback) button 30 9 d button...... 13, 40, 82, 106, 129, 136 10 Multi selector 12 11 l (delete) button......... 30, 31, 80, 86, 90 12 k (apply selection) button 12 13 Tripod socket 14 Battery-chamber/ memory card slot cover 18, 22 15 Cover latch 18, 22 16 Memory card slot 22 17 Battery latch 18, 19 18 Battery chamber...
Introduction Parts of the Camera 12 34 5 13 14 15 6 7 8 9 10 11 12 16 17 18 1 x (monitor) button 14 2 Diopter adjustment control 14 3 Electronic viewfinder 14 4 s (display) button 15 5 Command dial 11 6 Speaker 80, 86, 89 7 Monitor 8, 15, 25 8 c (playback) button 30 9 d button...... 13, 40, 82, 106, 129, 136 10 Multi selector 12 11 l (delete) button......... 30, 31, 80, 86, 90 12 k (apply selection) button 12 13 Tripod socket 14 Battery-chamber/ memory card slot cover 18, 22 15 Cover latch 18, 22 16 Memory card slot 22 17 Battery latch 18, 19 18 Battery chamber...

P90 User's Manual
Page 18
Introduction Parts of the Camera Changing the Angle of the Monitor The angle of the monitor. • The monitor cannot be lowered down to 45° or raised upward to 90°. B Notes on Monitor • Do not apply excessive force when changing the angle of the monitor can be moved horizontally. • Put the monitor back in the original position when using in normal situations. 6 This is convenient when taking pictures with the camera held at high or low positions.
Introduction Parts of the Camera Changing the Angle of the Monitor The angle of the monitor. • The monitor cannot be lowered down to 45° or raised upward to 90°. B Notes on Monitor • Do not apply excessive force when changing the angle of the monitor can be moved horizontally. • Put the monitor back in the original position when using in normal situations. 6 This is convenient when taking pictures with the camera held at high or low positions.

P90 User's Manual
Page 19
Attaching the Camera Strap and Lens Cap Attach the lens cap to the strap, and then attach the strap to raise the built-in flash. • When not using the built-in Flash Press the m (flash pop-up) button to the camera (at two places). Introduction Parts of the Camera Raising and Lowering the Built-in flash, gently push the flash down until it clicks shut. B Lens Cap • Remove the lens cap before you shoot a picture. • At times when you will not be shooting pictures such as when the power is off, or while you are carrying the camera, attach the lens cap to the camera to ...
Attaching the Camera Strap and Lens Cap Attach the lens cap to the strap, and then attach the strap to raise the built-in flash. • When not using the built-in Flash Press the m (flash pop-up) button to the camera (at two places). Introduction Parts of the Camera Raising and Lowering the Built-in flash, gently push the flash down until it clicks shut. B Lens Cap • Remove the lens cap before you shoot a picture. • At times when you will not be shooting pictures such as when the power is off, or while you are carrying the camera, attach the lens cap to the camera to ...
P90 User's Manual
Page 20
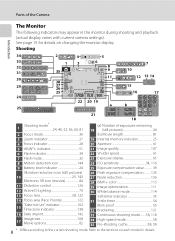
Refer to the current shooting mode. Shooting 34 2 4 5 33 13 6 7 32 31 35 8 9 10 30 28 11 12 13 14 29 27 26 15 25 16 17 24 1/125 F2.8 999 22 20 19 a b 23 999 1m00s 21 9999 1m00s 18 Shooting mode* 1 24, 40, 52, 56, 60, 81 2 Focus mode 36 3 Zoom indicator 27 4 Focus indicator 28 5 AE/AF-L indicator 51 6 Flash indicator 34 7 Flash mode 32 8 Motion detection icon 144 9 Battery level indicator 24 Vibration reduction icon (still pictures) 10 25, 143 Electronic VR icon (movies 84 11 Distortion control 126 12 Active D-Lighting 70 13 Focus area 28...
Refer to the current shooting mode. Shooting 34 2 4 5 33 13 6 7 32 31 35 8 9 10 30 28 11 12 13 14 29 27 26 15 25 16 17 24 1/125 F2.8 999 22 20 19 a b 23 999 1m00s 21 9999 1m00s 18 Shooting mode* 1 24, 40, 52, 56, 60, 81 2 Focus mode 36 3 Zoom indicator 27 4 Focus indicator 28 5 AE/AF-L indicator 51 6 Flash indicator 34 7 Flash mode 32 8 Motion detection icon 144 9 Battery level indicator 24 Vibration reduction icon (still pictures) 10 25, 143 Electronic VR icon (movies 84 11 Distortion control 126 12 Active D-Lighting 70 13 Focus area 28...
P90 User's Manual
Page 21
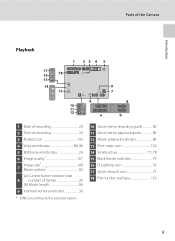
Parts of the Camera Introduction Playback 1 23 4 5 17 16 15/05/2009 12:00 18 9999.JPG 15 14 13 6 7 999/ 999 9 8 10 999/ 999 1m00s 11 12 9999/9999 a 1m00s b 1 Date of recording 20 2 Time of recording 20 3 Protect icon 132 4 Volume indicator 80, 86 5 Battery level indicator 24 6 Image quality 107 Image size 108 7 Movie options 82 (a) Current frame number/ total 8 number of frames 30 (b) Movie length 86 9 Internal memory indicator 30 * Differs according to the selected option. 10 Voice memo recording guide 80 11 Voice memo playback guide 80 12 Movie playback ...
Parts of the Camera Introduction Playback 1 23 4 5 17 16 15/05/2009 12:00 18 9999.JPG 15 14 13 6 7 999/ 999 9 8 10 999/ 999 1m00s 11 12 9999/9999 a 1m00s b 1 Date of recording 20 2 Time of recording 20 3 Protect icon 132 4 Volume indicator 80, 86 5 Battery level indicator 24 6 Image quality 107 Image size 108 7 Movie options 82 (a) Current frame number/ total 8 number of frames 30 (b) Movie length 86 9 Internal memory indicator 30 * Differs according to the selected option. 10 Voice memo recording guide 80 11 Voice memo playback guide 80 12 Movie playback ...
