
P90 User's Manual
Page 9
... ...2 Parts of the Camera ...4 The Camera Body...4 Changing the Angle of the Monitor ...6 Raising and Lowering the Built-in Flash 7 Attaching the Camera Strap and Lens Cap 7 The Monitor...8 Basic Operations...10 The Mode Dial...10 The Command Dial...11 The Multi Selector ...12 The d Button...13 Switching Between Tabs...13 Help...
... ...2 Parts of the Camera ...4 The Camera Body...4 Changing the Angle of the Monitor ...6 Raising and Lowering the Built-in Flash 7 Attaching the Camera Strap and Lens Cap 7 The Monitor...8 Basic Operations...10 The Mode Dial...10 The Command Dial...11 The Multi Selector ...12 The d Button...13 Switching Between Tabs...13 Help...

P90 User's Manual
Page 19
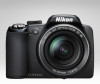
...; At times when you will not be shooting pictures such as when the power is off, or while you are carrying the camera, attach the lens cap to the camera to the camera (at two places). Introduction Parts of the Camera Raising and Lowering the Built-in Flash Press the m (flash pop...
...; At times when you will not be shooting pictures such as when the power is off, or while you are carrying the camera, attach the lens cap to the camera to the camera (at two places). Introduction Parts of the Camera Raising and Lowering the Built-in Flash Press the m (flash pop...

P90 User's Manual
Page 31
...battery, open the battery-chamber/ memory card slot cover and slide the orange battery latch in playback mode (A30). • If Lens error is displayed, check that the lens cap has been removed and turn the camera on again. If no operations are performed for about a minute (default setting), the monitor... on in the direction shown 1. D Auto Power Off while in the setup menu (A135). 19 Turning On and Off the Camera Remove the lens cap before the camera enters standby mode can then be changed from the Auto off option (A146) in Shooting Mode (Standby Mode) If no operations ...
...battery, open the battery-chamber/ memory card slot cover and slide the orange battery latch in playback mode (A30). • If Lens error is displayed, check that the lens cap has been removed and turn the camera on again. If no operations are performed for about a minute (default setting), the monitor... on in the direction shown 1. D Auto Power Off while in the setup menu (A135). 19 Turning On and Off the Camera Remove the lens cap before the camera enters standby mode can then be changed from the Auto off option (A146) in Shooting Mode (Standby Mode) If no operations ...

P90 User's Manual
Page 32
... "The Multi Selector" (A12) 3 Choose Yes and press the k button. • If No is selected, the date and time will turn on. • Remove the lens cap. To turn off the daylight saving time option, press I. 20 Back London Casablanca Back First Steps 2 Use the multi selector to select your home time...
... "The Multi Selector" (A12) 3 Choose Yes and press the k button. • If No is selected, the date and time will turn on. • Remove the lens cap. To turn off the daylight saving time option, press I. 20 Back London Casablanca Back First Steps 2 Use the multi selector to select your home time...

P90 User's Manual
Page 33
..., and follow the procedure described in step 5 above. • Select Time zone from Date (A138) in the setup menu (A135) to shooting mode. • The lens will extend at this time. D Changing the Date and Time • Select Date from Date in the following order. D (day) ➝ M (month) ➝ Y (year) ➝... zone and daylight saving time settings (A138). 21 Date D M Y 01 01 2009 00 00 Edit Date D M Y 15 05 2009 15 10 Edit 7 Check that the lens cap is removed, and press the k button. • The settings are displayed.
..., and follow the procedure described in step 5 above. • Select Time zone from Date (A138) in the setup menu (A135) to shooting mode. • The lens will extend at this time. D Changing the Date and Time • Select Date from Date in the following order. D (day) ➝ M (month) ➝ Y (year) ➝... zone and daylight saving time settings (A138). 21 Date D M Y 01 01 2009 00 00 Edit Date D M Y 15 05 2009 15 10 Edit 7 Check that the lens cap is removed, and press the k button. • The settings are displayed.

P90 User's Manual
Page 36
... replace the battery. Recharge or replace with a fully-charged battery. Basic Photography and Playback: Auto Mode 2 Remove the lens cap and press the power switch. • The power will be turned on, and the lens will extend. • The power-on lamp (green) will light for a moment and the monitor will be stored...
... replace the battery. Recharge or replace with a fully-charged battery. Basic Photography and Playback: Auto Mode 2 Remove the lens cap and press the power switch. • The power will be turned on, and the lens will extend. • The power-on lamp (green) will light for a moment and the monitor will be stored...

P90 User's Manual
Page 167
... could cause damage to the Nikon website for the latest information on the above cards. Operation is not guaranteed with a card reader or similar device, check that device supports SDHC. Technical Notes 155 USB Cable UC-E6 Audio Video Cable EG-CP14 Lens Cap LC-CP19 Approved Memory Cards ...Li-ion Battery EN-EL5 Battery charger Battery Charger MH-61 AC Adapter EH-62A (connect as shown) 1 2 3 AC adapter USB cable A/V cable Lens cap Ensure that device supports 2 GB cards. *2 SDHC-compliant. If the memory card will be used with a card reader or similar device, check that the...
... could cause damage to the Nikon website for the latest information on the above cards. Operation is not guaranteed with a card reader or similar device, check that device supports SDHC. Technical Notes 155 USB Cable UC-E6 Audio Video Cable EG-CP14 Lens Cap LC-CP19 Approved Memory Cards ...Li-ion Battery EN-EL5 Battery charger Battery Charger MH-61 AC Adapter EH-62A (connect as shown) 1 2 3 AC adapter USB cable A/V cable Lens cap Ensure that device supports 2 GB cards. *2 SDHC-compliant. If the memory card will be used with a card reader or similar device, check that the...

P90 User's Manual
Page 176
...to raise the flash. This file cannot be viewed on again. The built-in flash. If error persists, contact retailer or 19 Nikon-authorized service representative. P Communications error USB cable disconnected during the Night portrait or Backlight scene Press the m (flash pop-up) button...131 show. The built-in flash is not raised during printing. Turn camera off , Lens error. lowered if you do not wish to - remove the lens cap, and turn the camera on.) Remove lens cap if still attached, and turn the camera off and reconnect cable. 94, 98 Technical ...
...to raise the flash. This file cannot be viewed on again. The built-in flash. If error persists, contact retailer or 19 Nikon-authorized service representative. P Communications error USB cable disconnected during the Night portrait or Backlight scene Press the m (flash pop-up) button...131 show. The built-in flash is not raised during printing. Turn camera off , Lens error. lowered if you do not wish to - remove the lens cap, and turn the camera on.) Remove lens cap if still attached, and turn the camera off and reconnect cable. 94, 98 Technical ...

P90 User's Manual
Page 189
... Infinity 36 Internal memory 22 Internal memory indicator 25 Interval Timer Shooting 118, 119 INTN 156 ISO sensitivity 34, 116 L Landscape c 41 Language 148 Lens 4, 172 Lens cap 7 Li-ion rechargable battery 18 Lithium-ion type battery 18 M Macro close-up 36 Manual focus 36, 38 Manual Mode 65 Memory capacity 24 Memory... playback 86 Movie recording 81 Movie settings 82 Multi selector 12 Multi-shot 16 118 Museum l 45 Technical Notes N Night landscape j 44 Night portrait e 42 Nikon Transfer 94 177
... Infinity 36 Internal memory 22 Internal memory indicator 25 Interval Timer Shooting 118, 119 INTN 156 ISO sensitivity 34, 116 L Landscape c 41 Language 148 Lens 4, 172 Lens cap 7 Li-ion rechargable battery 18 Lithium-ion type battery 18 M Macro close-up 36 Manual focus 36, 38 Manual Mode 65 Memory capacity 24 Memory... playback 86 Movie recording 81 Movie settings 82 Multi selector 12 Multi-shot 16 118 Museum l 45 Technical Notes N Night landscape j 44 Night portrait e 42 Nikon Transfer 94 177


