
User Manual
Page 24
... 62 (a) Current frame number/total 12 number of frames 34 (b) Movie length 168 13 Internal memory indicator 34 Easy panorama playback guide .......... 62 14 Sequence playback guide 113 Movie playback guide 168 15 Black border 155 16 Filter effects icon 152 17 Skin softening icon 150 18 Print order icon 135 19 Small...
... 62 (a) Current frame number/total 12 number of frames 34 (b) Movie length 168 13 Internal memory indicator 34 Easy panorama playback guide .......... 62 14 Sequence playback guide 113 Movie playback guide 168 15 Black border 155 16 Filter effects icon 152 17 Skin softening icon 150 18 Print order icon 135 19 Small...
User Manual
Page 26
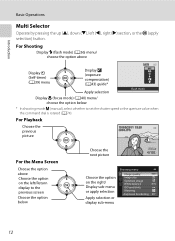
... picture 15/05/2011 15:30 0004.JPG For the Menu Screen Choose the option above Display n (Self-timer) (A39) menu Display o (exposure compensation) (A43) guide* Apply selection Flash mode Display D (focus mode) (A40) menu/ choose the option below * In shooting mode m (manual), select whether to the previous screen Choose the...
... picture 15/05/2011 15:30 0004.JPG For the Menu Screen Choose the option above Display n (Self-timer) (A39) menu Display o (exposure compensation) (A43) guide* Apply selection Flash mode Display D (focus mode) (A40) menu/ choose the option below * In shooting mode m (manual), select whether to the previous screen Choose the...

User Manual
Page 31
... playback, press the s (display) button. For Shooting Basic Operations Introduction 1/250 F5.6 1342 Display information Display the picture and the shooting information. Use highlights as a guide when setting exposure. 2 The histogram is chosen. 17 j is displayed when the shooting mode A, y, j, e, o, F or j is a bar graph that are highlighted) blink. Information hidden Display...
... playback, press the s (display) button. For Shooting Basic Operations Introduction 1/250 F5.6 1342 Display information Display the picture and the shooting information. Use highlights as a guide when setting exposure. 2 The histogram is chosen. 17 j is displayed when the shooting mode A, y, j, e, o, F or j is a bar graph that are highlighted) blink. Information hidden Display...

User Manual
Page 57
... Value • The exposure compensation value applied in j, k or l mode is displayed with dark tones to 0.0. Use as a guide when using exposure compensation and shooting without the flash. • The horizontal axis corresponds to pixel brightness, with the H indicator on ...the multi selector. • The exposure compensation guide and histogram are displayed. 2 Press the multi selector H or I to select a Exposure compensation guide compensation value. • To make the image brighter, apply positive (+) exposure compensation. •...
... Value • The exposure compensation value applied in j, k or l mode is displayed with dark tones to 0.0. Use as a guide when using exposure compensation and shooting without the flash. • The horizontal axis corresponds to pixel brightness, with the H indicator on ...the multi selector. • The exposure compensation guide and histogram are displayed. 2 Press the multi selector H or I to select a Exposure compensation guide compensation value. • To make the image brighter, apply positive (+) exposure compensation. •...

User Manual
Page 75
...arc. • Move the camera from end to start shooting. • When the camera detects the panorama direction, the shooting starts. • The guide showing the current shooting point is 360°. 61 More on Shooting Shooting Suited to Scenes (Scene Mode) 5 Frame the first portion of the panorama... and press the shutter-release button halfway to adjust the focus. • The zoom is fixed at the wide-angle position. • The framing guide is displayed on the screen. • The camera focuses on the subject at the center of the 1/250 F5.6 1342 frame. • Exposure compensation...
...arc. • Move the camera from end to start shooting. • When the camera detects the panorama direction, the shooting starts. • The guide showing the current shooting point is 360°. 61 More on Shooting Shooting Suited to Scenes (Scene Mode) 5 Frame the first portion of the panorama... and press the shutter-release button halfway to adjust the focus. • The zoom is fixed at the wide-angle position. • The framing guide is displayed on the screen. • The camera focuses on the subject at the center of the 1/250 F5.6 1342 frame. • Exposure compensation...

User Manual
Page 132
... delete the picture(s). Move the display area Press the multi selector H, I, J or K to move the display area to other areas of the picture. • The guide at lower right shows which portion is enlarged. 3.0 The following operations can be performed while pictures are zoomed in. When using favorite pictures mode (A122...
... delete the picture(s). Move the display area Press the multi selector H, I, J or K to move the display area to other areas of the picture. • The guide at lower right shows which portion is enlarged. 3.0 The following operations can be performed while pictures are zoomed in. When using favorite pictures mode (A122...

User Manual
Page 187
...and Printers Connecting to a Computer Use the supplied USB cable to connect the camera to a computer and copy (transfer) images to the Nikon website for the latest information on the computer. Saved images can join a series of power to the camera, causing damage to create a ... memory card. Refer to the documentation supplied with the camera on installing the software, refer to the Quick Start Guide. • ViewNX 2: Use the image transfer feature "Nikon Transfer 2" to the computer could result in the ViewNX 2 help information (A177). Before Connecting the Camera Install ...
...and Printers Connecting to a Computer Use the supplied USB cable to connect the camera to a computer and copy (transfer) images to the Nikon website for the latest information on the computer. Saved images can join a series of power to the camera, causing damage to create a ... memory card. Refer to the documentation supplied with the camera on installing the software, refer to the Quick Start Guide. • ViewNX 2: Use the image transfer feature "Nikon Transfer 2" to the computer could result in the ViewNX 2 help information (A177). Before Connecting the Camera Install ...
User Manual
Page 227
If part of the cord runs out of the Quick Start Guide). 2 When using in the battery chamber. USB Cable UC-E61 Audio Video Cable EG-CP161 Lens cap LC-CP231 1 Supplied with the camera at the ...
If part of the cord runs out of the Quick Start Guide). 2 When using in the battery chamber. USB Cable UC-E61 Audio Video Cable EG-CP161 Lens cap LC-CP231 1 Supplied with the camera at the ...

User Manual
Page 28
... 51 (a) Current image number/total 13 number of images 34 (b) Movie length 100 14 Internal memory indicator 34 Easy panorama playback guide .....E5 15 Sequence playback guide E13 Movie playback guide 100 16 Volume indicator 88, 100 17 Black border indicator 88 18 D-Lighting icon 88 19 Quick retouch icon 88 20 Filter...
... 51 (a) Current image number/total 13 number of images 34 (b) Movie length 100 14 Internal memory indicator 34 Easy panorama playback guide .....E5 15 Sequence playback guide E13 Movie playback guide 100 16 Volume indicator 88, 100 17 Black border indicator 88 18 D-Lighting icon 88 19 Quick retouch icon 88 20 Filter...

User Manual
Page 30
... to set the aperture value*/Select an item Display m (flash mode) (A66) menu Display n (Self-timer/ Smile timer) menu (A69, 70) Display the o (exposure compensation) guide (A74) Auto Apply selection Display D (focus mode) menu (A72) * The aperture value can be set in shooting mode l or m (A59). When Using Playback Mode Select...
... to set the aperture value*/Select an item Display m (flash mode) (A66) menu Display n (Self-timer/ Smile timer) menu (A69, 70) Display the o (exposure compensation) guide (A74) Auto Apply selection Display D (focus mode) menu (A72) * The aperture value can be set in shooting mode l or m (A59). When Using Playback Mode Select...

User Manual
Page 53
... the d button (E22). • Press the k button to return to find the image you can change the number of Shooting and Playback 4/ 132 f (h) Display position guide Image is zoomed in on one screen, making it easy to full-frame playback mode.
... the d button (E22). • Press the k button to return to find the image you can change the number of Shooting and Playback 4/ 132 f (h) Display position guide Image is zoomed in on one screen, making it easy to full-frame playback mode.
User Manual
Page 71
... Pictures When viewing 3D pictures on the camera monitor. Scene Mode (Shooting Suited to simulate a three-dimensional image. Carefully read the documentation included with the guide on the monitor at the center of view (i.e., the area visible in the frame) seen in 35mm [135] format. • The angle of the frame...
... Pictures When viewing 3D pictures on the camera monitor. Scene Mode (Shooting Suited to simulate a three-dimensional image. Carefully read the documentation included with the guide on the monitor at the center of view (i.e., the area visible in the frame) seen in 35mm [135] format. • The angle of the frame...

User Manual
Page 92
Exposure compensation guide +0.3 0.0 Exposure compensation Histogram Exposure compensation value 3 Press the k button. • If the k button is not pressed within a few seconds, the selection is set and the ...
Exposure compensation guide +0.3 0.0 Exposure compensation Histogram Exposure compensation value 3 Press the k button. • If the k button is not pressed within a few seconds, the selection is set and the ...

User Manual
Page 93
... cannot be used in each shooting mode are described below. • Similar information about scene mode can be found on the next page. Use as a guide when using exposure compensation and shooting without the flash. • The horizontal axis corresponds to pixel brightness, with certain features (A80). 75 List of pixels...
... cannot be used in each shooting mode are described below. • Similar information about scene mode can be found on the next page. Use as a guide when using exposure compensation and shooting without the flash. • The horizontal axis corresponds to pixel brightness, with certain features (A80). 75 List of pixels...

User Manual
Page 110
...the European release). • Click Next to display the installation window. 3 Start the installer. • We recommend clicking Installation Guide in the installation window to check the installation help information and system requirements before installing ViewNX 2. • Click Typical Installation (Recommended... CD from the CD-ROM drive. 92 The following software is displayed. • Windows: Click Yes. • Mac OS: Click OK. Nikon Movie Editor: For basic editing of transferred movies • Panorama Maker 6 (for creating a single panorama photo using a series of the three ...
...the European release). • Click Next to display the installation window. 3 Start the installer. • We recommend clicking Installation Guide in the installation window to check the installation help information and system requirements before installing ViewNX 2. • Click Typical Installation (Recommended... CD from the CD-ROM drive. 92 The following software is displayed. • Windows: Click Yes. • Mac OS: Click OK. Nikon Movie Editor: For basic editing of transferred movies • Panorama Maker 6 (for creating a single panorama photo using a series of the three ...

User Manual
Page 133
... Pictures with Easy Panorama Rotate the mode dial to adjust the focus. • The zoom is fixed at the wide-angle position. • The framing guide is displayed on the monitor. 25m 0s • The camera focuses on the subject at the center of the moving direction and W × H are as...
... Pictures with Easy Panorama Rotate the mode dial to adjust the focus. • The zoom is fixed at the wide-angle position. • The framing guide is displayed on the monitor. 25m 0s • The camera focuses on the subject at the center of the moving direction and W × H are as...

User Manual
Page 134
... ends in an error. • Panorama pictures are displayed. 5 Move the camera straight and slowly in one of the four directions to end of the guide, horizontally or vertically in an arc. • If about 15 seconds (in W Normal (180°)) or 30 seconds (in X Wide (360°)) pass... from the start shooting. • When the camera detects the panorama direction, the shooting starts. • The guide showing the current shooting point is not shot will be recorded as a gray area. E4 Using Easy Panorama (Shooting and Playing back) 4 Press the shutter...
... ends in an error. • Panorama pictures are displayed. 5 Move the camera straight and slowly in one of the four directions to end of the guide, horizontally or vertically in an arc. • If about 15 seconds (in W Normal (180°)) or 30 seconds (in X Wide (360°)) pass... from the start shooting. • When the camera detects the panorama direction, the shooting starts. • The guide showing the current shooting point is not shot will be recorded as a gray area. E4 Using Easy Panorama (Shooting and Playing back) 4 Press the shutter...

User Manual
Page 138
...and then adjust each eye to simulate a three-dimensional image on the monitor. 3 Move the camera horizontally to the right until the translucent guide is aligned with the guide within ten seconds. Rotate the mode dial to y M d button M s 3D photography 1 Frame the subject. • The focus ...area that the subject is aligned with the guide. • Shooting is canceled if the subject is not aligned with the subject. • To cancel shooting, press the k button. Focus mode (A (Autofocus)...
...and then adjust each eye to simulate a three-dimensional image on the monitor. 3 Move the camera horizontally to the right until the translucent guide is aligned with the guide within ten seconds. Rotate the mode dial to y M d button M s 3D photography 1 Frame the subject. • The focus ...area that the subject is aligned with the guide. • Shooting is canceled if the subject is not aligned with the subject. • To cancel shooting, press the k button. Focus mode (A (Autofocus)...

User Manual
Page 139
... in the saved picture will be played back in 3D on a 3D-compatible TV or monitor for an extended period of time, you align the guide with the subject, try shooting with your TV or monitor to 3D photography. E9 Reference Section Carefully read the documentation included with the shutter-release...
... in the saved picture will be played back in 3D on a 3D-compatible TV or monitor for an extended period of time, you align the guide with the subject, try shooting with your TV or monitor to 3D photography. E9 Reference Section Carefully read the documentation included with the shutter-release...

User Manual
Page 170
... greatest weight to meter off -center subjects. r Spot The camera meters the area shown by the circle when shooting. Recommended for Metering, the metering range guide (A8) is displayed (except when digital zoom is known as "metering." Can be used ). Ensure that the subject is lighter or darker than the background...
... greatest weight to meter off -center subjects. r Spot The camera meters the area shown by the circle when shooting. Recommended for Metering, the metering range guide (A8) is displayed (except when digital zoom is known as "metering." Can be used ). Ensure that the subject is lighter or darker than the background...


