
Reference Manual
Page 12
... Should the monitor break, care should any of these symptoms occur and consult a physician if necessary. x Observe caution when using the flash Using the flash close to your subject's eyes could cause hearing loss or damage the equipment. Turn the power off when using while in a hospital.... CD player could cause temporary visual impairment. Playing CD-ROMs on audio CD equipment. Particular care should be observed if photographing infants, when the flash should not be no less than 1 m (3 ft 4 in.) from the monitor touching the skin or entering the eyes or mouth. Introduction...
... Should the monitor break, care should any of these symptoms occur and consult a physician if necessary. x Observe caution when using the flash Using the flash close to your subject's eyes could cause hearing loss or damage the equipment. Turn the power off when using while in a hospital.... CD player could cause temporary visual impairment. Playing CD-ROMs on audio CD equipment. Particular care should be observed if photographing infants, when the flash should not be no less than 1 m (3 ft 4 in.) from the monitor touching the skin or entering the eyes or mouth. Introduction...
Reference Manual
Page 15
... iv For Your Safety vii WARNINGS vii Notices xi Parts of the Camera 1 The Camera Body 2 Attaching the Camera Strap 4 Raising and Lowering the Flash 5 Using Menus (d Button 6 The Monitor 8 Shooting Mode 8 Playback Mode 10 The Basics of Shooting and Playback ... 13 Preparation 1 Insert the ...Using Skin Softening 50 A (Auto) Mode 51 Features That Can Be Set Using the Multi Selector 52 Available Features 52 Using the Flash (Flash Modes 53 Using the Self-timer 56 Using Macro Mode 58 Adjusting Brightness (Exposure Compensation 60 Default Settings 61 Features That Can Be ...
... iv For Your Safety vii WARNINGS vii Notices xi Parts of the Camera 1 The Camera Body 2 Attaching the Camera Strap 4 Raising and Lowering the Flash 5 Using Menus (d Button 6 The Monitor 8 Shooting Mode 8 Playback Mode 10 The Basics of Shooting and Playback ... 13 Preparation 1 Insert the ...Using Skin Softening 50 A (Auto) Mode 51 Features That Can Be Set Using the Multi Selector 52 Available Features 52 Using the Flash (Flash Modes 53 Using the Self-timer 56 Using Macro Mode 58 Adjusting Brightness (Exposure Compensation 60 Default Settings 61 Features That Can Be ...

Reference Manual
Page 19
Parts of the Camera Parts of the Camera This chapter describes the parts of Shooting and Playback" (A 13). 1 The Camera Body 2 Attaching the Camera Strap 4 Raising and Lowering the Flash 5 Using Menus (d Button 6 The Monitor 8 Shooting Mode 8 Playback Mode 10 If you want to start using the camera right away, see "The Basics of the camera and explains information that is displayed in the monitor.
Parts of the Camera Parts of the Camera This chapter describes the parts of Shooting and Playback" (A 13). 1 The Camera Body 2 Attaching the Camera Strap 4 Raising and Lowering the Flash 5 Using Menus (d Button 6 The Monitor 8 Shooting Mode 8 Playback Mode 10 If you want to start using the camera right away, see "The Basics of the camera and explains information that is displayed in the monitor.

Reference Manual
Page 20
... 4 Power switch/power-on lamp 22 5 Self-timer lamp 56 AF-assist illuminator 98 6 Microphone (stereo 79, 90 7 Flash 5, 53 8 Lens cover 9 Lens 10 Power connector cover (for AC adapter available separately from Nikon)...... 15, E95 11 Connector cover 80 12 USB/audio/video output connector.......80 13 HDMI mini connector (Type...
... 4 Power switch/power-on lamp 22 5 Self-timer lamp 56 AF-assist illuminator 98 6 Microphone (stereo 79, 90 7 Flash 5, 53 8 Lens cover 9 Lens 10 Power connector cover (for AC adapter available separately from Nikon)...... 15, E95 11 Connector cover 80 12 USB/audio/video output connector.......80 13 HDMI mini connector (Type...

Reference Manual
Page 21
1 2 13 12 11 3 4 5 6 7 8 9 10 Parts of the Camera 1 K (flash pop-up) control 5, 53 2 Flash lamp 55 3 b (e movie-record) button 90 4 A (shooting mode) button 36, 37, 46, 48, 51 5 c (playback) button 30, 76 6 Multi selector 7 k (apply selection) button 8 l (delete) button 32 9 d button 6, 63, 78, 93, 98 10 Battery-chamber/ memory card slot cover 14, 16 11 Tripod socket F19 12 Monitor 8 13 Speaker 79, 94 3
1 2 13 12 11 3 4 5 6 7 8 9 10 Parts of the Camera 1 K (flash pop-up) control 5, 53 2 Flash lamp 55 3 b (e movie-record) button 90 4 A (shooting mode) button 36, 37, 46, 48, 51 5 c (playback) button 30, 76 6 Multi selector 7 k (apply selection) button 8 l (delete) button 32 9 d button 6, 63, 78, 93, 98 10 Battery-chamber/ memory card slot cover 14, 16 11 Tripod socket F19 12 Monitor 8 13 Speaker 79, 94 3

Reference Manual
Page 23
Parts of the Camera Raising and Lowering the Flash Slide the K (flash pop-up) control to raise the flash. • Flash settings ➝ "Using the Flash (Flash Modes)" (A 53) • Push the flash down gently to lower the flash until it clicks into place when not in use. 5
Parts of the Camera Raising and Lowering the Flash Slide the K (flash pop-up) control to raise the flash. • Flash settings ➝ "Using the Flash (Flash Modes)" (A 53) • Push the flash down gently to lower the flash until it clicks into place when not in use. 5

Reference Manual
Page 27
Parts of the Camera 1 Shooting mode 36, 37, 46, 48, 51 2 Macro mode 58 3 Zoom indicator 27, 58 4 Focus indicator 28 5 AE/AF-L indicator 44 6 Flash mode 53 7 Eye-Fi indicator 99 8 Battery level indicator 22 9 Vibration reduction icon 98 10 Print date 98 11 Motion detection icon 98 12 Wind ...
Parts of the Camera 1 Shooting mode 36, 37, 46, 48, 51 2 Macro mode 58 3 Zoom indicator 27, 58 4 Focus indicator 28 5 AE/AF-L indicator 44 6 Flash mode 53 7 Eye-Fi indicator 99 8 Battery level indicator 22 9 Vibration reduction icon 98 10 Print date 98 11 Motion detection icon 98 12 Wind ...

Reference Manual
Page 39
... selected region are saved at the time of shooting. • If you want the shooting date to be printed without setting the date and time, O flashes when the shooting screen is turned on. Set the date and time again. ➝ Step 3 of "Preparation 3 Set the Display Language, Date, and Time" (A 18...
... selected region are saved at the time of shooting. • If you want the shooting date to be printed without setting the date and time, O flashes when the shooting screen is turned on. Set the date and time again. ➝ Step 3 of "Preparation 3 Set the Display Language, Date, and Time" (A 18...

Reference Manual
Page 40
... power switch. • The lens extends and the monitor turns on the image quality and image size (determined by the image mode setting; Raise the flash (A 5, 53) in situations where you want to replace the batteries. A 64, E40). Battery level low. Replace the batteries. The Basics of exposures remaining. Battery level...the amount of available memory in dark locations or when the subject is backlit. Battery Level Indicator Display b B Battery exhausted. Prepare to 22 use the flash, such as in the internal memory or memory card, and also varies depending on . • Slide the...
... power switch. • The lens extends and the monitor turns on the image quality and image size (determined by the image mode setting; Raise the flash (A 5, 53) in situations where you want to replace the batteries. A 64, E40). Battery level low. Replace the batteries. The Basics of exposures remaining. Battery level...the amount of available memory in dark locations or when the subject is backlit. Battery Level Indicator Display b B Battery exhausted. Prepare to 22 use the flash, such as in the internal memory or memory card, and also varies depending on . • Slide the...
Reference Manual
Page 41
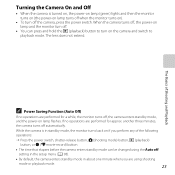
... Auto off setting in the setup menu (A 98). • By default, the camera enters standby mode in standby mode, the monitor turns back on lamp flashes. When the camera turns off, the power-on lamp and the monitor turn off the camera, press the power switch. If no operations are performed...
... Auto off setting in the setup menu (A 98). • By default, the camera enters standby mode in standby mode, the monitor turns back on lamp flashes. When the camera turns off, the power-on lamp and the monitor turn off the camera, press the power switch. If no operations are performed...

Reference Manual
Page 43
... are available. • To select an effect, first display the shooting-mode selection menu and then press the multi selector K. Settings can take . Using the flash ➝ A 53 -
... are available. • To select an effect, first display the shooting-mode selection menu and then press the multi selector K. Settings can take . Using the flash ➝ A 53 -

Reference Manual
Page 44
The Basics of Shooting and Playback 2 Frame the picture. • Aim the camera at the desired subject. • When the camera determines the scene mode, the shooting mode icon changes (A 36). Step 3 Frame a Picture 1 Hold the camera steady. • Keep fingers, hair, the camera strap, and other objects away from the lens, flash, AF-assist illuminator, and microphone. Shooting mode icon 29m 0s 860 26
The Basics of Shooting and Playback 2 Frame the picture. • Aim the camera at the desired subject. • When the camera determines the scene mode, the shooting mode icon changes (A 36). Step 3 Frame a Picture 1 Hold the camera steady. • Keep fingers, hair, the camera strap, and other objects away from the lens, flash, AF-assist illuminator, and microphone. Shooting mode icon 29m 0s 860 26

Reference Manual
Page 45
C When Using a Tripod • We recommend using the digital zoom, image quality deteriorates when zooming in past V in which the flash does not fire - The Basics of Shooting and Playback Using the Zoom Rotate the zoom control to stabilize the camera in the following situations: - C Digital... is in the setup menu (A 98) when using a shooting mode in the zoom indicator. Small image size 27 When shooting in dark conditions with the flash lowered, or when shooting in dark conditions using a tripod. A 64, E39), more to Off in effect, the scene mode changes to U. In this case, ...
C When Using a Tripod • We recommend using the digital zoom, image quality deteriorates when zooming in past V in which the flash does not fire - The Basics of Shooting and Playback Using the Zoom Rotate the zoom control to stabilize the camera in the following situations: - C Digital... is in the setup menu (A 98) when using a shooting mode in the zoom indicator. Small image size 27 When shooting in dark conditions with the flash lowered, or when shooting in dark conditions using a tripod. A 64, E39), more to Off in effect, the scene mode changes to U. In this case, ...

Reference Manual
Page 46
... the center of the frame and the focus area is not displayed. When the subject is pressed halfway, the focus area or focus indicator may flash in the center of the way down (A 29). • The shutter is released and the image is unable to focus. When the camera has focused...
... the center of the frame and the focus area is not displayed. When the subject is pressed halfway, the focus area or focus indicator may flash in the center of the way down (A 29). • The shutter is released and the image is unable to focus. When the camera has focused...

Reference Manual
Page 47
...halfway, stopping when you are being saved. B Notes About Focus Subjects Not Suitable for Autofocus ➝ A 72 C AF-assist Illuminator and Flash If the subject is dimly lit, the AF-assist illuminator (A 98) may light when the shutter-release button is pressed halfway. Press the button...gently. While pressing the shutter-release button halfway, press the shutter-release button the rest of exposures remaining or the remaining recording time flashes while images or movies are concerned that you might miss a shot, press the shutter-release button all the way without first pressing...
...halfway, stopping when you are being saved. B Notes About Focus Subjects Not Suitable for Autofocus ➝ A 72 C AF-assist Illuminator and Flash If the subject is dimly lit, the AF-assist illuminator (A 98) may light when the shutter-release button is pressed halfway. Press the button...gently. While pressing the shutter-release button halfway, press the shutter-release button the rest of exposures remaining or the remaining recording time flashes while images or movies are concerned that you might miss a shot, press the shutter-release button all the way without first pressing...

Reference Manual
Page 53
... When Shooting)... 46 Smart Portrait Mode (Capturing Smiling Faces) ... 48 A (Auto) Mode 51 Features That Can Be Set Using the Multi Selector .... 52 Using the Flash (Flash Modes 53 Using the Self-timer 56 Using Macro Mode 58 Adjusting Brightness (Exposure Compensation 60 Features That Can Be Set by Pressing the d Button...
... When Shooting)... 46 Smart Portrait Mode (Capturing Smiling Faces) ... 48 A (Auto) Mode 51 Features That Can Be Set Using the Multi Selector .... 52 Using the Flash (Flash Modes 53 Using the Self-timer 56 Using Macro Mode 58 Adjusting Brightness (Exposure Compensation 60 Features That Can Be Set by Pressing the d Button...

Reference Manual
Page 57
...center of the frame. h Sunset O • The camera focuses on the area in the center of the frame. e Night portrait O • The flash always fires. f Party/indoor • The camera focuses on the area in the center of the frame. • As images are detected, the camera ... • The skin softening feature makes the skin tones in the setup menu (A 98) when shooting using a tripod to stabilize the camera. Raise the flash before shooting. • When the camera detects a person's face, it focuses on the subject in the center of the frame. • Digital zoom ...
...center of the frame. h Sunset O • The camera focuses on the area in the center of the frame. e Night portrait O • The flash always fires. f Party/indoor • The camera focuses on the area in the center of the frame. • As images are detected, the camera ... • The skin softening feature makes the skin tones in the setup menu (A 98) when shooting using a tripod to stabilize the camera. Raise the flash before shooting. • When the camera detects a person's face, it focuses on the subject in the center of the frame. • Digital zoom ...

Reference Manual
Page 59
... at 4 seconds. • The camera focuses at which it can shoot. • You can adjust hue by pressing the multi selector H or I. l Museum • The flash does not fire. • The camera focuses on an object not in the center of up to 10 images while the shutter-release button is...
... at 4 seconds. • The camera focuses at which it can shoot. • You can adjust hue by pressing the multi selector H or I. l Museum • The flash does not fire. • The camera focuses on an object not in the center of up to 10 images while the shutter-release button is...

Reference Manual
Page 60
... you select p Easy panorama, select the shooting range from the button, and then slowly pan the camera horizontally. Shooting Features o Backlighting • The flash always fires. Raise the flash before shooting. • The camera focuses on the next screen. • Press the shutter-release button all the way down, remove your finger...
... you select p Easy panorama, select the shooting range from the button, and then slowly pan the camera horizontally. Shooting Features o Backlighting • The flash always fires. Raise the flash before shooting. • The camera focuses on the next screen. • Press the shutter-release button all the way down, remove your finger...

Reference Manual
Page 64
... the frame. • When Selective color is displayed. The following functions, first press the k button to the color selection screen, press the k button again. 46 Flash mode (A 53) -
... the frame. • When Selective color is displayed. The following functions, first press the k button to the color selection screen, press the k button again. 46 Flash mode (A 53) -

