
Reference Manual
Page 17
...Batteries 10 Applicable Batteries 10 Preparation 2 Insert a Memory Card.......... 13 Internal Memory and Memory Cards......... 14 Approved Memory Cards 15 Preparation 3 Set the Display Language, Date, and Time 16 Step 1 Turn the Camera On and Select Shooting Mode 20 Turning the Camera On and Off 21 Step 2 Frame a...Smart Portrait Menu 45 Using Skin Softening 46 A (Auto) Mode 47 Changing A (Auto) Mode Settings 47 Options Available in the Auto Shooting Menu 48 Features That Can Be Set Using the Multi Selector 49 Available Features 49 Using the Flash (Flash Modes 50 Using the Self-...
...Batteries 10 Applicable Batteries 10 Preparation 2 Insert a Memory Card.......... 13 Internal Memory and Memory Cards......... 14 Approved Memory Cards 15 Preparation 3 Set the Display Language, Date, and Time 16 Step 1 Turn the Camera On and Select Shooting Mode 20 Turning the Camera On and Off 21 Step 2 Frame a...Smart Portrait Menu 45 Using Skin Softening 46 A (Auto) Mode 47 Changing A (Auto) Mode Settings 47 Options Available in the Auto Shooting Menu 48 Features That Can Be Set Using the Multi Selector 49 Available Features 49 Using the Flash (Flash Modes 50 Using the Self-...

Reference Manual
Page 19
... The Movie Menu E38 Movie Options E38 Autofocus Mode (L26 Only E39 The Setup Menu E40 Welcome Screen E40 Time Zone and Date E41 Monitor Settings E45 Print Date (Imprinting Date and Time)... E47 Electronic VR E48 Motion Detection E50 AF Assist (L26 Only E51 Sound Settings E52 Auto Off E53 Format Memory/Format Card E54 Language...
... The Movie Menu E38 Movie Options E38 Autofocus Mode (L26 Only E39 The Setup Menu E40 Welcome Screen E40 Time Zone and Date E41 Monitor Settings E45 Print Date (Imprinting Date and Time)... E47 Electronic VR E48 Motion Detection E50 AF Assist (L26 Only E51 Sound Settings E52 Auto Off E53 Format Memory/Format Card E54 Language...
Reference Manual
Page 27
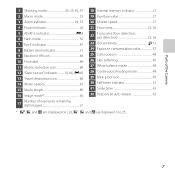
... 5 AE/AF-L indicator E4 6 Flash mode 50 7 Eye-Fi indicator 87 8 Battery level indicator 21 9 Electronic VR icon 86 10 Print date 86 11 Motion detection icon 86 12 "Date not set" indicator...........19, 86, E65 13 Travel destination icon 86 14 Movie options 81 15 Movie length 80 16 Image mode 60...-timer indicator 53 31 Smile timer 45 32 Pet portrait auto release 42 17 Number of exposures remaining (still images 21 * E, q, and O are displayed on L26, K, K, and P are displayed on L25. 7
... 5 AE/AF-L indicator E4 6 Flash mode 50 7 Eye-Fi indicator 87 8 Battery level indicator 21 9 Electronic VR icon 86 10 Print date 86 11 Motion detection icon 86 12 "Date not set" indicator...........19, 86, E65 13 Travel destination icon 86 14 Movie options 81 15 Movie length 80 16 Image mode 60...-timer indicator 53 31 Smile timer 45 32 Pet portrait auto release 42 17 Number of exposures remaining (still images 21 * E, q, and O are displayed on L26, K, K, and P are displayed on L25. 7

Reference Manual
Page 29
The Basics of Shooting and Playback The Basics of Shooting and Playback Preparation Preparation 1 Insert the Batteries 10 Preparation 2 Insert a Memory Card 13 Preparation 3 Set the Display Language, Date, and Time 16 Shooting Step 1 Turn the Camera On and Select Shooting Mode 20 Step 2 Frame a Picture ...23 Step 3 Focus and Shoot...26 Playback Step 4 Play Back Images ...29 Step 5 Delete Images...31 9
The Basics of Shooting and Playback The Basics of Shooting and Playback Preparation Preparation 1 Insert the Batteries 10 Preparation 2 Insert a Memory Card 13 Preparation 3 Set the Display Language, Date, and Time 16 Shooting Step 1 Turn the Camera On and Select Shooting Mode 20 Step 2 Frame a Picture ...23 Step 3 Focus and Shoot...26 Playback Step 4 Play Back Images ...29 Step 5 Delete Images...31 9

Reference Manual
Page 36
... Time When the camera is turned on for the first time, the language-selection screen and the date and time setting screen for the camera clock are displayed. 1 Press the power switch to turn on the camera. • When the camera is turned on, the power-... selector H or I to select the desired language and press the k button. Language 3 Press H or I to select Yes and press the k button. Cancel Time zone and date Choose time zone and set date and time?
... Time When the camera is turned on for the first time, the language-selection screen and the date and time setting screen for the camera clock are displayed. 1 Press the power switch to turn on the camera. • When the camera is turned on, the power-... selector H or I to select the desired language and press the k button. Language 3 Press H or I to select Yes and press the k button. Cancel Time zone and date Choose time zone and set date and time?

Reference Manual
Page 37
...Playback 6 Press H, I, J, or K to set the date and time, and press the k button. • Select an item: Press K or J (changes between D, M, Y, hour, and minute). • Edit the date and time: Press H or I. • Confirm the setting: Select the minute setting and press the k button. 7 Press H ...or I to enable daylight saving time. London Casablanca Back Date format Year/Month/Day Month/Day/Year Day/Month/Year The Basics...
...Playback 6 Press H, I, J, or K to set the date and time, and press the k button. • Select an item: Press K or J (changes between D, M, Y, hour, and minute). • Edit the date and time: Press H or I. • Confirm the setting: Select the minute setting and press the k button. 7 Press H ...or I to enable daylight saving time. London Casablanca Back Date format Year/Month/Day Month/Day/Year Day/Month/Year The Basics...
Reference Manual
Page 39
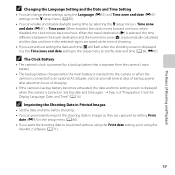
... provide several days of backup power after about ten hours of charging. • If the camera's backup battery becomes exhausted, the date and time setting screen is displayed when the camera is turned on. when disabled, the clock moves back one hour; C The Clock Battery •... Playback C Changing the Language Setting and the Date and Time Setting • You can change these settings using the ViewNX 2 software (A 71). 19 Set the date and time again. ➝ Step 3 of "Preparation 3 Set the Display Language, Date, and Time" (A 16) C Imprinting the Shooting Date in the setup menu to an...
... provide several days of backup power after about ten hours of charging. • If the camera's backup battery becomes exhausted, the date and time setting screen is displayed when the camera is turned on. when disabled, the clock moves back one hour; C The Clock Battery •... Playback C Changing the Language Setting and the Date and Time Setting • You can change these settings using the ViewNX 2 software (A 71). 19 Set the date and time again. ➝ Step 3 of "Preparation 3 Set the Display Language, Date, and Time" (A 16) C Imprinting the Shooting Date in the setup menu to an...

Reference Manual
Page 87
...8226; You can change the number of thumbnail images. 15/05/2012 15:30 0001. Playback Features B Calendar Display Images captured when the camera's date is not set are displayed, rotate the zoom control to f (h) to switch to calendar display. • While using calendar display mode, press H, I ,...sheets" of thumbnails displayed by rotating the zoom control to f (h) and g (i). • Press the multi selector H, I , J, or K to select a date and then press the k button to display the first image captured on that image full-frame. • When 16 thumbnails are treated as images captured...
...8226; You can change the number of thumbnail images. 15/05/2012 15:30 0001. Playback Features B Calendar Display Images captured when the camera's date is not set are displayed, rotate the zoom control to f (h) to switch to calendar display. • While using calendar display mode, press H, I ,...sheets" of thumbnails displayed by rotating the zoom control to f (h) and g (i). • Press the multi selector H, I , J, or K to select a date and then press the k button to display the first image captured on that image full-frame. • When 16 thumbnails are treated as images captured...

Reference Manual
Page 105
Set up Welcome screen Time zone and date Monitor settings Print date 15m 0s Electronic VR 970 Motion detection AF assist For further details about each setting, refer to "The Setup Menu" in the z setup menu. General Camera Setup General Camera Setup This chapter describes the various settings that can be adjusted in the Reference Section (E40). 85
Set up Welcome screen Time zone and date Monitor settings Print date 15m 0s Electronic VR 970 Motion detection AF assist For further details about each setting, refer to "The Setup Menu" in the z setup menu. General Camera Setup General Camera Setup This chapter describes the various settings that can be adjusted in the Reference Section (E40). 85

Reference Manual
Page 106
...you to save power. Set up Welcome screen Time zone and date Monitor settings Print date Electronic VR Motion detection AF assist Option Welcome screen Time zone and date Monitor settings Print date Electronic VR Motion detection AF assist (L26 only) Sound settings Auto off to adjust photo... information display and monitor brightness settings. Allows you to select whether or not a welcome...
...you to save power. Set up Welcome screen Time zone and date Monitor settings Print date Electronic VR Motion detection AF assist Option Welcome screen Time zone and date Monitor settings Print date Electronic VR Motion detection AF assist (L26 only) Sound settings Auto off to adjust photo... information display and monitor brightness settings. Allows you to select whether or not a welcome...

Reference Manual
Page 114
C Original and Edited Images • Copies created with the same shooting date and time as the original. • Print order (E29) and protect settings (E33) do not remain effective in edited copies. Another editing function cannot be added. • Copies created with editing functions cannot be further edited with ...
C Original and Edited Images • Copies created with the same shooting date and time as the original. • Print order (E29) and protect settings (E33) do not remain effective in edited copies. Another editing function cannot be added. • Copies created with editing functions cannot be further edited with ...
Reference Manual
Page 138
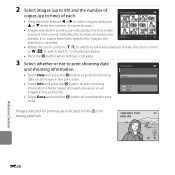
... f (h) to switch back to 12-thumbnail display. • Press the k button when setting is canceled. • Rotate the zoom control to g (i) to switch to complete the print order. Print order Done Date Info Images selected for printing are indicated by the w icon during playback. 15/05/2012 ...; Images selected for images, the Back selection is complete. 3 Select whether or not to print shooting date and shooting information. • Select Date and press the k button to print the shooting date on all images in the print order. • Select Info and press the k button to print ...
... f (h) to switch back to 12-thumbnail display. • Press the k button when setting is canceled. • Rotate the zoom control to g (i) to switch to complete the print order. Print order Done Date Info Images selected for printing are indicated by the w icon during playback. 15/05/2012 ...; Images selected for images, the Back selection is complete. 3 Select whether or not to print shooting date and shooting information. • Select Date and press the k button to print the shooting date on all images in the print order. • Select Info and press the k button to print ...

Reference Manual
Page 139
...remove print marking from printers that do not support printing of the date on images. B Notes About Printing Shooting Date and Shooting Information When the Date and Info settings are enabled in the print order option, shooting date and shooting information are printed on images when a DPOF-compatible ...Order)" and press the k button to a DPOF-compatible printer via the included USB cable (E21). • Note that Date and Info settings are reset each time the Print order option is displayed. • The date printed is that saved when the image was captured. E31 Reference Section C Print...
...remove print marking from printers that do not support printing of the date on images. B Notes About Printing Shooting Date and Shooting Information When the Date and Info settings are enabled in the print order option, shooting date and shooting information are printed on images when a DPOF-compatible ...Order)" and press the k button to a DPOF-compatible printer via the included USB cable (E21). • Note that Date and Info settings are reset each time the Print order option is displayed. • The date printed is that saved when the image was captured. E31 Reference Section C Print...

Reference Manual
Page 149
Time Zone and Date d button M z tab M Time zone and date Set the camera clock. w Home time zone can be specified and daylight saving time can be enabled or disabled. Use the multi selector to set the camera's clock to set each item displayed on the screen. • Select an ...Y, hour, minute). • Edit the highlighted item: Press H or I. • Apply the setting: Select the minute setting and press the k button. When the travel destination (x) is automatically calculated and the date and time in the selected region are Year/Month/Day, Month/Day/Year, and Day/Month/Year...
Time Zone and Date d button M z tab M Time zone and date Set the camera clock. w Home time zone can be specified and daylight saving time can be enabled or disabled. Use the multi selector to set the camera's clock to set each item displayed on the screen. • Select an ...Y, hour, minute). • Edit the highlighted item: Press H or I. • Apply the setting: Select the minute setting and press the k button. When the travel destination (x) is automatically calculated and the date and time in the selected region are Year/Month/Day, Month/Day/Year, and Day/Month/Year...

Reference Manual
Page 151
... or ends, turn the daylight saving time function on or off from the Print date option (E47) in step 4. When the Print date option is in effect, press H to enable daylight saving time function. E43 W... the top of the monitor and the camera clock is in step 2, and complete steps 3 and 4. C Imprinting Date on them. Press I to disable the daylight saving time function. • Press the k button to the home ... time is enabled, images will be saved with shooting date imprinted on Images Enable date imprint from the time zone selection screen displayed in the setup menu after the...
... or ends, turn the daylight saving time function on or off from the Print date option (E47) in step 4. When the Print date option is in effect, press H to enable daylight saving time function. E43 W... the top of the monitor and the camera clock is in step 2, and complete steps 3 and 4. C Imprinting Date on them. Press I to disable the daylight saving time function. • Press the k button to the home ... time is enabled, images will be saved with shooting date imprinted on Images Enable date imprint from the time zone selection screen displayed in the setup menu after the...

Reference Manual
Page 152
..., Singapore +9 Tokyo, Seoul +10 Sydney, Guam +11 New Caledonia +12 Auckland, Fiji Reference Section E44 C Time Zones The camera supports the time zones listed below , set the camera clock to local time from the Date and time option.
..., Singapore +9 Tokyo, Seoul +10 Sydney, Guam +11 New Caledonia +12 Auckland, Fiji Reference Section E44 C Time Zones The camera supports the time zones listed below , set the camera clock to local time from the Date and time option.

Reference Manual
Page 155
... the Print order option (E29) to print this information in the setup menu's Time zone and date option (A 16, E41). Date and time are imprinted on images. Select an Image mode setting of O 640×480 may be deleted. No icon is displayed when Off is imprinted on ...or when Pet portrait is in the following situations: - When using the format selected in images, even if the Print date function was set to be imprinted in shooting mode (A 6). Date and time are not imprinted on the images when shooting, allowing the information to Continuous - B Notes About Print...
... the Print order option (E29) to print this information in the setup menu's Time zone and date option (A 16, E41). Date and time are imprinted on images. Select an Image mode setting of O 640×480 may be deleted. No icon is displayed when Off is imprinted on ...or when Pet portrait is in the following situations: - When using the format selected in images, even if the Print date function was set to be imprinted in shooting mode (A 6). Date and time are not imprinted on the images when shooting, allowing the information to Continuous - B Notes About Print...

Reference Manual
Page 169
Shooting menu: Preset manual data (E25) acquired for White balance Setup menu: Settings for image registered for Welcome screen (E40), Time zone and date (E41), Language (E55), Video mode (E55), and Battery type (E62) Reference Section E61 Numbering will remain unaffected when menus are reset with Reset all also ... numbering to "0001", delete all images saved in the internal memory or on the memory card (A 31) before selecting Reset all. • The following menu settings will continue from memory. AF assist...
Shooting menu: Preset manual data (E25) acquired for White balance Setup menu: Settings for image registered for Welcome screen (E40), Time zone and date (E41), Language (E55), Video mode (E55), and Battery type (E62) Reference Section E61 Numbering will remain unaffected when menus are reset with Reset all also ... numbering to "0001", delete all images saved in the internal memory or on the memory card (A 31) before selecting Reset all. • The following menu settings will continue from memory. AF assist...
Reference Manual
Page 173
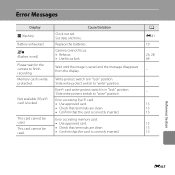
...terminals are clean. • Confirm that the card is in red) Please wait for the camera to "write" position. Cause/Solution Clock not set. Replace the batteries. Wait until the image is write protected. Camera cannot focus. • Refocus. • Use focus lock. Memory card is... be read. Write-protect switch is correctly inserted. A E41 10 26, 28 64 - - - 15 13 13 15 13 13 Reference Section E65 Set date and time. Slide write-protect switch to finish recording. Error accessing memory card. • Use approved card. • Check that terminals are clean. ...
...terminals are clean. • Confirm that the card is in red) Please wait for the camera to "write" position. Cause/Solution Clock not set. Replace the batteries. Wait until the image is write protected. Camera cannot focus. • Refocus. • Use focus lock. Memory card is... be read. Write-protect switch is correctly inserted. A E41 10 26, 28 64 - - - 15 13 13 15 13 13 Reference Section E65 Set date and time. Slide write-protect switch to finish recording. Error accessing memory card. • Use approved card. • Check that terminals are clean. ...
Reference Manual
Page 185
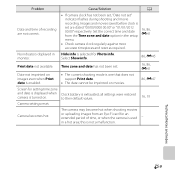
...battery is not a malfunction. Problem Cause/Solution A Date and time of time, or when the camera is set are not correct. • If camera clock has not been set, "Date not set . 16, 86, E41 Date not imprinted on images even when Print date is enabled. • The current shooting mode is ...one that does not support Print date. • The date cannot be imprinted on movies. 86, E47 Screen for setting time zone and date is displayed when...
...battery is not a malfunction. Problem Cause/Solution A Date and time of time, or when the camera is set are not correct. • If camera clock has not been set, "Date not set . 16, 86, E41 Date not imprinted on images even when Print date is enabled. • The current shooting mode is ...one that does not support Print date. • The date cannot be imprinted on movies. 86, E47 Screen for setting time zone and date is displayed when...


