
Reference Manual
Page 14
... made to this equipment does cause harmful interference to radio or television reception, which the receiver is encouraged to try to correct the interference by Nikon Corporation may cause harmful interference to radio communications. This equipment generates, uses, and can be determined by turning the equipment off and on a circuit different... and receiver. • Connect the equipment into an outlet on , the user is connected. • Consult the dealer or an experienced radio/television technician for help.
... made to this equipment does cause harmful interference to radio or television reception, which the receiver is encouraged to try to correct the interference by Nikon Corporation may cause harmful interference to radio communications. This equipment generates, uses, and can be determined by turning the equipment off and on a circuit different... and receiver. • Connect the equipment into an outlet on , the user is connected. • Consult the dealer or an experienced radio/television technician for help.

Reference Manual
Page 22
Parts of the Camera The Camera Body COOLPIX L26 1 23 4 5 Lens cover closed Parts of the Camera 10 9 8 76 1 Shutter-release button 26 Zoom control 24 f : wide 24 2 g : tele 24 h : thumbnail playback 67 i : playback zoom 66 j : help 35 3 Power switch/power-on lamp 20 4 Self-timer lamp 53 AF-assist illuminator 86 5 Flash 50 6 Microphone 78 7 Lens cover 8 Lens 9 Power connector cover (for connecting optional AC adapter E64 10 Eyelet for camera strap iii 2
Parts of the Camera The Camera Body COOLPIX L26 1 23 4 5 Lens cover closed Parts of the Camera 10 9 8 76 1 Shutter-release button 26 Zoom control 24 f : wide 24 2 g : tele 24 h : thumbnail playback 67 i : playback zoom 66 j : help 35 3 Power switch/power-on lamp 20 4 Self-timer lamp 53 AF-assist illuminator 86 5 Flash 50 6 Microphone 78 7 Lens cover 8 Lens 9 Power connector cover (for connecting optional AC adapter E64 10 Eyelet for camera strap iii 2

Reference Manual
Page 24
COOLPIX L25 1 23 4 5 67 Parts of the Camera Lens cover closed 8 10 9 1 Shutter-release button 26 Zoom control 24 f : wide 24 2 g : tele 24 h : thumbnail playback 67 i : playback zoom 66 j : help 35 3 Power switch/power-on lamp 20 4 Self-timer lamp 53 5 Flash 50 6 Microphone 78 7 Lens cover 8 Lens 9 Power connector cover (for connecting optional AC adapter E64 10 Eyelet for camera strap iii 4
COOLPIX L25 1 23 4 5 67 Parts of the Camera Lens cover closed 8 10 9 1 Shutter-release button 26 Zoom control 24 f : wide 24 2 g : tele 24 h : thumbnail playback 67 i : playback zoom 66 j : help 35 3 Power switch/power-on lamp 20 4 Self-timer lamp 53 5 Flash 50 6 Microphone 78 7 Lens cover 8 Lens 9 Power connector cover (for connecting optional AC adapter E64 10 Eyelet for camera strap iii 4
Reference Manual
Page 55
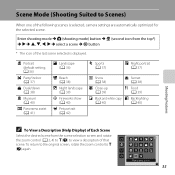
... (A 37) e Night portrait (A 37) z Snow (A 38) h Sunset (A 38) k Close-up (A 39) u Food (A 39) n Black and white copy o Backlighting (A 40) (A 40) Shooting Features C To View a Description (Help Display) of Each Scene Select the desired scene from the top*) M K M H, I, J, K M select a scene M k button * The icon of that scene. b Portrait (default setting; To return to...
... (A 37) e Night portrait (A 37) z Snow (A 38) h Sunset (A 38) k Close-up (A 39) u Food (A 39) n Black and white copy o Backlighting (A 40) (A 40) Shooting Features C To View a Description (Help Display) of Each Scene Select the desired scene from the top*) M K M H, I, J, K M select a scene M k button * The icon of that scene. b Portrait (default setting; To return to...
Reference Manual
Page 92
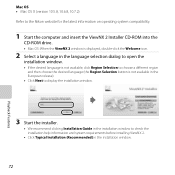
Mac OS • Mac OS X (version 10.5.8, 10.6.8, 10.7.2) Refer to the Nikon website for the latest information on operating system compatibility. 1 Start the computer and insert the ViewNX 2 Installer CD-ROM into the CD-ROM drive. • ...). • Click Next to display the installation window. 3 Start the installer. • We recommend clicking Installation Guide in the installation window to check the installation help information and system requirements before installing ViewNX 2. • Click Typical Installation (Recommended) in the installation window. 72 Playback Features
Mac OS • Mac OS X (version 10.5.8, 10.6.8, 10.7.2) Refer to the Nikon website for the latest information on operating system compatibility. 1 Start the computer and insert the ViewNX 2 Installer CD-ROM into the CD-ROM drive. • ...). • Click Next to display the installation window. 3 Start the installer. • We recommend clicking Installation Guide in the installation window to check the installation help information and system requirements before installing ViewNX 2. • Click Typical Installation (Recommended) in the installation window. 72 Playback Features
Reference Manual
Page 96
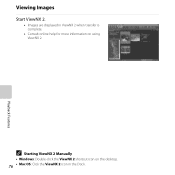
Playback Features C Starting ViewNX 2 Manually • Windows: Double-click the ViewNX 2 shortcut icon on the desktop. 76 • Mac OS: Click the ViewNX 2 icon in ViewNX 2 when transfer is complete. • Consult online help for more information on using ViewNX 2. Viewing Images Start ViewNX 2. • Images are displayed in the Dock.
Playback Features C Starting ViewNX 2 Manually • Windows: Double-click the ViewNX 2 shortcut icon on the desktop. 76 • Mac OS: Click the ViewNX 2 icon in ViewNX 2 when transfer is complete. • Consult online help for more information on using ViewNX 2. Viewing Images Start ViewNX 2. • Images are displayed in the Dock.

Reference Manual
Page 112
... End 969 C Combining Images to Make a Panorama (Panorama Maker 6) • Transfer images to a computer (A 74) and use Panorama Maker 6 to the on-screen instructions and help information contained in a single panorama. • Install Panorama Maker 6 from the included ViewNX 2 Installer CD-ROM (A 71). • After installing Panorama Maker 6, start the software...
... End 969 C Combining Images to Make a Panorama (Panorama Maker 6) • Transfer images to a computer (A 74) and use Panorama Maker 6 to the on-screen instructions and help information contained in a single panorama. • Install Panorama Maker 6 from the included ViewNX 2 Installer CD-ROM (A 71). • After installing Panorama Maker 6, start the software...

Reference Manual
Page 154
The same information as in Auto info is displayed. 15m 0s Movie frame+auto info 970 In addition to help frame pictures. Reference Section E46 It is not displayed when recording movies. It is not displayed when recording movies. The same information as in Auto ...
The same information as in Auto info is displayed. 15m 0s Movie frame+auto info 970 In addition to help frame pictures. Reference Section E46 It is not displayed when recording movies. It is not displayed when recording movies. The same information as in Auto ...
Reference Manual
Page 190
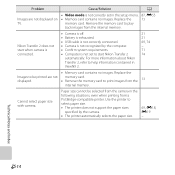
... from the internal memory. memory card. • Remove the memory card to play back images from the 13 internal memory. A 87, E55 13 Nikon Transfer 2 does not start Nikon Transfer 2 automatically. Cannot select paper size with camera. Cause/Solution • Video mode is not correctly set to be selected from the camera... set in the setup menu. • Memory card contains no images. Paper size cannot be printed are not displayed on TV. Use the printer to help information contained in the following situations, even when printing from a PictBridge-compatible printer.
... from the internal memory. memory card. • Remove the memory card to play back images from the 13 internal memory. A 87, E55 13 Nikon Transfer 2 does not start Nikon Transfer 2 automatically. Cannot select paper size with camera. Cause/Solution • Video mode is not correctly set to be selected from the camera... set in the setup menu. • Memory card contains no images. Paper size cannot be printed are not displayed on TV. Use the printer to help information contained in the following situations, even when printing from a PictBridge-compatible printer.

Reference Manual
Page 197
... button 3, 5 c Playback button 3, 5, 29 l Delete button 3, 5, 31 d button ......... 3, 5, 45, 48, 68, 81, 86 m Flash mode 50 n Self-timer 53 p Macro mode 55 o Exposure compensation 57 j Help 35 A AC adapter 12, E64 AF-assist illuminator 2, 86, E51 Alkaline batteries 10 Aperture value 27 Audio/video cable........ 70, E12, E64 Audio/video-in...
... button 3, 5 c Playback button 3, 5, 29 l Delete button 3, 5, 31 d button ......... 3, 5, 45, 48, 68, 81, 86 m Flash mode 50 n Self-timer 53 p Macro mode 55 o Exposure compensation 57 j Help 35 A AC adapter 12, E64 AF-assist illuminator 2, 86, E51 Alkaline batteries 10 Aperture value 27 Audio/video cable........ 70, E12, E64 Audio/video-in...

Reference Manual
Page 199
H Help 35 I Identifier E63 Image mode 60 Internal memory 14 J JPG E63 L Landscape c 36 Language 87, E55 Lens 2, 4, F15 Lens cover 2, 4 Lithium batteries 10 M Macro mode ... recording 78 Movie-record button 3, 5 Multi selector 3, 5 Multi-shot 16 E27 Museum l 40 N Nickel-metal hydride rechargeable batteries 10 Night landscape j 39 Night portrait e 37 Nikon Transfer 2 71, 73, 75 Number of exposures remaining.... 21, 61 O Optical zoom 24 Optional accessories E64 P Panorama assist U 41, E2 Panorama Maker 6 41, 73, E4...
H Help 35 I Identifier E63 Image mode 60 Internal memory 14 J JPG E63 L Landscape c 36 Language 87, E55 Lens 2, 4, F15 Lens cover 2, 4 Lithium batteries 10 M Macro mode ... recording 78 Movie-record button 3, 5 Multi selector 3, 5 Multi-shot 16 E27 Museum l 40 N Nickel-metal hydride rechargeable batteries 10 Night landscape j 39 Night portrait e 37 Nikon Transfer 2 71, 73, 75 Number of exposures remaining.... 21, 61 O Optical zoom 24 Optional accessories E64 P Panorama assist U 41, E2 Panorama Maker 6 41, 73, E4...


