
Reference Manual
Page 4
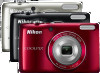
... the Nikon COOLPIX L26 or COOLPIX L25 digital camera. After reading, please keep this manual. Before using the camera, please read the information in this manual handy and refer to it to enhance your enjoyment of your new camera. or COOLPIX L26 Digital Camera COOLPIX L25 Digital Camera Camera Strap LR6.../L40 (AA-size) alkaline batteries (×2)* USB Cable UC-E16 ViewNX 2 Installer CD Reference Manual CD • Warranty * The included batteries are ...
... the Nikon COOLPIX L26 or COOLPIX L25 digital camera. After reading, please keep this manual. Before using the camera, please read the information in this manual handy and refer to it to enhance your enjoyment of your new camera. or COOLPIX L26 Digital Camera COOLPIX L25 Digital Camera Camera Strap LR6.../L40 (AA-size) alkaline batteries (×2)* USB Cable UC-E16 ViewNX 2 Installer CD Reference Manual CD • Warranty * The included batteries are ...

Reference Manual
Page 5
To learn about the parts of the camera and information that is displayed in the monitor, see "The Basics of the Camera" (A 1). iii Introduction Attaching the Camera Strap COOLPIX L26 COOLPIX L25 1 2 1 2 About This Manual If you want to start using the camera right away, see "Parts of Shooting and Playback" (A 9).
To learn about the parts of the camera and information that is displayed in the monitor, see "The Basics of the Camera" (A 1). iii Introduction Attaching the Camera Strap COOLPIX L26 COOLPIX L25 1 2 1 2 About This Manual If you want to start using the camera right away, see "Parts of Shooting and Playback" (A 9).
Reference Manual
Page 6
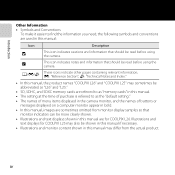
... referred to find the information you need, the following symbols and conventions are for COOLPIX L26. This icon indicates notes and information that should be read before using the camera. iv E: "Reference Section", F: "Technical Notes and Index." • In this manual: Icon B C A/E/F Description This icon indicates cautions and information that should be read before...
... referred to find the information you need, the following symbols and conventions are for COOLPIX L26. This icon indicates notes and information that should be read before using the camera. iv E: "Reference Section", F: "Technical Notes and Index." • In this manual: Icon B C A/E/F Description This icon indicates cautions and information that should be read before...

Reference Manual
Page 8
Unless the prior permission of the government was digitally copied or reproduced by means of a scanner, digital camera or other device may be punishable by law. • Items prohibited by law from the use of this product may be reproduced, transmitted, transcribed,... stamps or post cards issued by the government is prohibited. The copying or reproduction of necessary copies are to the attention of the Nikon representative in these manuals at any damages resulting from being in possession of material that the information in your area (address provided separately). Also, do not ...
Unless the prior permission of the government was digitally copied or reproduced by means of a scanner, digital camera or other device may be punishable by law. • Items prohibited by law from the use of this product may be reproduced, transmitted, transcribed,... stamps or post cards issued by the government is prohibited. The copying or reproduction of necessary copies are to the attention of the Nikon representative in these manuals at any damages resulting from being in possession of material that the information in your area (address provided separately). Also, do not ...

Reference Manual
Page 17
... Introduction Introduction ii Read This First ii Confirming the Package Contents ii Attaching the Camera Strap iii About This Manual iii Information and Precautions v For Your Safety viii WARNINGS viii Notices xii Parts of the Camera 1 The Camera Body 2 The Monitor 6 Shooting Mode 6 Playback Mode 8 The Basics of Shooting... 14 Approved Memory Cards 15 Preparation 3 Set the Display Language, Date, and Time 16 Step 1 Turn the Camera On and Select Shooting Mode 20 Turning the Camera On and Off 21 Step 2 Frame a Picture 23 Using the Zoom 24 Step 3 Focus and Shoot 26 The...
... Introduction Introduction ii Read This First ii Confirming the Package Contents ii Attaching the Camera Strap iii About This Manual iii Information and Precautions v For Your Safety viii WARNINGS viii Notices xii Parts of the Camera 1 The Camera Body 2 The Monitor 6 Shooting Mode 6 Playback Mode 8 The Basics of Shooting... 14 Approved Memory Cards 15 Preparation 3 Set the Display Language, Date, and Time 16 Step 1 Turn the Camera On and Select Shooting Mode 20 Turning the Camera On and Off 21 Step 2 Frame a Picture 23 Using the Zoom 24 Step 3 Focus and Shoot 26 The...

Reference Manual
Page 64
... used with other operations are performed. • The camera does not detect any faces. • The camera detected a face, but cannot detect a smile. C Releasing the Shutter Manually The shutter can be used . • Under some shooting conditions, the camera may be unable to On, the auto off function ...(A 86) is activated and the camera turns off when either of...
... used with other operations are performed. • The camera does not detect any faces. • The camera detected a face, but cannot detect a smile. C Releasing the Shutter Manually The shutter can be used . • Under some shooting conditions, the camera may be unable to On, the auto off function ...(A 86) is activated and the camera turns off when either of...
Reference Manual
Page 132
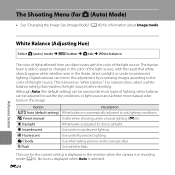
... can mimic this adjustment by processing images according to suit lighting conditions. E24 This is selected. Useful when shooting under overcast skies. Digital cameras can be used under incandescent lighting. The Shooting Menu (for A (Auto) Mode) • See "Changing the Image Size (Image ...pictures under unusual lighting (E25). No icon is displayed when Auto is known as "white balance." Option a Auto (default setting) b Preset manual c Daylight d Incandescent e Fluorescent f Cloudy g Flash Description White balance is in the shade, direct sunlight, or under most types of ...
... can mimic this adjustment by processing images according to suit lighting conditions. E24 This is selected. Useful when shooting under overcast skies. Digital cameras can be used under incandescent lighting. The Shooting Menu (for A (Auto) Mode) • See "Changing the Image Size (Image ...pictures under unusual lighting (E25). No icon is displayed when Auto is known as "white balance." Option a Auto (default setting) b Preset manual c Daylight d Incandescent e Fluorescent f Cloudy g Flash Description White balance is in the shade, direct sunlight, or under most types of ...

Reference Manual
Page 133
...lighting used when shooting. 2 Display the shooting menu (A 48), use the multi selector to select b Preset manual in the White balance menu, and press the k button. • The camera zooms in to make images shot under a lamp with white balance settings like Auto and Incandescent (for example,...will not be used during shooting. 1 Prepare a white or gray-colored subject and place it under white light). White balance Auto Preset manual Daylight Incandescent Fluorescent Cloudy Flash 3 Select Measure. • To apply the most recently measured value will be measured again and the most ...
...lighting used when shooting. 2 Display the shooting menu (A 48), use the multi selector to select b Preset manual in the White balance menu, and press the k button. • The camera zooms in to make images shot under a lamp with white balance settings like Auto and Incandescent (for example,...will not be used during shooting. 1 Prepare a white or gray-colored subject and place it under white light). White balance Auto Preset manual Daylight Incandescent Fluorescent Cloudy Flash 3 Select Measure. • To apply the most recently measured value will be measured again and the most ...

Reference Manual
Page 166
... permitted, set to Disable. • x (lights): Eye-Fi upload enabled; C Eye-Fi Upload Indicator The upload status of the Eye-Fi card in the camera can be used to turn Eye-Fi cards on the monitor (A 6, 8). • w: Eye-Fi upload is set this feature to Disable. • Refer... to the instruction manual of malfunction, contact the card manufacturer. • The camera can be confirmed on and off, but no images available for image upload. • x (flashes): Eye-Fi upload enabled; The...
... permitted, set to Disable. • x (lights): Eye-Fi upload enabled; C Eye-Fi Upload Indicator The upload status of the Eye-Fi card in the camera can be used to turn Eye-Fi cards on the monitor (A 6, 8). • w: Eye-Fi upload is set this feature to Disable. • Refer... to the instruction manual of malfunction, contact the card manufacturer. • The camera can be confirmed on and off, but no images available for image upload. • x (flashes): Eye-Fi upload enabled; The...

Reference Manual
Page 195
...images are subject to P 4608×3456 for the L26, i 3648×2736 for the L25. Technical Notes and Index B Specifications • Nikon will not be held liable for any errors this manual may vary depending on Camera and Imaging Products Association (CIPA) standards for measuring ...the life of camera batteries. • Unless otherwise stated, all figures are for a camera with every other shot, image ...
...images are subject to P 4608×3456 for the L26, i 3648×2736 for the L25. Technical Notes and Index B Specifications • Nikon will not be held liable for any errors this manual may vary depending on Camera and Imaging Products Association (CIPA) standards for measuring ...the life of camera batteries. • Unless otherwise stated, all figures are for a camera with every other shot, image ...


