
User Manual
Page 9
... Steps ...12 Inserting the Batteries ...12 Applicable Batteries ...12 Turning On and Off the Camera...12 Setting Display Language, Date and Time 14 Inserting Memory Cards ...16 Removing Memory Cards...17 G Basic Photography and Playback: Easy Auto Mode 18 Step 1 Turn the Camera On and Select G (Easy Auto) Mode 18 Indicators Displayed in G (Easy...
... Steps ...12 Inserting the Batteries ...12 Applicable Batteries ...12 Turning On and Off the Camera...12 Setting Display Language, Date and Time 14 Inserting Memory Cards ...16 Removing Memory Cards...17 G Basic Photography and Playback: Easy Auto Mode 18 Step 1 Turn the Camera On and Select G (Easy Auto) Mode 18 Indicators Displayed in G (Easy...

User Manual
Page 12
......90 f Date Imprint...92 w Electronic VR...93 U Motion Detection ...94 h AF Assist ...95 i Sound Settings ...96 k Auto Off ...97 l Format Memory/m Format Card...98 n Language ...99 o Video Mode ...99 d Blink Warning...100 p Reset All ...101 s Battery Type...103 d Protect ...104 f Rotate Image...105... h Copy...106 r Firmware Version ...107 Technical Notes...108 Optional Accessories ...108 Approved Memory Cards ...109 Image File and Folder Names...110 Caring for the Camera ...111 Cleaning ...113 Storage ...114 Error Messages...115 Troubleshooting...118 ...
......90 f Date Imprint...92 w Electronic VR...93 U Motion Detection ...94 h AF Assist ...95 i Sound Settings ...96 k Auto Off ...97 l Format Memory/m Format Card...98 n Language ...99 o Video Mode ...99 d Blink Warning...100 p Reset All ...101 s Battery Type...103 d Protect ...104 f Rotate Image...105... h Copy...106 r Firmware Version ...107 Technical Notes...108 Optional Accessories ...108 Approved Memory Cards ...109 Image File and Folder Names...110 Caring for the Camera ...111 Cleaning ...113 Storage ...114 Error Messages...115 Troubleshooting...118 ...

User Manual
Page 13
... in bold. This manual was written to store, delete or view pictures. 1 Notations • Secure Digital (SD) memory card, SDHC memory card, and SDXC memory card are referred to as "memory card." • The setting at the time of a Nikon COOLPIX L24 digital camera. C Memory Cards Pictures taken with your purchase of purchase is inserted, all those who use , to prevent damage to...
... in bold. This manual was written to store, delete or view pictures. 1 Notations • Secure Digital (SD) memory card, SDHC memory card, and SDXC memory card are referred to as "memory card." • The setting at the time of a Nikon COOLPIX L24 digital camera. C Memory Cards Pictures taken with your purchase of purchase is inserted, all those who use , to prevent damage to...

User Manual
Page 15
... the device and then completely refill it with copyright notices The copying or reproduction of copyrighted creative works such as memory cards or builtin camera memory does not completely erase the original image data. Care should be recovered from being in a foreign country is prohibited...circulated in possession of material that was obtained, the copying or reproduction of unused postage stamps or post cards issued by public agencies and private groups, ID cards and tickets, such as passes and meal coupons. • Comply with images containing no private information...
... the device and then completely refill it with copyright notices The copying or reproduction of copyrighted creative works such as memory cards or builtin camera memory does not completely erase the original image data. Care should be recovered from being in a foreign country is prohibited...circulated in possession of material that was obtained, the copying or reproduction of unused postage stamps or post cards issued by public agencies and private groups, ID cards and tickets, such as passes and meal coupons. • Comply with images containing no private information...

User Manual
Page 17
Parts of the Camera 1 2 34 5 67 89 Introduction 10 11 12 13 14 1 Monitor 6 2 d button 10, 54, 71, 79, 84 3 k (apply selection) button 9 4 A (shooting mode) button 8 5 Flash lamp 29 6 c (playback) button 8, 24 7 Multi selector 9 8 l (delete) button 24, 25, 55 9 Battery-chamber/ memory card slot cover 12, 16 10 Tripod socket 11 Pin cover 56, 58, 63 12 USB connector and audio/video output 56, 58, 63 13 Memory card slot 16 14 Battery-chamber 12 5
Parts of the Camera 1 2 34 5 67 89 Introduction 10 11 12 13 14 1 Monitor 6 2 d button 10, 54, 71, 79, 84 3 k (apply selection) button 9 4 A (shooting mode) button 8 5 Flash lamp 29 6 c (playback) button 8, 24 7 Multi selector 9 8 l (delete) button 24, 25, 55 9 Battery-chamber/ memory card slot cover 12, 16 10 Tripod socket 11 Pin cover 56, 58, 63 12 USB connector and audio/video output 56, 58, 63 13 Memory card slot 16 14 Battery-chamber 12 5

User Manual
Page 24
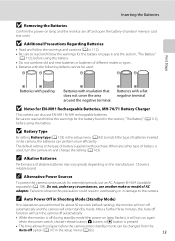
...the camera on the camera. Confirm that the positive (+) and negative (-) terminals are oriented correctly as described on . First Steps 3 Close the battery-chamber/memory card slot 1 cover. 2 Applicable Batteries • Two LR6/L40 (AA-size) alkaline batteries (batteries supplied) • Two FR6/L91 (AA-size) ...the Camera Press the power switch to turn on in playback mode (A 24). 12 First Steps Inserting the Batteries 1 Open the battery-chamber/memory card slot 3 cover. After the power-on lamp (green) lights for a moment, the monitor turns on the label at the entrance of...
...the camera on the camera. Confirm that the positive (+) and negative (-) terminals are oriented correctly as described on . First Steps 3 Close the battery-chamber/memory card slot 1 cover. 2 Applicable Batteries • Two LR6/L40 (AA-size) alkaline batteries (batteries supplied) • Two FR6/L91 (AA-size) ...the Camera Press the power switch to turn on in playback mode (A 24). 12 First Steps Inserting the Batteries 1 Open the battery-chamber/memory card slot 3 cover. After the power-on lamp (green) lights for a moment, the monitor turns on the label at the entrance of...
User Manual
Page 25
... (default setting), the monitor will turn on lamp and the monitor are off automatically and the camera will turn off and open the battery-chamber/ memory card slot cover. Failure to observe this precaution could result in overheating or in damage to read and follow the warnings for EN-MH1 Rechargeable Batteries...
... (default setting), the monitor will turn on lamp and the monitor are off automatically and the camera will turn off and open the battery-chamber/ memory card slot cover. Failure to observe this precaution could result in overheating or in damage to read and follow the warnings for EN-MH1 Rechargeable Batteries...

User Manual
Page 28
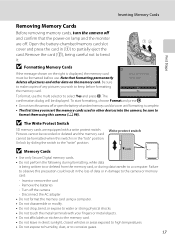
... camera or the memory card. Make sure that the memory card is inserted in the internal memory, or play back, delete or transfer pictures from falling out. 2 Insert the memory card. Close the battery-chamber/memory card slot cover. Slide the memory card in the camera's internal memory (approximately 17 MB) or on the memory card and pictures recorded to the memory card can be played...
... camera or the memory card. Make sure that the memory card is inserted in the internal memory, or play back, delete or transfer pictures from falling out. 2 Insert the memory card. Close the battery-chamber/memory card slot cover. Slide the memory card in the camera's internal memory (approximately 17 MB) or on the memory card and pictures recorded to the memory card can be played...
User Manual
Page 29
... power-on lamp and the monitor are equipped with your fingers or metal objects. • Do not affix labels or stickers to the memory card. • Do not leave in direct sunlight, closed vehicles or areas exposed to high temperatures. • Do not expose to humidity,... dialog will be displayed. Unlock by sliding the switch to select Yes and press k. Inserting Memory Cards First Steps Removing Memory Cards Before removing memory cards, turn the camera off or open the battery-chamber/memory card slot cover until formatting is complete. • The first time you wish to keep before ...
... power-on lamp and the monitor are equipped with your fingers or metal objects. • Do not affix labels or stickers to the memory card. • Do not leave in direct sunlight, closed vehicles or areas exposed to high temperatures. • Do not expose to humidity,... dialog will be displayed. Unlock by sliding the switch to select Yes and press k. Inserting Memory Cards First Steps Removing Memory Cards Before removing memory cards, turn the camera off or open the battery-chamber/memory card slot cover until formatting is complete. • The first time you wish to keep before ...

User Manual
Page 30
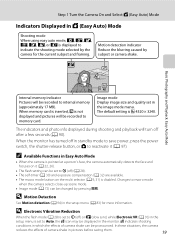
... auto) mode. The lens will turn on lamp (green) will light for a moment and the monitor will extend at the time of the internal memory or memory card and image mode setting (A 73). 18 Description The battery level is set at this time. Batteries low. Easy auto mode is high. The power-on...
... auto) mode. The lens will turn on lamp (green) will light for a moment and the monitor will extend at the time of the internal memory or memory card and image mode setting (A 73). 18 Description The battery level is set at this time. Batteries low. Easy auto mode is high. The power-on...
User Manual
Page 31
...or j is disabled. R indicates shooting conditions in which the effects of camera shake in the monitor. Image mode Display image size and quality set to memory card. When memory card is inserted, C is k 4320 × 3240. Step 1 Turn the Camera On and Select G (Easy Auto) Mode Indicators Displayed in the ...See Motion detection (A 94) in standby mode to save power, press the power switch, the shutter-release button, or A to internal memory (approximately 17 MB). The default setting is not displayed and pictures will be recorded to reactivate it (A 22, 26). • The...
...or j is disabled. R indicates shooting conditions in which the effects of camera shake in the monitor. Image mode Display image size and quality set to memory card. When memory card is inserted, C is k 4320 × 3240. Step 1 Turn the Camera On and Select G (Easy Auto) Mode Indicators Displayed in the ...See Motion detection (A 94) in standby mode to save power, press the power switch, the shutter-release button, or A to internal memory (approximately 17 MB). The default setting is not displayed and pictures will be recorded to reactivate it (A 22, 26). • The...

User Manual
Page 34
... zoom, the camera focuses on the center of the way down. Focus and exposure remain locked while the shutter release button is unable to the memory card or internal memory. 22
... zoom, the camera focuses on the center of the way down. Focus and exposure remain locked while the shutter release button is unable to the memory card or internal memory. 22

User Manual
Page 35
...) is standing in front of a white wall, wearing a white shirt) • Several objects are included in the scene (e.g. Removing the battery or the memory card while data is moving rapidly In these situations, try pressing the shutter-release button halfway again to take the picture by first focusing on an...the same distance from the camera (e.g. C The Did someone blink? Screen When d Blink warning is set to the saved data, camera or card. B Autofocus Performance Autofocus may not be in focus despite the fact that is in the following situations. Do not open the battery-chamber...
...) is standing in front of a white wall, wearing a white shirt) • Several objects are included in the scene (e.g. Removing the battery or the memory card while data is moving rapidly In these situations, try pressing the shutter-release button halfway again to take the picture by first focusing on an...the same distance from the camera (e.g. C The Did someone blink? Screen When d Blink warning is set to the saved data, camera or card. B Autofocus Performance Autofocus may not be in focus despite the fact that is in the following situations. Do not open the battery-chamber...

User Manual
Page 36
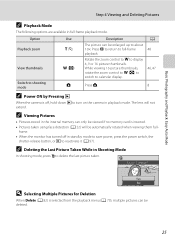
... in full-frame playback mode. Deleted pictures cannot be displayed briefly at low resolution while being read from the memory card or internal memory. When memory card is inserted, C is displayed, pictures stored in the internal memory will be displayed. Pictures may be recovered. Yes No A (shooting mode) button The last picture taken will be displayed...
... in full-frame playback mode. Deleted pictures cannot be displayed briefly at low resolution while being read from the memory card or internal memory. When memory card is inserted, C is displayed, pictures stored in the internal memory will be displayed. Pictures may be recovered. Yes No A (shooting mode) button The last picture taken will be displayed...
User Manual
Page 37
... camera in Shooting Mode In shooting mode, press l to full-frame playback. Erase 1 image? C Viewing Pictures • Pictures stored in the internal memory can only be viewed if no memory card is selected from the playback menu (A 79), multiple pictures can be enlarged up to shooting mode Use g (i) f (h) A Description The picture can be...
... camera in Shooting Mode In shooting mode, press l to full-frame playback. Erase 1 image? C Viewing Pictures • Pictures stored in the internal memory can only be viewed if no memory card is selected from the playback menu (A 79), multiple pictures can be enlarged up to shooting mode Use g (i) f (h) A Description The picture can be...

User Manual
Page 47
... is set to R 4320 × 3240). • The maximum frame rate with continuous shooting may vary depending upon the current image mode setting and the memory card used to illuminate the subject while maintaining the mood of about 0.7 frames per second (fps) (when image mode is not available. Using the Scene Mode...
... is set to R 4320 × 3240). • The maximum frame rate with continuous shooting may vary depending upon the current image mode setting and the memory card used to illuminate the subject while maintaining the mood of about 0.7 frames per second (fps) (when image mode is not available. Using the Scene Mode...

User Manual
Page 61
...when editing pictures that were created by the editing functions cannot be edited again using a different model of the picture. C Restrictions on the memory card. Copies Created By: D-Lighting Can Be Edited By: Small picture and crop can be edited with this camera may not be displayed properly and...• Pictures taken at an Image mode setting (A 72) of P 3968×2232 cannot be edited. • Only pictures taken with the COOLPIX L24 can be transferred to edit pictures in their edited copies. 49 More on Playback B Notes on web pages or as e-mail attachments. Use the ...
...when editing pictures that were created by the editing functions cannot be edited again using a different model of the picture. C Restrictions on the memory card. Copies Created By: D-Lighting Can Be Edited By: Small picture and crop can be edited with this camera may not be displayed properly and...• Pictures taken at an Image mode setting (A 72) of P 3968×2232 cannot be edited. • Only pictures taken with the COOLPIX L24 can be transferred to edit pictures in their edited copies. 49 More on Playback B Notes on web pages or as e-mail attachments. Use the ...
User Manual
Page 65
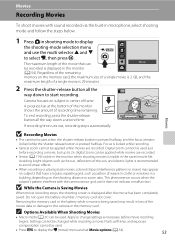
...have a regular, repeating grid, such as necessary before recording a movie, but up to start recording. Do not open the battery-chamber / memory card slot cover. B While the Camera is Saving Movies When movie recording stops, the shooting screen is 29 minutes. 2 Press the shutter-release button...is locked while recording. • Optical zoom cannot be changed while recording a movie. The maximum length of frame. Camera focuses on the memory card, the maximum size of a single movie is 2 GB, and the maximum length of recording time remaining. To end recording, press the shutter...
...have a regular, repeating grid, such as necessary before recording a movie, but up to start recording. Do not open the battery-chamber / memory card slot cover. B While the Camera is Saving Movies When movie recording stops, the shooting screen is 29 minutes. 2 Press the shutter-release button...is locked while recording. • Optical zoom cannot be changed while recording a movie. The maximum length of frame. Camera focuses on the memory card, the maximum size of a single movie is 2 GB, and the maximum length of recording time remaining. To end recording, press the shutter...

User Manual
Page 66
Maximum movie length or frames varies with make of memory card. * Regardless of the remaining memory on the memory card, the maximum size of a single movie is 2 GB, and the maximum length of a single movie is the maximum recording time for more information. ...Frame rate: About 30 frames per second C Movie Options and Maximum Movie Length Option I TV movie 640 (default setting) S Small size 320 Internal memory (Approx. 17 MB) 9 s 38 s Memory card (4 GB)* 45 min 3 h All figures are approximate. The maximum recording time that is displayed is 29 minutes. Press d to choose and ...
Maximum movie length or frames varies with make of memory card. * Regardless of the remaining memory on the memory card, the maximum size of a single movie is 2 GB, and the maximum length of a single movie is the maximum recording time for more information. ...Frame rate: About 30 frames per second C Movie Options and Maximum Movie Length Option I TV movie 640 (default setting) S Small size 320 Internal memory (Approx. 17 MB) 9 s 38 s Memory card (4 GB)* 45 min 3 h All figures are approximate. The maximum recording time that is displayed is 29 minutes. Press d to choose and ...
User Manual
Page 71
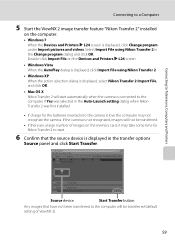
...and Printers Connecting to a Computer 5 Start the ViewNX 2 image transfer feature "Nikon Transfer 2" installed on the computer. • Windows 7 When the Devices and Printers K L24 screen is displayed, click Import File using Nikon Transfer 2 in the Change program dialog and click OK. If the camera is...When the action selection dialog is displayed, select Nikon Transfer 2 Import File, and click OK. • Mac OS X Nikon Transfer 2 will be transferred. • If there are a large number of ViewNX 2). 59 Double-click Import File on the memory card, it may take some time for the ...
...and Printers Connecting to a Computer 5 Start the ViewNX 2 image transfer feature "Nikon Transfer 2" installed on the computer. • Windows 7 When the Devices and Printers K L24 screen is displayed, click Import File using Nikon Transfer 2 in the Change program dialog and click OK. If the camera is...When the action selection dialog is displayed, select Nikon Transfer 2 Import File, and click OK. • Mac OS X Nikon Transfer 2 will be transferred. • If there are a large number of ViewNX 2). 59 Double-click Import File on the memory card, it may take some time for the ...


