
User Manual
Page 12
Table of Contents Basic Camera Setup: The Setup Menu 83 Displaying the Setup Menu...84 a Menus ...85 c Welcome Screen...86 d Date...87 e Monitor Settings ...90 f Date Imprint...92 w Electronic VR...93 U Motion Detection ...94 h AF Assist ...95 i Sound Settings ...96 k Auto Off ...97 l Format ...
Table of Contents Basic Camera Setup: The Setup Menu 83 Displaying the Setup Menu...84 a Menus ...85 c Welcome Screen...86 d Date...87 e Monitor Settings ...90 f Date Imprint...92 w Electronic VR...93 U Motion Detection ...94 h AF Assist ...95 i Sound Settings ...96 k Auto Off ...97 l Format ...

User Manual
Page 13
Illustrations and Screen Display Illustrations and text displays shown in the camera's internal memory or on the memory card. Introduction Introduction About This Manual Thank you for your Nikon digital camera. This icon indicates that monitor indicators can be stored in this manual or ... be removed before use , to prevent damage to as "memory card." • The setting at the time of a Nikon COOLPIX L24 digital camera. Screen Samples In this manual thoroughly before the internal memory can be more A information is referred to the pictures on removable memory ...
Illustrations and Screen Display Illustrations and text displays shown in the camera's internal memory or on the memory card. Introduction Introduction About This Manual Thank you for your Nikon digital camera. This icon indicates that monitor indicators can be stored in this manual or ... be removed before use , to prevent damage to as "memory card." • The setting at the time of a Nikon COOLPIX L24 digital camera. Screen Samples In this manual thoroughly before the internal memory can be more A information is referred to the pictures on removable memory ...

User Manual
Page 15
... prior permission of the government was digitally copied or reproduced by means of a scanner, digital camera or other device may be provided for the welcome screen (A 86). Disposing of Data Storage Devices Please note that deleting images or formatting data storage devices such as books, music, paintings, woodcut prints, maps, drawings...
... prior permission of the government was digitally copied or reproduced by means of a scanner, digital camera or other device may be provided for the welcome screen (A 86). Disposing of Data Storage Devices Please note that deleting images or formatting data storage devices such as books, music, paintings, woodcut prints, maps, drawings...

User Manual
Page 21
...:30 0004.JPG Display the previous picture. Select the item below . Display the next picture. 44 For the Menu Screen Select the item above . Select the item to the left/return to the next screen). For Shooting Display m (flash mode) menu (A 28)/select the item above . Apply selection (Go to the... previous screen. Introduction Basic Operations The Multi Selector This section describes standard uses of the multi selector. 9 Display p (macro mode) menu (A 31)/select the item below ....
...:30 0004.JPG Display the previous picture. Select the item below . Display the next picture. 44 For the Menu Screen Select the item above . Select the item to the left/return to the next screen). For Shooting Display m (flash mode) menu (A 28)/select the item above . Apply selection (Go to the... previous screen. Introduction Basic Operations The Multi Selector This section describes standard uses of the multi selector. 9 Display p (macro mode) menu (A 31)/select the item below ....

User Manual
Page 22
Set up Menus Welcome screen Date Monitor settings Date imprint Electronic VR Exit Press the multi selector J to highlight the tab. When using the following modes, you can display the ...
Set up Menus Welcome screen Date Monitor settings Date imprint Electronic VR Exit Press the multi selector J to highlight the tab. When using the following modes, you can display the ...

User Manual
Page 23
... button halfway, stopping when you feel resistance. Focus and exposure lock while the shutter-release button is displayed at the lower right of the menu screen to take a picture, press the shutter-release button the rest of the way down to view a description of the way down . Exit Back About the...
... button halfway, stopping when you feel resistance. Focus and exposure lock while the shutter-release button is displayed at the lower right of the menu screen to take a picture, press the shutter-release button the rest of the way down to view a description of the way down . Exit Back About the...

User Manual
Page 27
... 5. • To change the time zone and the daylight saving settings, select Time zone from Date in the setup menu. 15 Press K to exit the screen. First Steps Setting Display Language, Date and Time 5 Change the date and time. The settings are applied. 7 Press A to move the cursor in the Auto...
... 5. • To change the time zone and the daylight saving settings, select Time zone from Date in the setup menu. 15 Press K to exit the screen. First Steps Setting Display Language, Date and Time 5 Change the date and time. The settings are applied. 7 Press A to move the cursor in the Auto...

User Manual
Page 33
... digital zoom. C Digital Zoom and Interpolation Unlike optical zoom, digital zoom uses a digital imaging process known as image size decreases, allowing for confirmation of the screen. Using the Zoom Use the zoom control to zoom out.
... digital zoom. C Digital Zoom and Interpolation Unlike optical zoom, digital zoom uses a digital imaging process known as image size decreases, allowing for confirmation of the screen. Using the Zoom Use the zoom control to zoom out.

User Manual
Page 35
If the subject is still not in deep shadow) • No contrast between the subject and surroundings (e.g. screen (A 100) is moving rapidly In these situations, try pressing the shutter-release button halfway again to On, the Did someone blink? Basic Photography and Playback: ... may not perform as the desired subject. B Autofocus Performance Autofocus may result in loss of data or in front of exposures remaining display will blink. Screen When d Blink warning is pressed all the way down. 23 Do not open the battery-chamber/memory card slot cover. In some rare cases, the...
If the subject is still not in deep shadow) • No contrast between the subject and surroundings (e.g. screen (A 100) is moving rapidly In these situations, try pressing the shutter-release button halfway again to On, the Did someone blink? Basic Photography and Playback: ... may not perform as the desired subject. B Autofocus Performance Autofocus may result in loss of data or in front of exposures remaining display will blink. Screen When d Blink warning is pressed all the way down. 23 Do not open the battery-chamber/memory card slot cover. In some rare cases, the...

User Manual
Page 45
... displayed. Portrait Beach/snow Shooting Suited for the selected scene is the default setting. 2 Press K, press H, I to select a scene mode, then press k. The shooting mode screen for the Scene 4 D Image Mode When using scene mode, you can set the Image mode setting (A 72) by pressing d. The following scene modes are automatically...
... displayed. Portrait Beach/snow Shooting Suited for the selected scene is the default setting. 2 Press K, press H, I to select a scene mode, then press k. The shooting mode screen for the Scene 4 D Image Mode When using scene mode, you can set the Image mode setting (A 72) by pressing d. The following scene modes are automatically...

User Manual
Page 47
... set to achieve a natural balance between the main subject and background lighting in a series of pictures. • The camera focuses on the center of the screen. • Digital zoom is not available. The camera focuses continuously until the shutterrelease button is pressed halfway to lock the focus. • While the shutter...
... set to achieve a natural balance between the main subject and background lighting in a series of pictures. • The camera focuses on the center of the screen. • Digital zoom is not available. The camera focuses continuously until the shutterrelease button is pressed halfway to lock the focus. • While the shutter...

User Manual
Page 64
...More on the both sides of the monitor disappear. A new picture, containing only the portion visible in the monitor with a gray border on the playback screen, and the small picture icon l or m is displayed on the image. To cancel, select No and press k. When the image is cropped and ... the Size of the Original Image The smaller the cropped area of the image, the smaller of the cropped image size (number of the playback screen. D More Information 52 See, "Image File and Folder Names" (A 110) for more information. Rotate the zoom control to g (i) or f (h) to zoom in landscape ...
...More on the both sides of the monitor disappear. A new picture, containing only the portion visible in the monitor with a gray border on the playback screen, and the small picture icon l or m is displayed on the image. To cancel, select No and press k. When the image is cropped and ... the Size of the Original Image The smaller the cropped area of the image, the smaller of the cropped image size (number of the playback screen. D More Information 52 See, "Image File and Folder Names" (A 110) for more information. Rotate the zoom control to g (i) or f (h) to zoom in landscape ...
User Manual
Page 65
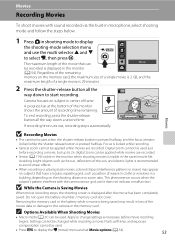
... selector H and I to display the D (movie) menu and set Movie options (A 54). 53 B While the Camera is Saving Movies When movie recording stops, the shooting screen is pressed halfway. Do not open the battery-chamber / memory card slot cover. C Options Available When Shooting Movies • Macro mode (A 31) can be used...
... selector H and I to display the D (movie) menu and set Movie options (A 54). 53 B While the Camera is Saving Movies When movie recording stops, the shooting screen is pressed halfway. Do not open the battery-chamber / memory card slot cover. C Options Available When Shooting Movies • Macro mode (A 31) can be used...
User Manual
Page 71
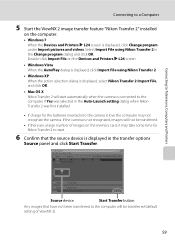
... images will not be transferred (default setting of images on the computer. • Windows 7 When the Devices and Printers K L24 screen is displayed, click Change program under Import pictures and videos. Source device Start Transfer button Any images that the source device is displayed... Import File on the Devices and Printers K L24 screen. • Windows Vista When the AutoPlay dialog is displayed, click Import File using Nikon Transfer 2 in the Auto-Launch setting dialog when Nikon Transfer 2 was first installed. • If charge for Nikon Transfer 2 to start. 6 Confirm that have...
... images will not be transferred (default setting of images on the computer. • Windows 7 When the Devices and Printers K L24 screen is displayed, click Change program under Import pictures and videos. Source device Start Transfer button Any images that the source device is displayed... Import File on the Devices and Printers K L24 screen. • Windows Vista When the AutoPlay dialog is displayed, click Import File using Nikon Transfer 2 in the Auto-Launch setting dialog when Nikon Transfer 2 was first installed. • If charge for Nikon Transfer 2 to start. 6 Confirm that have...
User Manual
Page 73
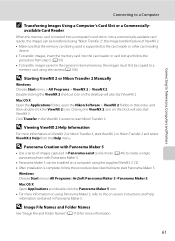
...desktop will also start ViewNX 2. Clicking the ViewNX 2 icon on -screen instructions and help information contained in the camera's internal memory, the images must first be installed on ViewNX 2 or Nikon Transfer 2, start ViewNX 2. Windows Choose Start menu>All Programs>ArcSoft ...Make sure that order, and then double-click the ViewNX 2 icon. D Viewing ViewNX 2 Help Information For more information. 61 D Starting ViewNX 2 or Nikon Transfer 2 Manually Windows Choose Start menu > All Programs > ViewNX 2 > ViewNX 2. D Panorama Creation with Panorama Maker 5. • Panorama Maker 5...
...desktop will also start ViewNX 2. Clicking the ViewNX 2 icon on -screen instructions and help information contained in the camera's internal memory, the images must first be installed on ViewNX 2 or Nikon Transfer 2, start ViewNX 2. Windows Choose Start menu>All Programs>ArcSoft ...Make sure that order, and then double-click the ViewNX 2 icon. D Viewing ViewNX 2 Help Information For more information. 61 D Starting ViewNX 2 or Nikon Transfer 2 Manually Windows Choose Start menu > All Programs > ViewNX 2 > ViewNX 2. D Panorama Creation with Panorama Maker 5. • Panorama Maker 5...

User Manual
Page 75
When disconnecting the USB cable, do not pull the connector at an angle. 63 When connected correctly, the PictBridge startup screen (1) is displayed in the camera monitor, then the Print selection screen (2) is displayed. 1 2 Print selection 15/05 2011 NO. 12 [ 12] B Connecting the Audio Video/USB Cable When connecting the USB cable...
When disconnecting the USB cable, do not pull the connector at an angle. 63 When connected correctly, the PictBridge startup screen (1) is displayed in the camera monitor, then the Print selection screen (2) is displayed. 1 2 Print selection 15/05 2011 NO. 12 [ 12] B Connecting the Audio Video/USB Cable When connecting the USB cable...

User Manual
Page 77
... step 1 when printing is displayed. 2 Use the multi selector to the printer correctly (A 63), print pictures by following the procedure below. 1 When the print selection screen is displayed, press d. 6 Choose Start print and press k.
... step 1 when printing is displayed. 2 Use the multi selector to the printer correctly (A 63), print pictures by following the procedure below. 1 When the print selection screen is displayed, press d. 6 Choose Start print and press k.

User Manual
Page 81
... of shooting date and photo information is displayed. • The date and time printed on pictures with DPOF printing when Date in the Print set screen. 69 Date and time printed using Date imprint (A 92) in the print set menu is enabled with the picture when it was taken. Pictures selected...
... of shooting date and photo information is displayed. • The date and time printed on pictures with DPOF printing when Date in the Print set screen. 69 Date and time printed using Date imprint (A 92) in the print set menu is enabled with the picture when it was taken. Pictures selected...

User Manual
Page 84
... for the current setting is approximately 1:8. The compression ratio is approximately 1:8. The compression ratio is approximately 1:4. N 1024×768 1024×768 Suited to full-screen display on a 4:3 television, or distribution by e-mail or the web. P 3968×2232 3968×2232 Pictures with a digital camera are recorded as image files...
... for the current setting is approximately 1:8. The compression ratio is approximately 1:8. The compression ratio is approximately 1:4. N 1024×768 1024×768 Suited to full-screen display on a 4:3 television, or distribution by e-mail or the web. P 3968×2232 3968×2232 Pictures with a digital camera are recorded as image files...

User Manual
Page 92
Playback menu: Print set: Select images (A 68) Erase selected images Delete: Erase selected images (A 82) Back Setup menu: Welcome screen: Select an image (A 86) Protect (A 104) Rotate image (A 105) Copy: Selected images (A 106) Follow the procedure described below ) when choosing pictures. Rotate the zoom control ... additional pictures. Repeat steps 1 and 2 to select ON or OFF (or the number of pictures, press k. Playback Options: The Playback Menu Selecting Multiple Pictures The screen shown at right will be selected for Rotate image and Welcome...
Playback menu: Print set: Select images (A 68) Erase selected images Delete: Erase selected images (A 82) Back Setup menu: Welcome screen: Select an image (A 86) Protect (A 104) Rotate image (A 105) Copy: Selected images (A 106) Follow the procedure described below ) when choosing pictures. Rotate the zoom control ... additional pictures. Repeat steps 1 and 2 to select ON or OFF (or the number of pictures, press k. Playback Options: The Playback Menu Selecting Multiple Pictures The screen shown at right will be selected for Rotate image and Welcome...


