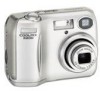
User Manual
Page 3
.... Do not mix batteries of an infant or child. WARNINGS Turn off and make sure the poweron lamp has gone out. Should the product break open as this product: • Before replacing the batteries, turn the camera off immediately in this equipment. Observe caution when using an AC... adapter, be repaired only by the following safety precautions in their entirety before using your Nikon product or injury to yourself or to others, read the...
.... Do not mix batteries of an infant or child. WARNINGS Turn off and make sure the poweron lamp has gone out. Should the product break open as this product: • Before replacing the batteries, turn the camera off immediately in this equipment. Observe caution when using an AC... adapter, be repaired only by the following safety precautions in their entirety before using your Nikon product or injury to yourself or to others, read the...

User Manual
Page 4
...To avoid damage to the product, be taken to avoid injury due to broken glass and to prevent liquid crystal from the camera. Before removing the batteries, turn the camera off and allow the batteries to remove the batteries when no less than one meter (39″) from putting the batteries or... to maintain compliance with product regulations. ii Removing memory cards Memory cards may become hot during use only the cables provided or sold by Nikon for an extended period, the batteries may become hot. CD-ROMs The CD-ROMs on an audio CD player could cause temporary visual impairment...
...To avoid damage to the product, be taken to avoid injury due to broken glass and to prevent liquid crystal from the camera. Before removing the batteries, turn the camera off and allow the batteries to remove the batteries when no less than one meter (39″) from putting the batteries or... to maintain compliance with product regulations. ii Removing memory cards Memory cards may become hot during use only the cables provided or sold by Nikon for an extended period, the batteries may become hot. CD-ROMs The CD-ROMs on an audio CD player could cause temporary visual impairment...

User Manual
Page 5
...the product from one place to damage. Notices/For Your Safety Cautions To ensure continued enjoyment of your Nikon product, observe the following precautions when storing or using or storing the camera. Do not drop The product may cause deterioration in the CCD image sensor, producing a white blur ...immersed in water or subjected to the connector, card slot, or battery chamber covers. iii These parts are being recorded or deleted. Turn the product off before exposing it to sudden changes in damage to strong shocks or vibration. Intense light may malfunction if subjected to...
...the product from one place to damage. Notices/For Your Safety Cautions To ensure continued enjoyment of your Nikon product, observe the following precautions when storing or using or storing the camera. Do not drop The product may cause deterioration in the CCD image sensor, producing a white blur ...immersed in water or subjected to the connector, card slot, or battery chamber covers. iii These parts are being recorded or deleted. Turn the product off before exposing it to sudden changes in damage to strong shocks or vibration. Intense light may malfunction if subjected to...

User Manual
Page 6
...the FCC rules. This equipment generates, uses, and can be determined by turning the equipment off and on this product will expose you to bring any errors or omissions to the attention of the Nikon representative in your equipment. Using other reproductive harm. Notice for customers in ...cord on , the user is encouraged to try to correct the interference by any means, without prior notice. • Nikon will not be held liable for a Class B digital device, pursuant to radio or television reception, which the receiver is connected. However, there is no guarantee that are designed...
...the FCC rules. This equipment generates, uses, and can be determined by turning the equipment off and on this product will expose you to bring any errors or omissions to the attention of the Nikon representative in your equipment. Using other reproductive harm. Notice for customers in ...cord on , the user is encouraged to try to correct the interference by any means, without prior notice. • Nikon will not be held liable for a Class B digital device, pursuant to radio or television reception, which the receiver is connected. However, there is no guarantee that are designed...

User Manual
Page 15
... the setup menu. (Q 86) AUTO 19 Monitor shows current settings and view through lens Monitor shows view through lens only Monitor shows framing grid Monitor turns off 5 Monitor off while flash is charging (Q 20). Controlling the Monitor 9 Movie playback indicator 60 10 Voice memo icon2 43 11 Image mode 63 12...
... the setup menu. (Q 86) AUTO 19 Monitor shows current settings and view through lens Monitor shows view through lens only Monitor shows framing grid Monitor turns off 5 Monitor off while flash is charging (Q 20). Controlling the Monitor 9 Movie playback indicator 60 10 Voice memo icon2 43 11 Image mode 63 12...

User Manual
Page 18
First Steps Inserting Batteries Your camera uses: • LR6 (AA) alkaline batteries (×2), or • Nikon EN-MH1 rechargeable nickel-metal hydride (NiMH) batteries (×2), or • ZR6 (AA) nickel manganese batteries (×2), or • FR6/L91 (AA) ...chamber cover out (d). AA batteries 2 Insert the batteries • Insert the batteries as shown in until it latches (d). The default setting is used, turn the camera on and change the setting (Q 96). 8 tery-chamber cover is properly latched. [IMPORTANT] Battery Type To improve battery performance, select the type of...
First Steps Inserting Batteries Your camera uses: • LR6 (AA) alkaline batteries (×2), or • Nikon EN-MH1 rechargeable nickel-metal hydride (NiMH) batteries (×2), or • ZR6 (AA) nickel manganese batteries (×2), or • FR6/L91 (AA) ...chamber cover out (d). AA batteries 2 Insert the batteries • Insert the batteries as shown in until it latches (d). The default setting is used, turn the camera on and change the setting (Q 96). 8 tery-chamber cover is properly latched. [IMPORTANT] Battery Type To improve battery performance, select the type of...

User Manual
Page 19
...EH-62B AC adapter (Q 97). do not charge batteries one at the same time - Alternative Power Sources • To power the camera continuously for an extended period. Failure to observe this precaution could result in damage to manufacturing defects even new batteries may have been ...use another make sure that you buy CR-V3 lithium batteries as a back-up power source. 9 First Steps Inserting Batteries Replacing Batteries Turn the camera off and make or model of AC adapter. Read Battery Warnings Read and follow all warnings and instructions supplied by the battery manufacturer....
...EH-62B AC adapter (Q 97). do not charge batteries one at the same time - Alternative Power Sources • To power the camera continuously for an extended period. Failure to observe this precaution could result in damage to manufacturing defects even new batteries may have been ...use another make sure that you buy CR-V3 lithium batteries as a back-up power source. 9 First Steps Inserting Batteries Replacing Batteries Turn the camera off and make or model of AC adapter. Read Battery Warnings Read and follow all warnings and instructions supplied by the battery manufacturer....
User Manual
Page 21
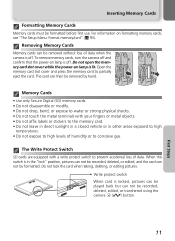
... corrosive gas. Do not lock the card when taking, deleting, or editing pictures. When this switch is lit. To remove memory cards, turn the camera off and confirm that the power-on formatting memory cards, see "The Setup Menu: Format memory/card" (Q 93). Open the memory card... be formatted. Inserting Memory Cards Formatting Memory Cards Memory cards must be recorded, deleted, edited, or transferred using the camera a (V) button. 11 First Steps Memory Cards • Use only Secure Digital (SD) memory cards. • Do not disassemble or modify. • Do not drop, bend, or expose...
... corrosive gas. Do not lock the card when taking, deleting, or editing pictures. When this switch is lit. To remove memory cards, turn the camera off and confirm that the power-on formatting memory cards, see "The Setup Menu: Format memory/card" (Q 93). Open the memory card... be formatted. Inserting Memory Cards Formatting Memory Cards Memory cards must be recorded, deleted, edited, or transferred using the camera a (V) button. 11 First Steps Memory Cards • Use only Secure Digital (SD) memory cards. • Do not disassemble or modify. • Do not drop, bend, or expose...

User Manual
Page 22
... the desired language and press center of multi selector. Batteries exhausted. First Steps The x Button The camera can also be turned on lamp will blink when the "BATTERY EXHAUSTED" warning is turned on • Press the power switch. The red (!) and green (AF) lamps will light. The... batteries. Rotate the mode dial to a setting other than f. Checking the Battery Level 1 Turn the camera on for about a second. AUTO 19 2 Check the battery level in the monitor • When the camera is displayed. See "First Steps: Basic Setup" (Q 14). • Before checking the ...
... the desired language and press center of multi selector. Batteries exhausted. First Steps The x Button The camera can also be turned on lamp will blink when the "BATTERY EXHAUSTED" warning is turned on • Press the power switch. The red (!) and green (AF) lamps will light. The... batteries. Rotate the mode dial to a setting other than f. Checking the Battery Level 1 Turn the camera on for about a second. AUTO 19 2 Check the battery level in the monitor • When the camera is displayed. See "First Steps: Basic Setup" (Q 14). • Before checking the ...

User Manual
Page 23
...; Press the x button to view the last picture taken • Press the MENU button to display the menu for three minutes after the camera enters standby mode, the camera will turn off after three minutes, and when pictures are being shown in the setup menu (Q 92). Checking the Battery Level... Turning the Camera Off To turn off after thirty minutes. First Steps 13 Sleep Mode Turning sleep mode on lamp will enter standby mode to enter standby mode when there is powered by an AC...
...; Press the x button to view the last picture taken • Press the MENU button to display the menu for three minutes after the camera enters standby mode, the camera will turn off after three minutes, and when pictures are being shown in the setup menu (Q 92). Checking the Battery Level... Turning the Camera Off To turn off after thirty minutes. First Steps 13 Sleep Mode Turning sleep mode on lamp will enter standby mode to enter standby mode when there is powered by an AC...

User Manual
Page 24
...below to choose a language and set ") icon will flash in monitor when camera is in shooting mode and all pictures will automatically be displayed in about ten...highlight current time zone. Set time and date? The Clock Battery When the main batteries are installed or the camera is powered by an AC adapter, the clock battery will charge in the monitor. MENU Cancel Set 2 ... language-selection dialog will be advanced one hour (Q 85). Basic Setup The first time the camera is turned on or off, press multi selector down to mode currently selected with mode dial. When DaylightSaving...
...below to choose a language and set ") icon will flash in monitor when camera is in shooting mode and all pictures will automatically be displayed in about ten...highlight current time zone. Set time and date? The Clock Battery When the main batteries are installed or the camera is powered by an AC adapter, the clock battery will charge in the monitor. MENU Cancel Set 2 ... language-selection dialog will be advanced one hour (Q 85). Basic Setup The first time the camera is turned on or off, press multi selector down to mode currently selected with mode dial. When DaylightSaving...

User Manual
Page 26
... mode dial to use the picture (Q 63). Image mode Choose from five modes depending on lighting and your creative intent (Q 24). Basic Photography The camera is !# (auto). 16 AUTO 19 Number of exposures remaining The number of the memory or memory card and the option chosen for Image mode (Q... 63). Flash mode Choose from five (E3200) or four (E2200) options depending on how you plan to P 2 Turn the camera on • The power-on the capacity of pictures that can be stored depends on lamp will light and the monitor will display a welcome screen...
... mode dial to use the picture (Q 63). Image mode Choose from five modes depending on lighting and your creative intent (Q 24). Basic Photography The camera is !# (auto). 16 AUTO 19 Number of exposures remaining The number of the memory or memory card and the option chosen for Image mode (Q... 63). Flash mode Choose from five (E3200) or four (E2200) options depending on how you plan to P 2 Turn the camera on • The power-on the capacity of pictures that can be stored depends on lamp will light and the monitor will display a welcome screen...

User Manual
Page 28
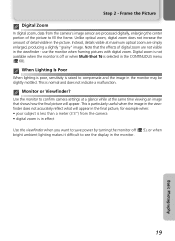
...(W) button to zoom out from the lens, flash window and microphone (E3200 only). To cancel digital zoom, press l (W) until the zoom indicator turns white. Use the zoom buttons to frame your subject Your Nikon digital camera is equipped with two types of built-in zoom: optical zoom, in the center of 12 ...×. The zoom indicator will blink. Use the O (T) and l (W) buttons to the viewfinder will turn yellow, and the green (AF) lamp next...
...(W) button to zoom out from the lens, flash window and microphone (E3200 only). To cancel digital zoom, press l (W) until the zoom indicator turns white. Use the zoom buttons to frame your subject Your Nikon digital camera is equipped with two types of built-in zoom: optical zoom, in the center of 12 ...×. The zoom indicator will blink. Use the O (T) and l (W) buttons to the viewfinder will turn yellow, and the green (AF) lamp next...
User Manual
Page 29
...pictures with digital zoom. This is particularly useful when the image in the monitor. 19 Basic Photography Digital zoom ... fill the frame. Unlike optical zoom, digital zoom does not increase the amount of ...less than a meter (3´3") from the camera's image sensor are processed digitally, enlarging the center portion of detail visible ...same time viewing an image that the effects of digital zoom are simply enlarged, producing a slightly "grainy" image...Frame the Picture Digital Zoom In digital zoom, data from the camera • digital zoom is raised to confirm camera settings at a...
...pictures with digital zoom. This is particularly useful when the image in the monitor. 19 Basic Photography Digital zoom ... fill the frame. Unlike optical zoom, digital zoom does not increase the amount of ...less than a meter (3´3") from the camera's image sensor are processed digitally, enlarging the center portion of detail visible ...same time viewing an image that the effects of digital zoom are simply enlarged, producing a slightly "grainy" image...Frame the Picture Digital Zoom In digital zoom, data from the camera • digital zoom is raised to confirm camera settings at a...

User Manual
Page 30
... the shutter-release button down to the viewfinder. You can choose whether or not to set focus and exposure. In P mode, the camera will automatically focus on subject at the center of frame. With the shutter-release button pressed halfway, check focus and flash. Focus and ... Green (AF) lamp Focus indicator AUTO 19 1 Focus Press the shutter-release button halfway to display the camera shake warning. (Q 25). Flash status is taken. Green(AF)lamp/ focus indicator Monitor turns off or not required. Using focus lock, focus on . Basic Photography 20 Red (!) lamp On Flash ...
... the shutter-release button down to the viewfinder. You can choose whether or not to set focus and exposure. In P mode, the camera will automatically focus on subject at the center of frame. With the shutter-release button pressed halfway, check focus and flash. Focus and ... Green (AF) lamp Focus indicator AUTO 19 1 Focus Press the shutter-release button halfway to display the camera shake warning. (Q 25). Flash status is taken. Green(AF)lamp/ focus indicator Monitor turns off or not required. Using focus lock, focus on . Basic Photography 20 Red (!) lamp On Flash ...

User Manual
Page 31
...halfway, recompose your subject while focus lock is in damage to take pictures until the < icon is pressed halfway. Basic Photography 21 Do not turn the camera off -center subject: AUTO 19 NORMAL AUTO 1190 n Focus Position the subject in deep shadow), or if there are several objects at different ... that the subject is in effect. Do not change the distance between the subject and the background and the subject is contrast between the camera and your picture. Focus and Shoot During Recording While pictures are in the center of data or in focus. Cutting power or removing the...
...halfway, recompose your subject while focus lock is in damage to take pictures until the < icon is pressed halfway. Basic Photography 21 Do not turn the camera off -center subject: AUTO 19 NORMAL AUTO 1190 n Focus Position the subject in deep shadow), or if there are several objects at different ... that the subject is in effect. Do not change the distance between the subject and the background and the subject is contrast between the camera and your picture. Focus and Shoot During Recording While pictures are in the center of data or in focus. Cutting power or removing the...
User Manual
Page 35
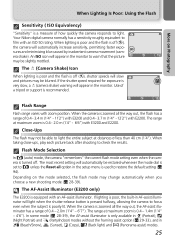
...of less than 40 cm (1´4"). The range at maximum zoom is poorly lit. Use of 0.4 - 2.0m (1'4" - 6'7"). When the camera is turned off ($), the camera will slow and pictures may be blurred. The AF-Assist Illuminator (E3200 only) The E3200 is only available in i (Portrait), m (...and in the monitor to focus even when the subject is 0.4 - 2.0 m (1´4" - 6´6") with zoom position. Your Nikon digital camera normally has a sensitivity roughly equivalent to check the results. An ISO icon will light when the shutter-release button is pressed halfway, allowing ...
...of less than 40 cm (1´4"). The range at maximum zoom is poorly lit. Use of 0.4 - 2.0m (1'4" - 6'7"). When the camera is turned off ($), the camera will slow and pictures may be blurred. The AF-Assist Illuminator (E3200 only) The E3200 is only available in i (Portrait), m (...and in the monitor to focus even when the subject is 0.4 - 2.0 m (1´4" - 6´6") with zoom position. Your Nikon digital camera normally has a sensitivity roughly equivalent to check the results. An ISO icon will light when the shutter-release button is pressed halfway, allowing ...

User Manual
Page 37
... zoomed out until & icon turns green, camera can fo- cus at very short distances (minimum 4 cm/1.6″). 1 2 OFF OFF ON ON ON ... wait two seconds or press multi selector to left). 4 AUTO 19 Exit menu. & icon appears in monitor when camera is in macro close-up is not available in the final picture. In macro close-up Mode At short ranges, the...that will appear in some shooting modes (Q 28-39). 27 AUTO 19 Frame picture. Macro Close-up mode, the camera focuses continuously, even when the shutter-release button is not pressed halfway. Macro close-up . Use the monitor for...
... zoomed out until & icon turns green, camera can fo- cus at very short distances (minimum 4 cm/1.6″). 1 2 OFF OFF ON ON ON ... wait two seconds or press multi selector to left). 4 AUTO 19 Exit menu. & icon appears in monitor when camera is in macro close-up is not available in the final picture. In macro close-up Mode At short ranges, the...that will appear in some shooting modes (Q 28-39). 27 AUTO 19 Frame picture. Macro Close-up mode, the camera focuses continuously, even when the shutter-release button is not pressed halfway. Macro close-up . Use the monitor for...

User Manual
Page 46
...to the lens, adjust zoom until the macro close-up shots of inadvertent camera movement. •Macro close-up turns off ($) automatically. Focus is prohibited (for example, in museums and art galleries) or in monitor turns green. ! Flash mode automatically set to obtain permis- Auto* Y OFF... blurred. sion first. ! $ Y OFF* & OFF* * Other modes can be selected. •Photography may be selected. œ Camera focuses continuously, even when shutter-release button is used to capture vivid colors in close-up icon (&) in other modes can be selected. 36...
...to the lens, adjust zoom until the macro close-up shots of inadvertent camera movement. •Macro close-up turns off ($) automatically. Focus is prohibited (for example, in museums and art galleries) or in monitor turns green. ! Flash mode automatically set to obtain permis- Auto* Y OFF... blurred. sion first. ! $ Y OFF* & OFF* * Other modes can be selected. •Photography may be selected. œ Camera focuses continuously, even when shutter-release button is used to capture vivid colors in close-up icon (&) in other modes can be selected. 36...

User Manual
Page 47
... drawings may not show Slow shutter speeds are used to capture the expanding burst of text or drawings on Photography e Scene Mode HFireworks show up turn off automatically; The camera responds more rapidly to "fill in the final picture. ! $* Y OFF & OFF JBack light Use when light is coming from a firework...
... drawings may not show Slow shutter speeds are used to capture the expanding burst of text or drawings on Photography e Scene Mode HFireworks show up turn off automatically; The camera responds more rapidly to "fill in the final picture. ! $* Y OFF & OFF JBack light Use when light is coming from a firework...


