D90 User's Manual
Page 6
... settings? Self timer, remote control What optional flash units (Speedlights) can I use the monitor as a viewfinder? Servicing the camera How do I clean the camera or lens? Picture Controls How do I preserve details in focus when changing the composition? 3D-tracking How do with this card? Control panel, viewfinder What does this...
... settings? Self timer, remote control What optional flash units (Speedlights) can I use the monitor as a viewfinder? Servicing the camera How do I clean the camera or lens? Picture Controls How do I preserve details in focus when changing the composition? 3D-tracking How do with this card? Control panel, viewfinder What does this...

D90 User's Manual
Page 9
...photograph? Color balance Can I create a monochrome copy of a photograph? Small picture Can I compare retouched copies with different colors? Fisheye Can I overlay two photos to make a single image? Delete Playback zoom Protect Pictmotion Slide show ") option? NEF (RAW) processing Is there a quick way to my ...sure they're in on the camera? Viewing and Retouching Photographs Question Key phrase Can I create the effect of a fisheye lens? Can I print photographs? Side-by-side comparison See page 48, 128 129 49, 140, 162 162 138 139 141,...
...photograph? Color balance Can I create a monochrome copy of a photograph? Small picture Can I compare retouched copies with different colors? Fisheye Can I overlay two photos to make a single image? Delete Playback zoom Protect Pictmotion Slide show ") option? NEF (RAW) processing Is there a quick way to my ...sure they're in on the camera? Viewing and Retouching Photographs Question Key phrase Can I create the effect of a fisheye lens? Can I print photographs? Side-by-side comparison See page 48, 128 129 49, 140, 162 162 138 139 141,...
D90 User's Manual
Page 10
... Viewfinder Eyepiece Cup 17 Camera Menus...18 Using Camera Menus ...19 Help ...21 First Steps ...22 Charge the Battery ...22 Insert the Battery ...23 Attach a Lens...25 Basic Setup...27 Inserting Memory Cards...29 Adjust Viewfinder Focus ...32 Basic Photography and Playback 33 "Point-and-Shoot" Photography (i and j Modes 34 Step...
... Viewfinder Eyepiece Cup 17 Camera Menus...18 Using Camera Menus ...19 Help ...21 First Steps ...22 Charge the Battery ...22 Insert the Battery ...23 Attach a Lens...25 Basic Setup...27 Inserting Memory Cards...29 Adjust Viewfinder Focus ...32 Basic Photography and Playback 33 "Point-and-Shoot" Photography (i and j Modes 34 Step...
D90 User's Manual
Page 21
... Viewfinder Eyepiece Cup 17 Camera Menus ...18 Using Camera Menus...19 Help...21 First Steps...22 Charge the Battery ...22 Insert the Battery ...23 Attach a Lens ...25 Basic Setup ...27 Inserting Memory Cards...29 Adjust Viewfinder Focus...32 1 Overview ...2 Getting to ready the camera for use.
... Viewfinder Eyepiece Cup 17 Camera Menus ...18 Using Camera Menus...19 Help...21 First Steps...22 Charge the Battery ...22 Insert the Battery ...23 Attach a Lens ...25 Basic Setup ...27 Inserting Memory Cards...29 Adjust Viewfinder Focus...32 1 Overview ...2 Getting to ready the camera for use.
D90 User's Manual
Page 22
... DAMAGE YOUR CAMERA AND MAY VOID YOUR NIKON WARRANTY. D Use Only Nikon Brand Accessories Only Nikon brand accessories certified by Nikon specifically for your purchase of a Nikon single-lens reflex (SLR) digital camera. To get the most from your Nikon digital camera are particularly recommended if the camera ... services). Frequent inspection and servicing are engineered and proven to read by the original retailer or a Nikon-authorized service representative once every one to two years, and that it be included when the camera is a precision device and requires regular servicing...
... DAMAGE YOUR CAMERA AND MAY VOID YOUR NIKON WARRANTY. D Use Only Nikon Brand Accessories Only Nikon brand accessories certified by Nikon specifically for your purchase of a Nikon single-lens reflex (SLR) digital camera. To get the most from your Nikon digital camera are particularly recommended if the camera ... services). Frequent inspection and servicing are engineered and proven to read by the original retailer or a Nikon-authorized service representative once every one to two years, and that it be included when the camera is a precision device and requires regular servicing...
D90 User's Manual
Page 23
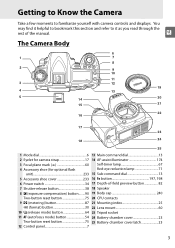
... mark (E 60 4 Accessory shoe (for optional flash unit 233 5 Accessory shoe cover 233 6 Power switch 34 7 Shutter-release button 38 8 E (exposure compensation) button........90 Two-button reset button 75 9 Z (metering) button 87 Q (format) button 30 10 I (release mode) button 64 11 AF (autofocus mode) button 54...as you read through the rest of -field preview button 82 18 Speaker 19 Body cap 240 20 CPU contacts 21 Mounting index 25 22 Lens mount 60 23 Tripod socket 24 Battery-chamber cover 23 25 Battery-chamber cover latch 23 3 You may find it helpful to bookmark this section...
... mark (E 60 4 Accessory shoe (for optional flash unit 233 5 Accessory shoe cover 233 6 Power switch 34 7 Shutter-release button 38 8 E (exposure compensation) button........90 Two-button reset button 75 9 Z (metering) button 87 Q (format) button 30 10 I (release mode) button 64 11 AF (autofocus mode) button 54...as you read through the rest of -field preview button 82 18 Speaker 19 Body cap 240 20 CPU contacts 21 Mounting index 25 22 Lens mount 60 23 Tripod socket 24 Battery-chamber cover 23 25 Battery-chamber cover latch 23 3 You may find it helpful to bookmark this section...
D90 User's Manual
Page 24
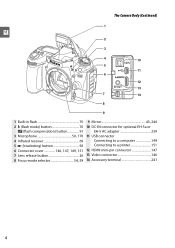
The Camera Body (Continued) 1 X 2 3 4 10 5 11 6 12 13 7 14 8 9 1 Built-in flash 70 9 Mirror 43, 246 2 M (flash mode) button 70 10 DC-IN connector for optional EH-5a or Y (flash compensation) button 91 EH-5 AC adapter 239 3 Microphone 50, 170 11 USB connector 4 Infrared receiver 69 Connecting to a computer 149 5 D (bracketing) button 92 Connecting to a printer 151 6 Connector cover 146, 147, 149, 151 12 HDMI mini-pin connector 147 7 Lens release button 26 13 Video connector 146 8 Focus-mode selector 54, 59 14 Accessory terminal 241 4
The Camera Body (Continued) 1 X 2 3 4 10 5 11 6 12 13 7 14 8 9 1 Built-in flash 70 9 Mirror 43, 246 2 M (flash mode) button 70 10 DC-IN connector for optional EH-5a or Y (flash compensation) button 91 EH-5 AC adapter 239 3 Microphone 50, 170 11 USB connector 4 Infrared receiver 69 Connecting to a computer 149 5 D (bracketing) button 92 Connecting to a printer 151 6 Connector cover 146, 147, 149, 151 12 HDMI mini-pin connector 147 7 Lens release button 26 13 Video connector 146 8 Focus-mode selector 54, 59 14 Accessory terminal 241 4

D90 User's Manual
Page 45
...dust from entering the camera when the lens is off, remove the rear lens cap from the lens and remove the camera body cap. If the lens is used in the camera's bayonet mount. qw 2 Attach the lens. An AF-S DX NIKKOR 18-105mm f/3.5-5.6G ED VR lens is equipped with an A-M or ... this manual for illustrative purposes. After confirming that the camera is removed. Mounting index 25 X Focal length scale Lens hood (pg. 273) Mounting index Focal length index Lens cap CPU contacts (pg. 228) Rear cover Focus mode switch (pg. 25, 273) Zoom ring VR (vibration reduction) switch Focus ring...
...dust from entering the camera when the lens is off, remove the rear lens cap from the lens and remove the camera body cap. If the lens is used in the camera's bayonet mount. qw 2 Attach the lens. An AF-S DX NIKKOR 18-105mm f/3.5-5.6G ED VR lens is equipped with an A-M or ... this manual for illustrative purposes. After confirming that the camera is removed. Mounting index 25 X Focal length scale Lens hood (pg. 273) Mounting index Focal length index Lens cap CPU contacts (pg. 228) Rear cover Focus mode switch (pg. 25, 273) Zoom ring VR (vibration reduction) switch Focus ring...
D90 User's Manual
Page 46
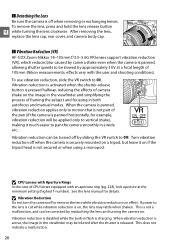
... shutter-release button is in a wide arc. To remove the lens, press and hold the lens release button X while turning the lens clockwise. D CPU Lenses with Aperture Rings In the case of 105mm (Nikon measurements; Vibration reduction can be slowed by reattaching the lens and turning the camera on. When the camera is panned, vibration...
... shutter-release button is in a wide arc. To remove the lens, press and hold the lens release button X while turning the lens clockwise. D CPU Lenses with Aperture Rings In the case of 105mm (Nikon measurements; Vibration reduction can be slowed by reattaching the lens and turning the camera on. When the camera is panned, vibration...

D90 User's Manual
Page 52
... to put your fingers or fingernails in vision. Rotate the diopter control until the viewfinder display and focus point are in the viewfinder. 1 Remove the lens cap and turn the camera Power switch on. 2 Focus the viewfinder.
... to put your fingers or fingernails in vision. Rotate the diopter control until the viewfinder display and focus point are in the viewfinder. 1 Remove the lens cap and turn the camera Power switch on. 2 Focus the viewfinder.

D90 User's Manual
Page 53
... viewing photographs in the Monitor (Live View 43 Basic Playback...48 Deleting Unwanted Photographs 49 Recording and Viewing Movies (Live View 50 A Use a CPU Lens Auto and scene modes are selected when a non-CPU lens is attached, the shutter release will be disabled. 33 It assumes that default camera settings are used;
... viewing photographs in the Monitor (Live View 43 Basic Playback...48 Deleting Unwanted Photographs 49 Recording and Viewing Movies (Live View 50 A Use a CPU Lens Auto and scene modes are selected when a non-CPU lens is attached, the shutter release will be disabled. 33 It assumes that default camera settings are used;

D90 User's Manual
Page 54
Battery partially discharged. Remove the lens cap and turn the camera on . Control panel Viewfinder Description L - K J - instead, a 9 icon appears in the viewfinder or control panel. The control panel and viewfinder displays ...
Battery partially discharged. Remove the lens cap and turn the camera on . Control panel Viewfinder Description L - K J - instead, a 9 icon appears in the viewfinder or control panel. The control panel and viewfinder displays ...

D90 User's Manual
Page 57
... 43. 2 Frame the photograph. Frame a photograph in the viewfinder with the main subject in your right hand and cradle the camera body or lens with your upper body stable. Zoom in , shorter focal lengths to increase the area visible in the final photograph (select longer focal lengths on ...framing photographs in the monitor in portrait (tall) orientation. In j mode, shutter speeds slow when lighting is recommended. Focus point A Using a Zoom Lens Use the zoom ring to zoom in on the subject so that it fills a larger area of the eleven focus points. Keep your elbows propped...
... 43. 2 Frame the photograph. Frame a photograph in the viewfinder with the main subject in your right hand and cradle the camera body or lens with your upper body stable. Zoom in , shorter focal lengths to increase the area visible in the final photograph (select longer focal lengths on ...framing photographs in the monitor in portrait (tall) orientation. In j mode, shutter speeds slow when lighting is recommended. Focus point A Using a Zoom Lens Use the zoom ring to zoom in on the subject so that it fills a larger area of the eleven focus points. Keep your elbows propped...
D90 User's Manual
Page 60
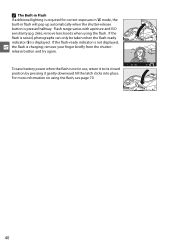
remove lens hoods when using the flash, see page 70. 40 If the flash is raised, photographs can only be taken when the flash-ready indicator (M) is ...
remove lens hoods when using the flash, see page 70. 40 If the flash is raised, photographs can only be taken when the flash-ready indicator (M) is ...

D90 User's Manual
Page 61
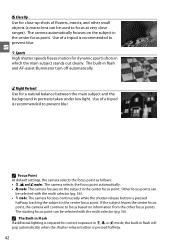
... will be softened to lend the composition a sense of depth. Mode Description s k Portrait For portraits. If the subject is far from the background or a telephoto lens is poor. 41 The builtin flash and AF-assist illuminator turn off automatically. To take photographs in daylight or at night. Selecting a program automatically optimizes...
... will be softened to lend the composition a sense of depth. Mode Description s k Portrait For portraits. If the subject is far from the background or a telephoto lens is poor. 41 The builtin flash and AF-assist illuminator turn off automatically. To take photographs in daylight or at night. Selecting a program automatically optimizes...
D90 User's Manual
Page 62
... exposure in k, n, or o mode, the built-in flash will continue to focus at very close -up shots of flowers, insects, and other small objects (a macro lens can be used to focus based on information from the other focus points. Use of a tripod is pressed halfway. 42 If the subject leaves the...
... exposure in k, n, or o mode, the built-in flash will continue to focus at very close -up shots of flowers, insects, and other small objects (a macro lens can be used to focus based on information from the other focus points. Use of a tripod is pressed halfway. 42 If the subject leaves the...

D90 User's Manual
Page 63
... live view mode. 43 The subject will no longer be displayed in the camera monitor. The mirror will be raised and the view through the lens will end in 30 s or less. 46 e "No movie" icon Indicates that metering can not be changed in the viewfinder. Displayed if shooting will be...
... live view mode. 43 The subject will no longer be displayed in the camera monitor. The mirror will be raised and the view through the lens will end in 30 s or less. 46 e "No movie" icon Indicates that metering can not be changed in the viewfinder. Displayed if shooting will be...
D90 User's Manual
Page 64
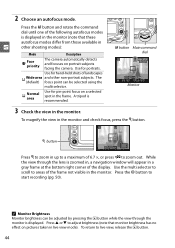
... autofocus modes differ from those available in the monitor. A Monitor Brightness Monitor brightness can be adjusted by pressing the K button while the view through the lens is displayed. Normal area Use for portraits. Use the multi selector to scroll to start recording (pg. 50). While the view through the monitor is...
... autofocus modes differ from those available in the monitor. A Monitor Brightness Monitor brightness can be adjusted by pressing the K button while the view through the lens is displayed. Normal area Use for portraits. Use the multi selector to scroll to start recording (pg. 50). While the view through the monitor is...

D90 User's Manual
Page 66
...button to the camera's Exit internal circuits, live view mode, avoid pointing the camera at high speed through frame. To reduce blur when using the lens focusing ring. 6 s Take the picture. D Shooting in Live View Mode Although they will be used in live view mode is removed. Live view... shooting ends automatically if the lens is selected. A count-down to an hour. The effects of the camera's internal circuits may also become noticeably warm, but are visible ...
...button to the camera's Exit internal circuits, live view mode, avoid pointing the camera at high speed through frame. To reduce blur when using the lens focusing ring. 6 s Take the picture. D Shooting in Live View Mode Although they will be used in live view mode is removed. Live view... shooting ends automatically if the lens is selected. A count-down to an hour. The effects of the camera's internal circuits may also become noticeably warm, but are visible ...

D90 User's Manual
Page 67
Use an AF-S lens. A The Shooting Information Display To hide or display indicators in the monitor in live view. If a flashing double red border is displayed, the camera is ... Autofocus is pressed halfway. If no face is detected when the shutter-release button is pressed halfway, the camera will display the view through the lens as shown at right. The desired results may not be displayed in green when the camera is facing the camera. D Face-Priority AF The camera...
Use an AF-S lens. A The Shooting Information Display To hide or display indicators in the monitor in live view. If a flashing double red border is displayed, the camera is ... Autofocus is pressed halfway. If no face is detected when the shutter-release button is pressed halfway, the camera will display the view through the lens as shown at right. The desired results may not be displayed in green when the camera is facing the camera. D Face-Priority AF The camera...


