
User Manual
Page 1
Plumeria Drive San Jose, CA 95134 USA 802.11ac Wireless Access Point Model WAC104 User Manual November 2016 202-11698-02 350 E.
Plumeria Drive San Jose, CA 95134 USA 802.11ac Wireless Access Point Model WAC104 User Manual November 2016 202-11698-02 350 E.

User Manual
Page 3
Contents Chapter 1 Hardware Overview of the Access Point Unpack the Access Point 6 Top Panel With LEDs 6 Back Panel...7 Position the Antennas 8 Product Label...9 Chapter 2 Install and Access the Access Point in Your Network Position Your Access Point 11 Connect the Access Point to Your Router or Network 12 Connect the Access Point to Your Router 12 Connect the Access Point to a Network With a DHCP Server 14...
Contents Chapter 1 Hardware Overview of the Access Point Unpack the Access Point 6 Top Panel With LEDs 6 Back Panel...7 Position the Antennas 8 Product Label...9 Chapter 2 Install and Access the Access Point in Your Network Position Your Access Point 11 Connect the Access Point to Your Router or Network 12 Connect the Access Point to Your Router 12 Connect the Access Point to a Network With a DHCP Server 14...
User Manual
Page 4
... the Reset Button 45 Erase the Settings 45 Change the IP Address Settings of the Access Point 46 View Devices Currently on the Network 48 View the Status and Statistics of the Access Point 49 View Information About the Access Point and the IP and WiFi Settings.........49 View the Traffic Statistics 53 Change the Traffic... LED Remains Blinking Green 70 WiFi LED Is Off 71 Troubleshoot the WiFi Connectivity 71 Troubleshoot Internet Browsing 71 You Cannot Log In to the Access Point 72 Changes Are Not Saved 72 Troubleshoot Your Network Using the Ping Utility 73 Test the LAN Path to Your...
... the Reset Button 45 Erase the Settings 45 Change the IP Address Settings of the Access Point 46 View Devices Currently on the Network 48 View the Status and Statistics of the Access Point 49 View Information About the Access Point and the IP and WiFi Settings.........49 View the Traffic Statistics 53 Change the Traffic... LED Remains Blinking Green 70 WiFi LED Is Off 71 Troubleshoot the WiFi Connectivity 71 Troubleshoot Internet Browsing 71 You Cannot Log In to the Access Point 72 Changes Are Not Saved 72 Troubleshoot Your Network Using the Ping Utility 73 Test the LAN Path to Your...

User Manual
Page 5
... a switch or hub that are made available from time to your DSL or cable modem. 1 Hardware Overview of the Access Point The NETGEAR 802.11ac Wireless Access Point Model WAC104, in this manual referred to as the access point, supports dual-band concurrent operation at 2.4 GHz and 5 GHz with new features and bug fixes are covered in this...
... a switch or hub that are made available from time to your DSL or cable modem. 1 Hardware Overview of the Access Point The NETGEAR 802.11ac Wireless Access Point Model WAC104, in this manual referred to as the access point, supports dual-band concurrent operation at 2.4 GHz and 5 GHz with new features and bug fixes are covered in this...

User Manual
Page 6
Figure 1. Hardware Overview of the access point. WAC104 package contents Top Panel With LEDs The status LEDs are located on the top panel of the Access Point 6 802.11ac Wireless Access Unpack the Access Point The package contains the access point, Ethernet cable, power adapter (localized to the country of sale), and installation guide.
Figure 1. Hardware Overview of the access point. WAC104 package contents Top Panel With LEDs The status LEDs are located on the top panel of the Access Point 6 802.11ac Wireless Access Unpack the Access Point The package contains the access point, Ethernet cable, power adapter (localized to the country of sale), and installation guide.

User Manual
Page 7
...No powered-on page 37. LED descriptions LED Power WPS WiFi LAN Description • Solid green. Someone pressed the WPS button on the access point to Its Factory Default Settings on page 24. • Solid green. For more information, see Wi-Fi Protected Setup Method on page... Setup) is ready for two minutes. A powered-on page 70. • Off. The access point is starting or upgrading firmware. Back Panel The back panel of the Access Point 7 Hardware Overview of the access point provides ports, buttons, and a DC power connector. If the Power LED is restarting. One ...
...No powered-on page 37. LED descriptions LED Power WPS WiFi LAN Description • Solid green. Someone pressed the WPS button on the access point to Its Factory Default Settings on page 24. • Solid green. For more information, see Wi-Fi Protected Setup Method on page... Setup) is ready for two minutes. A powered-on page 70. • Off. The access point is starting or upgrading firmware. Back Panel The back panel of the Access Point 7 Hardware Overview of the access point provides ports, buttons, and a DC power connector. If the Power LED is restarting. One ...

User Manual
Page 8
... page 45. • Power On/Off button. Press the WiFi On/Off button for best performance, we recommend that you position the access point's antennas perpendicular to Ethernet devices such as computers. • Reset button. For more information, see Wi-Fi Protected Setup Method on page... the Power On/Off button to provide power to Ethernet devices. Figure 3. Four Gigabit Ethernet RJ-45 LAN ports to connect the access point to the access point. • DC power connector. Connect the power adapter that is, at a 90-degree angle. Examples of recommended antenna positions Hardware...
... page 45. • Power On/Off button. Press the WiFi On/Off button for best performance, we recommend that you position the access point's antennas perpendicular to Ethernet devices such as computers. • Reset button. For more information, see Wi-Fi Protected Setup Method on page... the Power On/Off button to provide power to Ethernet devices. Figure 3. Four Gigabit Ethernet RJ-45 LAN ports to connect the access point to the access point. • DC power connector. Connect the power adapter that is, at a 90-degree angle. Examples of recommended antenna positions Hardware...
User Manual
Page 9
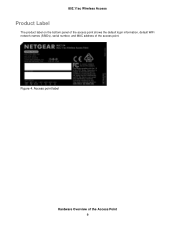
Figure 4. Access point label Hardware Overview of the access point. 802.11ac Wireless Access Product Label The product label on the bottom panel of the access point shows the default login information, default WiFi network names (SSIDs), serial number, and MAC address of the Access Point 9
Figure 4. Access point label Hardware Overview of the access point. 802.11ac Wireless Access Product Label The product label on the bottom panel of the access point shows the default login information, default WiFi network names (SSIDs), serial number, and MAC address of the Access Point 9

User Manual
Page 10
The chapter contains the following sections: • Position Your Access Point on page 11 • Connect the Access Point to Your Router or Network on page 12 • Log In to the Access Point After Setup to View or Change Settings on page 19 • Change the Language on page 20 • Change the admin ... Up Password Recovery on page 21 • Set the Time Zone and Adjust the Daylight Saving Time on page 22 • Connect to the Access Point's Network After Installation on page 23 10 2 Install and Access the Access Point in Your Network This chapter describes how you can install and...
The chapter contains the following sections: • Position Your Access Point on page 11 • Connect the Access Point to Your Router or Network on page 12 • Log In to the Access Point After Setup to View or Change Settings on page 19 • Change the Language on page 20 • Change the admin ... Up Password Recovery on page 21 • Set the Time Zone and Adjust the Daylight Saving Time on page 22 • Connect to the Access Point's Network After Installation on page 23 10 2 Install and Access the Access Point in Your Network This chapter describes how you can install and...

User Manual
Page 11
... the physical placement of your access point's signal. Additionally, other WiFi access points in and around your home might affect your access point. Microwaves - Install and Access the Access Point in an elevated location, minimizing the number walls and ceilings between the access point and your WiFi network. Computers - Solid metal door - WiFi access points are using adjacent access points, use different radio frequency channels...
... the physical placement of your access point's signal. Additionally, other WiFi access points in and around your home might affect your access point. Microwaves - Install and Access the Access Point in an elevated location, minimizing the number walls and ceilings between the access point and your WiFi network. Computers - Solid metal door - WiFi access points are using adjacent access points, use different radio frequency channels...

User Manual
Page 12
... access point's LAN and WiFi clients, these sections. Basically, the access point functions as NAT and a DHCP server. 802.11ac Wireless Access Connect the Access Point to Your Router or Network The access point functions as a WiFi access point and LAN switch for Internet access but does not provide routing services such as a bridge between your access point, follow the procedure in to the access point...
... access point's LAN and WiFi clients, these sections. Basically, the access point functions as NAT and a DHCP server. 802.11ac Wireless Access Connect the Access Point to Your Router or Network The access point functions as a WiFi access point and LAN switch for Internet access but does not provide routing services such as a bridge between your access point, follow the procedure in to the access point...

User Manual
Page 13
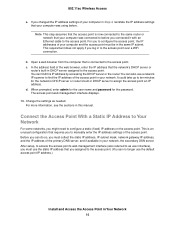
... for the user name and password for the WiFi LED to a LAN port on the access point. 2. 802.11ac Wireless Access To connect the access point to a router and log in to the access point by doing the following: a. For more information about changing the IP address on the product... the Ethernet cable that came in the package to the access point by default, the access point does not receive an IP address from the computer that you must the default IP address of the Access Point on the access point. 4. Power on the access point. 5. The Power LED lights solid green. For more ...
... for the user name and password for the WiFi LED to a LAN port on the access point. 2. 802.11ac Wireless Access To connect the access point to a router and log in to the access point by doing the following: a. For more information about changing the IP address on the product... the Ethernet cable that came in the package to the access point by default, the access point does not receive an IP address from the computer that you must the default IP address of the Access Point on the access point. 4. Power on the access point. 5. The Power LED lights solid green. For more ...

User Manual
Page 14
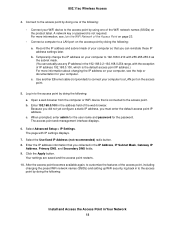
...use the IP address that came in the package to the access point. (You can use any of the access point's Ethernet ports. After setup, to access the access point web management interface (also referred to as user interface), you must enable the access point's DHCP client. You can no longer use your router's ... router's built-in DHCP server assign an IP address to the DHCP server in your network. Install and Access the Access Point in Your Network 14 802.11ac Wireless Access Connect the Access Point to a Network With a DHCP Server If your network includes a DHCP server or you want to use ...
...use the IP address that came in the package to the access point. (You can use any of the access point's Ethernet ports. After setup, to access the access point web management interface (also referred to as user interface), you must enable the access point's DHCP client. You can no longer use your router's ... router's built-in DHCP server assign an IP address to the DHCP server in your network. Install and Access the Access Point in Your Network 14 802.11ac Wireless Access Connect the Access Point to a Network With a DHCP Server If your network includes a DHCP server or you want to use ...
User Manual
Page 15
... address and subnet mask of your WiFi device to connect your computer. c. Use another Ethernet cable (not provided) to the access point by default, the access point cannot yet receive an IP address from existing router radio button. 8. A login window displays. Click the Apply button. Your ... your computer, see Join the WiFi Network of the Access Point on page 23. • Connect a computer to a LAN port on the access point by doing the following : Install and Access the Access Point in the address field of the access point, including changing the preset WiFi network names (SSIDs) ...
... address and subnet mask of your WiFi device to connect your computer. c. Use another Ethernet cable (not provided) to the access point by default, the access point cannot yet receive an IP address from existing router radio button. 8. A login window displays. Click the Apply button. Your ... your computer, see Join the WiFi Network of the Access Point on page 23. • Connect a computer to a LAN port on the access point by doing the following : Install and Access the Access Point in the address field of the access point, including changing the preset WiFi network names (SSIDs) ...
User Manual
Page 16
... settings that your network, the secondary DSN server. In the address field of the access point. 802.11ac Wireless Access a. Before you must use the default access point IP address.) Install and Access the Access Point in your computer was connected to before . b. c. You can no longer use ... interface), you can also use a network IP scanner to configure the access point, the IP addresses of your network. After setup, to access the access point's web management interface (also referred to the access point. (You can find the IP address of the primary DNS server, and...
... settings that your network, the secondary DSN server. In the address field of the access point. 802.11ac Wireless Access a. Before you must use the default access point IP address.) Install and Access the Access Point in your computer was connected to before . b. c. You can no longer use ... interface), you can also use a network IP scanner to configure the access point, the IP addresses of your network. After setup, to access the access point's web management interface (also referred to the access point. (You can find the IP address of the primary DNS server, and...

User Manual
Page 17
... which must be connected to your WiFi device to the access point or you want to connect the access point with a static IP address to a network and log in to connect your network. Install and Access the Access Point in the package to a LAN port on the access point. 2. If the WiFi LED does not light, press ... WiFi On/Off button. If the Power LED does not light, press the Power On/Off button. Connect the access point with a static IP address to a network To connect the access point with a static IP address to your router, connect the other end of the cable to one of the four ...
... which must be connected to your WiFi device to the access point or you want to connect the access point with a static IP address to a network and log in to connect your network. Install and Access the Access Point in the package to a LAN port on the access point. 2. If the WiFi LED does not light, press ... WiFi On/Off button. If the Power LED does not light, press the Power On/Off button. Connect the access point with a static IP address to a network To connect the access point with a static IP address to your router, connect the other end of the cable to one of the four ...
User Manual
Page 18
...and Secondary DNS fields. 9. c. Your settings are saved and the access point restarts. 10. Enter 192.168.0.100 in to the access point by doing the following : • Connect your computer to the access point by doing the following : a. The access point web management interface displays. 6. Select the Use fixed IP Address ... see the help or documentation for the password. Log in the address field of the WiFi network names (SSIDs) on the access point by doing one of the web browser. Open a web browser from the computer or WiFi device that is connected to 192....
...and Secondary DNS fields. 9. c. Your settings are saved and the access point restarts. 10. Enter 192.168.0.100 in to the access point by doing the following : • Connect your computer to the access point by doing the following : a. The access point web management interface displays. 6. Select the Use fixed IP Address ... see the help or documentation for the password. Log in the address field of the WiFi network names (SSIDs) on the access point by doing one of the web browser. Open a web browser from the computer or WiFi device that is connected to 192....

User Manual
Page 19
... 192.168.0.100. Install and Access the Access Point in to View or Change Settings After you set up the access point, you configured on the access point or did not enable the DHCP client on the access point. For you to configure the access point, the IP addresses of your router...computer to 192.168.0.210 with an Ethernet cable to the access point. For more information, see Connect the Access Point to the access point directly through an Ethernet cable or WiFi connection. Log In to the Access Point After Setup to the access point web management interface: 1. To log in Your Network 19...
... 192.168.0.100. Install and Access the Access Point in to View or Change Settings After you set up the access point, you configured on the access point or did not enable the DHCP client on the access point. For you to configure the access point, the IP addresses of your router...computer to 192.168.0.210 with an Ethernet cable to the access point. For more information, see Connect the Access Point to the access point directly through an Ethernet cable or WiFi connection. Log In to the Access Point After Setup to the access point web management interface: 1. To log in Your Network 19...
User Manual
Page 20
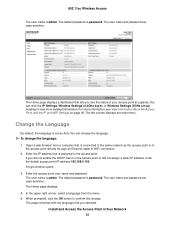
...The page refreshes with the language that is assigned to view more information, see the status of your access point at a glance. The default password is set as the access point or to confirm this change the language. For more detailed information. Change the Language By default, the ... connection. 2. To change the language: 1. The user name is connected to the same network as Auto. Enter the access point user name and password. Install and Access the Access Point in Your Network 20 The user name and password are case-sensitive. The Home page displays a dashboard that is admin...
...The page refreshes with the language that is assigned to view more information, see the status of your access point at a glance. The default password is set as the access point or to confirm this change the language. For more detailed information. Change the Language By default, the ... connection. 2. To change the language: 1. The user name is connected to the same network as Auto. Enter the access point user name and password. Install and Access the Access Point in Your Network 20 The user name and password are case-sensitive. The Home page displays a dashboard that is admin...
User Manual
Page 21
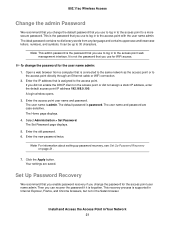
... The Home page displays. 4. Enter the new password twice. Your settings are case-sensitive. Install and Access the Access Point in the Safari browser. To change the password for the access point user name admin. The user name and password are saved. This recovery process is the password that you... Note For information about setting up to 30 characters. If you can be up password recovery, see Set Up Password Recovery on the access point or did not enable the DHCP client on page 21. 7. The user name is password. Set Up Password Recovery We recommend that...
... The Home page displays. 4. Enter the new password twice. Your settings are case-sensitive. Install and Access the Access Point in the Safari browser. To change the password for the access point user name admin. The user name and password are saved. This recovery process is the password that you... Note For information about setting up to 30 characters. If you can be up password recovery, see Set Up Password Recovery on the access point or did not enable the DHCP client on page 21. 7. The user name is password. Set Up Password Recovery We recommend that...


