Hardware Manual
Page 6
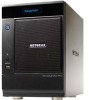
... information about configuring, managing, and using an uninterruptable power supply (UPS) for use in the following table. Choosing a Setup Location Your ReadyNAS desktop unit is as listed in a home or small office environment where it suitable for reviews, tutorials, a comparison chart, software updates, documentation, an active user forum, and much more. The small, compact size makes it can be freestanding. Choose a location for your unit, as free of...
... information about configuring, managing, and using an uninterruptable power supply (UPS) for use in the following table. Choosing a Setup Location Your ReadyNAS desktop unit is as listed in a home or small office environment where it suitable for reviews, tutorials, a comparison chart, software updates, documentation, an active user forum, and much more. The small, compact size makes it can be freestanding. Choose a location for your unit, as free of...
Hardware Manual
Page 7
... you purchased a ReadyNAS storage system without a pre-installed hard disk drive or drives, you must follow this procedure before you are using a previously formatted disk, see http://www.readynas.com/hard_disk_hcl. If you use : 1. The following : • Ethernet connection • Microsoft Windows 7, Vista, XP, 2000, Mac OS, UNIX, or Linux operating system • Microsoft Internet Explorer 7.0+, Apple Safari, 2.0+, Mozilla Firefox 2.0+, or Opera 9.5+ browser • Hard disk drive or drives from the NETGEAR Hardware Compatibility List;
... you purchased a ReadyNAS storage system without a pre-installed hard disk drive or drives, you must follow this procedure before you are using a previously formatted disk, see http://www.readynas.com/hard_disk_hcl. If you use : 1. The following : • Ethernet connection • Microsoft Windows 7, Vista, XP, 2000, Mac OS, UNIX, or Linux operating system • Microsoft Internet Explorer 7.0+, Apple Safari, 2.0+, Mozilla Firefox 2.0+, or Opera 9.5+ browser • Hard disk drive or drives from the NETGEAR Hardware Compatibility List;
Hardware Manual
Page 8
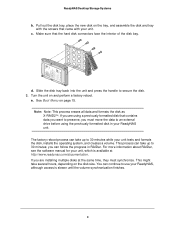
... creates a volume. Make sure that came with the screws that the hard disk connectors face the interior of the disk bay. ReadyNAS Desktop Storage Systems b. See Boot Menu on and perform a factory reboot. This process can continue to an external drive before using a previously formatted disk that contains data you want to preserve, you are installing multiple disks at http://www.readynas.com/documentation. Pull out the disk tray, place the new disk...
... creates a volume. Make sure that came with the screws that the hard disk connectors face the interior of the disk bay. ReadyNAS Desktop Storage Systems b. See Boot Menu on and perform a factory reboot. This process can continue to an external drive before using a previously formatted disk that contains data you want to preserve, you are installing multiple disks at http://www.readynas.com/documentation. Pull out the disk tray, place the new disk...
Hardware Manual
Page 13
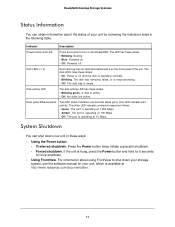
...; Amber. Press the Power button twice initiate a graceful shutdown. • Forced shutdown. The port is operating at 10 Mbps. Booting • Blue. The disk bay is hung, press the Power button and hold for your storage system, see the software manual for 5 seconds to turn on • Off. The other LED indicates connection speed as follows: • Green. The LED has these states: • Blinking green. ReadyNAS Desktop Storage Systems Status Information...
...; Amber. Press the Power button twice initiate a graceful shutdown. • Forced shutdown. The port is operating at 10 Mbps. Booting • Blue. The disk bay is hung, press the Power button and hold for your storage system, see the software manual for 5 seconds to turn on • Off. The other LED indicates connection speed as follows: • Green. The LED has these states: • Blinking green. ReadyNAS Desktop Storage Systems Status Information...
Hardware Manual
Page 14
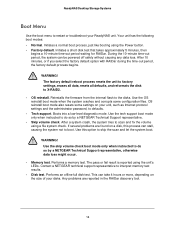
... flash to interpret memory test results. • Disk test. Use this process can stall, causing the system not to boot. WARNING! ReadyNAS Desktop Storage Systems Boot Menu Use the boot menu to restart or troubleshoot your disks. During the 10-minute time-out period, the system can take 4 hours or more, depending on the size of your ReadyNAS unit. OS reinstall boot mode also resets some configuration files. Contact a NETGEAR technical support...
... flash to interpret memory test results. • Disk test. Use this process can stall, causing the system not to boot. WARNING! ReadyNAS Desktop Storage Systems Boot Menu Use the boot menu to restart or troubleshoot your disks. During the 10-minute time-out period, the system can take 4 hours or more, depending on the size of your ReadyNAS unit. OS reinstall boot mode also resets some configuration files. Contact a NETGEAR technical support...
Hardware Manual
Page 15
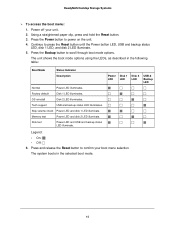
... volume check Power LED and disk 1 LED illuminate. Press and release the Reset button to press the Reset button until the Power button LED, USB and backup status LED, disk 1 LED, and disk 2 LED illuminate. 5. Factory default Disk 1 LED illuminates. OS reinstall Disk 2 LED illuminates. Using a straightened paper clip, press and hold the Reset button. 3. The system boots in the following table: Boot Mode Status Indicator Description Normal Power LED illuminates. Disk test Power LED and USB and backup status LED illuminate. The unit shows the boot mode options using...
... volume check Power LED and disk 1 LED illuminate. Press and release the Reset button to press the Reset button until the Power button LED, USB and backup status LED, disk 1 LED, and disk 2 LED illuminate. 5. Factory default Disk 1 LED illuminates. OS reinstall Disk 2 LED illuminates. Using a straightened paper clip, press and hold the Reset button. 3. The system boots in the following table: Boot Mode Status Indicator Description Normal Power LED illuminates. Disk test Power LED and USB and backup status LED illuminate. The unit shows the boot mode options using...
Hardware Manual
Page 21
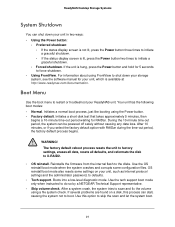
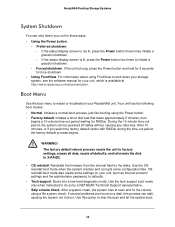
... your ReadyNAS unit. ReadyNAS Desktop Storage Systems System Shutdown You can stall, causing the system not to boot. The factory default reboot process resets the unit to factory settings, erases all data, resets all defaults, and reformats the disk to scan and fix the volume using the Power button. • Factory default. Reinstalls the firmware from the internal flash to restart or troubleshoot your unit, such as Internet protocol settings and the administrator password, to defaults. • Tech support. Initiates a short disk...
... your ReadyNAS unit. ReadyNAS Desktop Storage Systems System Shutdown You can stall, causing the system not to boot. The factory default reboot process resets the unit to factory settings, erases all data, resets all defaults, and reformats the disk to scan and fix the volume using the Power button. • Factory default. Reinstalls the firmware from the internal flash to restart or troubleshoot your unit, such as Internet protocol settings and the administrator password, to defaults. • Tech support. Initiates a short disk...

Hardware Manual
Page 22
.... ReadyNAS Desktop Storage Systems WARNING! Use the skip volume check boot mode only when instructed to confirm your boot menu selection. Power off your disks. Press the Power button to power on the size of your unit. 2. Performs a memory test. This can take 4 hours or more depending on the unit. 4. When the status display screen shows the boot mode you need, press and release Reset button to do so by a NETGEAR...
.... ReadyNAS Desktop Storage Systems WARNING! Use the skip volume check boot mode only when instructed to confirm your boot menu selection. Power off your disks. Press the Power button to power on the size of your unit. 2. Performs a memory test. This can take 4 hours or more depending on the unit. 4. When the status display screen shows the boot mode you need, press and release Reset button to do so by a NETGEAR...
Hardware Manual
Page 24
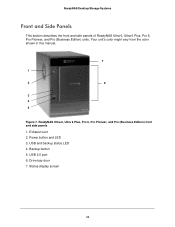
Power button and LED 3. USB 2.0 port 6. Status display screen 24 USB and backup status LED 4. Backup button 5. ReadyNAS Ultra 6, Ultra 6 Plus, Pro 6, Pro Pioneer, and Pro (Business Edition) front and side panels 1. Your unit's color might vary from the color shown in this manual. 7 1 2 6 3 4 5 Figure 7. Drive bay door 7. ReadyNAS Desktop Storage Systems Front and Side Panels This section describes the front and side panels of ReadyNAS Ultra 6, Ultra 6 Plus, Pro 6, Pro Pioneer, and Pro (Business Edition) units. Exhaust vent 2.
Power button and LED 3. USB 2.0 port 6. Status display screen 24 USB and backup status LED 4. Backup button 5. ReadyNAS Ultra 6, Ultra 6 Plus, Pro 6, Pro Pioneer, and Pro (Business Edition) front and side panels 1. Your unit's color might vary from the color shown in this manual. 7 1 2 6 3 4 5 Figure 7. Drive bay door 7. ReadyNAS Desktop Storage Systems Front and Side Panels This section describes the front and side panels of ReadyNAS Ultra 6, Ultra 6 Plus, Pro 6, Pro Pioneer, and Pro (Business Edition) units. Exhaust vent 2.
Hardware Manual
Page 27
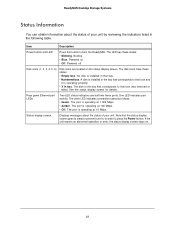
... , press the Power button. Powered off Disk icons (1, 2, 3, 4, 5, 6) Disk icons are built into these ports. to boot the ReadyNAS. Rear panel Ethernet port LEDs Two LED status indicators are located on the status display screen. A disk is installed in the bay that corresponds to prevent burn-in box. One LED indicates port activity. The other LED indicates connection speed as follows: • Green. Item Description Power button and LED Press this button to wake it...
... , press the Power button. Powered off Disk icons (1, 2, 3, 4, 5, 6) Disk icons are built into these ports. to boot the ReadyNAS. Rear panel Ethernet port LEDs Two LED status indicators are located on the status display screen. A disk is installed in the bay that corresponds to prevent burn-in box. One LED indicates port activity. The other LED indicates connection speed as follows: • Green. Item Description Power button and LED Press this button to wake it...
Hardware Manual
Page 28
... shutdown. • Using FrontView. The factory default reboot process resets the unit to factory settings, erases all data, resets all defaults, and reformats the disk to the disks. Reinstalls the firmware from the internal flash to X-RAID2. • OS reinstall. Use this process can be powered off safely without causing any data loss. Boot Menu Use the boot menu to restart or troubleshoot your unit, such as Internet protocol settings and the administrator password, to defaults. • Tech support...
... shutdown. • Using FrontView. The factory default reboot process resets the unit to factory settings, erases all data, resets all defaults, and reformats the disk to the disks. Reinstalls the firmware from the internal flash to X-RAID2. • OS reinstall. Use this process can be powered off safely without causing any data loss. Boot Menu Use the boot menu to restart or troubleshoot your unit, such as Internet protocol settings and the administrator password, to defaults. • Tech support...

Hardware Manual
Page 29
... system boots in the RAIDar discovery tool. To access the boot menu: 1. Use the skip volume check boot mode only when instructed to press the Reset button until the status display screen shows a boot menu message. 5. Continue to do so by a NETGEAR Technical Support representative, otherwise data loss might occur. • Memory test. ReadyNAS Desktop Storage Systems WARNING! Press the Power button to power on the status display screen. • Disk test...
... system boots in the RAIDar discovery tool. To access the boot menu: 1. Use the skip volume check boot mode only when instructed to press the Reset button until the status display screen shows a boot menu message. 5. Continue to do so by a NETGEAR Technical Support representative, otherwise data loss might occur. • Memory test. ReadyNAS Desktop Storage Systems WARNING! Press the Power button to power on the status display screen. • Disk test...
Hardware Manual
Page 32
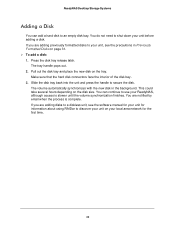
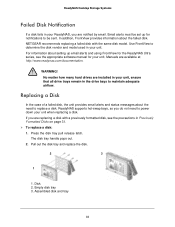
ReadyNAS Desktop Storage Systems Adding a Disk You can continue to use your ReadyNAS, although access is complete. Make sure that the hard disk connectors face the interior of the disk bay. 3. The volume automatically synchronizes with the new disk in Previously Formatted Disks on your unit before adding a disk. You can add a hard disk to an empty disk bay. Press the disk tray release latch. Slide the disk tray back into the unit and...
ReadyNAS Desktop Storage Systems Adding a Disk You can continue to use your ReadyNAS, although access is complete. Make sure that the hard disk connectors face the interior of the disk bay. 3. The volume automatically synchronizes with the new disk in Previously Formatted Disks on your unit before adding a disk. You can add a hard disk to an empty disk bay. Press the disk tray release latch. Slide the disk tray back into the unit and...
Hardware Manual
Page 33
... failed disk. ReadyNAS supports hot-swap bays, so you are replacing a disk with the same disk model. Email alerts must be sent. If you are notified by email. Assembled disk and tray 33 Disk 2. Use FrontView to maintain adequate airflow. Press the disk tray pull release latch. Pull out the disk tray and replace the disk. 2 3 1 1. No matter how many hard drives are available at http://www.readynas.com/documentation. Empty disk...
... failed disk. ReadyNAS supports hot-swap bays, so you are replacing a disk with the same disk model. Email alerts must be sent. If you are notified by email. Assembled disk and tray 33 Disk 2. Use FrontView to maintain adequate airflow. Press the disk tray pull release latch. Pull out the disk tray and replace the disk. 2 3 1 1. No matter how many hard drives are available at http://www.readynas.com/documentation. Empty disk...
Hardware Manual
Page 36
... table lists factory default settings for ReadyNAS Ultra 2, Ultra 2 Plus, and Pro 2 storage systems. Feature Default Login User login URL when the ReadyNAS is https://192.168.168.168/admin not connected to a DHCP server Admin user name (case-sensitive) admin Admin login password (case-sensitive) netgear1 Management System configuration FrontView web-based configuration and status monitoring Discovery, multi-unit status monitoring, RAIDar for Windows, Mac, and Linux and RAID formatting utility LAN Connections MAC address Default address MTU size 1500 Ports 2 Auto Sense...
... table lists factory default settings for ReadyNAS Ultra 2, Ultra 2 Plus, and Pro 2 storage systems. Feature Default Login User login URL when the ReadyNAS is https://192.168.168.168/admin not connected to a DHCP server Admin user name (case-sensitive) admin Admin login password (case-sensitive) netgear1 Management System configuration FrontView web-based configuration and status monitoring Discovery, multi-unit status monitoring, RAIDar for Windows, Mac, and Linux and RAID formatting utility LAN Connections MAC address Default address MTU size 1500 Ports 2 Auto Sense...

Hardware Manual
Page 38
...table lists factory default settings for ReadyNAS Ultra 4, Ultra 4 Plus, Pro 4 NVX Pioneer, and NVX (Business Edition) storage systems. Feature Default Login User login URL when the ReadyNAS is https://192.168.168.168/admin not connected to a DHCP server Admin user name (case-sensitive) admin Admin login password (case-sensitive) netgear1 Management System configuration FrontView Web-based configuration and status monitoring Discovery, multi-unit status monitoring, RAIDar for Windows, Mac, and Linux and RAID formatting utility LAN Connections MAC address Default address MTU size...
...table lists factory default settings for ReadyNAS Ultra 4, Ultra 4 Plus, Pro 4 NVX Pioneer, and NVX (Business Edition) storage systems. Feature Default Login User login URL when the ReadyNAS is https://192.168.168.168/admin not connected to a DHCP server Admin user name (case-sensitive) admin Admin login password (case-sensitive) netgear1 Management System configuration FrontView Web-based configuration and status monitoring Discovery, multi-unit status monitoring, RAIDar for Windows, Mac, and Linux and RAID formatting utility LAN Connections MAC address Default address MTU size...
Hardware Manual
Page 40
... lists factory default settings for ReadyNAS Ultra 6, Ultra 6 Plus, Pro 6, Pro Pioneer, and Pro (Business Edition) storage systems. Feature Default Login User login URL when the ReadyNAS is https://192.168.168.168/admin not connected to a DHCP server Admin user name (case-sensitive) admin Admin login password (case-sensitive) netgear1 Management System configuration FrontView web-based configuration and status monitoring Discovery, multi-unit status monitoring, RAIDar for Windows, Mac, and Linux and RAID formatting utility LAN Connections MAC address Default address MTU size...
... lists factory default settings for ReadyNAS Ultra 6, Ultra 6 Plus, Pro 6, Pro Pioneer, and Pro (Business Edition) storage systems. Feature Default Login User login URL when the ReadyNAS is https://192.168.168.168/admin not connected to a DHCP server Admin user name (case-sensitive) admin Admin login password (case-sensitive) netgear1 Management System configuration FrontView web-based configuration and status monitoring Discovery, multi-unit status monitoring, RAIDar for Windows, Mac, and Linux and RAID formatting utility LAN Connections MAC address Default address MTU size...
Hardware Manual
Page 46
... disk failure 33 disk, adding 32 disk, failure 33 disk, replacing 33 diskless units 7 disks, previously formatted 31 disks, supported 30 drive bay NVX (Business Edition) 18 NVX Pioneer 18 Pro (Business Edition) 25 Pro 2 11 Pro 4 18 Pro 6 25 Pro Pioneer 25 Ultra 2 11 Ultra 2 Plus 11 Ultra 4 18 Ultra 4 Plus 18 Ultra 6 25 Ultra 6 Plus 25 E electrical safety 42 electrostatic discharge 43 email alerts 33 ESD 43 F factory default settings...
... disk failure 33 disk, adding 32 disk, failure 33 disk, replacing 33 diskless units 7 disks, previously formatted 31 disks, supported 30 drive bay NVX (Business Edition) 18 NVX Pioneer 18 Pro (Business Edition) 25 Pro 2 11 Pro 4 18 Pro 6 25 Pro Pioneer 25 Ultra 2 11 Ultra 2 Plus 11 Ultra 4 18 Ultra 4 Plus 18 Ultra 6 25 Ultra 6 Plus 25 E electrical safety 42 electrostatic discharge 43 email alerts 33 ESD 43 F factory default settings...
Installation Guide
Page 1
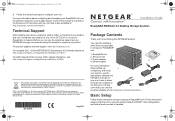
For more information about configuring and managing your ReadyNAS unit, see the appropriate software and 3 hardware manuals for your unit. If disposed of your product at http://readynas.com/documentation. All rights reserved. Power adapter 2 4. Links to these instructions to this NETGEAR product. A link to begin using this product should be treated and recycled in accordance with your device, locate the serial number on the Waste Electrical and Electronic...
For more information about configuring and managing your ReadyNAS unit, see the appropriate software and 3 hardware manuals for your unit. If disposed of your product at http://readynas.com/documentation. All rights reserved. Power adapter 2 4. Links to these instructions to this NETGEAR product. A link to begin using this product should be treated and recycled in accordance with your device, locate the serial number on the Waste Electrical and Electronic...
Installation Guide
Page 2
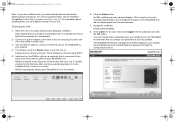
... certificate security warning displays. It automatically launches a Setup Wizard to the same local area network (LAN) as possible. Click the Setup button. This is connected to guide you configure your network. 4. Use an Ethernet cable to connect an Ethernet port on a computer that the fan exhausts are unobstructed. 2. Enter admin for the user name and netgear1 for the Windows, Mac, and Linux operating systems. It is important to turn the unit on. ReadyNAS RAIDiator...
... certificate security warning displays. It automatically launches a Setup Wizard to the same local area network (LAN) as possible. Click the Setup button. This is connected to guide you configure your network. 4. Use an Ethernet cable to connect an Ethernet port on a computer that the fan exhausts are unobstructed. 2. Enter admin for the user name and netgear1 for the Windows, Mac, and Linux operating systems. It is important to turn the unit on. ReadyNAS RAIDiator...


