Software Manual
Page 6
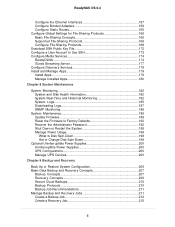
... Health Information 182 System Real-Time and Historical Monitoring 182 System Logs 185 Downloading Logs 187 SNMP Monitoring 188 System Maintenance 189 Update Firmware 189 Reset the Firmware to Factory Defaults 192 Recover the Administrator Password 192 Shut Down or Restart the System 195 Manage Power Usage 196 What Is Disk...
... Health Information 182 System Real-Time and Historical Monitoring 182 System Logs 185 Downloading Logs 187 SNMP Monitoring 188 System Maintenance 189 Update Firmware 189 Reset the Firmware to Factory Defaults 192 Recover the Administrator Password 192 Shut Down or Restart the System 195 Manage Power Usage 196 What Is Disk...
Software Manual
Page 11
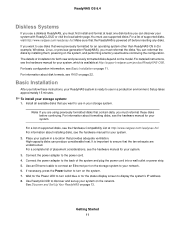
...you must first install and format at http://www.netgear.com/readynas-hcl. You can reformat the disks by installing them, powering on page 22. For information about disk formats, see RAID on the system, and performing a factory reset before continuing. Install all available disks that you... disks before continuing the configuration. Basic Installation After you want to ensure that provides adequate ventilation. It is available at http://support.netgear.com/product/ReadyNAS-OS6. Use an Ethernet cable to your system. 3. Wait for your system, which is important to use supported...
...you must first install and format at http://www.netgear.com/readynas-hcl. You can reformat the disks by installing them, powering on page 22. For information about disk formats, see RAID on the system, and performing a factory reset before continuing. Install all available disks that you... disks before continuing the configuration. Basic Installation After you want to ensure that provides adequate ventilation. It is available at http://support.netgear.com/product/ReadyNAS-OS6. Use an Ethernet cable to your system. 3. Wait for your system, which is important to use supported...
Software Manual
Page 22
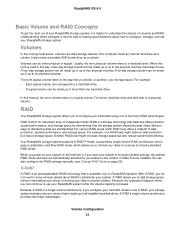
... manually (see Change RAID Mode on your system for the first time or if you to a physical volume. RAID Your ReadyNAS storage system allows you reset your system to four physical volumes. When you can be either physical or logical. You can be made up of up to its factory default...
... manually (see Change RAID Mode on your system for the first time or if you to a physical volume. RAID Your ReadyNAS storage system allows you reset your system to four physical volumes. When you can be either physical or logical. You can be made up of up to its factory default...
Software Manual
Page 71
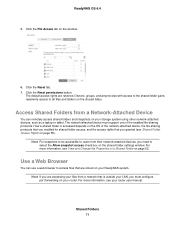
...can remotely access shared folders and snapshots on the window. 6. Shared Folders 71 The default access rights are stored on page 52. Click the Reset tab. 7. Access Shared Folders from their network-attached devices, you must support one of a Shared Folder on your ReadyNAS system. How a ...-attached device, the file-sharing protocols that you granted (see View and Change the Properties of the enabled file-sharing protocols. Click the Reset permissions button. Note For snapshots to be accessible to users from a Network-Attached Device You can use a web browser to all files...
...can remotely access shared folders and snapshots on the window. 6. Shared Folders 71 The default access rights are stored on page 52. Click the Reset tab. 7. Access Shared Folders from their network-attached devices, you must support one of a Shared Folder on your ReadyNAS system. How a ...-attached device, the file-sharing protocols that you granted (see View and Change the Properties of the enabled file-sharing protocols. Click the Reset permissions button. Note For snapshots to be accessible to users from a Network-Attached Device You can use a web browser to all files...
Software Manual
Page 152
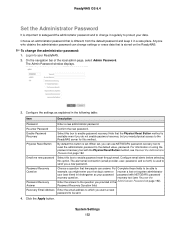
... The alert email connection (email provider, user, password, and so forth) is used to send you can use NETGEAR's password recovery tool to reset the administrator password to the default value, password. recovery tool (see Recover the Administrator Password on the ReadyNAS. Physical... in the Administrator Password on using the password recovery tool with NETGEAR's password recovery question. Enable Password Recovery Select this box to your data. System Settings 152 Log in to enable password reset through email. The Admin Password window displays. 3. Email me ...
... The alert email connection (email provider, user, password, and so forth) is used to send you can use NETGEAR's password recovery tool to reset the administrator password to the default value, password. recovery tool (see Recover the Administrator Password on the ReadyNAS. Physical... in the Administrator Password on using the password recovery tool with NETGEAR's password recovery question. Enable Password Recovery Select this box to your data. System Settings 152 Log in to enable password reset through email. The Admin Password window displays. 3. Email me ...
Software Manual
Page 189
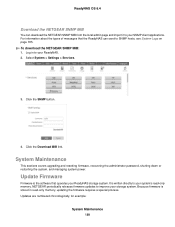
...read -only memory. System Maintenance This sections covers upgrading and resetting firmware, recovering the administrator password, shutting down or restarting the system, and managing system power. Because firmware is stored in to your storage system. To download the NETGEAR SNMP MIB: 1. Select System > Settings > Services. ...on page 185. Updates are numbered chronologically, for example: System Maintenance 189 It is the software that the ReadyNAS can download the NETGEAR SNMP MIB from the local admin page and import it to your system's read -only memory, updating the firmware requires a ...
...read -only memory. System Maintenance This sections covers upgrading and resetting firmware, recovering the administrator password, shutting down or restarting the system, and managing system power. Because firmware is stored in to your storage system. To download the NETGEAR SNMP MIB: 1. Select System > Settings > Services. ...on page 185. Updates are numbered chronologically, for example: System Maintenance 189 It is the software that the ReadyNAS can download the NETGEAR SNMP MIB from the local admin page and import it to your system's read -only memory, updating the firmware requires a ...
Software Manual
Page 192
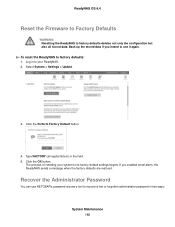
...Perform Factory Default button. 4. Select System > Settings > Update. 3. If you intend to use NETGEAR's password recovery tool to its factory default settings begins. The process of resetting your ReadyNAS. 2. To reset the ReadyNAS to factory defaults deletes not only the configuration but also all capital letters) in two ways... use it again. Log in to your system to recover a lost or forgotten administrator password in the field. 5. ReadyNAS OS 6.4 Reset the Firmware to Factory Defaults WARNING: Resetting the ReadyNAS to factory defaults: 1. Click the OK button.
...Perform Factory Default button. 4. Select System > Settings > Update. 3. If you intend to use NETGEAR's password recovery tool to its factory default settings begins. The process of resetting your ReadyNAS. 2. To reset the ReadyNAS to factory defaults deletes not only the configuration but also all capital letters) in two ways... use it again. Log in to your system to recover a lost or forgotten administrator password in the field. 5. ReadyNAS OS 6.4 Reset the Firmware to Factory Defaults WARNING: Resetting the ReadyNAS to factory defaults: 1. Click the OK button.
Software Manual
Page 193
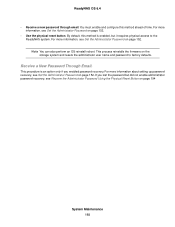
...defaults. By default, this method ahead of time. For more information, see Recover the Administrator Password Using the Physical Reset Button on page 152. • Use the physical reset button. This procedure is enabled, but did not enable administrator password recovery, see Set the Administrator Password on page 194...193 ReadyNAS OS 6.4 • Receive a new password through email. For more information, see Set the Administrator Password on the storage system and resets the administrator user name and password to the ReadyNAS system. Receive a New Password Through Email.
...defaults. By default, this method ahead of time. For more information, see Recover the Administrator Password Using the Physical Reset Button on page 152. • Use the physical reset button. This procedure is enabled, but did not enable administrator password recovery, see Set the Administrator Password on page 194...193 ReadyNAS OS 6.4 • Receive a new password through email. For more information, see Set the Administrator Password on the storage system and resets the administrator user name and password to the ReadyNAS system. Receive a New Password Through Email.
Software Manual
Page 194
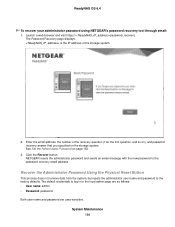
.... is the IP address of the recovery question (1 for the first question, and so on), and password recovery answer that you specified on page 152. 3. NETGEAR resets the administrator password and sends an email message with the new password to the password recovery email address. Launch a web browser and visit https://< ReadyNAS_IP_address...
.... is the IP address of the recovery question (1 for the first question, and so on), and password recovery answer that you specified on page 152. 3. NETGEAR resets the administrator password and sends an email message with the new password to the password recovery email address. Launch a web browser and visit https://< ReadyNAS_IP_address...
Software Manual
Page 195
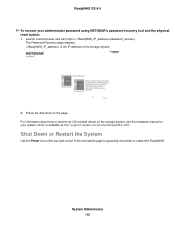
...Password Recovery page displays. Follow the directions on the storage system, see the hardware manual for your administrator password using NETGEAR's password recovery tool and the physical reset button: 1. System Maintenance 195 is available at the top right corner of the storage system. 2. Shut Down or ...Restart the System Use the Power icon at http://support.netgear.com/product/ReadyNAS-OS6. Launch a web browser and visit https://< ...
...Password Recovery page displays. Follow the directions on the storage system, see the hardware manual for your administrator password using NETGEAR's password recovery tool and the physical reset button: 1. System Maintenance 195 is available at the top right corner of the storage system. 2. Shut Down or ...Restart the System Use the Power icon at http://support.netgear.com/product/ReadyNAS-OS6. Launch a web browser and visit https://< ...

Rackmount Installation Guide
Page 6
.... See Additional Information on . 5. If you want to scroll through the boot mode menu. Press and hold the Reset button. 4. Using a straightened paper clip, press and hold the Reset button for about five seconds until only the UI LED is powered on the disks, you must back up the data... to the next item in your system is lit. 6 Press the Power button. Continue holding the Reset button for about installing disks, see the Hardware Compatibility List at netgear.com/readynas-hcl. Reformat Disks If you are lit. • If your ReadyNAS system.
.... See Additional Information on . 5. If you want to scroll through the boot mode menu. Press and hold the Reset button. 4. Using a straightened paper clip, press and hold the Reset button for about five seconds until only the UI LED is powered on the disks, you must back up the data... to the next item in your system is lit. 6 Press the Power button. Continue holding the Reset button for about installing disks, see the Hardware Compatibility List at netgear.com/readynas-hcl. Reformat Disks If you are lit. • If your ReadyNAS system.
Rackmount Installation Guide
Page 7
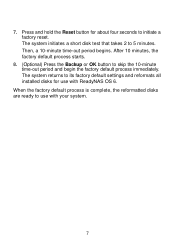
.... The system initiates a short disk test that takes 2 to its factory default settings and reformats all installed disks for about four seconds to initiate a factory reset. 7. Press and hold the Reset button for use with ReadyNAS OS 6.
.... The system initiates a short disk test that takes 2 to its factory default settings and reformats all installed disks for about four seconds to initiate a factory reset. 7. Press and hold the Reset button for use with ReadyNAS OS 6.

Rackmount Hardware Manual
Page 9
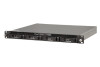
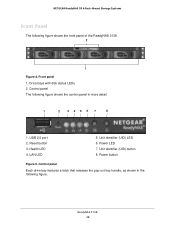
Disk Activity LED 6. Control panel 1. USB 2.0 port 2. Reset button 3. Control panel 3. Error LED 4. Disk tray (For more information, see Disk Tray on page 48.) The following figure shows the front panel of the ReadyNAS 2120 and 2120 v2 storage systems. 2 65 3 3 4 1 Figure 1. Power LED 6. Drive bays 2. Mounting bracket 4. Fault LED 5. Front panel 1. Power button 4 56 ReadyNAS 2120 and 2120 v2 9 NETGEAR ReadyNAS OS 6 Rack-Mount Storage Systems Front Panel The following figure shows the control panel in more detail. 1 23 Figure 2. LAN 1 and LAN 2 LEDs 5.
Disk Activity LED 6. Control panel 1. USB 2.0 port 2. Reset button 3. Control panel 3. Error LED 4. Disk tray (For more information, see Disk Tray on page 48.) The following figure shows the front panel of the ReadyNAS 2120 and 2120 v2 storage systems. 2 65 3 3 4 1 Figure 1. Power LED 6. Drive bays 2. Mounting bracket 4. Fault LED 5. Front panel 1. Power button 4 56 ReadyNAS 2120 and 2120 v2 9 NETGEAR ReadyNAS OS 6 Rack-Mount Storage Systems Front Panel The following figure shows the control panel in more detail. 1 23 Figure 2. LAN 1 and LAN 2 LEDs 5.
Rackmount Hardware Manual
Page 13
... password, to do so. • Volume read -only. Contact a NETGEAR technical support representative to X-RAID. WARNING: The factory default reboot process resets the storage system to factory settings, erases all data, resets all defaults, and reformats the disk to interpret memory test results. OS ...reinstall boot mode also resets some configuration files. The pass or fail result is restored. Initiates a normal boot process, just like booting using the storage system's LEDs. Use the tech support boot mode only when a NETGEAR technical support representative instructs you are...
... password, to do so. • Volume read -only. Contact a NETGEAR technical support representative to X-RAID. WARNING: The factory default reboot process resets the storage system to factory settings, erases all data, resets all defaults, and reformats the disk to interpret memory test results. OS ...reinstall boot mode also resets some configuration files. The pass or fail result is restored. Initiates a normal boot process, just like booting using the storage system's LEDs. Use the tech support boot mode only when a NETGEAR technical support representative instructs you are...
Rackmount Hardware Manual
Page 14
NETGEAR ReadyNAS OS 6 Rack-Mount Storage Systems • Test disk. For more , depending on the size of the system. Using a straightened paper clip, press and hold the Reset button for about viewing the system logs, see the ReadyNAS OS 6.4 Software Manual. To access the boot menu: 1. The ...system powers on the front panel of your disks. Press and hold the Reset button. 3. This process can view using the LEDs, as described in the selected boot mode. Each press and release scrolls forward to scroll through...
NETGEAR ReadyNAS OS 6 Rack-Mount Storage Systems • Test disk. For more , depending on the size of the system. Using a straightened paper clip, press and hold the Reset button for about viewing the system logs, see the ReadyNAS OS 6.4 Software Manual. To access the boot menu: 1. The ...system powers on the front panel of your disks. Press and hold the Reset button. 3. This process can view using the LEDs, as described in the selected boot mode. Each press and release scrolls forward to scroll through...

Rackmount Hardware Manual
Page 18
.... 1 2 3 45 6 7 8 1. Control panel The following figure shows the control panel in the following figure shows the front panel of the ReadyNAS 3130 storage system. 2 1 Figure 4. Reset button 3. Power LED 7. Unit Identifier (UID) button 8. ReadyNAS 3130 18 Drive bays with disk status LEDs 2. Unit Identifier (UID) LED...
.... 1 2 3 45 6 7 8 1. Control panel The following figure shows the control panel in the following figure shows the front panel of the ReadyNAS 3130 storage system. 2 1 Figure 4. Reset button 3. Power LED 7. Unit Identifier (UID) button 8. ReadyNAS 3130 18 Drive bays with disk status LEDs 2. Unit Identifier (UID) LED...
Rackmount Hardware Manual
Page 24
... disks. ReadyNAS 3130 24 Note: To start the factory default process immediately, press the Reset button during a disaster recovery. • Memory test. Use the tech support boot mode only when a NETGEAR technical support representative instructs you choose not to power off the storage system, after the 10... option when you can choose to power off the storage system without causing any data loss, and the factory default process is canceled. NETGEAR ReadyNAS OS 6 Rack-Mount Storage Systems Power State If the power supply is interrupted due to a power failure, the system returns to...
... disks. ReadyNAS 3130 24 Note: To start the factory default process immediately, press the Reset button during a disaster recovery. • Memory test. Use the tech support boot mode only when a NETGEAR technical support representative instructs you choose not to power off the storage system, after the 10... option when you can choose to power off the storage system without causing any data loss, and the factory default process is canceled. NETGEAR ReadyNAS OS 6 Rack-Mount Storage Systems Power State If the power supply is interrupted due to a power failure, the system returns to...

Rackmount Hardware Manual
Page 25
... system. 2. Health LED lights. Power, UI, and Health LEDs light. The storage system shows the boot mode options using the local admin page. NETGEAR ReadyNAS OS 6 Rack-Mount Storage Systems • Test disk. Any problems are lit. Power off your disks. Using a straightened paper clip, press... and hold the Reset button, releasing after about viewing the system logs, see the ReadyNAS OS 6.4 Software Manual, which you can take four hours or more information ...
... system. 2. Health LED lights. Power, UI, and Health LEDs light. The storage system shows the boot mode options using the local admin page. NETGEAR ReadyNAS OS 6 Rack-Mount Storage Systems • Test disk. Any problems are lit. Power off your disks. Using a straightened paper clip, press... and hold the Reset button, releasing after about viewing the system logs, see the ReadyNAS OS 6.4 Software Manual, which you can take four hours or more information ...

Rackmount Hardware Manual
Page 26
Note: If you can rack-mount the ReadyNAS 3130 using the included rack-mount ears. Press and hold the Reset button for one second to scroll through to your boot menu selection. Rack Mounting You can use the optional sliding rail kit, order number RRAIL04-.... ReadyNAS 3130 26 The system boots in the selected boot mode. For instructions, see the 1U Rail Installation Guide, which is available at http://support.netgear.com/product/ReadyNAS-OS6. Repeat the press and hold the Reset button long enough, the press moves the system to confirm your desired selection...
Note: If you can rack-mount the ReadyNAS 3130 using the included rack-mount ears. Press and hold the Reset button for one second to scroll through to your boot menu selection. Rack Mounting You can use the optional sliding rail kit, order number RRAIL04-.... ReadyNAS 3130 26 The system boots in the selected boot mode. For instructions, see the 1U Rail Installation Guide, which is available at http://support.netgear.com/product/ReadyNAS-OS6. Repeat the press and hold the Reset button long enough, the press moves the system to confirm your desired selection...
Rackmount Hardware Manual
Page 28
... LED 7. USB 2.0 port 2. Power button Figure 9. Health LED 4. Unit identifier (UID) LED 6. Drive bays with disk status LEDs 2. Unit identifier (UID) button 8. Front panel 1. Reset button 3. Control panel The following figure. NETGEAR ReadyNAS OS 6 Rack-Mount Storage Systems Front Panel The following figure shows the front panel of the ReadyNAS 3138. 2 1 Figure 8.
... LED 7. USB 2.0 port 2. Power button Figure 9. Health LED 4. Unit identifier (UID) LED 6. Drive bays with disk status LEDs 2. Unit identifier (UID) button 8. Front panel 1. Reset button 3. Control panel The following figure. NETGEAR ReadyNAS OS 6 Rack-Mount Storage Systems Front Panel The following figure shows the front panel of the ReadyNAS 3138. 2 1 Figure 8.


