Hardware Manual
Page 7
... Windows Vista • Apple Mac OS X 10.5 Leopard or later • Linux, UNIX, Solaris • Apple iOS • Google Android Getting Started 7 Visit http://www.netgear.com/readynas for reviews, tutorials, a comparison chart, software updates, documentation, an active user forum, and much more. NETGEAR maintains a community website that meets these criteria: • Cables can be exceeded. • If you are using your storage system that supports ReadyNAS products...
... Windows Vista • Apple Mac OS X 10.5 Leopard or later • Linux, UNIX, Solaris • Apple iOS • Google Android Getting Started 7 Visit http://www.netgear.com/readynas for reviews, tutorials, a comparison chart, software updates, documentation, an active user forum, and much more. NETGEAR maintains a community website that meets these criteria: • Cables can be exceeded. • If you are using your storage system that supports ReadyNAS products...

Hardware Manual
Page 15
... like booting using the storage system's LEDs. The system powers down safely without causing any data loss. - Reinstalls the firmware from the internal flash to interpret memory test results. • Test disk. Performs a memory test. If you to defaults. • Tech support. After the 10-minute time-out period, the factory default process begins. OS reinstall boot mode also resets some configuration files. Mounts a volume as Internet protocol settings and the administrator password, to...
... like booting using the storage system's LEDs. The system powers down safely without causing any data loss. - Reinstalls the firmware from the internal flash to interpret memory test results. • Test disk. Performs a memory test. If you to defaults. • Tech support. After the 10-minute time-out period, the factory default process begins. OS reinstall boot mode also resets some configuration files. Mounts a volume as Internet protocol settings and the administrator password, to...
Hardware Manual
Page 23
... boot mode also resets some configuration files. NETGEAR ReadyNAS 104 23 If you want to cancel the factory default process, power off the storage system before the 10-minute time-out ends. Tip: To start the factory default process immediately, press the Backup button during the 10-minute time-out period. • OS reinstall. After the disk test, a 10-minute time-out period begins. WARNING: The factory default reboot process resets the storage system to factory settings, erases...
... boot mode also resets some configuration files. NETGEAR ReadyNAS 104 23 If you want to cancel the factory default process, power off the storage system before the 10-minute time-out ends. Tip: To start the factory default process immediately, press the Backup button during the 10-minute time-out period. • OS reinstall. After the disk test, a 10-minute time-out period begins. WARNING: The factory default reboot process resets the storage system to factory settings, erases...
Hardware Manual
Page 24
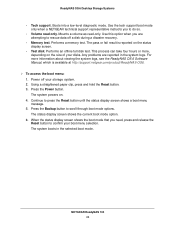
... boot menu: 1. The system boots in the system logs. NETGEAR ReadyNAS 104 24 Using a straightened paper clip, press and hold the Reset button. 3. Mounts a volume as read only. Performs a memory test. Press the Backup button to confirm your disks. This process can take four hours or more information about viewing the system logs, see the ReadyNAS OS 6 Software Manual, which is reported on . 4. When the status display screen shows the boot mode...
... boot menu: 1. The system boots in the system logs. NETGEAR ReadyNAS 104 24 Using a straightened paper clip, press and hold the Reset button. 3. Mounts a volume as read only. Performs a memory test. Press the Backup button to confirm your disks. This process can take four hours or more information about viewing the system logs, see the ReadyNAS OS 6 Software Manual, which is reported on . 4. When the status display screen shows the boot mode...
Hardware Manual
Page 31
... factory default reboot process resets the storage system to factory settings, erases all data, resets all defaults, and reformats the disk to the disks. After the 10-minute time-out period, the factory default process begins. Tip: To start the factory default process immediately, press the Backup button during a disaster recovery. • Memory test. Boots into a low-level diagnostic mode. The system powers down safely without causing any data loss. - Use the tech support boot mode only when a NETGEAR technical support representative instructs...
... factory default reboot process resets the storage system to factory settings, erases all data, resets all defaults, and reformats the disk to the disks. After the 10-minute time-out period, the factory default process begins. Tip: To start the factory default process immediately, press the Backup button during a disaster recovery. • Memory test. Boots into a low-level diagnostic mode. The system powers down safely without causing any data loss. - Use the tech support boot mode only when a NETGEAR technical support representative instructs...
Hardware Manual
Page 39
... storage system to factory settings, erases all data, resets all defaults, and reformats the disk to restart or troubleshoot your disks. The system powers down . If you want to reset the system to defaults. • Tech support. After the 10-minute time-out period, the factory default process begins. Reinstalls the firmware from the internal flash to rescue data off forcibly. OS reinstall boot mode also resets some configuration files. Mounts a volume as Internet protocol settings and the administrator password, to factory default settings...
... storage system to factory settings, erases all data, resets all defaults, and reformats the disk to restart or troubleshoot your disks. The system powers down . If you want to reset the system to defaults. • Tech support. After the 10-minute time-out period, the factory default process begins. Reinstalls the firmware from the internal flash to rescue data off forcibly. OS reinstall boot mode also resets some configuration files. Mounts a volume as Internet protocol settings and the administrator password, to factory default settings...
Hardware Manual
Page 47
... boot process, just like booting using the Power button. • Factory default. If you to do not power off your ReadyNAS storage system. Reinstalls the firmware from the internal flash to X-RAID2. - OS reinstall boot mode also resets some configuration files. This process can take four hours or more information about viewing the system logs, see the ReadyNAS OS 6 Software Manual, which is reported on your disks. Use the tech support boot mode only when a NETGEAR technical support representative instructs...
... boot process, just like booting using the Power button. • Factory default. If you to do not power off your ReadyNAS storage system. Reinstalls the firmware from the internal flash to X-RAID2. - OS reinstall boot mode also resets some configuration files. This process can take four hours or more information about viewing the system logs, see the ReadyNAS OS 6 Software Manual, which is reported on your disks. Use the tech support boot mode only when a NETGEAR technical support representative instructs...
Hardware Manual
Page 55
...-minute time-out ends. OS reinstall boot mode also resets some configuration files. Tip: To start the factory default process immediately, press the OK button during a disaster recovery. • Memory test. NETGEAR ReadyNAS 516 55 Reinstalls the firmware from the internal flash to X-RAID2. - WARNING: The factory default reboot process resets the storage system to factory settings, erases all data, resets all defaults, and reformats the disk to the disks. If you want to factory default settings, do so. • Volume read...
...-minute time-out ends. OS reinstall boot mode also resets some configuration files. Tip: To start the factory default process immediately, press the OK button during a disaster recovery. • Memory test. NETGEAR ReadyNAS 516 55 Reinstalls the firmware from the internal flash to X-RAID2. - WARNING: The factory default reboot process resets the storage system to factory settings, erases all data, resets all defaults, and reformats the disk to the disks. If you want to factory default settings, do so. • Volume read...

Hardware Manual
Page 63
... to factory settings, erases all data, resets all defaults, and reformats the disk to the disks. After the disk test, a 10-minute time-out period begins. Any problems are attempting to rescue data off your ReadyNAS storage system. Boots into a low-level diagnostic mode. Use this option when you want to reset the system to factory default settings, do so by a NETGEAR technical support representative. • Volume read -only. Reinstalls the firmware from the internal flash...
... to factory settings, erases all data, resets all defaults, and reformats the disk to the disks. After the disk test, a 10-minute time-out period begins. Any problems are attempting to rescue data off your ReadyNAS storage system. Boots into a low-level diagnostic mode. Use this option when you want to reset the system to factory default settings, do so by a NETGEAR technical support representative. • Volume read -only. Reinstalls the firmware from the internal flash...

Hardware Manual
Page 69
...://support.netgear.com/product/ReadyNAS-OS6. • Off. Table 8. Use the local admin page to each active drive bay indicates the status of your storage system by a host. • Off. Powered off. For more information, see the ReadyNAS OS 6 Software Manual, which is resynchronizing. The disk is not established. The Volume LED has these states: • On. The data volume or volumes are not mounted. The SATA link is active. • Solid red. NETGEAR...
...://support.netgear.com/product/ReadyNAS-OS6. • Off. Table 8. Use the local admin page to each active drive bay indicates the status of your storage system by a host. • Off. Powered off. For more information, see the ReadyNAS OS 6 Software Manual, which is resynchronizing. The disk is not established. The Volume LED has these states: • On. The data volume or volumes are not mounted. The SATA link is active. • Solid red. NETGEAR...
Hardware Manual
Page 83
... the Power button. If necessary, turn on the disk tray handle until it latches closed. For more information, see the ReadyNAS OS 6 Software Manual, which is secured in Previously Formatted Disks on the left side of a disk. The Disk LEDs can help you replace the failed disk, the system rebuilds the volume using the local admin page, see the instructions in the drive bay. 10. The disk tray is available at a time. You can recover...
... the Power button. If necessary, turn on the disk tray handle until it latches closed. For more information, see the ReadyNAS OS 6 Software Manual, which is secured in Previously Formatted Disks on the left side of a disk. The Disk LEDs can help you replace the failed disk, the system rebuilds the volume using the local admin page, see the instructions in the drive bay. 10. The disk tray is available at a time. You can recover...
Software Manual
Page 2
First publication 2 After installing your device, locate the serial number on the label of NETGEAR, Inc. Phone (US & Canada only): 1-888-NETGEAR. ReadyNAS OS 6.1 Support Thank you can use it to reflect changes in the United States and/or other countries. and/or its subsidiaries in 6.0.8 firmware. Updated to register your product and use NETGEAR telephone support. Trademarks NETGEAR, the NETGEAR logo, and Connect with Innovation are trademarks and...
First publication 2 After installing your device, locate the serial number on the label of NETGEAR, Inc. Phone (US & Canada only): 1-888-NETGEAR. ReadyNAS OS 6.1 Support Thank you can use it to reflect changes in the United States and/or other countries. and/or its subsidiaries in 6.0.8 firmware. Updated to register your product and use NETGEAR telephone support. Trademarks NETGEAR, the NETGEAR logo, and Connect with Innovation are trademarks and...
Software Manual
Page 5
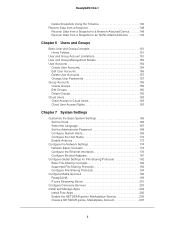
...Password 168 Configure System Alerts 169 Configure the Host Name 172 Enable Antivirus 173 Configure the Network Settings 174 Network Basic Concepts 174 Configure the Ethernet Interfaces 176 Configure Bonded Adapters 181 Configure Global Settings for File-Sharing Protocols 192 Basic File-Sharing Concepts 192 Supported File-Sharing Protocols 193 Configure File-Sharing Protocols 194 Configure Media Services 199 ReadyDLNA 199 iTunes Streaming Server 201 Configure Discovery Services 203 Install and Manage Apps 204 Install Free Apps 205 Enable the NETGEAR genie+ Marketplace Service...
...Password 168 Configure System Alerts 169 Configure the Host Name 172 Enable Antivirus 173 Configure the Network Settings 174 Network Basic Concepts 174 Configure the Ethernet Interfaces 176 Configure Bonded Adapters 181 Configure Global Settings for File-Sharing Protocols 192 Basic File-Sharing Concepts 192 Supported File-Sharing Protocols 193 Configure File-Sharing Protocols 194 Configure Media Services 199 ReadyDLNA 199 iTunes Streaming Server 201 Configure Discovery Services 203 Install and Manage Apps 204 Install Free Apps 205 Enable the NETGEAR genie+ Marketplace Service...
Software Manual
Page 6
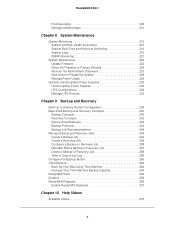
...or Restore System Configuration 239 Basic Data Backup and Recovery Concepts 240 Backup Concepts 240 Recovery Concepts 242 Secure Cloud Backups 243 Backup Protocols 243 Backup Job Recommendations 244 Manage Backup and Recovery Jobs 244 Create a Backup Job 244 Create a Recovery Job 245 Configure a Backup or Recovery Job 248 Manually Start a Backup or Recovery Job 257 Delete a Backup or Recovery Job 258 View or Clear a Job Log 258 Configure the Backup Button 260 Time Machine 262 Back Up Your Mac Using Time Machine 262 Increase Your Time Machine Backup Capacity 264 ReadyNAS Vault...
...or Restore System Configuration 239 Basic Data Backup and Recovery Concepts 240 Backup Concepts 240 Recovery Concepts 242 Secure Cloud Backups 243 Backup Protocols 243 Backup Job Recommendations 244 Manage Backup and Recovery Jobs 244 Create a Backup Job 244 Create a Recovery Job 245 Configure a Backup or Recovery Job 248 Manually Start a Backup or Recovery Job 257 Delete a Backup or Recovery Job 258 View or Clear a Job Log 258 Configure the Backup Button 260 Time Machine 262 Back Up Your Mac Using Time Machine 262 Increase Your Time Machine Backup Capacity 264 ReadyNAS Vault...

Software Manual
Page 9
... ReadyNAS system to back up the data that you can use ReadyCLOUD to transfer files across a network. 7. Configure Global Settings for your ReadyNAS system. 6. Basic Data Backup and Recovery Concepts on page 192. For information about configuring, managing, and backing up your ReadyNAS system. 3. To quickly start using your system, and NETGEAR's recommendations about your system's hardware, see the hardware manual for File-Sharing Protocols on page 240. Basic Snapshot Concepts on page 154. Create User Accounts...
... ReadyNAS system to back up the data that you can use ReadyCLOUD to transfer files across a network. 7. Configure Global Settings for your ReadyNAS system. 6. Basic Data Backup and Recovery Concepts on page 192. For information about configuring, managing, and backing up your ReadyNAS system. 3. To quickly start using your system, and NETGEAR's recommendations about your system's hardware, see the hardware manual for File-Sharing Protocols on page 240. Basic Snapshot Concepts on page 154. Create User Accounts...
Software Manual
Page 54
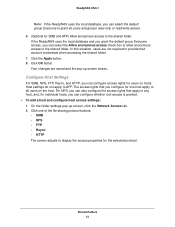
... the Network Access tab. 2. Configure Host Settings For SMB, NFS, FTP, Rsync, and HTTP, you can configure whether root access is granted. To add a host and configure host access settings: 1. The access rights that apply to any host, and, for individual hosts, you can configure access rights for SMB and AFP) Allow anonymous access to the shared folder. Your changes are not required to provide their account credentials when accessing the shared folder. 7. ReadyNAS...
... the Network Access tab. 2. Configure Host Settings For SMB, NFS, FTP, Rsync, and HTTP, you can configure whether root access is granted. To add a host and configure host access settings: 1. The access rights that apply to any host, and, for individual hosts, you can configure access rights for SMB and AFP) Allow anonymous access to the shared folder. Your changes are not required to provide their account credentials when accessing the shared folder. 7. ReadyNAS...
Software Manual
Page 63
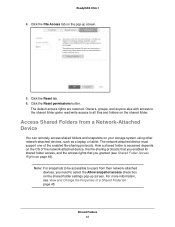
... the network-attached device, the file-sharing protocols that you enabled for shared folder access, and the access rights that you need to users from a Network-Attached Device You can remotely access shared folders and snapshots on page 45. Click the Reset permissions button. Owners, groups, and anyone else with access to the shared folder gains read/write access to all files and folders on page 49). The network-attached device must support one of a Shared Folder on your storage system using other network-attached devices...
... the network-attached device, the file-sharing protocols that you enabled for shared folder access, and the access rights that you need to users from a Network-Attached Device You can remotely access shared folders and snapshots on page 45. Click the Reset permissions button. Owners, groups, and anyone else with access to the shared folder gains read/write access to all files and folders on page 49). The network-attached device must support one of a Shared Folder on your storage system using other network-attached devices...
Software Manual
Page 67
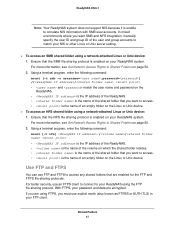
... server setting. To access an SMB shared folder using a network-attached Linux or Unix device: 1. For more information, see Set Network Access Rights to access any shared folders that the NFS file-sharing protocol is enabled on your ReadyNAS system. Use FTP and FTPS You can use explicit mode (also known as FTPES or AUTH TLS) in your FTP client. For better security, use an FTPS client to connect to Shared Folders on page 50. 2. In mixed environments where you must use FTP and FTPS to Shared Folders...
... server setting. To access an SMB shared folder using a network-attached Linux or Unix device: 1. For more information, see Set Network Access Rights to access any shared folders that the NFS file-sharing protocol is enabled on your ReadyNAS system. Use FTP and FTPS You can use explicit mode (also known as FTPES or AUTH TLS) in your FTP client. For better security, use an FTPS client to connect to Shared Folders on page 50. 2. In mixed environments where you must use FTP and FTPS to Shared Folders...
Software Manual
Page 81
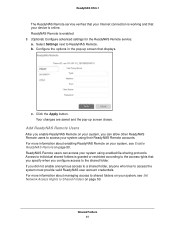
... according to the shared folder. ReadyNAS Remote users can allow other ReadyNAS Remote users to ReadyNAS Remote. Configure the options in the pop-up screen closes. Add ReadyNAS Remote Users After you enable ReadyNAS Remote on your system, you configure access to the access rights that displays. ReadyNAS OS 6.1 The ReadyNAS Remote service verifies that your Internet connection is working and that your system, see Enable ReadyNAS Remote on page 80. Select Settings next to access your system using their ReadyNAS Remote accounts. Your changes are saved and...
... according to the shared folder. ReadyNAS Remote users can allow other ReadyNAS Remote users to ReadyNAS Remote. Configure the options in the pop-up screen closes. Add ReadyNAS Remote Users After you enable ReadyNAS Remote on your system, you configure access to the access rights that displays. ReadyNAS OS 6.1 The ReadyNAS Remote service verifies that your Internet connection is working and that your system, see Enable ReadyNAS Remote on page 80. Select Settings next to access your system using their ReadyNAS Remote accounts. Your changes are saved and...
Software Manual
Page 127
ReadyNAS OS 6.1 Note: For snapshots to be accessible to users from their network-attached device, you roll back to a Snapshot on page 139. Clones You can replace a shared folder or LUN with the version captured by rolling back to a snapshot, see View and Change the Properties of automatic (continuous) snapshots per shared folder or LUN. For information about how to roll back to...
ReadyNAS OS 6.1 Note: For snapshots to be accessible to users from their network-attached device, you roll back to a Snapshot on page 139. Clones You can replace a shared folder or LUN with the version captured by rolling back to a snapshot, see View and Change the Properties of automatic (continuous) snapshots per shared folder or LUN. For information about how to roll back to...


