PS110 Reference Manual
Page 11
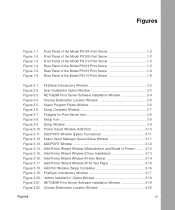
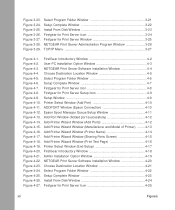
.... "Admin Installation" Option Window 3-18 Figure 3-21. NETGEAR Print Server Software Installation Window 3-19 Figure 3-22. Figure 1-6. FirstGear Introductory Window 3-2 Figure 3-2. Select Program Folder Window 3-6 Figure 3-6. Setup Window 3-9 Figure 3-10. ADDPORT Window 3-12 Figure 3-14. Setup Complete Window 3-7 Figure 3-7. Printer Select Window (Add Port 3-10 Figure 3-11. Firstgear for Print Server Icon 3-8 Figure 3-8. Add Printer Wizard Window (Manufacturer and Model of the Model PS110 Print Server 1-6 Figure 3-1. Epson Spool...
.... "Admin Installation" Option Window 3-18 Figure 3-21. NETGEAR Print Server Software Installation Window 3-19 Figure 3-22. Figure 1-6. FirstGear Introductory Window 3-2 Figure 3-2. Select Program Folder Window 3-6 Figure 3-6. Setup Window 3-9 Figure 3-10. ADDPORT Window 3-12 Figure 3-14. Setup Complete Window 3-7 Figure 3-7. Printer Select Window (Add Port 3-10 Figure 3-11. Firstgear for Print Server Icon 3-8 Figure 3-8. Add Printer Wizard Window (Manufacturer and Model of the Model PS110 Print Server 1-6 Figure 3-1. Epson Spool...
PS110 Reference Manual
Page 12
... Figure 4-19. NETGEAR Print Server Software Installation Window 4-20 Figure 4-23. Choose Destination Location Window 4-21 Figure 4-24. Setup Complete Window 4-23 Figure 4-26. Firstgear for Print Server Icon 3-24 Figure 3-27. Figure 3-23. Add Port Window (Added port successfully 4-12 Figure 4-14. Setup Complete Window 3-22 Figure 3-25. NETGEAR Print Server Software Installation Window 4-4 Figure 4-4. Select Program Folder Window 4-6 Figure 4-6. Setup Window 4-9 Figure 4-10. Epson Spool...
... Figure 4-19. NETGEAR Print Server Software Installation Window 4-20 Figure 4-23. Choose Destination Location Window 4-21 Figure 4-24. Setup Complete Window 4-23 Figure 4-26. Firstgear for Print Server Icon 3-24 Figure 3-27. Figure 3-23. Add Port Window (Added port successfully 4-12 Figure 4-14. Setup Complete Window 3-22 Figure 3-25. NETGEAR Print Server Software Installation Window 4-4 Figure 4-4. Select Program Folder Window 4-6 Figure 4-6. Setup Window 4-9 Figure 4-10. Epson Spool...
PS110 Reference Manual
Page 13
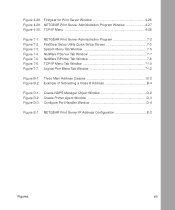
... Window 7-9 TCP/IP Menu Tab Window 7-10 Logical Port Menu Tab Window 7-12 Figure B-1. Figure D-2. TCP/IP Menu 4-28 Figure 7-1. Figure 7-5. Three Main Address Classes B-2 Figure B-2. Example of Subnetting a Class B Address B-4 Figure D-1. Create NDPS Manager Object Window D-2 Create Printer Agent Window D-3 Configure Port Handler Window D-4 Figure E-1. Figure 7-2. Figure D-3. NETGEAR Print Server IP Address Configuration E-2 Figures xiii Figure 4-28. NETGEAR Print Server Administration Program Window...
... Window 7-9 TCP/IP Menu Tab Window 7-10 Logical Port Menu Tab Window 7-12 Figure B-1. Figure D-2. TCP/IP Menu 4-28 Figure 7-1. Figure 7-5. Three Main Address Classes B-2 Figure B-2. Example of Subnetting a Class B Address B-4 Figure D-1. Create NDPS Manager Object Window D-2 Create Printer Agent Window D-3 Configure Port Handler Window D-4 Figure E-1. Figure 7-2. Figure D-3. NETGEAR Print Server IP Address Configuration E-2 Figures xiii Figure 4-28. NETGEAR Print Server Administration Program Window...
PS110 Reference Manual
Page 21
..., NETGEAR configuration software that assures fast and easy setup for Windows 95, Windows 98, and Window NT users • Support for 10BASE-T Ethernet connection with four 10BASE-T ports on the Model PS104 Print Server, four 10BASE-T ports and a BNC port on the Model PS105 Print Server, or 10/ 100BASE-T Ethernet connection on the Model PS110 Print Server • One IEEE 1284 bidirectional parallel...
..., NETGEAR configuration software that assures fast and easy setup for Windows 95, Windows 98, and Window NT users • Support for 10BASE-T Ethernet connection with four 10BASE-T ports on the Model PS104 Print Server, four 10BASE-T ports and a BNC port on the Model PS105 Print Server, or 10/ 100BASE-T Ethernet connection on the Model PS110 Print Server • One IEEE 1284 bidirectional parallel...
PS110 Reference Manual
Page 40
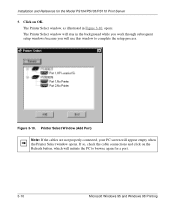
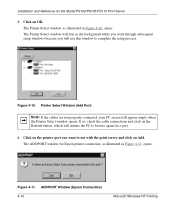
... on OK. The Printer Select window, as illustrated in the background while you work through subsequent setup windows because you will stay in Figure 3-10, opens. Printer Select Window (Add Port) Note: If the... cables are not properly connected, your PC screen will initiate the PC to complete the setup process. The Printer Select window will use this window to browse again for the Model PS104/PS105/PS110 Print Server 5. Figure 3-10. Installation and Reference for a port. 3-10 Microsoft Windows 95 and Windows 98 Printing...
... on OK. The Printer Select window, as illustrated in the background while you work through subsequent setup windows because you will stay in Figure 3-10, opens. Printer Select Window (Add Port) Note: If the... cables are not properly connected, your PC screen will initiate the PC to complete the setup process. The Printer Select window will use this window to browse again for the Model PS104/PS105/PS110 Print Server 5. Figure 3-10. Installation and Reference for a port. 3-10 Microsoft Windows 95 and Windows 98 Printing...
PS110 Reference Manual
Page 44
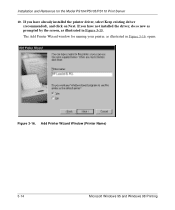
If you have already installed the printer driver, select Keep existing driver (recommended), and click on Next. Add Printer Wizard Window (Printer Name) 3-14 Microsoft Windows 95 and Windows 98 Printing The Add Printer Wizard window for the Model PS104/PS105/PS110 Print Server 10. Installation and Reference for naming your printer, as illustrated in Figure 3-16, opens. Figure 3-16. If you have not installed the driver, do so now as prompted by the screen, as illustrated in Figure 3-15.
If you have already installed the printer driver, select Keep existing driver (recommended), and click on Next. Add Printer Wizard Window (Printer Name) 3-14 Microsoft Windows 95 and Windows 98 Printing The Add Printer Wizard window for the Model PS104/PS105/PS110 Print Server 10. Installation and Reference for naming your printer, as illustrated in Figure 3-16, opens. Figure 3-16. If you have not installed the driver, do so now as prompted by the screen, as illustrated in Figure 3-15.
PS110 Reference Manual
Page 52
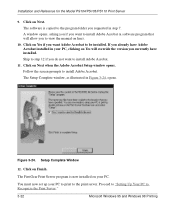
... software is now installed on line). 10. Click on Finish. You must now set up your PC. Click on Next. Click on Next when the Adobe Acrobat Setup window opens. Installation and Reference for the Model PS104/PS105/PS110 Print Server 9. The FirstGear Print Server program is copied to be installed. A window opens, asking you if you want...
... software is now installed on line). 10. Click on Finish. You must now set up your PC. Click on Next. Click on Next when the Adobe Acrobat Setup window opens. Installation and Reference for the Model PS104/PS105/PS110 Print Server 9. The FirstGear Print Server program is copied to be installed. A window opens, asking you if you want...
PS110 Reference Manual
Page 58
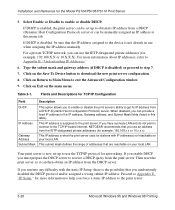
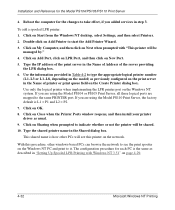
...IP address assigned to exit the Advanced Configuration window. 9. If you have a private LAN and do not plan to connect to the TCP/IP-based Internet, NETGEAR recommends that are reachable on Return to Main Menu to the device is enabled, the print server can be sure that you can then ...allows you must prepare the DHCP server to enable or disable DHCP. Then reset the print server so it can provide a fixed IP address in the IP address, Gateway address, and Subnet Mask fields (listed in use the TCP/IP protocol for the Model PS104/PS105/PS110 Print Server 5. Click on your local LAN...
...IP address assigned to exit the Advanced Configuration window. 9. If you have a private LAN and do not plan to connect to the TCP/IP-based Internet, NETGEAR recommends that are reachable on Return to Main Menu to the device is enabled, the print server can be sure that you can then ...allows you must prepare the DHCP server to enable or disable DHCP. Then reset the print server so it can provide a fixed IP address in the IP address, Gateway address, and Subnet Mask fields (listed in use the TCP/IP protocol for the Model PS104/PS105/PS110 Print Server 5. Click on your local LAN...
PS110 Reference Manual
Page 68
... the Refresh button, which will stay in the background while you work through subsequent setup windows because you want to use this window to browse again for the Model PS104/PS105/PS110 Print Server 5. Figure 4-11. ADDPORT Window (Epson Connection) 4-10 Microsoft Windows NT Printing The Printer Select window will initiate the PC to complete the setup process. Printer Select...
... the Refresh button, which will stay in the background while you work through subsequent setup windows because you want to use this window to browse again for the Model PS104/PS105/PS110 Print Server 5. Figure 4-11. ADDPORT Window (Epson Connection) 4-10 Microsoft Windows NT Printing The Printer Select window will initiate the PC to complete the setup process. Printer Select...
PS110 Reference Manual
Page 71
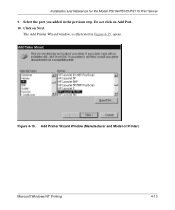
Add Printer Wizard Window (Manufacturer and Model of Printer) Microsoft Windows NT Printing 4-13 Select the port you added in Figure 4-15, opens. Do not click on Next. Installation and Reference for the Model PS104/PS105/PS110 Print Server 9. The Add Printer Wizard window, as illustrated in the previous step. Figure 4-15. Click on Add Port. 10.
Add Printer Wizard Window (Manufacturer and Model of Printer) Microsoft Windows NT Printing 4-13 Select the port you added in Figure 4-15, opens. Do not click on Next. Installation and Reference for the Model PS104/PS105/PS110 Print Server 9. The Add Printer Wizard window, as illustrated in the previous step. Figure 4-15. Click on Add Port. 10.
PS110 Reference Manual
Page 81
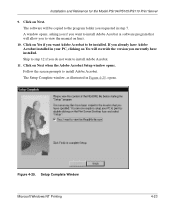
... on Yes if you want to view the manual on line). 10. Installation and Reference for the Model PS104/PS105/PS110 Print Server 9. Click on Next. Click on Yes will override the version you requested in Figure 4-25, opens. Setup Complete Window Microsoft Windows NT Printing 4-23 A window opens, asking you if you want to install Adobe Acrobat...
... on Yes if you want to view the manual on line). 10. Installation and Reference for the Model PS104/PS105/PS110 Print Server 9. Click on Next. Click on Yes will override the version you requested in Figure 4-25, opens. Setup Complete Window Microsoft Windows NT Printing 4-23 A window opens, asking you if you want to install Adobe Acrobat...
PS110 Reference Manual
Page 86
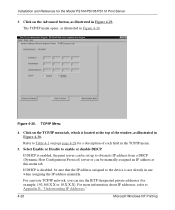
...use when assigning the IP address manually. Select Enable or Disable to Appendix B, "Understanding IP Addresses." 4-28 Microsoft Windows NT Printing If DHCP is enabled, the print server can be sure that the IP address assigned to the device is disabled, be set up to Table 4-1 on... the Advanced button, as illustrated in use the IETP-designated private addresses (for example, 192.168.X.X or 10.X.X.X). TCP/IP Menu 4. For more information about IP addresses, refer to enable or disable DHCP. Click on page page 4-29 for the Model PS104/PS105/PS110 Print Server 3.
...use when assigning the IP address manually. Select Enable or Disable to Appendix B, "Understanding IP Addresses." 4-28 Microsoft Windows NT Printing If DHCP is enabled, the print server can be sure that the IP address assigned to the device is disabled, be set up to Table 4-1 on... the Advanced button, as illustrated in use the IETP-designated private addresses (for example, 192.168.X.X or 10.X.X.X). TCP/IP Menu 4. For more information about IP addresses, refer to enable or disable DHCP. Click on page page 4-29 for the Model PS104/PS105/PS110 Print Server 3.

PS110 Reference Manual
Page 87
...address from a DHCP (Dynamic Host Configuration Protocol) server. Microsoft Windows NT Printing 4-29 Installation and Reference for spooled LPR printing: 1. To prepare for the Model PS104/PS105/PS110 Print Server 6. Click on Exit on your local LAN. ...print server is what the print server uses for more information to receive a DHCP query from the DHCP server. If you have a private LAN and do not plan to connect to the TCP/IP-based Internet, NETGEAR recommends that you force a static IP address to the next section, "Setting Up Spooled LPR Printing with Windows...
...address from a DHCP (Dynamic Host Configuration Protocol) server. Microsoft Windows NT Printing 4-29 Installation and Reference for spooled LPR printing: 1. To prepare for the Model PS104/PS105/PS110 Print Server 6. Click on Exit on your local LAN. ...print server is what the print server uses for more information to receive a DHCP query from the DHCP server. If you have a private LAN and do not plan to connect to the TCP/IP-based Internet, NETGEAR recommends that you force a static IP address to the next section, "Setting Up Spooled LPR Printing with Windows...
PS110 Reference Manual
Page 90
... select Printers. 2. The configuration procedure for the Model PS104/PS105/PS110 Print Server 4. Click on Close when the Printer Ports window reopens, and then install your printer driver as previously configured on the print server in "Setting Up Spooled LPR Printing with "This printer will be shared. 10. This shared name is the same as described in the...
... select Printers. 2. The configuration procedure for the Model PS104/PS105/PS110 Print Server 4. Click on Close when the Printer Ports window reopens, and then install your printer driver as previously configured on the print server in "Setting Up Spooled LPR Printing with "This printer will be shared. 10. This shared name is the same as described in the...

PS110 Reference Manual
Page 95
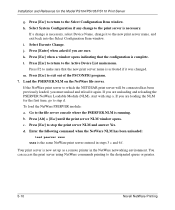
... the File Server Queue Priority window opens. Installation and Reference for each printer port on the print server. Enter the print server name in Table 5-1. h. Press [Esc] to return to save the changes. e. For more information about logical ports, refer to service. Table 5-1. f. Repeat steps d, e, and f for the Model PS104/PS105/PS110 Print Server d. To associate print queues with the...
... the File Server Queue Priority window opens. Installation and Reference for each printer port on the print server. Enter the print server name in Table 5-1. h. Press [Esc] to return to save the changes. e. For more information about logical ports, refer to service. Table 5-1. f. Repeat steps d, e, and f for the Model PS104/PS105/PS110 Print Server d. To associate print queues with the...
PS110 Reference Manual
Page 100
... the Select Configuration Item window. Load the PSERVER.NLM on the NetWare file server. To load the NetWare PSERVER module: a. b. Press [Esc] to return to the Active Device List main menu. m. Press F2 to which the NETGEAR print server will be connected has been.... 5-10 Novell NetWare Printing c. Your print server is necessary. l. You can access the print server using NetWare commands printing to step d. Go to the print server is now set up as a remote printer in steps 3 c and 6 f. If you are loading the NLM for the Model PS104/PS105/PS110 Print Server g....
... the Select Configuration Item window. Load the PSERVER.NLM on the NetWare file server. To load the NetWare PSERVER module: a. b. Press [Esc] to return to the Active Device List main menu. m. Press F2 to which the NETGEAR print server will be connected has been.... 5-10 Novell NetWare Printing c. Your print server is necessary. l. You can access the print server using NetWare commands printing to step d. Go to the print server is now set up as a remote printer in steps 3 c and 6 f. If you are loading the NLM for the Model PS104/PS105/PS110 Print Server g....
PS110 Reference Manual
Page 111
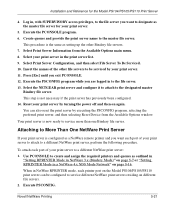
... want each printer port on the Model PS104/PS105/PS110 print server can also reset the print server by executing the PSCONFIG program, selecting the preferred print server, and then selecting Reset Device from the Available Options...servers. 7. Select Print Server Information from the Available Options window. Select the NETGEAR print server and configure it to attach to the master file server. Execute PSCONFIG. Novell NetWare Printing 5-21 You can be serviced by turning the power off and then on again. Select Print Server Configuration, and then select File Server To Be Serviced. 10...
... want each printer port on the Model PS104/PS105/PS110 print server can also reset the print server by executing the PSCONFIG program, selecting the preferred print server, and then selecting Reset Device from the Available Options...servers. 7. Select Print Server Information from the Available Options window. Select the NETGEAR print server and configure it to attach to the master file server. Execute PSCONFIG. Novell NetWare Printing 5-21 You can be serviced by turning the power off and then on again. Select Print Server Configuration, and then select File Server To Be Serviced. 10...
PS110 Reference Manual
Page 124
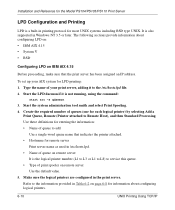
... the /etc/hosts.lpd file. 2. Create the required number of print spooler on remote server Use the default value. 5. Installation and Reference for the Model PS104/PS105/PS110 Print Server LPD Configuration and Printing LPD is a built-in Windows NT 3.5 or later. Start the LPD daemon if it to add... sections provide information about configuring logical printers. 6-10 UNIX Printing Using TCP/IP Refer to the information provided in /etc/hosts.lpd. • Name of queue on IBM AIX 4.15 Before proceeding, make sure that the print server has been assigned an IP address. Make sure...
... the /etc/hosts.lpd file. 2. Create the required number of print spooler on remote server Use the default value. 5. Installation and Reference for the Model PS104/PS105/PS110 Print Server LPD Configuration and Printing LPD is a built-in Windows NT 3.5 or later. Start the LPD daemon if it to add... sections provide information about configuring logical printers. 6-10 UNIX Printing Using TCP/IP Refer to the information provided in /etc/hosts.lpd. • Name of queue on IBM AIX 4.15 Before proceeding, make sure that the print server has been assigned an IP address. Make sure...
PS110 Reference Manual
Page 138
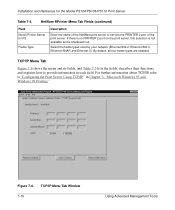
... print server. NetWare RPrinter Menu Tab Fields (continued) Field Novell Printer Server for the Model PS104/PS105/PS110 Print Server Table 7-4. TCP/IP Menu Tab Figure 7-6 shows the menu and its fields, and Table 7-5 lists the fields, describes their functions, and explains how to provide information in Chapter 3, "Microsoft Windows 95 and Windows 98 Printing." TCP/IP Menu Tab Window 7-10...
... print server. NetWare RPrinter Menu Tab Fields (continued) Field Novell Printer Server for the Model PS104/PS105/PS110 Print Server Table 7-4. TCP/IP Menu Tab Figure 7-6 shows the menu and its fields, and Table 7-5 lists the fields, describes their functions, and explains how to provide information in Chapter 3, "Microsoft Windows 95 and Windows 98 Printing." TCP/IP Menu Tab Window 7-10...
PS110 Reference Manual
Page 170
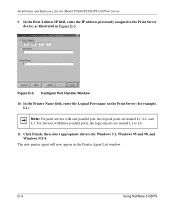
... Window 10. For devices with one parallel port, the logical ports are named L1 to the Print Server device, as illustrated in the Printer Agent List window. Figure D-3. The new printer agent will now appear in Figure D-3. In the Printer Name field, enter the Logical Port name on the Print Server (for the Model PS104/PS105/PS110 Print Server 9. Note: For print servers...
... Window 10. For devices with one parallel port, the logical ports are named L1 to the Print Server device, as illustrated in the Printer Agent List window. Figure D-3. The new printer agent will now appear in Figure D-3. In the Printer Name field, enter the Logical Port name on the Print Server (for the Model PS104/PS105/PS110 Print Server 9. Note: For print servers...

