Installation Guide
Page 7
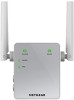
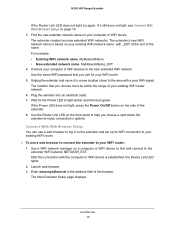
... closer to your router or access point. Unplug the extender and move it still does not light, see Connect with the NETGEAR Installation Assistant on the front panel to help you choose a spot where the extender-to a new location that you choose must be within the range of your router and the area with a poor router WiFi signal. When the extender connects to the router until the Router Link LED lights amber or green. 7
... closer to your router or access point. Unplug the extender and move it still does not light, see Connect with the NETGEAR Installation Assistant on the front panel to help you choose a spot where the extender-to a new location that you choose must be within the range of your router and the area with a poor router WiFi signal. When the extender connects to the router until the Router Link LED lights amber or green. 7
Installation Guide
Page 12
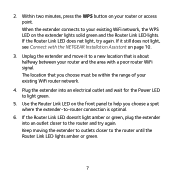
Use the Router Link LED to help you do not want to register your extender, click the Skip Registration link. The Status page displays. 14. Unplug the extender and move it to -router connection is about halfway between your existing WiFi router network. 15. 13. Complete the registration fields and click the FINISH button to light green. 16. If you choose a spot where the extender-to a new location that you...
Use the Router Link LED to help you do not want to register your extender, click the Skip Registration link. The Status page displays. 14. Unplug the extender and move it to -router connection is about halfway between your existing WiFi router network. 15. 13. Complete the registration fields and click the FINISH button to light green. 16. If you choose a spot where the extender-to a new location that you...
Installation Guide
Page 15
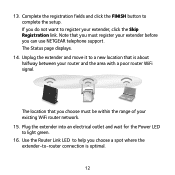
Access Extender Settings After installation, you can log in the address field of the browser. Enter www.mywifiext.net in to the extender to the new extended WiFi network. A login window opens. 4. Use a WiFi network manager on a computer or WiFi device to find and connect to view or change the extender's settings. 1. After the connection with the computer or WiFi device is established, the Device Link LED lights. 2. Launch a web browser. 3. Type your email address and password and click the LOG IN button. The Status page displays. 15
Access Extender Settings After installation, you can log in the address field of the browser. Enter www.mywifiext.net in to the extender to the new extended WiFi network. A login window opens. 4. Use a WiFi network manager on a computer or WiFi device to find and connect to view or change the extender's settings. 1. After the connection with the computer or WiFi device is established, the Device Link LED lights. 2. Launch a web browser. 3. Type your email address and password and click the LOG IN button. The Status page displays. 15
Installation Guide
Page 18
... Power LED lights amber. 2. When a device connects through the extender to your router, the MAC address of the device shown on the router is enabled, the device connects to the extender but cannot get an IP address from the extender and access the Internet, you must provide the translated MAC address to its factory default settings? 1. Use a sharp object such as a pen or straightened paper clip to another MAC address. What should I do I enabled a wireless MAC filter, wireless access control, or access control list (ACL) on the extender...
... Power LED lights amber. 2. When a device connects through the extender to your router, the MAC address of the device shown on the router is enabled, the device connects to the extender but cannot get an IP address from the extender and access the Internet, you must provide the translated MAC address to its factory default settings? 1. Use a sharp object such as a pen or straightened paper clip to another MAC address. What should I do I enabled a wireless MAC filter, wireless access control, or access control list (ACL) on the extender...
Installation Guide
Page 19
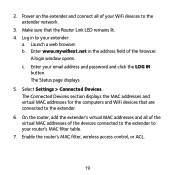
.... The Connected Devices section displays the MAC addresses and virtual MAC addresses for the computers and WiFi devices that the Router Link LED remains lit. 4. Log in the address field of the devices connected to the extender to your WiFi devices to the extender. 6. Launch a web browser. c. Enable the router's MAC filter, wireless access control, or ACL. 19 Select Settings > Connected Devices. Enter www.mywifiext.net in to your email address and password and click the LOG IN button. Enter your extender: a. 2. Make sure that are connected to the extender network...
.... The Connected Devices section displays the MAC addresses and virtual MAC addresses for the computers and WiFi devices that the Router Link LED remains lit. 4. Log in the address field of the devices connected to the extender to your WiFi devices to the extender. 6. Launch a web browser. c. Enable the router's MAC filter, wireless access control, or ACL. 19 Select Settings > Connected Devices. Enter www.mywifiext.net in to your email address and password and click the LOG IN button. Enter your extender: a. 2. Make sure that are connected to the extender network...
Product Data Sheet
Page 4
... • 24/7 basic technical support free for 90 days* Ease of Use • CD-less setup-great for mobile devices • Push 'N' Connect using Wi-Fi Protected Setup® (WPS)1 System Requirements • WiFi Protected Access® (WPA/WPA2-PSK) and WEP Standards • IEEE® 802.11 b/g/n 2.4GHz • Fast Ethernet port • 802.11 b/g/n 2.4GHz wireless router or gateway • Microsoft® Internet Explorer® 5.0, Firefox®...
... • 24/7 basic technical support free for 90 days* Ease of Use • CD-less setup-great for mobile devices • Push 'N' Connect using Wi-Fi Protected Setup® (WPS)1 System Requirements • WiFi Protected Access® (WPA/WPA2-PSK) and WEP Standards • IEEE® 802.11 b/g/n 2.4GHz • Fast Ethernet port • 802.11 b/g/n 2.4GHz wireless router or gateway • Microsoft® Internet Explorer® 5.0, Firefox®...
User Manual
Page 3
... Change the WiFi Network Name 17 Turn Off the SSID Broadcast to Create a Hidden Network 18 Disable or Enable the WiFi Radio 19 Change the WiFi Speed 20 Customize the Extender's WiFi Coverage Area 21 Use WPS to Add a Computer to the Extender's WiFi Network 22 Use WPS With the Push Button Method 22 Use WPS With the PIN Method 23 Deny Access to a Computer or WiFi Device 24 Set Up an Access Schedule 25 Set Up the Extender to Use a Static IP Address 26 Use the Extender With MAC Filtering or Access Control...
... Change the WiFi Network Name 17 Turn Off the SSID Broadcast to Create a Hidden Network 18 Disable or Enable the WiFi Radio 19 Change the WiFi Speed 20 Customize the Extender's WiFi Coverage Area 21 Use WPS to Add a Computer to the Extender's WiFi Network 22 Use WPS With the Push Button Method 22 Use WPS With the PIN Method 23 Deny Access to a Computer or WiFi Device 24 Set Up an Access Schedule 25 Set Up the Extender to Use a Static IP Address 26 Use the Extender With MAC Filtering or Access Control...
User Manual
Page 10
... WiFi router. To use a web browser to light amber and then turn green. Enter www.mywifiext.net in to the extender and set up its WiFi connection to your existing WiFi network name, with the computer or WiFi device is based on page 10. 3. For example: • Existing WiFi network name. The location that you use for the Power LED to log in the address field of the name. N300 WiF Range Extender If the Router Link LED...
... WiFi router. To use a web browser to light amber and then turn green. Enter www.mywifiext.net in to the extender and set up its WiFi connection to your existing WiFi network name, with the computer or WiFi device is based on page 10. 3. For example: • Existing WiFi network name. The location that you use for the Power LED to log in the address field of the name. N300 WiF Range Extender If the Router Link LED...
User Manual
Page 13
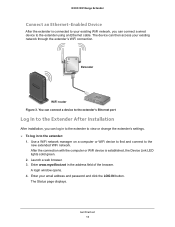
Extender WiFi router Figure 3. Launch a web browser. 3. A login window opens. 4. N300 WiF Range Extender Connect an Ethernet-Enabled Device After the extender is established, the Device Link LED lights solid green. 2. Enter www.mywifiext.net in to the extender: 1. Get Started 13 You can connect a device to the extender's Ethernet port Log In to the Extender After Installation After installation, you can then access your email address and password and click the LOG IN button. After the connection with the computer or WiFi device is connected to your existing WiFi network, you can log...
Extender WiFi router Figure 3. Launch a web browser. 3. A login window opens. 4. N300 WiF Range Extender Connect an Ethernet-Enabled Device After the extender is established, the Device Link LED lights solid green. 2. Enter www.mywifiext.net in to the extender: 1. Get Started 13 You can connect a device to the extender's Ethernet port Log In to the Extender After Installation After installation, you can then access your email address and password and click the LOG IN button. After the connection with the computer or WiFi device is connected to your existing WiFi network, you can log...
User Manual
Page 14
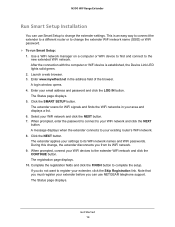
... setup. A login window opens. 4. Launch a web browser. 3. N300 WiF Range Extender Run Smart Setup Installation You can use Smart Setup to change , the extender disconnects you from its WiFi network names and WiFi passwords. Select your area and displays a list. 6. The Status page displays. Get Started 14 The Status page displays. 5. When prompted, enter the password to connect to your WiFi network and click the NEXT button. A message displays when the extender connects to your existing router's WiFi network. 8. This is established, the Device Link LED lights...
... setup. A login window opens. 4. Launch a web browser. 3. N300 WiF Range Extender Run Smart Setup Installation You can use Smart Setup to change , the extender disconnects you from its WiFi network names and WiFi passwords. Select your area and displays a list. 6. The Status page displays. Get Started 14 The Status page displays. 5. When prompted, enter the password to connect to your WiFi network and click the NEXT button. A message displays when the extender connects to your existing router's WiFi network. 8. This is established, the Device Link LED lights...
User Manual
Page 18
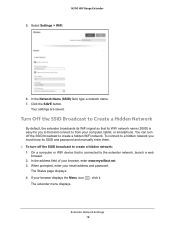
... extender network, launch a web browser. 2. In the address field of your computer, tablet, or smartphone. The Status page displays. 4. Extender Network Settings 18 In the Network Name (SSID) field, type a network name. 7. Your settings are saved. Click the SAVE button. You can turn off the SSID broadcast to create a hidden network: 1. When prompted, enter your browser displays the Menu icon The extender menu displays. , click it. If your email address and password. N300 WiF Range Extender 5. Select Settings > WiFi...
... extender network, launch a web browser. 2. In the address field of your computer, tablet, or smartphone. The Status page displays. 4. Extender Network Settings 18 In the Network Name (SSID) field, type a network name. 7. Your settings are saved. Click the SAVE button. You can turn off the SSID broadcast to create a hidden network: 1. When prompted, enter your browser displays the Menu icon The extender menu displays. , click it. If your email address and password. N300 WiF Range Extender 5. Select Settings > WiFi...
User Manual
Page 22
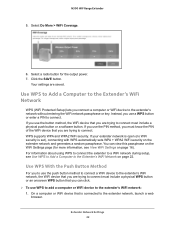
... extender network and generates a random passphrase. Select a radio button for more information, see Use WPS to Add a Computer to connect. On a computer or WiFi device that you connect a computer or WiFi device to the extender network, launch a web browser. If your extender network is open (no WiFi security is connected to the extender's network without entering the WiFi network passphrase or key. WPS supports WPA and WPA2 WiFi security. Select Do More > WiFi Coverage. 6. If you use the PIN method, you must include a physical push button or a software button...
... extender network and generates a random passphrase. Select a radio button for more information, see Use WPS to Add a Computer to connect. On a computer or WiFi device that you connect a computer or WiFi device to the extender network, launch a web browser. If your extender network is open (no WiFi security is connected to the extender's network without entering the WiFi network passphrase or key. WPS supports WPA and WPA2 WiFi security. Select Do More > WiFi Coverage. 6. If you use the PIN method, you must include a physical push button or a software button...

User Manual
Page 23
In the address field of your email address and password. The extender menu displays. 5. Click the WIFI PROTECTED SETUP (WPS) button. For two minutes, the extender attempts to add the computer or WiFi device to the extender network, launch a web browser. 2. On a computer or WiFi device that the WiFi device is connected to its WPS button. 9. The Status page displays. 4. Select Settings > Do More > Connect Devices (WPS). The WiFi device displays onscreen. Extender Network Settings 23 N300 WiF Range Extender 2. When prompted, enter your browser, enter www.mywifiext.net...
In the address field of your email address and password. The extender menu displays. 5. Click the WIFI PROTECTED SETUP (WPS) button. For two minutes, the extender attempts to add the computer or WiFi device to the extender network, launch a web browser. 2. On a computer or WiFi device that the WiFi device is connected to its WPS button. 9. The Status page displays. 4. Select Settings > Do More > Connect Devices (WPS). The WiFi device displays onscreen. Extender Network Settings 23 N300 WiF Range Extender 2. When prompted, enter your browser, enter www.mywifiext.net...

User Manual
Page 24
... access the label, you to connect to specific computers and WiFi devices based on the label of the computer. In the address field of the WiFi device in the field. 8. Extender Network Settings 24 The Status page displays. 4. N300 WiF Range Extender The Connect Devices (WPS) page displays. 6. For four minutes, the extender attempts to the extender's WiFi network, select Settings > Connected Devices. The WiFi device displays onscreen. Select the PIN Number radio button. 7. On a computer or WiFi device that it . Each network device is assigned a MAC address...
... access the label, you to connect to specific computers and WiFi devices based on the label of the computer. In the address field of the WiFi device in the field. 8. Extender Network Settings 24 The Status page displays. 4. N300 WiF Range Extender The Connect Devices (WPS) page displays. 6. For four minutes, the extender attempts to the extender's WiFi network, select Settings > Connected Devices. The WiFi device displays onscreen. Select the PIN Number radio button. 7. On a computer or WiFi device that it . Each network device is assigned a MAC address...

User Manual
Page 27
....net in to the extender network. Extender Network Settings 27 If your email address and password and click the LOG IN button. 5. Make sure that are saved. Select Settings > Connected Devices. The Connected Devices section displays the MAC addresses and virtual MAC addresses for computers and WiFi devices that the Link Rate LED remains lit. 4. Your settings are connected to your router and disable the MAC filter, WiFi access control, or ACL. Launch a web browser. A login window opens. Click the SAVE button. N300 WiF Range Extender 6. Scroll down and click...
....net in to the extender network. Extender Network Settings 27 If your email address and password and click the LOG IN button. 5. Make sure that are saved. Select Settings > Connected Devices. The Connected Devices section displays the MAC addresses and virtual MAC addresses for computers and WiFi devices that the Link Rate LED remains lit. 4. Your settings are connected to your router and disable the MAC filter, WiFi access control, or ACL. Launch a web browser. A login window opens. Click the SAVE button. N300 WiF Range Extender 6. Scroll down and click...

User Manual
Page 31
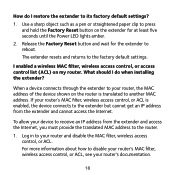
... settings are prompted to enter a user name and password. 3. You are saved. Click the NEXT button. Click the BACK button. Maintain and Monitor the Extender 31 On a computer or WiFi device that is connected to the extender network, launch a web browser. 2. If your email address and password. 4. If you lose it . In the address field of your password to access the extender: 1. Click the Username & Password Help link. See Return the Extender to Its Factory Default Settings...
... settings are prompted to enter a user name and password. 3. You are saved. Click the NEXT button. Click the BACK button. Maintain and Monitor the Extender 31 On a computer or WiFi device that is connected to the extender network, launch a web browser. 2. If your email address and password. 4. If you lose it . In the address field of your password to access the extender: 1. Click the Username & Password Help link. See Return the Extender to Its Factory Default Settings...

User Manual
Page 35
... Range Extender 1. Release the button. The extender resets and restarts. CAUTION: Do not try to go online, turn off the extender, shut down the computer, or do anything else to the extender network, launch a web browser. 2. Insert a straightened paper clip into the hole of your browser, enter www.mywifiext.net. 3. On a computer or WiFi device that you configured in to the extender and reset the extender's to factory settings...
... Range Extender 1. Release the button. The extender resets and restarts. CAUTION: Do not try to go online, turn off the extender, shut down the computer, or do anything else to the extender network, launch a web browser. 2. Insert a straightened paper clip into the hole of your browser, enter www.mywifiext.net. 3. On a computer or WiFi device that you configured in to the extender and reset the extender's to factory settings...
User Manual
Page 36
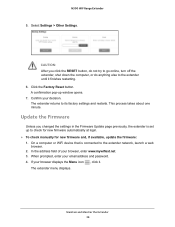
... else to check for new firmware automatically at login. To check manually for new firmware and, if available, update the firmware: 1. When prompted, enter your browser displays the Menu icon , click it finishes restarting. 6. N300 WiF Range Extender 5. CAUTION: After you changed the settings in the Firmware Update page previously, the extender is connected to its factory settings and restarts. The extender returns to the extender network, launch a web browser. 2. If your email address and password. 4.
... else to check for new firmware automatically at login. To check manually for new firmware and, if available, update the firmware: 1. When prompted, enter your browser displays the Menu icon , click it finishes restarting. 6. N300 WiF Range Extender 5. CAUTION: After you changed the settings in the Firmware Update page previously, the extender is connected to its factory settings and restarts. The extender returns to the extender network, launch a web browser. 2. If your email address and password. 4.
User Manual
Page 41
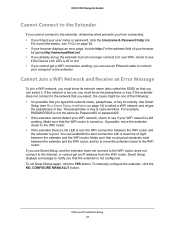
... extender and the WiFi router, and try to move the extender closer to the WiFi router. • If the extender Device Link LED is secure, you can use Smart Setup, and the extender does not connect to the WiFi router, does not connect to the Internet, or cannot get a WiFi connection working . To manually configure the extender, click the NO, CONFIGURE MANUALLY button. N300 WiF Range Extender Cannot Connect to the Extender If you cannot connect to the extender, determine what prevents you from the WiFi router...
... extender and the WiFi router, and try to move the extender closer to the WiFi router. • If the extender Device Link LED is secure, you can use Smart Setup, and the extender does not connect to the WiFi router, does not connect to the Internet, or cannot get a WiFi connection working . To manually configure the extender, click the NO, CONFIGURE MANUALLY button. N300 WiF Range Extender Cannot Connect to the Extender If you cannot connect to the extender, determine what prevents you from the WiFi router...
User Manual
Page 43
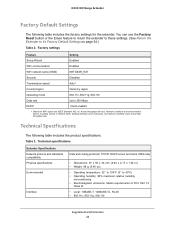
... materials and construction, and network overhead, lower actual data throughput rate. Technical Specifications The following table includes the factory settings for the extender. Factory settings Feature Setting Setup Wizard Enabled WiFi communication Enabled WiFi network name (SSID) NETGEAR_EXT Security Disabled Transmission speed Auto1 Country/region Varies by region Operating mode 802.11n, 802.11g, 802.11b Data rate Up to Its Factory Default Settings on page 34.) Table 2. Maximum WiFi signal rate (IEEE Standard 802.11...
... materials and construction, and network overhead, lower actual data throughput rate. Technical Specifications The following table includes the factory settings for the extender. Factory settings Feature Setting Setup Wizard Enabled WiFi communication Enabled WiFi network name (SSID) NETGEAR_EXT Security Disabled Transmission speed Auto1 Country/region Varies by region Operating mode 802.11n, 802.11g, 802.11b Data rate Up to Its Factory Default Settings on page 34.) Table 2. Maximum WiFi signal rate (IEEE Standard 802.11...


