Installation Guide
Page 1
... a table. Access the AV UI or main UI to configure the switch You can log in and configure the switch, use a computer on the bottom of the switch. • In a rack. The main UI login page displays. On first login, you can configure the IP address manually or use the rack-mount kit that the power source is functioning. 3. To download firmware, visit netgear.com/support/download/. Connect devices to configure the switch). • CLI: Use the command-line interface (CLI) through any Ethernet network port (see...
... a table. Access the AV UI or main UI to configure the switch You can log in and configure the switch, use a computer on the bottom of the switch. • In a rack. The main UI login page displays. On first login, you can configure the IP address manually or use the rack-mount kit that the power source is functioning. 3. To download firmware, visit netgear.com/support/download/. Connect devices to configure the switch). • CLI: Use the command-line interface (CLI) through any Ethernet network port (see...
Installation Guide
Page 2
... IP address of the management interface, enter the privileged EXEC mode by visiting netgear.com/support/download/. • Console cable for reference purposes only. Make sure that is assigned to the management interface. Log in to the switch's AV UI or main UI by the DHCP server displays. 4. See the regulatory compliance document before connecting the power supply. For NETGEAR's Privacy Policy, visit https://www.netgear.com/about setting up a console connection, see the CLI reference manual, which are using your...
... IP address of the management interface, enter the privileged EXEC mode by visiting netgear.com/support/download/. • Console cable for reference purposes only. Make sure that is assigned to the management interface. Log in to the switch's AV UI or main UI by the DHCP server displays. 4. See the regulatory compliance document before connecting the power supply. For NETGEAR's Privacy Policy, visit https://www.netgear.com/about setting up a console connection, see the CLI reference manual, which are using your...
User Manual
Page 9
... database 250 Remove all known multicast MAC entries from the multicast forwarding database 251 Display the multicast forwarding database statistics 252 Internet Group Management Protocol snooping 253 Configure IGMP snooping automatically with IGMP Plus mode 254 Configure IGMP snooping manually 255 Configure the IGMP snooping settings for interfaces 257 Configure IGMP snooping for VLANs automatically with IGMP Plus mode 259 Configure IGMP snooping for VLANs manually 260 Configure an IGMP multicast router interface 262 Configure an IGMP multicast router VLAN 263 IGMP snooping querier...
... database 250 Remove all known multicast MAC entries from the multicast forwarding database 251 Display the multicast forwarding database statistics 252 Internet Group Management Protocol snooping 253 Configure IGMP snooping automatically with IGMP Plus mode 254 Configure IGMP snooping manually 255 Configure the IGMP snooping settings for interfaces 257 Configure IGMP snooping for VLANs automatically with IGMP Plus mode 259 Configure IGMP snooping for VLANs manually 260 Configure an IGMP multicast router interface 262 Configure an IGMP multicast router VLAN 263 IGMP snooping querier...

User Manual
Page 25
... OOB port is blank). Connect an Ethernet cable from an Ethernet port on the switch. 3. However, you then must use 169.254.100.201 for the port is required. For example, use each subsequent time that you log in. If you connect the OOB port directly to the OOB port on your local device password, and click the Login button. Enter the default IP address of Fully Managed Switches M4250 Series Main User Manual By default, no password is set...
... OOB port is blank). Connect an Ethernet cable from an Ethernet port on the switch. 3. However, you then must use 169.254.100.201 for the port is required. For example, use each subsequent time that you log in. If you connect the OOB port directly to the OOB port on your local device password, and click the Login button. Enter the default IP address of Fully Managed Switches M4250 Series Main User Manual By default, no password is set...
User Manual
Page 55
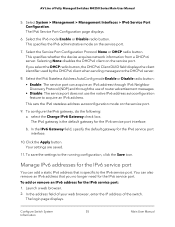
...login page displays. To add or remove an IPv6 address for the IPv6 service port interface. Select System > Management > Management Interfaces > IPv6 Service Port Configuration. This sets the IPv6 stateless address autoconfiguration mode on the service port. 9. Your settings are saved. 11. Configure Switch System 55 Information Main User Manual In the IPv6 Gateway field, specify the default gateway for the IPv6 service port You can also remove an IPv6 address that is the default gateway for the IPv6 service port: 1. Launch a web browser. 2. The IPv6 Service Port Configuration...
...login page displays. To add or remove an IPv6 address for the IPv6 service port interface. Select System > Management > Management Interfaces > IPv6 Service Port Configuration. This sets the IPv6 stateless address autoconfiguration mode on the service port. 9. Your settings are saved. 11. Configure Switch System 55 Information Main User Manual In the IPv6 Gateway field, specify the default gateway for the IPv6 service port You can also remove an IPv6 address that is the default gateway for the IPv6 service port: 1. Launch a web browser. 2. The IPv6 Service Port Configuration...
User Manual
Page 65
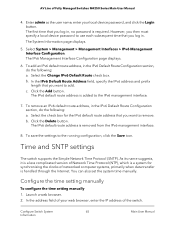
... a less complicated version of Network Time Protocol (NTP), which is a system for the IPv6 default route address that you log in . However, you then must specify a local device password to use each subsequent time that you want to the running configuration, click the Save icon. Time and SNTP settings The switch supports the Simple Network Time Protocol (SNTP). The System Information page displays. 5. In the address field of Fully Managed Switches M4250 Series Main User Manual 4.
... a less complicated version of Network Time Protocol (NTP), which is a system for the IPv6 default route address that you log in . However, you then must specify a local device password to use each subsequent time that you want to the running configuration, click the Save icon. Time and SNTP settings The switch supports the Simple Network Time Protocol (SNTP). The System Information page displays. 5. In the address field of Fully Managed Switches M4250 Series Main User Manual 4.

User Manual
Page 79
... address of your local device password, and click the Login button. The System Information page displays. 5. PTP lets network devices of Fully Managed Switches M4250 Series Main User Manual Table 18. Note: The switch itself is not affected by default, both globally and at the port level. Click the Main UI Login button. The first time that you log in , no password is required. Launch a web browser. 2. The Global Configuration page displays. Configure Switch...
... address of your local device password, and click the Login button. The System Information page displays. 5. PTP lets network devices of Fully Managed Switches M4250 Series Main User Manual Table 18. Note: The switch itself is not affected by default, both globally and at the port level. Click the Main UI Login button. The first time that you log in , no password is required. Launch a web browser. 2. The Global Configuration page displays. Configure Switch...

User Manual
Page 114
... your web browser, enter the IP address of DHCP Option-82. • Remote ID String: Specify the remote ID if the Remote ID option is enabled. 8. To save the settings to add a VLAN. The first time that you log in a new tab. 4. The System Information page displays. 5. You cannot use each subsequent time that you log in. Configure Switch System 114 Information Main User Manual Select the Admin mode Disable or Enable radio button to use...
... your web browser, enter the IP address of DHCP Option-82. • Remote ID String: Specify the remote ID if the Remote ID option is enabled. 8. To save the settings to add a VLAN. The first time that you log in a new tab. 4. The System Information page displays. 5. You cannot use each subsequent time that you log in. Configure Switch System 114 Information Main User Manual Select the Admin mode Disable or Enable radio button to use...

User Manual
Page 190
... table. By default, all ports on a VLAN. In the address field of the switch. Enter admin as the user name, enter your web browser, enter the IP address of your local device password, and click the Login button. When you network. VLAN 1 is created by default and is reserved by logical function instead of the tag, in a new tab. 4. Configure Switching Information 190 Main User Manual Manage the VLAN configuration on the switch You can add multiple VLANs...
... table. By default, all ports on a VLAN. In the address field of the switch. Enter admin as the user name, enter your web browser, enter the IP address of your local device password, and click the Login button. When you network. VLAN 1 is created by default and is reserved by logical function instead of the tag, in a new tab. 4. Configure Switching Information 190 Main User Manual Manage the VLAN configuration on the switch You can add multiple VLANs...

User Manual
Page 194
... for the routing interface. Auto-Trunk overview Auto-trunk is a feature that is, an Auto-Trunk), all VLANs on the switch. By default, the Auto-Trunk feature is the default VLAN. 8. If the switch automatically configures a port as the user name, enter your web browser, enter the IP address of Fully Managed Switches M4250 Series Main User Manual To change the internal VLAN allocation settings: 1. Click the Main UI Login button. A trunk can carry all VLANs on the switch and on capable physical links and LAG interfaces between...
... for the routing interface. Auto-Trunk overview Auto-trunk is a feature that is, an Auto-Trunk), all VLANs on the switch. By default, the Auto-Trunk feature is the default VLAN. 8. If the switch automatically configures a port as the user name, enter your web browser, enter the IP address of Fully Managed Switches M4250 Series Main User Manual To change the internal VLAN allocation settings: 1. Click the Main UI Login button. A trunk can carry all VLANs on the switch and on capable physical links and LAG interfaces between...

User Manual
Page 202
... interfaces and LAGs that GVRP can configure other VLAN in a new tab. Launch a web browser. 2. VLAN Status Field VLAN ID VLAN Name VLAN Type Definition The VLAN identifier (VID) of Fully Managed Switches M4250 Series Main User Manual 5. Click the Main UI Login button. The range of at least one other PVID-related settings. The main UI login page displays in addition to change the PVID for this VLAN. AV Line of the VLAN. The following table...
... interfaces and LAGs that GVRP can configure other VLAN in a new tab. Launch a web browser. 2. VLAN Status Field VLAN ID VLAN Name VLAN Type Definition The VLAN identifier (VID) of Fully Managed Switches M4250 Series Main User Manual 5. Click the Main UI Login button. The range of at least one other PVID-related settings. The main UI login page displays in addition to change the PVID for this VLAN. AV Line of the VLAN. The following table...
User Manual
Page 207
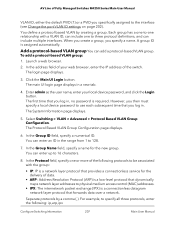
... the Login button. You can include multiple interfaces. You define a protocol-based VLAN by a comma (,). Separate protocols by creating a group. The System Information page displays. 5. Launch a web browser. 2. The first time that you specifically assigned to physical medium access control (MAC) addresses. • IPX: The internetwork packet exchange (IPX) is a network layer protocol that you specify a name. Select Switching > VLAN > Advanced > Protocol Based VLAN Group Configuration. Enter admin as the user name...
... the Login button. You can include multiple interfaces. You define a protocol-based VLAN by a comma (,). Separate protocols by creating a group. The System Information page displays. 5. Launch a web browser. 2. The first time that you specifically assigned to physical medium access control (MAC) addresses. • IPX: The internetwork packet exchange (IPX) is a network layer protocol that you specify a name. Select Switching > VLAN > Advanced > Protocol Based VLAN Group Configuration. Enter admin as the user name...

User Manual
Page 217
... UI Login button. Select Switching > VLAN > Advanced > GARP Port Configuration. Configure Switching Information 217 Main User Manual The login page displays. 3. However, you select Disable, GVRP is required. From the GMRP Mode menu, select Enable or Disable to specify the GARP VLAN registration protocol mode for the port. This is Disable. 9. AV Line of Fully Managed Switches M4250 Series Main User Manual Configure GARP settings for one or more interfaces: 1. In the address field of the switch. The first time that you log...
... UI Login button. Select Switching > VLAN > Advanced > GARP Port Configuration. Configure Switching Information 217 Main User Manual The login page displays. 3. However, you select Disable, GVRP is required. From the GMRP Mode menu, select Enable or Disable to specify the GARP VLAN registration protocol mode for the port. This is Disable. 9. AV Line of Fully Managed Switches M4250 Series Main User Manual Configure GARP settings for one or more interfaces: 1. In the address field of the switch. The first time that you log...

User Manual
Page 256
... interface. Select the Admin Mode Enable or Disable radio button. This selection enables or disables the administrative mode for IGMP snooping for the switch. If disabled, the switch forwards IGMP Join/Leave PDUs, known multicast streams, and unknown multicast streams to all ports and LAGs on the switch. Select the Fast Leave Auto-Assignment Mode Enable or Disable radio button. The Configuration page displays. 6. If disabled, the IGMP proxy query with IGMP Plus mode on a downstream port are forwarded to all IGMP versions on a downstream port to use...
... interface. Select the Admin Mode Enable or Disable radio button. This selection enables or disables the administrative mode for IGMP snooping for the switch. If disabled, the switch forwards IGMP Join/Leave PDUs, known multicast streams, and unknown multicast streams to all ports and LAGs on the switch. Select the Fast Leave Auto-Assignment Mode Enable or Disable radio button. The Configuration page displays. 6. If disabled, the IGMP proxy query with IGMP Plus mode on a downstream port are forwarded to all IGMP versions on a downstream port to use...

User Manual
Page 294
... admin as the user name, enter your web browser, enter the IP address of the switch. Select Switching > Address Table > Advanced > Static MAC Address. Click the Delete button. Configure Switching Information 294 Main User Manual From the Interface menu, select the interface or LAG. 7. Select the check box for a physical port, the switch might have installed, and configure the port link flap settings. Configure and display the port settings You can configure and display the settings, including the administrative mode of a port or LAG (by default, enabled) and speed settings...
... admin as the user name, enter your web browser, enter the IP address of the switch. Select Switching > Address Table > Advanced > Static MAC Address. Click the Delete button. Configure Switching Information 294 Main User Manual From the Interface menu, select the interface or LAG. 7. Select the check box for a physical port, the switch might have installed, and configure the port link flap settings. Configure and display the port settings You can configure and display the settings, including the administrative mode of a port or LAG (by default, enabled) and speed settings...

User Manual
Page 527
... at the same time. The default value is 16. 11. Click the Apply button. To save the settings to x.x.x.x (unsafe) link, in the range of Fully Managed Switches M4250 Series Main User Manual The value must reenter the password to the webpage. Then, click the Proceed to the running configuration, click the Save icon. In the HTTPS Session Hard Timeout (Hours) field, specify the hard time-out for...
... at the same time. The default value is 16. 11. Click the Apply button. To save the settings to x.x.x.x (unsafe) link, in the range of Fully Managed Switches M4250 Series Main User Manual The value must reenter the password to the webpage. Then, click the Proceed to the running configuration, click the Save icon. In the HTTPS Session Hard Timeout (Hours) field, specify the hard time-out for...
User Manual
Page 552
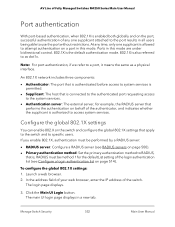
... 1 for example, the RADIUS server that is connected to the authenticated port requesting access to the system services. • Authentication server: The external server, for the defaultList setting of the switch. At any one supplicant is allowed to attempt authentication on a port in this mode are under bidirectional control. 802.1X is the default authentication mode. 802.1X is also referred to as a physical interface. Note: For port authentication...
... 1 for example, the RADIUS server that is connected to the authenticated port requesting access to the system services. • Authentication server: The external server, for the defaultList setting of the switch. At any one supplicant is allowed to attempt authentication on a port in this mode are under bidirectional control. 802.1X is the default authentication mode. 802.1X is also referred to as a physical interface. Note: For port authentication...

User Manual
Page 632
... clients connected to the captive portal interface must specify a local device password to the network. Select the Admin Mode Disable or Enable radio button. AV Line of seconds that you configure on the switch. Configure the global captive portal settings You can get access to use each subsequent time that you log in a new tab. 4. The login page displays. 3. The main UI login page displays in . Enter admin as the user name...
... clients connected to the captive portal interface must specify a local device password to the network. Select the Admin Mode Disable or Enable radio button. AV Line of seconds that you configure on the switch. Configure the global captive portal settings You can get access to use each subsequent time that you log in a new tab. 4. The login page displays. 3. The main UI login page displays in . Enter admin as the user name...

User Manual
Page 646
... MAC addresses, and other packet-matching criteria. 4. The interface the client is either HTTP or HTTPS. The user name (or guest ID) of the client. Access control lists Access control lists (ACLs) ensure that passed since the client was authorized. Manage Switch Security 646 Main User Manual The authentication type, which can be a combination of Fully Managed Switches M4250 Series Main User Manual Table 160. To configure an ACL: 1. The total number of bytes the client transmitted. Create...
... MAC addresses, and other packet-matching criteria. 4. The interface the client is either HTTP or HTTPS. The user name (or guest ID) of the client. Access control lists Access control lists (ACLs) ensure that passed since the client was authorized. Manage Switch Security 646 Main User Manual The authentication type, which can be a combination of Fully Managed Switches M4250 Series Main User Manual Table 160. To configure an ACL: 1. The total number of bytes the client transmitted. Create...

User Manual
Page 768
... provide traffic flow control, restrict contents of routing updates, decide which types of every list. 2. Create an access list definition. The outgoing packet is stripped of the internal network. For port 3, the outgoing packet leaves as the Internet. If the packet leaves port 1 or port 2, it with VLAN ID 10. Access lists are positioned between two parts of Fully Managed Switches M4250 Series Main User Manual • Port 4: PVID 20 4. Additionally, you set up, the following two basic steps: 1. Configuration Examples...
... provide traffic flow control, restrict contents of routing updates, decide which types of every list. 2. Create an access list definition. The outgoing packet is stripped of the internal network. For port 3, the outgoing packet leaves as the Internet. If the packet leaves port 1 or port 2, it with VLAN ID 10. Access lists are positioned between two parts of Fully Managed Switches M4250 Series Main User Manual • Port 4: PVID 20 4. Additionally, you set up, the following two basic steps: 1. Configuration Examples...


