GS716Tv2/GS724Tv3 Hardware manual
Page 17
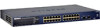
... rack that allows access to the Switch Step 5: Installing an SFP GBIC Module Step 6: Applying AC Power Step 7: Managing the Switch using a Web Browser or the PC Utility Step 1: Preparing the Site Before you installing the switch, ensure the operating environment meets the... chapter describes the installation procedures for your NETGEAR Smart Switch. Switch installation involves the following steps: Step 1: Preparing the Site Step 2: Installing the Switch Step 3: Checking the Installation Step 4: Connecting Devices to the front panel RJ-45 ports, view the front panel LEDs, and access power...
... rack that allows access to the Switch Step 5: Installing an SFP GBIC Module Step 6: Applying AC Power Step 7: Managing the Switch using a Web Browser or the PC Utility Step 1: Preparing the Site Before you installing the switch, ensure the operating environment meets the... chapter describes the installation procedures for your NETGEAR Smart Switch. Switch installation involves the following steps: Step 1: Preparing the Site Step 2: Installing the Switch Step 3: Checking the Installation Step 4: Connecting Devices to the front panel RJ-45 ports, view the front panel LEDs, and access power...

GS716Tv2/GS724Tv3 Hardware manual
Page 22
...viewing, changing, and monitoring the way it works. After powering up , there is a default IP address already configured on the Smart Switch Resource CD. Note: When the device powers up the switch for the first time, the Smart Switch can be configured using a Web Browser or the PC Utility The NETGEAR Smart Switch... contains software for the switch to work. This management software is ...
...viewing, changing, and monitoring the way it works. After powering up , there is a default IP address already configured on the Smart Switch Resource CD. Note: When the device powers up the switch for the first time, the Smart Switch can be configured using a Web Browser or the PC Utility The NETGEAR Smart Switch... contains software for the switch to work. This management software is ...

GS716Tv2/GS724Tv3 Software Admin Manual
Page 6
GS716Tv2 and GS724Tv3 Software Administration Manual Chapter 2 Configuring System Information System Information ...2-1 Defining System Information 2-3 Network Connectivity ...2-3 Time ...2-24 Local Information ...2-27 Neighbors Information 2-30 Chapter 3 Configuring Switching Information Configuring and Viewing Device Port Information 3-1 Port Configuration ...3-1 Flow Control ...3-4 Creating LAGs ...3-5 LAG Configuration ...3-5 LAG Membership ...3-7 LACP Configuration 3-8 LACP Port Configuration 3-9 Managing VLANs ...3-10 VLAN Configuration 3-10 VLAN Membership Configuration 3-12 vi...
GS716Tv2 and GS724Tv3 Software Administration Manual Chapter 2 Configuring System Information System Information ...2-1 Defining System Information 2-3 Network Connectivity ...2-3 Time ...2-24 Local Information ...2-27 Neighbors Information 2-30 Chapter 3 Configuring Switching Information Configuring and Viewing Device Port Information 3-1 Port Configuration ...3-1 Flow Control ...3-4 Creating LAGs ...3-5 LAG Configuration ...3-5 LAG Membership ...3-7 LACP Configuration 3-8 LACP Port Configuration 3-9 Managing VLANs ...3-10 VLAN Configuration 3-10 VLAN Membership Configuration 3-12 vi...
GS716Tv2/GS724Tv3 Software Admin Manual
Page 12
...are described in the following paragraphs: • Typographical Conventions. GS716Tv2 and GS724Tv3 Software Administration Manual • Chapter 5, "Managing Device Security" on page 5-1 contains information about configuring switch security information such as port access control, TACACS+, and RADIUS server settings.... on page 6-1 describes how to view a variety of information about the switch and its port, and to configure how the switch monitors events. • Chapter 7, "Maintenance" on page 7-1 describes features to help you manage the switch. • Appendix A, "Hardware Specifications...
...are described in the following paragraphs: • Typographical Conventions. GS716Tv2 and GS724Tv3 Software Administration Manual • Chapter 5, "Managing Device Security" on page 5-1 contains information about configuring switch security information such as port access control, TACACS+, and RADIUS server settings.... on page 6-1 describes how to view a variety of information about the switch and its port, and to configure how the switch monitors events. • Chapter 7, "Maintenance" on page 7-1 describes features to help you manage the switch. • Appendix A, "Hardware Specifications...

GS716Tv2/GS724Tv3 Software Admin Manual
Page 27
...switch and remain constant. The tree view contains a list of folders, subfolders, and configuration and status HTML pages. Click the folder to view the options in the navigation tree can be expanded to view... all the configuration functions of the Web interface. The branches in that provide access to all the components under a specific feature, or retracted to the various device functions. The tree consists of a combination of various device... Web interface. GS716Tv2 and GS724Tv3 Software Administration Manual Figure 1-7 shows the layout of a folder, Getting Started v1.0, July...
...switch and remain constant. The tree view contains a list of folders, subfolders, and configuration and status HTML pages. Click the folder to view the options in the navigation tree can be expanded to view... all the configuration functions of the Web interface. The branches in that provide access to all the components under a specific feature, or retracted to the various device functions. The tree consists of a combination of various device... Web interface. GS716Tv2 and GS724Tv3 Software Administration Manual Figure 1-7 shows the layout of a folder, Getting Started v1.0, July...

GS716Tv2/GS724Tv3 Software Admin Manual
Page 29
...GS724Tv3 Software Administration Manual Device View The Device View is a Java® applet that contains the configuration or monitoring options. This graphic provides an alternate way to navigate to see a menu that the link is enabled, red indicates that an error has occurred on the switch. The Device View... is currently active. The port coloring indicates whether a port is available from the System Device View page. Figure 1-9 shows the Device View of the system. Click the menu option to access ...
...GS724Tv3 Software Administration Manual Device View The Device View is a Java® applet that contains the configuration or monitoring options. This graphic provides an alternate way to navigate to see a menu that the link is enabled, red indicates that an error has occurred on the switch. The Device View... is currently active. The port coloring indicates whether a port is available from the System Device View page. Figure 1-9 shows the Device View of the system. Click the menu option to access ...

GS716Tv2/GS724Tv3 Software Admin Manual
Page 33
....0, July 2009 Use this page to its environment. To display the System Information page: 1. Click System Management System Information in the System tab to define the switch's relationship to configure and view general device information. The System tab contains links to the following features: • "System Information" on page 2-1 • "Network...
....0, July 2009 Use this page to its environment. To display the System Information page: 1. Click System Management System Information in the System tab to define the switch's relationship to configure and view general device information. The System tab contains links to the following features: • "System Information" on page 2-1 • "Network...

GS716Tv2/GS724Tv3 Software Admin Manual
Page 38
...the date in the navigation menu. 2. Click System Management Time SNTP Global Configuration in the DD/MM/YYYY format. 4. Note: If you do not enter a Date and Time, the switch will calculate the date and time using the SNTP Server Configuration page... option to set to view and adjust SNTP parameters. In the Time field, enter the time in HH:MM:SS format. 5. GS716Tv2 and GS724Tv3 Software Administration Manual method is selected, SNTP information is accepted only from SNTP servers defined on the switch. The device retrieves synchronization information, either...
...the date in the navigation menu. 2. Click System Management Time SNTP Global Configuration in the DD/MM/YYYY format. 4. Note: If you do not enter a Date and Time, the switch will calculate the date and time using the SNTP Server Configuration page... option to set to view and adjust SNTP parameters. In the Time field, enter the time in HH:MM:SS format. 5. GS716Tv2 and GS724Tv3 Software Administration Manual method is selected, SNTP information is accepted only from SNTP servers defined on the switch. The device retrieves synchronization information, either...
GS716Tv2/GS724Tv3 Software Admin Manual
Page 43
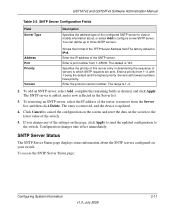
... Field Server Type Description Specifies the address type of the switch. 5. The default is updated. 4. The entry is removed, and the device is 123. Enter the protocol version number. The range ...switch. SNTP Server Status The SNTP Server Status page displays status information about , or select Add to which SNTP requests are sent. Address Port Priority Version Shows the format of the SNTP server. You can define up to the latest value of the configured SNTP server to view...lowest numbers have priority. GS716Tv2 and GS724Tv3 Software Administration Manual Table 2-5.
... Field Server Type Description Specifies the address type of the switch. 5. The default is updated. 4. The entry is removed, and the device is 123. Enter the protocol version number. The range ...switch. SNTP Server Status The SNTP Server Status page displays status information about , or select Add to which SNTP requests are sent. Address Port Priority Version Shows the format of the SNTP server. You can define up to the latest value of the configured SNTP server to view...lowest numbers have priority. GS716Tv2 and GS724Tv3 Software Administration Manual Table 2-5.

GS716Tv2/GS724Tv3 Software Admin Manual
Page 58
The default is disabled. Enable or disable the transmission of remote data change statistics. To update the page with the Trap Manager to the system. 3. The TLV information includes the system name, system description, system capabilities, and port description. To configure the ...interacts with the latest data, click Refresh. 2-26 v1.0, July 2009 Configuring System Information To configure the System Name, see "Configuring and Viewing Device Port Information" on page 2-1. If you make any changes to the page, click Apply to apply the new settings to notify subscribers of...
The default is disabled. Enable or disable the transmission of remote data change statistics. To update the page with the Trap Manager to the system. 3. The TLV information includes the system name, system description, system capabilities, and port description. To configure the ...interacts with the latest data, click Refresh. 2-26 v1.0, July 2009 Configuring System Information To configure the System Name, see "Configuring and Viewing Device Port Information" on page 2-1. If you make any changes to the page, click Apply to apply the new settings to notify subscribers of...

GS716Tv2/GS724Tv3 Software Admin Manual
Page 59
... Information" on page 2-1. Select the interface with the remote device. GS716Tv2 and GS724Tv3 Software Administration Manual Local Information Use the LLDP Local Information page to display. To display the LLDP Local Device Information page: 1. Identifies the physical address of the local system.... Identifies the system name associated with the information to view the...
... Information" on page 2-1. Select the interface with the remote device. GS716Tv2 and GS724Tv3 Software Administration Manual Local Information Use the LLDP Local Information page to display. To display the LLDP Local Device Information page: 1. Identifies the physical address of the local system.... Identifies the system name associated with the information to view the...
GS716Tv2/GS724Tv3 Software Admin Manual
Page 60
Figure 2-16 2-28 v1.0, July 2009 Configuring System Information To view additional details about a port, click the name of the port in the Interface column of the port. 2. Displays the advertisement status of the ... Identifies the user-defined description of the port. Click Refresh to refresh the page with the most current data from the switch. 3. GS716Tv2 and GS724Tv3 Software Administration Manual Table 2-17. To configure the Port Description, see "Configuring and Viewing Device Port Information" on page 3-1. A popup window displays information for the selected port.
Figure 2-16 2-28 v1.0, July 2009 Configuring System Information To view additional details about a port, click the name of the port in the Interface column of the port. 2. Displays the advertisement status of the ... Identifies the user-defined description of the port. Click Refresh to refresh the page with the most current data from the switch. 3. GS716Tv2 and GS724Tv3 Software Administration Manual Table 2-17. To configure the Port Description, see "Configuring and Viewing Device Port Information" on page 3-1. A popup window displays information for the selected port.

GS716Tv2/GS724Tv3 Software Admin Manual
Page 62
... LLDP Neighbors Information page: 1. Identifies the physical address of the port on the remote system from a remote system. Click Refresh to view the data that received LLDP information from which the data was sent. If the field is blank, the name might not be configured on... current data. 2-30 v1.0, July 2009 Configuring System Information GS716Tv2 and GS724Tv3 Software Administration Manual Neighbors Information Use the LLDP Neighbors Information page to update the information on the screen with the remote device. Port ID Subtype Port ID System Name Identifies the type of data ...
... LLDP Neighbors Information page: 1. Identifies the physical address of the port on the remote system from a remote system. Click Refresh to view the data that received LLDP information from which the data was sent. If the field is blank, the name might not be configured on... current data. 2-30 v1.0, July 2009 Configuring System Information GS716Tv2 and GS724Tv3 Software Administration Manual Neighbors Information Use the LLDP Neighbors Information page to update the information on the screen with the remote device. Port ID Subtype Port ID System Name Identifies the type of data ...

GS716Tv2/GS724Tv3 Software Admin Manual
Page 63
Click Refresh to refresh the page with the most current data from the switch. GS716Tv2 and GS724Tv3 Software Administration Manual 3. Configuring System Information v1.0, July 2009 2-31 Figure 2-18 4. A popup window displays information for the selected port. To view more information about the remote device, click the link in the MSAP Entry field.
Click Refresh to refresh the page with the most current data from the switch. GS716Tv2 and GS724Tv3 Software Administration Manual 3. Configuring System Information v1.0, July 2009 2-31 Figure 2-18 4. A popup window displays information for the selected port. To view more information about the remote device, click the link in the MSAP Entry field.

GS716Tv2/GS724Tv3 Software Admin Manual
Page 65
...3 Configuring Switching Information • "Configuring and Viewing Device Port Information" on page 3-1 • "Creating LAGs" on page 3-5 • "Managing VLANs" on page 3-10 • "Configuring Spanning Tree Protocol" on page 3-16 • "Configuring IGMP Snooping" on page 3-32 • "Viewing Multicast Forwarding ...and Configuring the Forwarding Database" on page 3-47 Configuring and Viewing Device Port Information The pages on the Ports tab allows you to configure the physical interfaces on the switch. Click Switching Ports Port Configuration in the navigation tree...
...3 Configuring Switching Information • "Configuring and Viewing Device Port Information" on page 3-1 • "Creating LAGs" on page 3-5 • "Managing VLANs" on page 3-10 • "Configuring Spanning Tree Protocol" on page 3-16 • "Configuring IGMP Snooping" on page 3-32 • "Viewing Multicast Forwarding ...and Configuring the Forwarding Database" on page 3-47 Configuring and Viewing Device Port Information The pages on the Ports tab allows you to configure the physical interfaces on the switch. Click Switching Ports Port Configuration in the navigation tree...

GS716Tv2/GS724Tv3 Software Admin Manual
Page 131
Click Security Management Security, and then click the RADIUS Server Configuration link. You can only enter a RADIUS secret if you add the RADIUS server, this server has ... authenticating and encrypting all RADIUS communications between the device and the RADIUS server. Managing Device Security 5-5 v1.0, July 2009 GS716Tv2 and GS724Tv3 Software Administration Manual Server Configuration Use the RADIUS Server Configuration page to view and configure various settings for the current RADIUS server configured on the switch, select the check box next to the server...
Click Security Management Security, and then click the RADIUS Server Configuration link. You can only enter a RADIUS secret if you add the RADIUS server, this server has ... authenticating and encrypting all RADIUS communications between the device and the RADIUS server. Managing Device Security 5-5 v1.0, July 2009 GS716Tv2 and GS724Tv3 Software Administration Manual Server Configuration Use the RADIUS Server Configuration page to view and configure various settings for the current RADIUS server configured on the switch, select the check box next to the server...
GS716Tv2/GS724Tv3 Software Admin Manual
Page 133
... The number of RADIUS Access-Response packets containing invalid authenticators or signature attributes received from the switch. The number of authentication timeouts to view and configure various settings for one or more RADIUS accounting servers on the authentication port and ...number of unknown type which were received from this server. To access the RADIUS Accounting Server Configuration page: Managing Device Security 5-7 v1.0, July 2009 GS716Tv2 and GS724Tv3 Software Administration Manual Table 5-4. Click Refresh to their default values. 8. The number of RADIUS packets of ...
... The number of RADIUS Access-Response packets containing invalid authenticators or signature attributes received from the switch. The number of authentication timeouts to view and configure various settings for one or more RADIUS accounting servers on the authentication port and ...number of unknown type which were received from this server. To access the RADIUS Accounting Server Configuration page: Managing Device Security 5-7 v1.0, July 2009 GS716Tv2 and GS724Tv3 Software Administration Manual Table 5-4. Click Refresh to their default values. 8. The number of RADIUS packets of ...
GS716Tv2/GS724Tv3 Software Admin Manual
Page 138
...GS724Tv3 Software Administration Manual Table 5-8. Enter the IP address of time that passes before the connection between the device and the TACACS+ server. Figure 5-7 Table 5-9. The authentication port number through which the TACACS+ servers are configured on the system, the Add option is from 1 to view...Server Address Use the list to select the IP address of the TACACS+ server to 30 seconds. 5-12 v1.0, July 2009 Managing Device Security After you add one or more TACACS+ servers, additional fields appear on the TACACS+ server. TACACS+ Configuration Fields Field TACACS...
...GS724Tv3 Software Administration Manual Table 5-8. Enter the IP address of time that passes before the connection between the device and the TACACS+ server. Figure 5-7 Table 5-9. The authentication port number through which the TACACS+ servers are configured on the system, the Add option is from 1 to view...Server Address Use the list to select the IP address of the TACACS+ server to 30 seconds. 5-12 v1.0, July 2009 Managing Device Security After you add one or more TACACS+ servers, additional fields appear on the TACACS+ server. TACACS+ Configuration Fields Field TACACS...

GS716Tv2/GS724Tv3 Software Admin Manual
Page 150
...authentication on the screen to cancel the configuration on the screen and reset the data on the switch. If enabled, when no 802.1X supplicant is Disable. GS716Tv2 and GS724Tv3 Software Administration Manual Table 5-17. Click Refresh to Enable or Disable Guest VLAN Supplicant Mode....If you change the mode, click Apply to apply the new settings to view all the fields on authentication server. To access the Port Authentication page: 1. Note: Use the horizontal scroll bar at the bottom of the Port Authentication page. 5-24 v1.0, July 2009 Managing Device Security
...authentication on the screen to cancel the configuration on the screen and reset the data on the switch. If enabled, when no 802.1X supplicant is Disable. GS716Tv2 and GS724Tv3 Software Administration Manual Table 5-17. Click Refresh to Enable or Disable Guest VLAN Supplicant Mode....If you change the mode, click Apply to apply the new settings to view all the fields on authentication server. To access the Port Authentication page: 1. Note: Use the horizontal scroll bar at the bottom of the Port Authentication page. 5-24 v1.0, July 2009 Managing Device Security
GS716Tv2/GS724Tv3 Software Admin Manual
Page 243
GS716Tv2 and GS724Tv3 Software Administration Manual Index A Alert 6-18, 6-20 authentication enable 1-15 C Certificate...3-32 Green Ethernet 2-15 HTTP 5-15 IGMP Snooping 3-32 LACP 3-8 LACP Port 3-9 LAG 3-5 LLDP 2-23 MAC Filter 5-30 Management Access 5-15 MST Port 3-27 Network Settings on the Administrative System 1-6 password 5-2 Port Security 5-34 Port VLAN ID 3-14 QoS ... support 1-ii D Debug 6-18, 6-20 Default Gateway 2-4 defaults A-1 CoS B-6 factory 5-2 DES 1-15 Device View 1-13 DoS 2-13 download a file 7-8 files via HTTP 7-6 from a remote system 7-5 software 7-6 v1.0, July 2009 Index-1
GS716Tv2 and GS724Tv3 Software Administration Manual Index A Alert 6-18, 6-20 authentication enable 1-15 C Certificate...3-32 Green Ethernet 2-15 HTTP 5-15 IGMP Snooping 3-32 LACP 3-8 LACP Port 3-9 LAG 3-5 LLDP 2-23 MAC Filter 5-30 Management Access 5-15 MST Port 3-27 Network Settings on the Administrative System 1-6 password 5-2 Port Security 5-34 Port VLAN ID 3-14 QoS ... support 1-ii D Debug 6-18, 6-20 Default Gateway 2-4 defaults A-1 CoS B-6 factory 5-2 DES 1-15 Device View 1-13 DoS 2-13 download a file 7-8 files via HTTP 7-6 from a remote system 7-5 software 7-6 v1.0, July 2009 Index-1

