User Manual
Page 4
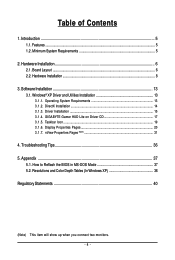
... Reflash the BIOS in MS-DOS Mode 37 5.2. Table of Contents 1. Hardware Installation 6 2.1. GIGABYTE Gamer HUD Lite on Driver CD 17 3.1.5. Taskbar Icon ...19 3.1.6. Troubleshooting Tips 36 5. Board Layout ...6 2.2. Appendix ...37 5.1. Windows® XP Driver and Utilities Installation 13 3.1.1. Features ...5 1.2. Operating System Requirements 13 3.1.2. Resolutions and Color Depth Tables (In Windows XP...
... Reflash the BIOS in MS-DOS Mode 37 5.2. Table of Contents 1. Hardware Installation 6 2.1. GIGABYTE Gamer HUD Lite on Driver CD 17 3.1.5. Taskbar Icon ...19 3.1.6. Troubleshooting Tips 36 5. Board Layout ...6 2.2. Appendix ...37 5.1. Windows® XP Driver and Utilities Installation 13 3.1.1. Features ...5 1.2. Operating System Requirements 13 3.1.2. Resolutions and Color Depth Tables (In Windows XP...
User Manual
Page 5
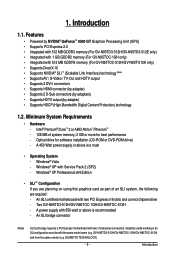
...NVIDIA® GeForceTM 9500 GT Graphics Processing Unit (GPU) • Supports PCI Express 2.0 • Integrated with 512 MB GDDR3 memory (For GV-N95TD3-512H/GV-N95TD3-512E only) • Integrated with 1 GB GDDR2 memory (For GV-N95TOC-1GH only) • Integrated with two x16...PCI Express motherboard with 512 MB GDDR2 memory (For GV-N95TOC-512H/GV-N95T-512H only) • Supports DirectX 10 • Supports NVIDIA® SLI TM (Scalable Link Interface) technology (Note) • Supports AV / S-Video...128 MB of an SLI system, the following are required: - Windows® Vista - Graphics cards...
...NVIDIA® GeForceTM 9500 GT Graphics Processing Unit (GPU) • Supports PCI Express 2.0 • Integrated with 512 MB GDDR3 memory (For GV-N95TD3-512H/GV-N95TD3-512E only) • Integrated with 1 GB GDDR2 memory (For GV-N95TOC-1GH only) • Integrated with two x16...PCI Express motherboard with 512 MB GDDR2 memory (For GV-N95TOC-512H/GV-N95T-512H only) • Supports DirectX 10 • Supports NVIDIA® SLI TM (Scalable Link Interface) technology (Note) • Supports AV / S-Video...128 MB of an SLI system, the following are required: - Windows® Vista - Graphics cards...

User Manual
Page 10
...red wire connects to the S/PDIF out pin and the black to the Ground pin). Connect the S/PDIF cable to the graphics card A-2. B-1. Connect the GIGABYTE video adapter to enable the S/PDIF in jack on the adapter and the other end into the S/PDIF in function for detailed instructions.... Insert one end of the graphics card driver. Method B (via the S/PDIF out header): Connect the provided S/PDIF cable to the graphics card and the ...
...red wire connects to the S/PDIF out pin and the black to the Ground pin). Connect the S/PDIF cable to the graphics card A-2. B-1. Connect the GIGABYTE video adapter to enable the S/PDIF in jack on the adapter and the other end into the S/PDIF in function for detailed instructions.... Insert one end of the graphics card driver. Method B (via the S/PDIF out header): Connect the provided S/PDIF cable to the graphics card and the ...
User Manual
Page 13
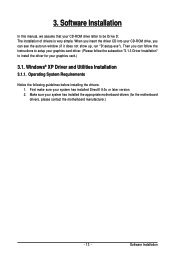
... installed DirectX 9.0c or later version. 2. Then you can follow the instructions to setup your graphics card driver. (Please follow the subsection "3.1.3 Driver Installation" to be Drive D: The installation of drivers is very simple. When you insert the driver CD into your CD-ROM drive, you can see the autorun window (if it does not...
... installed DirectX 9.0c or later version. 2. Then you can follow the instructions to setup your graphics card driver. (Please follow the subsection "3.1.3 Driver Installation" to be Drive D: The installation of drivers is very simple. When you insert the driver CD into your CD-ROM drive, you can see the autorun window (if it does not...
User Manual
Page 15
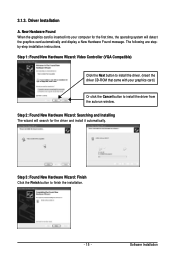
... will detect the graphics card automatically and display a New Hardware Found message. Software Installation Step 3: Found New Hardware Wizard: Finish Click the Finish button to install the driver from the autorun window. 3.1.3. Step 1: Found New Hardware Wizard: Video Controller (VGA Compatible) Click... the Next button to install the driver. (Insert the driver CD-ROM that came with your computer for the first...
... will detect the graphics card automatically and display a New Hardware Found message. Software Installation Step 3: Found New Hardware Wizard: Finish Click the Finish button to install the driver from the autorun window. 3.1.3. Step 1: Found New Hardware Wizard: Video Controller (VGA Compatible) Click... the Next button to install the driver. (Insert the driver CD-ROM that came with your computer for the first...
User Manual
Page 16
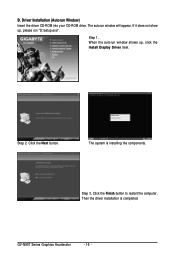
Then the driver installation is installing the components. When the autorun window shows up , please run "D:\setup.exe". The system is completed. The autorun window will appear. Step 1. GV-N95T Series Graphics Accelerator - 16 - If it does not show up , click the Install Display Driver item. Click the Next button. Step 2. Step 3. Click the Finish button to restart the computer. B. Driver Installation (Autorun Window) Insert the driver CD-ROM into your CD-ROM drive.
Then the driver installation is installing the components. When the autorun window shows up , please run "D:\setup.exe". The system is completed. The autorun window will appear. Step 1. GV-N95T Series Graphics Accelerator - 16 - If it does not show up , click the Install Display Driver item. Click the Next button. Step 2. Step 3. Click the Finish button to restart the computer. B. Driver Installation (Autorun Window) Insert the driver CD-ROM into your CD-ROM drive.
User Manual
Page 17
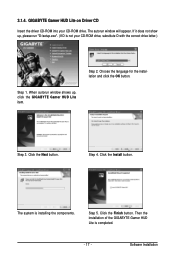
... autorun window shows up , please run "D:\setup.exe". (If D is installing the components. Step 4. Click the Next button. GIGABYTE Gamer HUD Lite on Driver CD Insert the driver CD-ROM into your CD-ROM drive, substitute D with the correct drive letter.) Step 2. Step 3. The system is not your CD-ROM drive. Click...
... autorun window shows up , please run "D:\setup.exe". (If D is installing the components. Step 4. Click the Next button. GIGABYTE Gamer HUD Lite on Driver CD Insert the driver CD-ROM into your CD-ROM drive, substitute D with the correct drive letter.) Step 2. Step 3. The system is not your CD-ROM drive. Click...

User Manual
Page 19
Right click the NVIDIA icon to open the control panel. You can adjust the properties of the graphics card here. - 19 - Click this icon to enter the NVIDIA Control Center. Software Installation 3.1.5. Taskbar Icon After installing the graphics card driver, you will find an NVIDIA icon in your system tray.
Right click the NVIDIA icon to open the control panel. You can adjust the properties of the graphics card here. - 19 - Click this icon to enter the NVIDIA Control Center. Software Installation 3.1.5. Taskbar Icon After installing the graphics card driver, you will find an NVIDIA icon in your system tray.
User Manual
Page 36
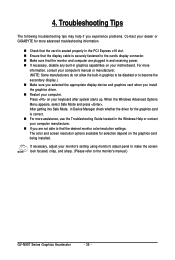
... Mode, in Device Manager check whether the driver for the graphics card is correct. For more assistance, use the Troubleshooting Guide located in the Windows Help or contact your computer manufacturer. If you install the graphics driver. Restart your keyboard after system... Mode and press . For more advanced troubleshooting information. Check that the card is seated properly in the PCI Express x16 slot. Ensure that the display cable is securely fastened to the card's display connector. Make sure that the monitor and computer are plugged in...
... Mode, in Device Manager check whether the driver for the graphics card is correct. For more assistance, use the Troubleshooting Guide located in the Windows Help or contact your computer manufacturer. If you install the graphics driver. Restart your keyboard after system... Mode and press . For more advanced troubleshooting information. Check that the card is seated properly in the PCI Express x16 slot. Ensure that the display cable is securely fastened to the card's display connector. Make sure that the monitor and computer are plugged in...


