

User Manual
Page 5
... power cord with a molded plug having a black (5 A) fuse installed for warming up. English Safety Precautions, Maintenance & Recommended Use Safety Precautions and Maintenance FOR OPTIMUM PERFORMANCE, PLEASE NOTE THE FOLLOWING WHEN SETTING UP AND USING THE MULTI-FUNCTION MONITOR: • DO NOT OPEN THE MONITOR. Connecting to a TV* • Cable distribution system should be connected to earth in Europe). • In the UK use your monitor from the wall...
... power cord with a molded plug having a black (5 A) fuse installed for warming up. English Safety Precautions, Maintenance & Recommended Use Safety Precautions and Maintenance FOR OPTIMUM PERFORMANCE, PLEASE NOTE THE FOLLOWING WHEN SETTING UP AND USING THE MULTI-FUNCTION MONITOR: • DO NOT OPEN THE MONITOR. Connecting to a TV* • Cable distribution system should be connected to earth in Europe). • In the UK use your monitor from the wall...

User Manual
Page 12
... not use the touch panel function and to this port (See page 22). K microSD Card Slot Insert a microSD memory card. To connect USB devices. USB MP: USB storage device port. M VIDEO IN (RCA) Composite video signal input. NOTE: Please turn main power ON/OFF. C Audio IN1/IN2 Audio signal input from other RGB equipment. F DisplayPort IN1/IN2 DisplayPort signals input. H DVI IN (DVI-D) To input digital RGB signals from the AUDIO IN1/IN2, DisplayPort and HDMI to control RS-232C functions. USB CM1 (2A): Power supply port...
... not use the touch panel function and to this port (See page 22). K microSD Card Slot Insert a microSD memory card. To connect USB devices. USB MP: USB storage device port. M VIDEO IN (RCA) Composite video signal input. NOTE: Please turn main power ON/OFF. C Audio IN1/IN2 Audio signal input from other RGB equipment. F DisplayPort IN1/IN2 DisplayPort signals input. H DVI IN (DVI-D) To input digital RGB signals from the AUDIO IN1/IN2, DisplayPort and HDMI to control RS-232C functions. USB CM1 (2A): Power supply port...

User Manual
Page 14
.... F DISPLAY Button Turns on /off the mute function. O GUIDE Button*1 P MUTE Button Turns on /off the menu mode. sRGB: For text based images. SVE-(1-5) SETTINGS: For images and movies. R ASPECT Button Selects the picture aspect, [FULL], [WIDE]*, [DYNAMIC]*, [1:1], [ZOOM] and [NORMAL]. Wireless Remote Control A POWER ON/STANDBY Button Switches the power on which option board you are using the IR LOCK SETTINGS function, you can unlock the buttons by holding down . M VOLUME UP/DOWN Button (VOL +/-) Increases or decreases the audio...
.... F DISPLAY Button Turns on /off the mute function. O GUIDE Button*1 P MUTE Button Turns on /off the menu mode. sRGB: For text based images. SVE-(1-5) SETTINGS: For images and movies. R ASPECT Button Selects the picture aspect, [FULL], [WIDE]*, [DYNAMIC]*, [1:1], [ZOOM] and [NORMAL]. Wireless Remote Control A POWER ON/STANDBY Button Switches the power on which option board you are using the IR LOCK SETTINGS function, you can unlock the buttons by holding down . M VOLUME UP/DOWN Button (VOL +/-) Increases or decreases the audio...

User Manual
Page 16
.... Screw Clamp English-14 Contact your equipment for proper selection of time, remove the batteries. 3. NOTE: If you do not intend to use : • Place "AAA" size batteries matching the (+) and (-) signs on the monitor or other external equipment, as a blanket that is covered with a protective screen, please check the inside the case. NOTE: Do not connect/disconnect cables when turning on...
.... Screw Clamp English-14 Contact your equipment for proper selection of time, remove the batteries. 3. NOTE: If you do not intend to use : • Place "AAA" size batteries matching the (+) and (-) signs on the monitor or other external equipment, as a blanket that is covered with a protective screen, please check the inside the case. NOTE: Do not connect/disconnect cables when turning on...

User Manual
Page 19
... AUDIO INPUT in the OSD or choose [DisplayPort1] or [DisplayPort2] by the remote control AUDIO INPUT button. • To display individual images at each connected monitors with the DisplayPort out connector, please set DisplayPort1.2 and MST at HDMI in the TERMINAL SETTINGS (See page 37). • If the monitor's main power is turned on after a connected computer is turned on, sometimes images are not displayed. English Connecting a Personal Computer Connecting your computer to your computer's video signal output. Connecting...
... AUDIO INPUT in the OSD or choose [DisplayPort1] or [DisplayPort2] by the remote control AUDIO INPUT button. • To display individual images at each connected monitors with the DisplayPort out connector, please set DisplayPort1.2 and MST at HDMI in the TERMINAL SETTINGS (See page 37). • If the monitor's main power is turned on after a connected computer is turned on, sometimes images are not displayed. English Connecting a Personal Computer Connecting your computer to your computer's video signal output. Connecting...

User Manual
Page 20
... NEC customer support for connection. USB MP: USB downstream port (Type-A). Using slot 2 type PC: Connect the slot 2 type PC into the option board slot. USB CM1 (2A): Power supply port. USB2: USB upstream port (Type-B). For using Touch Panel 1. NOTE: Please refer to the USB in multiple screens. NOTE: When you use the USB CM1 (2A) port for power supply, please use of the monitor or shutting down Windows®, please turn off the monitor. 2. B Type A Type Monitor Setting Select the input signal...
... NEC customer support for connection. USB MP: USB downstream port (Type-A). Using slot 2 type PC: Connect the slot 2 type PC into the option board slot. USB CM1 (2A): Power supply port. USB2: USB upstream port (Type-B). For using Touch Panel 1. NOTE: Please refer to the USB in multiple screens. NOTE: When you use the USB CM1 (2A) port for power supply, please use of the monitor or shutting down Windows®, please turn off the monitor. 2. B Type A Type Monitor Setting Select the input signal...
User Manual
Page 26
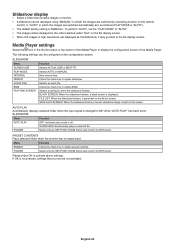
... display screen. • When still images in high resolutions are displayed as the Slideshow, it goes back to enable preset contents. Check the check box to display the configuration screen of the Media Player. PRESET CONTENTS Plays selected folder when the monitor has no signal input. Select a file by SET/POINT ZOOM button and confirm by ENT button. To perform "AUTO", set the "PLAY MODE" to repeat slideshow. Selects a setting...
... display screen. • When still images in high resolutions are displayed as the Slideshow, it goes back to enable preset contents. Check the check box to display the configuration screen of the Media Player. PRESET CONTENTS Plays selected folder when the monitor has no signal input. Select a file by SET/POINT ZOOM button and confirm by ENT button. To perform "AUTO", set the "PLAY MODE" to repeat slideshow. Selects a setting...

User Manual
Page 34
... needs further adjustment, the individual R/G/B/ levels of the white point can be able to adjust. COLOR CONTROL Adjusts the hue of the screen. to adjust. COMPUTE MODULE*5 Select input signal. to adjust. *1: If SPECTRAVIEW ENGINE is ON, this function cannot be changed . HUE*4 MP, VIDEO inputs only Adjusts the hue of the Red, Yellow, Green, Cyan, Blue and Magenta. HDMI1 HDMI2 DisplayPort1 DisplayPort2 VGA (RGB/YPbPr) VIDEO MP Displays images or movies saved in ROOM LIGHT...
... needs further adjustment, the individual R/G/B/ levels of the white point can be able to adjust. COLOR CONTROL Adjusts the hue of the screen. to adjust. COMPUTE MODULE*5 Select input signal. to adjust. *1: If SPECTRAVIEW ENGINE is ON, this function cannot be changed . HUE*4 MP, VIDEO inputs only Adjusts the hue of the Red, Yellow, Green, Cyan, Blue and Magenta. HDMI1 HDMI2 DisplayPort1 DisplayPort2 VGA (RGB/YPbPr) VIDEO MP Displays images or movies saved in ROOM LIGHT...

User Manual
Page 36
... if MONO is set to FULL image before ROTATE starts, then ROTATE will appear cropped. AUTO Image size is set "OFF". NOISE REDUCTION VIDEO input only Adjusts the amount of image retention. OSD FLIP Determines the OSD display direction. ON Converts interlaced signals to right. TELECINE HDMI1, HDMI2, VIDEO, VGA (YPbPr), MP inputs only Automatically senses the sources frame rate for motion pictures, but it makes brightness unstable due to best display the image. ROTATION Shows...
... if MONO is set to FULL image before ROTATE starts, then ROTATE will appear cropped. AUTO Image size is set "OFF". NOISE REDUCTION VIDEO input only Adjusts the amount of image retention. OSD FLIP Determines the OSD display direction. ON Converts interlaced signals to right. TELECINE HDMI1, HDMI2, VIDEO, VGA (YPbPr), MP inputs only Automatically senses the sources frame rate for motion pictures, but it makes brightness unstable due to best display the image. ROTATION Shows...

User Manual
Page 41
... to default setting. English TILE MATRIX Allows one image to be displayed on the monitor. If Media Player contents are saved for the master monitor. When HDMI of the detected monitors. When the setting returns to 100) through a distribution amplifier. DETECTED MONITORS Displays number of the TERMINAL SETTINGS is set base number by pressing the + button or the - Dynamic or Zoom will be given individual a monitor ID automatically. You can adjust a displayed image size and position...
... to default setting. English TILE MATRIX Allows one image to be displayed on the monitor. If Media Player contents are saved for the master monitor. When HDMI of the detected monitors. When the setting returns to 100) through a distribution amplifier. DETECTED MONITORS Displays number of the TERMINAL SETTINGS is set base number by pressing the + button or the - Dynamic or Zoom will be given individual a monitor ID automatically. You can adjust a displayed image size and position...

User Manual
Page 42
... SCREEN SAVER is activated, the image will be selected for signal input, this option allows you need to FULL image. BACKLIGHT*1 The brightness of the network connected with the Monitor ID. WIRELESS DATA Select "ON" to delete the setting. IP ADDRESS Set your network administrator. English-40 SCREEN SAVER Use the SCREEN SAVER function to factory setting except for [IP SETTING]. By pressing the + button on " mode. RESET Resets all settings within the DISPLAY PROTECTION menu...
... SCREEN SAVER is activated, the image will be selected for signal input, this option allows you need to FULL image. BACKLIGHT*1 The brightness of the network connected with the Monitor ID. WIRELESS DATA Select "ON" to delete the setting. IP ADDRESS Set your network administrator. English-40 SCREEN SAVER Use the SCREEN SAVER function to factory setting except for [IP SETTING]. By pressing the + button on " mode. RESET Resets all settings within the DISPLAY PROTECTION menu...

User Manual
Page 45
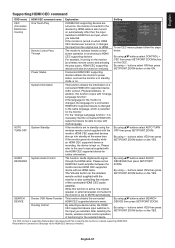
..., set , the monitor is displayed on , when a connected HDMI CEC device receives a play command, the monitor synchronously turns on then changes the input signal to YES again. OPTION OPTION POWER Allows the monitor to supply power to the slot2 type option specifications. AUDIO*1 Selects the sound input signal according to an Option board slot during power save mode. AUTO Sets the signal type automatically. 1CH Fills the screen entirely with no connected HDMI CEC audio device to USB2. EXTERNAL CONTROL When...
..., set , the monitor is displayed on , when a connected HDMI CEC device receives a play command, the monitor synchronously turns on then changes the input signal to YES again. OPTION OPTION POWER Allows the monitor to supply power to the slot2 type option specifications. AUDIO*1 Selects the sound input signal according to an Option board slot during power save mode. AUTO Sets the signal type automatically. 1CH Fills the screen entirely with no connected HDMI CEC audio device to USB2. EXTERNAL CONTROL When...

User Manual
Page 47
... lowest number. English-45 buttons to set "SCREEN SAVER", "DATE &TIME" and "SCHEDULE SETTINGS" functions to further reduce the risk of the monitor, the following is displayed for as long as Image Persistence. buttons to set . Use the down button to highlight the TIME. If the schedule is desired, choose the days of LCD Panel When an LCD panel is idle, or turn off schedule, set OFF. 3. Unlike CRT monitors, LCD monitors' image persistence...
... lowest number. English-45 buttons to set "SCREEN SAVER", "DATE &TIME" and "SCHEDULE SETTINGS" functions to further reduce the risk of the monitor, the following is displayed for as long as Image Persistence. buttons to set . Use the down button to highlight the TIME. If the schedule is desired, choose the days of LCD Panel When an LCD panel is idle, or turn off schedule, set OFF. 3. Unlike CRT monitors, LCD monitors' image persistence...
User Manual
Page 59
... speaker connected to the monitor is also controlling the volume of a connected HDMI CEC supported device (CEC version, Physical Address). Please refer to the input you selected. The function sends digital audio signal through the HDMI cable. The Volume button on automatically. This function obtains the connected HDMI CEC supported device's name. By selecting a device name, the HDMI CEC supported device input switches to the user's manual supplied with the monitor is set to HDMI CEC supporting devices. By using buttons select AUTO TURN...
... speaker connected to the monitor is also controlling the volume of a connected HDMI CEC supported device (CEC version, Physical Address). Please refer to the input you selected. The function sends digital audio signal through the HDMI cable. The Volume button on automatically. This function obtains the connected HDMI CEC supported device's name. By selecting a device name, the HDMI CEC supported device input switches to the user's manual supplied with the monitor is set to HDMI CEC supporting devices. By using buttons select AUTO TURN...

User Manual
Page 64
... DICOM image viewing in use an option board. Natural Color Matrix: Combines Six-axis color control and the sRGB standard. Plug and Play: The Microsoft® solution with other DVI-based digital connectors such as screen size and resolutions supported) directly to any user interaction. If you to mount the monitor to your supplier for digital connections between DVI-D and other common color standards. English-62 ZOOM: Expands/reduces the image size in diagnostics. DVI-D: The digital-only...
... DICOM image viewing in use an option board. Natural Color Matrix: Combines Six-axis color control and the sRGB standard. Plug and Play: The Microsoft® solution with other DVI-based digital connectors such as screen size and resolutions supported) directly to any user interaction. If you to mount the monitor to your supplier for digital connections between DVI-D and other common color standards. English-62 ZOOM: Expands/reduces the image size in diagnostics. DVI-D: The digital-only...

User Manual
Page 65
... to the user's manual of the monitor when not in use a 60 Hz refresh rate. • The image may be distorted when turning the power on the screen. Snowy Picture, Black Screen in DVI input • Check the DVI MODE setting when a DVD player or computer equipment is approved to support 4K resolution. For example, if an image was lost. Press the power on button on the remote control or press the power button on the monitor for one...
... to the user's manual of the monitor when not in use a 60 Hz refresh rate. • The image may be distorted when turning the power on the screen. Snowy Picture, Black Screen in DVI input • Check the DVI MODE setting when a DVD player or computer equipment is approved to support 4K resolution. For example, if an image was lost. Press the power on button on the remote control or press the power button on the monitor for one...
User Manual
Page 66
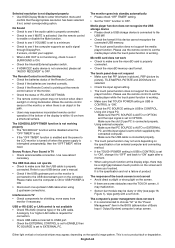
... Basic Input / Output System) computer's setup screen. Check the EXTERNAL CONTROL is set to ENABLE then PC SOURCE is set to a minimum. • Check to see if MUTE is activated. MicroSD card does not work • Check to see if the computer supports an audio signal through DisplayPort. Using slot 2 type PC: Make sure that TOUCH POWER setting in USB in CONTROL is "ON". • Check the PC SOURCE setting in USB in CONTROL is set to "ON", change...
... Basic Input / Output System) computer's setup screen. Check the EXTERNAL CONTROL is set to ENABLE then PC SOURCE is set to a minimum. • Check to see if MUTE is activated. MicroSD card does not work • Check to see if the computer supports an audio signal through DisplayPort. Using slot 2 type PC: Make sure that TOUCH POWER setting in USB in CONTROL is "ON". • Check the PC SOURCE setting in USB in CONTROL is set to "ON", change...

User Manual
Page 67
... free fall without breaking. V404-T Product Specifications LCD Module 40"/101.61 cm diagonal Pixel Pitch: 0.461 mm Resolution: 1920 x 1080 Color: Over 1073 million colors (depending on display card used) Brightness: 440 cd/m2 (Max.) @25°C Contrast Ratio: 4000:1 Viewing Angle: 89° (typ) @ CR>10 Frequency Horizontal: 15.625/15.734 kHz, 31.5 kHz - 91.1 kHz Vertical: 50.0 - 85.0 Hz (Analog Input) 24.0 - 85.0 Hz (Digital Input) Pixel...
... free fall without breaking. V404-T Product Specifications LCD Module 40"/101.61 cm diagonal Pixel Pitch: 0.461 mm Resolution: 1920 x 1080 Color: Over 1073 million colors (depending on display card used) Brightness: 440 cd/m2 (Max.) @25°C Contrast Ratio: 4000:1 Viewing Angle: 89° (typ) @ CR>10 Frequency Horizontal: 15.625/15.734 kHz, 31.5 kHz - 91.1 kHz Vertical: 50.0 - 85.0 Hz (Analog Input) 24.0 - 85.0 Hz (Digital Input) Pixel...

User Manual
Page 68
... is supported. V484-T Product Specifications LCD Module 48"/120.94 cm diagonal Pixel Pitch: 0.549 mm Resolution: 1920 x 1080 Color: Over 1073 million colors (depending on display card used) Brightness: 440 cd/m2 (Max.) @25°C Contrast Ratio: 4000:1 Viewing Angle: 89° (typ) @ CR>10 Frequency Horizontal: 15.625/15.734 kHz, 31.5 kHz - 91.1 kHz Vertical: 50.0 - 85.0 Hz (Analog Input) 24.0 - 85.0 Hz (Digital Input) Pixel Clock Analog: 13...
... is supported. V484-T Product Specifications LCD Module 48"/120.94 cm diagonal Pixel Pitch: 0.549 mm Resolution: 1920 x 1080 Color: Over 1073 million colors (depending on display card used) Brightness: 440 cd/m2 (Max.) @25°C Contrast Ratio: 4000:1 Viewing Angle: 89° (typ) @ CR>10 Frequency Horizontal: 15.625/15.734 kHz, 31.5 kHz - 91.1 kHz Vertical: 50.0 - 85.0 Hz (Analog Input) 24.0 - 85.0 Hz (Digital Input) Pixel Clock Analog: 13...

User Manual
Page 69
... card. English-67 English Specifications - USB Hub USB1: USB 2.0 Downstream port USB2: USB 2.0 Upstream port USB CM1 (2A): Power supply port, 5V/2A (max.) USB CM2: USB service port for Slot 2 type OPTION 16V/3.6 A NOTE: Technical specifications are subject to 32GB microSDHC is supported. V554-T Product Specifications LCD Module 55"/138.78 cm diagonal Pixel Pitch: 0.630 mm Resolution: 1920 x 1080 Color: Over 1073 million colors (depending on display card used) Brightness: 440 cd/m2 (Max.) @25°C Contrast Ratio: 1200:1 Viewing...
... card. English-67 English Specifications - USB Hub USB1: USB 2.0 Downstream port USB2: USB 2.0 Upstream port USB CM1 (2A): Power supply port, 5V/2A (max.) USB CM2: USB service port for Slot 2 type OPTION 16V/3.6 A NOTE: Technical specifications are subject to 32GB microSDHC is supported. V554-T Product Specifications LCD Module 55"/138.78 cm diagonal Pixel Pitch: 0.630 mm Resolution: 1920 x 1080 Color: Over 1073 million colors (depending on display card used) Brightness: 440 cd/m2 (Max.) @25°C Contrast Ratio: 1200:1 Viewing...


