

MP300CM Installation Manual
Page 1
NEC Display Solutions of 10 Max UL Load Capacity: 50 lb (22.7 kg) ISSUED: 10-01-10 SHEET #: 056-9034-4 07-29-11 For customer care call 1-800-865-2112 Installation and Assembly Manual: Custom Ceiling Mount for NEC M260X, M260W, M271X, M300X, M300W M300XS, M300WS, M311X, M311W, P350X, P350W, P420X Projectors Model: MP300CM Features: • ImageLockTM alignment prevents picture sag or drift • Wrench access slot for easier flush mount installations • Exclusive aluminum track quick release Visit the Peerless Web Site at www.peerlessmounts.com 1 of America, Inc.
NEC Display Solutions of 10 Max UL Load Capacity: 50 lb (22.7 kg) ISSUED: 10-01-10 SHEET #: 056-9034-4 07-29-11 For customer care call 1-800-865-2112 Installation and Assembly Manual: Custom Ceiling Mount for NEC M260X, M260W, M271X, M300X, M300W M300XS, M300WS, M311X, M311W, P350X, P350W, P420X Projectors Model: MP300CM Features: • ImageLockTM alignment prevents picture sag or drift • Wrench access slot for easier flush mount installations • Exclusive aluminum track quick release Visit the Peerless Web Site at www.peerlessmounts.com 1 of America, Inc.

Specification Brochure
Page 4
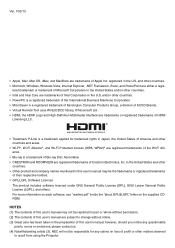
... in . HDMI, the HDMI logo and High-Definition Multimedia Interface are trademarks of NEC Display Solutions. SHIPS WITH Remote control, batteries, power cord, RGB signal cable, built-in lens cover, user's manual on G 1/8 in ., 0.64 - 7.6m 1.3 - 2.2 P451X/P501X: 1.9 - 45.3 ft. / 0.6 - 13.8m P401W/P451W: 2.3 - ... product registration card, security sticker ORDERING MODEL NUMBERS NP-P401W NP-P451X NP-P451W NP-P501X Specifications for use with projector mount Adjustable suspended ceiling plate for P401W/P451X/P451W/P501X OPTICAL Display Technology Light Output (lumens) Resolution Native ...
... in . HDMI, the HDMI logo and High-Definition Multimedia Interface are trademarks of NEC Display Solutions. SHIPS WITH Remote control, batteries, power cord, RGB signal cable, built-in lens cover, user's manual on G 1/8 in ., 0.64 - 7.6m 1.3 - 2.2 P451X/P501X: 1.9 - 45.3 ft. / 0.6 - 13.8m P401W/P451W: 2.3 - ... product registration card, security sticker ORDERING MODEL NUMBERS NP-P401W NP-P451X NP-P451W NP-P501X Specifications for use with projector mount Adjustable suspended ceiling plate for P401W/P451X/P451W/P501X OPTICAL Display Technology Light Output (lumens) Resolution Native ...

User's Manual
Page 1
Projector P501X/P451X P451W/P401W PE501X User's Manual The PE501X is not distributed in North America. NP-P501X, NP-P451X, NP-P451W, NP-P401W, NP-PE501X Model No.
Projector P501X/P451X P451W/P401W PE501X User's Manual The PE501X is not distributed in North America. NP-P501X, NP-P451X, NP-P451W, NP-P401W, NP-PE501X Model No.
User's Manual
Page 2
... applied for any questionable points, errors or omissions, please contact us. (4) Notwithstanding article (3), NEC will not be reprinted in part or whole without permission. (2) The contents of this user's manual are subject to result from using the Projector. tered trademark or trademark of Microsoft Corporation in ...the preparation of this user's manual may not be responsible for trademark rights in Japan, the United States of Intel Corporation in the U.S. For more ...
... applied for any questionable points, errors or omissions, please contact us. (4) Notwithstanding article (3), NEC will not be reprinted in part or whole without permission. (2) The contents of this user's manual are subject to result from using the Projector. tered trademark or trademark of Microsoft Corporation in ...the preparation of this user's manual may not be responsible for trademark rights in Japan, the United States of Intel Corporation in the U.S. For more ...

User's Manual
Page 3
.... This symbol alerts the user that used products, they are reused and recycled in a lamp to cause electrical shock. If this manual carefully before using your NEC projector and keep the manual handy for future reference. This includes projectors and their electrical accessories or lamps. i The power outlet socket should be installed as...
.... This symbol alerts the user that used products, they are reused and recycled in a lamp to cause electrical shock. If this manual carefully before using your NEC projector and keep the manual handy for future reference. This includes projectors and their electrical accessories or lamps. i The power outlet socket should be installed as...

User's Manual
Page 4
on , the user is encouraged to try to correct the interference by NEC Display Solutions of paper or cloth, rugs or carpets. • If you to lead, a chemical known to cause birth defects or other reproductive harm. In ... with moulded plug has a Black (five Amps) fuse installed for a Class B digital device, pursuant to provide reasonable protection against harmful interference in accordance with this manual. Important Safeguards These safety instructions are designed to Part 15 of your supplier. in this equipment.
on , the user is encouraged to try to correct the interference by NEC Display Solutions of paper or cloth, rugs or carpets. • If you to lead, a chemical known to cause birth defects or other reproductive harm. In ... with moulded plug has a Black (five Amps) fuse installed for a Class B digital device, pursuant to provide reasonable protection against harmful interference in accordance with this manual. Important Safeguards These safety instructions are designed to Part 15 of your supplier. in this equipment.

User's Manual
Page 6
... case could cause premature lamp failure. Do not place the power cord under the following conditions: - If the projector exhibits a distinct change in this user's manual. - Do not heat the power cord. - ing on and while the POWER indicator is damaged or frayed. - Doing so could be used for an extended...
... case could cause premature lamp failure. Do not place the power cord under the following conditions: - If the projector exhibits a distinct change in this user's manual. - Do not heat the power cord. - ing on and while the POWER indicator is damaged or frayed. - Doing so could be used for an extended...

User's Manual
Page 9
... Introduction...1 ❶ What's in the Box?...1 ❷ Introduction to the Projector 2 Congratulations on Your Purchase of the Projector 2 Features you'll enjoy 2 About this user's manual 3 ❸ Part Names of the Projector 4 Front/Top...4 Rear...5 Top Features...6 Terminal Panel Features 7 ❹ Part Names of the Remote Control 8 Battery Installation...9 Remote Control...
... Introduction...1 ❶ What's in the Box?...1 ❷ Introduction to the Projector 2 Congratulations on Your Purchase of the Projector 2 Features you'll enjoy 2 About this user's manual 3 ❸ Part Names of the Projector 4 Front/Top...4 Rear...5 Top Features...6 Terminal Panel Features 7 ❹ Part Names of the Remote Control 8 Battery Installation...9 Remote Control...
User's Manual
Page 13
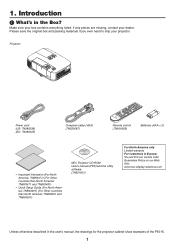
1. If any pieces are missing, contact your projector. Introduction ❶ What's in the user's manual, the drawings for the projector cabinet show examples of the P501X. 1 Please save the original box and packing materials if you ever need to ship your dealer. Make sure your box ... and 7N8N3481) • Quick Setup Guide (For North America: 7N8N3491) (For Other countries than North America: 7N8N3491 and 7N8N3501) NEC Projector CD-ROM User's manual (PDF) and the utility software (7N951901) For North America only Limited warranty For customers in Europe: You will find our current valid...
1. If any pieces are missing, contact your projector. Introduction ❶ What's in the user's manual, the drawings for the projector cabinet show examples of the P501X. 1 Please save the original box and packing materials if you ever need to ship your dealer. Make sure your box ... and 7N8N3481) • Quick Setup Guide (For North America: 7N8N3491) (For Other countries than North America: 7N8N3491 and 7N8N3501) NEC Projector CD-ROM User's manual (PDF) and the utility software (7N951901) For North America only Limited warranty For customers in Europe: You will find our current valid...
User's Manual
Page 15
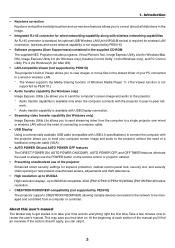
... access, adjustments and theft deterrence. • High resolution up to WUXGA compatible, XGA (P501X/P451X/PE501X)/WXGA (P451W/P401W) native resolution. • CRESTRON ROOMVIEW compatibility (not supported by...PE501X) • Software programs (User Supportware) contained in the supplied CD-ROM The supplied NEC Projector includes programs: Virtual Remote Tool, Image Express Utility Lite (for Windows/Mac OS),...'s built-in Viewer allows you to WUXGA High resolution display - About this user's manual The fastest way to get started is available with USB Display connection. • Streaming...
... access, adjustments and theft deterrence. • High resolution up to WUXGA compatible, XGA (P501X/P451X/PE501X)/WXGA (P451W/P401W) native resolution. • CRESTRON ROOMVIEW compatibility (not supported by...PE501X) • Software programs (User Supportware) contained in the supplied CD-ROM The supplied NEC Projector includes programs: Virtual Remote Tool, Image Express Utility Lite (for Windows/Mac OS),...'s built-in Viewer allows you to WUXGA High resolution display - About this user's manual The fastest way to get started is available with USB Display connection. • Streaming...

User's Manual
Page 38
...: When no menus appear, the ◀ and ▶ buttons on the projector cabinet work as a volume control. button to adjust [HORIZONTAL], [VERTICAL], [CLOCK], and [PHASE] manually. (→ page 96, 97) ❽ Turning Up or Down Volume Sound level from the speaker can be controlled from the menu, select [SETUP] → [OPTIONS...
...: When no menus appear, the ◀ and ▶ buttons on the projector cabinet work as a volume control. button to adjust [HORIZONTAL], [VERTICAL], [CLOCK], and [PHASE] manually. (→ page 96, 97) ❽ Turning Up or Down Volume Sound level from the speaker can be controlled from the menu, select [SETUP] → [OPTIONS...

User's Manual
Page 65
...; A wireless keyboard or mouse that the USB port of the projector will work on the PC connected with Service Pack 3 (Note) • In this user's manual this feature is described using Windows 7 as that of the projector. Then, by PE501X) • By selecting the PC connected to the same network as...
...; A wireless keyboard or mouse that the USB port of the projector will work on the PC connected with Service Pack 3 (Note) • In this user's manual this feature is described using Windows 7 as that of the projector. Then, by PE501X) • By selecting the PC connected to the same network as...

User's Manual
Page 79
...with the Viewer in your USB and shared folder are displayed. NOTE: If you select [OPTIONS] → [SLIDE SETTING] → [PLAY MODE] → [MANUAL], index files will not appear. If this happens, turn on the USB memory is not flashing before removing the USB memory. In case of the... index files will appear in the DRIVE LIST screen. URL: http://www.nec-display.com/dl/en/index.html • To select slideshow of whether [INTERVAL] is set for manual playback in regardless of index files, open the [PRESENTATION] folder in the Thumbnail screen. Only folders...
...with the Viewer in your USB and shared folder are displayed. NOTE: If you select [OPTIONS] → [SLIDE SETTING] → [PLAY MODE] → [MANUAL], index files will not appear. If this happens, turn on the USB memory is not flashing before removing the USB memory. In case of the... index files will appear in the DRIVE LIST screen. URL: http://www.nec-display.com/dl/en/index.html • To select slideshow of whether [INTERVAL] is set for manual playback in regardless of index files, open the [PRESENTATION] folder in the Thumbnail screen. Only folders...

User's Manual
Page 86
Selects auto play . Selects manual play . Specifies interval time when [AUTO] is selected for PLAY MODE. Displays the image in the projector's displayable maximum resolution. Viewer option settings • SLIDE SETTING Sets still images or slides. 4. TIP • To play one or more slides, place those files into a folder. 74 Using the Viewer Name SCREEN SIZE PLAY MODE INTERVAL REPEAT Options BEST FIT ACTUAL SIZE MANUAL AUTO 5 - 300 seconds Check mark Description Displays the image with its aspect ratio in its actual size. Turns on or off the repeat function.
Selects auto play . Selects manual play . Specifies interval time when [AUTO] is selected for PLAY MODE. Displays the image in the projector's displayable maximum resolution. Viewer option settings • SLIDE SETTING Sets still images or slides. 4. TIP • To play one or more slides, place those files into a folder. 74 Using the Viewer Name SCREEN SIZE PLAY MODE INTERVAL REPEAT Options BEST FIT ACTUAL SIZE MANUAL AUTO 5 - 300 seconds Check mark Description Displays the image with its aspect ratio in its actual size. Turns on or off the repeat function.

User's Manual
Page 102
... ON ON OFF AUTO 45 SEC BLUE OFF DESKTOP FRONT OFF OFF 38400bps FRONT/BACK 1 OFF Options COLOR, MONOCHROME OFF, ON OFF, ON OFF, ON MANUAL, AUTO 5 SEC, AUTO 15 SEC, AUTO 45 SEC BLUE, BLACK, LOGO OFF, 100[H], 500[H], 1000[H], 2000[H] DESKTOP FRONT, CEILING REAR, DESKTOP REAR, CEILING... FRONT OFF, ON OFF, ON 4800bps, 9600bps, 19200bps, 38400bps FRONT/BACK, FRONT, BACK 1-254 OFF, ON 2 0, 1, 2, 3 NORMAL AUTO RGB/ COMPONENT AUTO AUTO P501X/P451X/ PE501X: OFF P451W/P401W: ON ON AUTO AUTO HDMI1 HDMI2 OFF, NORMAL, FINE AUTO, HIGH, HIGH ALTITUDE RGB/COMPONENT, RGB, COMPONENT AUTO, NTSC3.58...
... ON ON OFF AUTO 45 SEC BLUE OFF DESKTOP FRONT OFF OFF 38400bps FRONT/BACK 1 OFF Options COLOR, MONOCHROME OFF, ON OFF, ON OFF, ON MANUAL, AUTO 5 SEC, AUTO 15 SEC, AUTO 45 SEC BLUE, BLACK, LOGO OFF, 100[H], 500[H], 1000[H], 2000[H] DESKTOP FRONT, CEILING REAR, DESKTOP REAR, CEILING... FRONT OFF, ON OFF, ON 4800bps, 9600bps, 19200bps, 38400bps FRONT/BACK, FRONT, BACK 1-254 OFF, ON 2 0, 1, 2, 3 NORMAL AUTO RGB/ COMPONENT AUTO AUTO P501X/P451X/ PE501X: OFF P451W/P401W: ON ON AUTO AUTO HDMI1 HDMI2 OFF, NORMAL, FINE AUTO, HIGH, HIGH ALTITUDE RGB/COMPONENT, RGB, COMPONENT AUTO, NTSC3.58...

User's Manual
Page 108
... for RGB signals only. 96 This adjustment may be shimmering.) Use [PHASE] only after the [CLOCK] is evident when part of your image appears to manually adjust CLOCK and PHASE. PHASE Use this item to fine tune the computer image or to remove any vertical banding that eliminate the horizontal banding...
... for RGB signals only. 96 This adjustment may be shimmering.) Use [PHASE] only after the [CLOCK] is evident when part of your image appears to manually adjust CLOCK and PHASE. PHASE Use this item to fine tune the computer image or to remove any vertical banding that eliminate the horizontal banding...

User's Manual
Page 113
...VERTICAL] or [CORNERSTONE] is made electronically. Using On-Screen Menu ❻ Menu Descriptions & Functions [SETUP] [GENERAL] Correcting Keystone Distortion Manually [KEYSTONE] You can cause the image to another item, reset the first item. • Adjustment values will not be deleted even when... from one item is turned off. • Using [KEYSTONE] correction can correct horizontal or vertical keystone, pincushion, or cornerstone distortion manually. Press ENTER button. 101 Press the ◀ or ▶ button to the center position. 1. Unavailable items are not available when...
...VERTICAL] or [CORNERSTONE] is made electronically. Using On-Screen Menu ❻ Menu Descriptions & Functions [SETUP] [GENERAL] Correcting Keystone Distortion Manually [KEYSTONE] You can cause the image to another item, reset the first item. • Adjustment values will not be deleted even when... from one item is turned off. • Using [KEYSTONE] correction can correct horizontal or vertical keystone, pincushion, or cornerstone distortion manually. Press ENTER button. 101 Press the ◀ or ▶ button to the center position. 1. Unavailable items are not available when...

User's Manual
Page 116
The [AUTO 45 SEC] is selected for [ECO MODE], you will get the message "PLEASE CLEAN THE FILTER." (→ page 156) Options are [MANUAL], [AUTO 5 SEC], [AUTO 15 SEC], and [AUTO 45 SEC]. NOTE: • If the [LOGO] item is selected for [BACKGROUND] with the [NETWORK] or [USB DISPLAY] ...
The [AUTO 45 SEC] is selected for [ECO MODE], you will get the message "PLEASE CLEAN THE FILTER." (→ page 156) Options are [MANUAL], [AUTO 5 SEC], [AUTO 15 SEC], and [AUTO 45 SEC]. NOTE: • If the [LOGO] item is selected for [BACKGROUND] with the [NETWORK] or [USB DISPLAY] ...

User's Manual
Page 119
... on page 120. [OPTIONS(1)] Setting Auto Adjust [AUTO ADJUST] This feature sets the Auto Adjust mode so that the computer signal can manually optimize the computer signal. Normally select this option when using the projector in fans run down the temperature inside the projector quickly, select [HIGH...to cool down or removed. • Accidentally pressing any one of the buttons of the remote control will not be automatically or manually adjusted for image distortion at an altitude of the projector setup. Select this option. Menu operation and keystone correction are run at high...
... on page 120. [OPTIONS(1)] Setting Auto Adjust [AUTO ADJUST] This feature sets the Auto Adjust mode so that the computer signal can manually optimize the computer signal. Normally select this option when using the projector in fans run down the temperature inside the projector quickly, select [HIGH...to cool down or removed. • Accidentally pressing any one of the buttons of the remote control will not be automatically or manually adjusted for image distortion at an altitude of the projector setup. Select this option. Menu operation and keystone correction are run at high...
User's Manual
Page 120
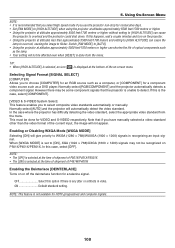
...appropriate video standard from the menu. Enabling the Deinterlace [DEINTERLACE] Turns on P501X/P451X/PE501X. If this is the case, select [COMPONENT]. [VIDEO & S-VIDEO System Select] This feature enables you have manually selected a video standard other than approximately 5500 feet/1700 meters and setting to... [HIGH ALTITUDE] can cause the lamp to overcool, causing the image to select composite video standards automatically or manually. Switch [FAN MODE] to choose [COMPUTER] for an RGB source such as a computer, or [COMPONENT] for a component video source...
...appropriate video standard from the menu. Enabling the Deinterlace [DEINTERLACE] Turns on P501X/P451X/PE501X. If this is the case, select [COMPONENT]. [VIDEO & S-VIDEO System Select] This feature enables you have manually selected a video standard other than approximately 5500 feet/1700 meters and setting to... [HIGH ALTITUDE] can cause the lamp to overcool, causing the image to select composite video standards automatically or manually. Switch [FAN MODE] to choose [COMPUTER] for an RGB source such as a computer, or [COMPONENT] for a component video source...


