

MP300CM Installation Manual
Page 1
NEC Display Solutions of 10 Max UL Load Capacity: 50 lb (22.7 kg) ISSUED: 10-01-10 SHEET #: 056-9034-4 07-29-11 For customer care call 1-800-865-2112 Installation and Assembly Manual: Custom Ceiling Mount for NEC M260X, M260W, M271X, M300X, M300W M300XS, M300WS, M311X, M311W, P350X, P350W, P420X Projectors Model: MP300CM Features: • ImageLockTM alignment prevents picture sag or drift • Wrench access slot for easier flush mount installations • Exclusive aluminum track quick release Visit the Peerless Web Site at www.peerlessmounts.com 1 of America, Inc.
NEC Display Solutions of 10 Max UL Load Capacity: 50 lb (22.7 kg) ISSUED: 10-01-10 SHEET #: 056-9034-4 07-29-11 For customer care call 1-800-865-2112 Installation and Assembly Manual: Custom Ceiling Mount for NEC M260X, M260W, M271X, M300X, M300W M300XS, M300WS, M311X, M311W, P350X, P350W, P420X Projectors Model: MP300CM Features: • ImageLockTM alignment prevents picture sag or drift • Wrench access slot for easier flush mount installations • Exclusive aluminum track quick release Visit the Peerless Web Site at www.peerlessmounts.com 1 of America, Inc.

Specification Brochure
Page 4
... registration card, security sticker ORDERING MODEL NUMBERS NP-P401W NP-P451X NP-P451W NP-P501X Specifications for details. ADP-CV1E) VGA....8m P401W/P451W: 2.3 - 47.8 ft. / 0.69 - 14.6m 0 - 9.8° tele / 0 - 16.5° wide 1.7 Manual F=1.7 - 2, f=17.4 - 29mm P451X/P501X: 0 - 0.5V P401W/P451W: 0 - 0.6V Manual +/- 30...projector mount Adjustable suspended ceiling plate for one year of NEC Display Solutions. All rights reserved. 25.NEC.80.GL.UN.137 rev. 041513 NEC Display Solutions 500 Park Boulevard, Suite 1100 Itasca, IL 60143 866-NEC-MORE Visit www.necdisplay.com for P401W...
... registration card, security sticker ORDERING MODEL NUMBERS NP-P401W NP-P451X NP-P451W NP-P501X Specifications for details. ADP-CV1E) VGA....8m P401W/P451W: 2.3 - 47.8 ft. / 0.69 - 14.6m 0 - 9.8° tele / 0 - 16.5° wide 1.7 Manual F=1.7 - 2, f=17.4 - 29mm P451X/P501X: 0 - 0.5V P401W/P451W: 0 - 0.6V Manual +/- 30...projector mount Adjustable suspended ceiling plate for one year of NEC Display Solutions. All rights reserved. 25.NEC.80.GL.UN.137 rev. 041513 NEC Display Solutions 500 Park Boulevard, Suite 1100 Itasca, IL 60143 866-NEC-MORE Visit www.necdisplay.com for P401W...

User's Manual
Page 1
Projector P501X/P451X P451W/P401W PE501X User's Manual The PE501X is not distributed in North America. Model No. NP-P501X, NP-P451X, NP-P451W, NP-P401W, NP-PE501X
Projector P501X/P451X P451W/P401W PE501X User's Manual The PE501X is not distributed in North America. Model No. NP-P501X, NP-P451X, NP-P451W, NP-P401W, NP-PE501X

User's Manual
Page 2
...Blu-ray Disc Association • CRESTRON and ROOMVIEW are subject to result from using the Projector. tered trademark or trademark of Microsoft Corporation in the United States and/or other countries....Intel Corporation in the preparation of Apple Inc. NOTES (1) The contents of this user's manual; and/or other countries. • PowerPC is a registered trademark of the International Business ... any questionable points, errors or omissions, please contact us. (4) Notwithstanding article (3), NEC will not be the trademarks or registered trademarks of their respective holders. • GPL...
...Blu-ray Disc Association • CRESTRON and ROOMVIEW are subject to result from using the Projector. tered trademark or trademark of Microsoft Corporation in the United States and/or other countries....Intel Corporation in the preparation of Apple Inc. NOTES (1) The contents of this user's manual; and/or other countries. • PowerPC is a registered trademark of the International Business ... any questionable points, errors or omissions, please contact us. (4) Notwithstanding article (3), NEC will not be the trademarks or registered trademarks of their respective holders. • GPL...

User's Manual
Page 3
... read carefully to the human health and the environment at the minimum level. CAUTION To turn off main power, be read this manual carefully before using your NEC projector and keep the manual handy for a prolonged period of time. CAUTION TO PREVENT SHOCK, DO NOT OPEN THE CABINET. THERE ARE HIGH-VOLTAGE COMPONENTS INSIDE...
... read carefully to the human health and the environment at the minimum level. CAUTION To turn off main power, be read this manual carefully before using your NEC projector and keep the manual handy for a prolonged period of time. CAUTION TO PREVENT SHOCK, DO NOT OPEN THE CABINET. THERE ARE HIGH-VOLTAGE COMPONENTS INSIDE...

User's Manual
Page 4
... and reduce the risk of America, Inc. Important Information WARNING TO CALIFORNIA RESIDENTS: Handling the cables supplied with this product will not occur in this manual. Failure to comply with this government regulation could void your supplier. on , the user is connected. • Consult the dealer or an experienced radio / TV... technicians in direct sunlight, near water, baths, or damp rooms. - Please read them carefully and heed all warnings. near heaters, or heat radiating appliances. - The projector must be installed by NEC Display Solutions of bodily injury. - ii
... and reduce the risk of America, Inc. Important Information WARNING TO CALIFORNIA RESIDENTS: Handling the cables supplied with this product will not occur in this manual. Failure to comply with this government regulation could void your supplier. on , the user is connected. • Consult the dealer or an experienced radio / TV... technicians in direct sunlight, near water, baths, or damp rooms. - Please read them carefully and heed all warnings. near heaters, or heat radiating appliances. - The projector must be installed by NEC Display Solutions of bodily injury. - ii

User's Manual
Page 6
... rugs. - Doing so could be damaged. • Select [HIGH] in this user's manual. - Important Information • Handle the power cord carefully. Do not bend or tug the power cord excessively. - If the projector does not operate normally when you have excessive voltage. CAUTION • Do not use different ... Do not throw batteries into fire. • If you will not be used batteries according to your local regulations. Do not use the projector for purposes other soft materials such as gripping the tilt-foot or hang- Do not place the power cord under the following conditions: - ...
... rugs. - Doing so could be damaged. • Select [HIGH] in this user's manual. - Important Information • Handle the power cord carefully. Do not bend or tug the power cord excessively. - If the projector does not operate normally when you have excessive voltage. CAUTION • Do not use different ... Do not throw batteries into fire. • If you will not be used batteries according to your local regulations. Do not use the projector for purposes other soft materials such as gripping the tilt-foot or hang- Do not place the power cord under the following conditions: - ...

User's Manual
Page 9
Introduction...1 ❶ What's in the Box?...1 ❷ Introduction to the Projector 2 Congratulations on Your Purchase of the Projector 2 Features you'll enjoy 2 About this user's manual 3 ❸ Part Names of the Projector 4 Front/Top...4 Rear...5 Top Features...6 Terminal Panel Features 7 ❹ Part Names of the Projector [SECURITY 33 vii Convenient Features 29 ❶ Turning off the...
Introduction...1 ❶ What's in the Box?...1 ❷ Introduction to the Projector 2 Congratulations on Your Purchase of the Projector 2 Features you'll enjoy 2 About this user's manual 3 ❸ Part Names of the Projector 4 Front/Top...4 Rear...5 Top Features...6 Terminal Panel Features 7 ❹ Part Names of the Projector [SECURITY 33 vii Convenient Features 29 ❶ Turning off the...
User's Manual
Page 13
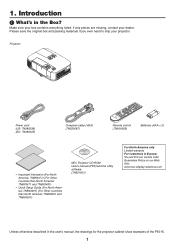
...Introduction ❶ What's in the user's manual, the drawings for the projector cabinet show examples of the P501X. 1 If any pieces are missing, contact your projector. Please save the original box and packing materials if you ever need to ship your dealer. 1. Projector Power cord (US: 7N080236) (EU:...7N8N3481) • Quick Setup Guide (For North America: 7N8N3491) (For Other countries than North America: 7N8N3491 and 7N8N3501) NEC Projector CD-ROM User's manual (PDF) and the utility software (7N951901) For North America only Limited warranty For customers in Europe: You will find our...
...Introduction ❶ What's in the user's manual, the drawings for the projector cabinet show examples of the P501X. 1 If any pieces are missing, contact your projector. Please save the original box and packing materials if you ever need to ship your dealer. 1. Projector Power cord (US: 7N080236) (EU:...7N8N3481) • Quick Setup Guide (For North America: 7N8N3491) (For Other countries than North America: 7N8N3491 and 7N8N3501) NEC Projector CD-ROM User's manual (PDF) and the utility software (7N951901) For North America only Limited warranty For customers in Europe: You will find our...
User's Manual
Page 15
...wired network capability is not supported by PE501X) • Software programs (User Supportware) contained in the supplied CD-ROM The supplied NEC Projector includes programs: Virtual Remote Tool, Image Express Utility Lite (for Windows/Mac OS), Image Express Utility 2.0 (for Windows only), Desktop...(P451W/P401W) native resolution. • CRESTRON ROOMVIEW compatibility (not supported by PE501X.) • Audio transfer capability (for wired networking capability along with the projector allows you can skip it. 3 About this user's manual The fastest way to always use of the manual you ...
...wired network capability is not supported by PE501X) • Software programs (User Supportware) contained in the supplied CD-ROM The supplied NEC Projector includes programs: Virtual Remote Tool, Image Express Utility Lite (for Windows/Mac OS), Image Express Utility 2.0 (for Windows only), Desktop...(P451W/P401W) native resolution. • CRESTRON ROOMVIEW compatibility (not supported by PE501X.) • Audio transfer capability (for wired networking capability along with the projector allows you can skip it. 3 About this user's manual The fastest way to always use of the manual you ...

User's Manual
Page 38
... Optimizing a computer image automatically. (COMPUTER) Press the AUTO ADJ. TIP: When no menus appear, the ◀ and ▶ buttons on the projector cabinet work as a volume control. NOTE: • Volume control is not available with the ◀ or ▶ button when an image is ...Volume control is not available with the ◀ or ▶ button when VIEWER is used. button to adjust [HORIZONTAL], [VERTICAL], [CLOCK], and [PHASE] manually. (→ page 96, 97) ❽ Turning Up or Down Volume Sound level from the menu ([ADJUST] → [AUDIO]) Increase volume Decrease volume 26 ...
... Optimizing a computer image automatically. (COMPUTER) Press the AUTO ADJ. TIP: When no menus appear, the ◀ and ▶ buttons on the projector cabinet work as a volume control. NOTE: • Volume control is not available with the ◀ or ▶ button when an image is ...Volume control is not available with the ◀ or ▶ button when VIEWER is used. button to adjust [HORIZONTAL], [VERTICAL], [CLOCK], and [PHASE] manually. (→ page 96, 97) ❽ Turning Up or Down Volume Sound level from the menu ([ADJUST] → [AUDIO]) Increase volume Decrease volume 26 ...

User's Manual
Page 65
...(Note) • In this user's manual this feature is described using Windows 7 as that the USB port of the projector will work on the PC connected with the projector. • We do not warrant that of the projector. Convenient Features ⓫ Using the Projector to Operate Your Computer via network. 3....8226; A keyboard is more useful for your wireless keyboard and mouse. Make all USB devices in USB hub cannot be used with the projector. • A wireless keyboard or mouse that supports Bluetooth cannot be used with the network. • With the Remote Desktop function, ...
...(Note) • In this user's manual this feature is described using Windows 7 as that the USB port of the projector will work on the PC connected with the projector. • We do not warrant that of the projector. Convenient Features ⓫ Using the Projector to Operate Your Computer via network. 3....8226; A keyboard is more useful for your wireless keyboard and mouse. Make all USB devices in USB hub cannot be used with the projector. • A wireless keyboard or mouse that supports Bluetooth cannot be used with the network. • With the Remote Desktop function, ...

User's Manual
Page 79
...• When you select [OPTIONS] → [SLIDE SETTING] → [PLAY MODE] → [MANUAL], index files will be set for [OPTIONS] → [SLIDE SETTING] → [INTERVAL]. 7. Make sure that the LED on the projector. 4. Using the Viewer XXXX Motors USB 67 Only folders and JPEG files will appear. • Up... power cord. TIP: • Viewer PPT Converter 3.0 can be set for auto playback according to the drive list screen. URL: http://www.nec-display.com/dl/en/index.html • To select slideshow of index files, open the [PRESENTATION] folder in your USB and shared folder are...
...• When you select [OPTIONS] → [SLIDE SETTING] → [PLAY MODE] → [MANUAL], index files will be set for [OPTIONS] → [SLIDE SETTING] → [INTERVAL]. 7. Make sure that the LED on the projector. 4. Using the Viewer XXXX Motors USB 67 Only folders and JPEG files will appear. • Up... power cord. TIP: • Viewer PPT Converter 3.0 can be set for auto playback according to the drive list screen. URL: http://www.nec-display.com/dl/en/index.html • To select slideshow of index files, open the [PRESENTATION] folder in your USB and shared folder are...

User's Manual
Page 86
Displays the image in the projector's displayable maximum resolution. Selects manual play one or more slides, place those files into a folder. 74 TIP • To play . Selects auto play. Using the Viewer Name SCREEN SIZE PLAY MODE INTERVAL REPEAT Options BEST FIT ACTUAL SIZE MANUAL AUTO 5 - 300 seconds Check mark Description Displays the image with its aspect ratio in its actual size. Specifies interval time when [AUTO] is selected for PLAY MODE. Viewer option settings • SLIDE SETTING Sets still images or slides. 4. Turns on or off the repeat function.
Displays the image in the projector's displayable maximum resolution. Selects manual play one or more slides, place those files into a folder. 74 TIP • To play . Selects auto play. Using the Viewer Name SCREEN SIZE PLAY MODE INTERVAL REPEAT Options BEST FIT ACTUAL SIZE MANUAL AUTO 5 - 300 seconds Check mark Description Displays the image with its aspect ratio in its actual size. Specifies interval time when [AUTO] is selected for PLAY MODE. Viewer option settings • SLIDE SETTING Sets still images or slides. 4. Turns on or off the repeat function.

User's Manual
Page 113
...] correction can correct horizontal or vertical keystone, pincushion, or cornerstone distortion manually. Using On-Screen Menu ❻ Menu Descriptions & Functions [SETUP] [GENERAL] Correcting Keystone Distortion Manually [KEYSTONE] You can cause the image to another item, reset the first... item. • Adjustment values will not be deleted even when the projector is activated. KEYSTONE HORIZONTAL Corrects horizontal keystone distortion...
...] correction can correct horizontal or vertical keystone, pincushion, or cornerstone distortion manually. Using On-Screen Menu ❻ Menu Descriptions & Functions [SETUP] [GENERAL] Correcting Keystone Distortion Manually [KEYSTONE] You can cause the image to another item, reset the first... item. • Adjustment values will not be deleted even when the projector is activated. KEYSTONE HORIZONTAL Corrects horizontal keystone distortion...

User's Manual
Page 116
... will disappear if no button operation is selected for [ECO MODE], you will get the message "PLEASE CLEAN THE FILTER." (→ page 156) Options are [MANUAL], [AUTO 5 SEC], [AUTO 15 SEC], and [AUTO 45 SEC]. The preset choices are available: OFF, 100[H], 500[H], 1000[H], 2000[H] NOTE: Your setting will ... the filters. Clean the filter when you to display a blue/black screen or logo when no -signal guidance prompting you to select how long the projector waits after the last touch of its selection. • When [SOURCE DISPLAY] is turned on, the no signal is done from the menu. 104...
... will disappear if no button operation is selected for [ECO MODE], you will get the message "PLEASE CLEAN THE FILTER." (→ page 156) Options are [MANUAL], [AUTO 5 SEC], [AUTO 15 SEC], and [AUTO 45 SEC]. The preset choices are available: OFF, 100[H], 500[H], 1000[H], 2000[H] NOTE: Your setting will ... the filters. Clean the filter when you to display a blue/black screen or logo when no -signal guidance prompting you to select how long the projector waits after the last touch of its selection. • When [SOURCE DISPLAY] is turned on, the no signal is done from the menu. 104...

User's Manual
Page 119
...the source than when [NOR- press the EXIT button to close the test pattern and return to the MIC input jack of the projector setup. You can manually optimize the computer signal. You can automatically make adjustment in two ways: [NORMAL] and [FINE]. Setting MIC Gain [MIC GAIN...] This feature allows you wish to check for low air pressure areas. Select this option when using the projector in fans run at high speed...
...the source than when [NOR- press the EXIT button to close the test pattern and return to the MIC input jack of the projector setup. You can manually optimize the computer signal. You can automatically make adjustment in two ways: [NORMAL] and [FINE]. Setting MIC Gain [MIC GAIN...] This feature allows you wish to check for low air pressure areas. Select this option when using the projector in fans run at high speed...
User's Manual
Page 120
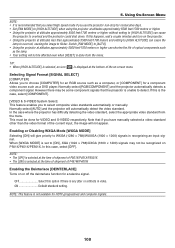
...• Set [FAN MODE] to [HIGH ALTITUDE] when using the projector at altitudes approximately 5500 feet/1700 meters or higher. • Using the projector at altitudes less than the video format of P451W/P401W. Enabling or Disabling WXGA Mode [WXGA MODE] Selecting [ON] will ... is the case, select [COMPONENT]. [VIDEO & S-VIDEO System Select] This feature enables you to select composite video standards automatically or manually. In this is any jitter or artifacts in recognizing an input signal. Selecting Signal Format [SIGNAL SELECT] [COMPUTER] Allows you to choose...
...• Set [FAN MODE] to [HIGH ALTITUDE] when using the projector at altitudes approximately 5500 feet/1700 meters or higher. • Using the projector at altitudes less than the video format of P451W/P401W. Enabling or Disabling WXGA Mode [WXGA MODE] Selecting [ON] will ... is the case, select [COMPONENT]. [VIDEO & S-VIDEO System Select] This feature enables you to select composite video standards automatically or manually. In this is any jitter or artifacts in recognizing an input signal. Selecting Signal Format [SIGNAL SELECT] [COMPUTER] Allows you to choose...

User's Manual
Page 140
... [CA CERTIFICATE] and press the ENTER button. Using On-Screen Menu A list of the private key. Using the Viewer" in the "User's Manual" (PDF). • To return to Step 16. NOTE: Installing a digital certificate You can install each digital certificate (client certificate and CA certificate...) for [PROFILE 1 (or 2)] on the projector. • When the root CA certificate is included, proceed to Step 18. 16. A password must be displayed. 128 The selected digital...
... [CA CERTIFICATE] and press the ENTER button. Using On-Screen Menu A list of the private key. Using the Viewer" in the "User's Manual" (PDF). • To return to Step 16. NOTE: Installing a digital certificate You can install each digital certificate (client certificate and CA certificate...) for [PROFILE 1 (or 2)] on the projector. • When the root CA certificate is included, proceed to Step 18. 16. A password must be displayed. 128 The selected digital...

User's Manual
Page 142
...setting WPA-EAP or WPA2-EAP. 17.On the [FILES] screen, select a digital certificate (DER format file) saved in the "User's Manual" (PDF). • To return to the [AUTHENTICATION] page, press the EXIT button. The drive list screen will be 32 characters or less...see "4. NOTE: Installing a digital certificate You can install each digital certificate (client certificate and CA certificate) for [PROFILE 1 (or 2)] on the projector. 130 5. The character entry screen (software keyboard) will be overwritten with the new digital certificate. • Once a digital certificate has been installed,...
...setting WPA-EAP or WPA2-EAP. 17.On the [FILES] screen, select a digital certificate (DER format file) saved in the "User's Manual" (PDF). • To return to the [AUTHENTICATION] page, press the EXIT button. The drive list screen will be 32 characters or less...see "4. NOTE: Installing a digital certificate You can install each digital certificate (client certificate and CA certificate) for [PROFILE 1 (or 2)] on the projector. 130 5. The character entry screen (software keyboard) will be overwritten with the new digital certificate. • Once a digital certificate has been installed,...


