
User Manual
Page 3
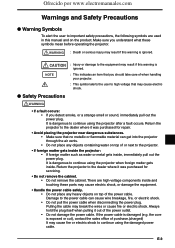
... WARNING • If a fault occurs: • If you understand what these parts may break the wires or cause fire or electric shock. It is ignored. : This indicates an item that you should take care of when handling your projector. : This symbol alerts the user to high voltage that no metallic or... when pulling it out of the power cable. WARNING : Death or serious injury may result if this warning is dangerous to continue using the projector when foreign matter gets inside , immediately pull out the power plug. CAUTION NOTE : Injury or damage to the equipment may result if this...
... WARNING • If a fault occurs: • If you understand what these parts may break the wires or cause fire or electric shock. It is ignored. : This indicates an item that you should take care of when handling your projector. : This symbol alerts the user to high voltage that no metallic or... when pulling it out of the power cable. WARNING : Death or serious injury may result if this warning is dangerous to continue using the projector when foreign matter gets inside , immediately pull out the power plug. CAUTION NOTE : Injury or damage to the equipment may result if this...
User Manual
Page 7
...screw and two lamp unit screws. E-7 G FCC WARNING Changes or modifications not expressly approved by the party responsible for use with the projector: Three-pin type for Europe. G WARNING This is operated in which case the user may be required to correct the interference at... In a domestic environment this equipment. In UK, a BS approved power cable with the limits for a Class A digital device, pursuant to Part 15 of the Canadian Interference-Causing Equipment Regulations. For FCC compatibility, use only the attached cable to connect to external devices. 3. You could ...
...screw and two lamp unit screws. E-7 G FCC WARNING Changes or modifications not expressly approved by the party responsible for use with the projector: Three-pin type for Europe. G WARNING This is operated in which case the user may be required to correct the interference at... In a domestic environment this equipment. In UK, a BS approved power cable with the limits for a Class A digital device, pursuant to Part 15 of the Canadian Interference-Causing Equipment Regulations. For FCC compatibility, use only the attached cable to connect to external devices. 3. You could ...

User Manual
Page 8
Ofrecido por www.electromanuales.com Contents Part Names and Functions E-9 Projector ...E-9 Terminal panel E-11 Buttons (Operation Panel E-12 Buttons (Adjustment Panel E-13 Remote Control ...E-14 Using Remote Control E-15 Installing Batteries E-15 ...Installation E-16 Installation Procedure E-16 Adjustable feet E-16 Projection Distance and Image Size E-17 Typical Installation E-18 How to Connect Your Projector E-19 Connecting to a Personal Computer E-19 If images of a parsonal computer are not projected E-21 Input Signal Compatibility Table (PC video input ...
Ofrecido por www.electromanuales.com Contents Part Names and Functions E-9 Projector ...E-9 Terminal panel E-11 Buttons (Operation Panel E-12 Buttons (Adjustment Panel E-13 Remote Control ...E-14 Using Remote Control E-15 Installing Batteries E-15 ...Installation E-16 Installation Procedure E-16 Adjustable feet E-16 Projection Distance and Image Size E-17 Typical Installation E-18 How to Connect Your Projector E-19 Connecting to a Personal Computer E-19 If images of a parsonal computer are not projected E-21 Input Signal Compatibility Table (PC video input ...

User Manual
Page 9
...foot. Adjustment panel These buttons are projected from outside via this vent. See page E-12 for connecting the projector to prevent dust from entering the inside of the projector. Handle Remote control sensor Terminal panel This panel houses the terminals and connectors for details. E-9 See page ... printed matter placed over the scanner. Focus adjuster Rotate to adjust the screen size. Ofrecido por www.electromanuales.com Part Names and Functions Part Names and Functions Projector Zoom adjuster Rotate to adjust the focus. An air filter is drawn in from here.
...foot. Adjustment panel These buttons are projected from outside via this vent. See page E-12 for connecting the projector to prevent dust from entering the inside of the projector. Handle Remote control sensor Terminal panel This panel houses the terminals and connectors for details. E-9 See page ... printed matter placed over the scanner. Focus adjuster Rotate to adjust the screen size. Ofrecido por www.electromanuales.com Part Names and Functions Part Names and Functions Projector Zoom adjuster Rotate to adjust the focus. An air filter is drawn in from here.
User Manual
Page 11
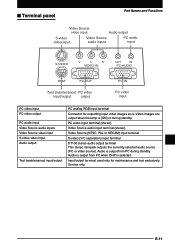
... images as-is [ON] or during standby. Video Source (NTSC, PAL or SECAM) input terminal S-video (Y/C separation) input terminal DT100 stereo audio output terminal This stereo mini-jack outputs the currently selected audio source (PC or video source). Video images are output when ...is output from PC during standby. E-11 Service only. Video Source audio input terminal (stereo). Ofrecido por www.electromanuales.com I Terminal panel Part Names and Functions Video Source video input Audio output S-video video input Video Source audio inputs PC audio input S-VIDEO V L R VIDEO-...
... images as-is [ON] or during standby. Video Source (NTSC, PAL or SECAM) input terminal S-video (Y/C separation) input terminal DT100 stereo audio output terminal This stereo mini-jack outputs the currently selected audio source (PC or video source). Video images are output when ...is output from PC during standby. E-11 Service only. Video Source audio input terminal (stereo). Ofrecido por www.electromanuales.com I Terminal panel Part Names and Functions Video Source video input Audio output S-video video input Video Source audio inputs PC audio input S-VIDEO V L R VIDEO-...

User Manual
Page 13
... of menu setting. • These buttons call up the menu for the contents of menu adjustments. E-13 Ofrecido por www.electromanuales.com I Buttons (Adjustment Panel) Part Names and Functions MENU button MENU SET button SET ADJUST VOLUME MENU button + / -
... of menu setting. • These buttons call up the menu for the contents of menu adjustments. E-13 Ofrecido por www.electromanuales.com I Buttons (Adjustment Panel) Part Names and Functions MENU button MENU SET button SET ADJUST VOLUME MENU button + / -

User Manual
Page 15
...not work if an inverter device is any obstacle between it and the sensor on the battery compartment. Slide the cover into position on the projector. Use only manganese batteries or alkaline batteries. E-15 And do , wipe dry immediately. • Avoid heat and humidity. Ofrecido por www....electromanuales.com I Installing Batteries 1. Note that the distance will not function if there is near. I Using Remote Control Part Names and Functions • Use the Remote control within about 6 meters (20 feet) and within an angle of 30˚ either side of...
...not work if an inverter device is any obstacle between it and the sensor on the battery compartment. Slide the cover into position on the projector. Use only manganese batteries or alkaline batteries. E-15 And do , wipe dry immediately. • Avoid heat and humidity. Ofrecido por www....electromanuales.com I Installing Batteries 1. Note that the distance will not function if there is near. I Using Remote Control Part Names and Functions • Use the Remote control within about 6 meters (20 feet) and within an angle of 30˚ either side of...

User Manual
Page 32
... or less obscure compared to when the keystoning compensation is not used. KEYSTONE button of the remote control to read. To prevent this, place the projector on a base as even as possible and set "Keystone" of the "Setting" menu to "0". (Refer to "Making Adjustment" on page E-33 for the ...information about how to set.) G How to Compensate Keystoning EX.1 Press the KEYSTONE button of the remote control to narrow the lower part of the NOTE • Since the keystoning compensation relates to the image processing, the displayed images (or characters) are hard to narrow the upper...
... or less obscure compared to when the keystoning compensation is not used. KEYSTONE button of the remote control to read. To prevent this, place the projector on a base as even as possible and set "Keystone" of the "Setting" menu to "0". (Refer to "Making Adjustment" on page E-33 for the ...information about how to set.) G How to Compensate Keystoning EX.1 Press the KEYSTONE button of the remote control to narrow the lower part of the NOTE • Since the keystoning compensation relates to the image processing, the displayed images (or characters) are hard to narrow the upper...

