

Users Manual - English
Page 5
... Size and Position controls with ANSI/NFPA 70, the National Electrical Code (NEC), in Europe). • In the UK use a BS-approved power cord with care when transporting. Connecting to a TV* • Cable distribution system should be connected to a power outlet that is intended to be installed close to earth in accordance with standard input signals. • Use the preset color settings. • Use non-interlaced signals. • Do not view...
... Size and Position controls with ANSI/NFPA 70, the National Electrical Code (NEC), in Europe). • In the UK use a BS-approved power cord with care when transporting. Connecting to a TV* • Cable distribution system should be connected to a power outlet that is intended to be installed close to earth in accordance with standard input signals. • Use the preset color settings. • Use non-interlaced signals. • Do not view...

Users Manual - English
Page 15
... change passwords, change channel and set button" when you make a selection. STANDARD: For images. CINEMA: For movies. CAPTURE button: Captures still picture. O GUIDE Button*1 P MUTE Button Turns on /off the menu mode. See page 28. If you lock remote control buttons using the IR LOCK SETTINGS function, you are installed. sRGB: For text based images. When using . *1: This button's action depends on which Option Board you can unlock the buttons by holding down this button acts as "point zoom button". M VOLUME UP/DOWN Button...
... change passwords, change channel and set button" when you make a selection. STANDARD: For images. CINEMA: For movies. CAPTURE button: Captures still picture. O GUIDE Button*1 P MUTE Button Turns on /off the menu mode. See page 28. If you lock remote control buttons using the IR LOCK SETTINGS function, you are installed. sRGB: For text based images. When using . *1: This button's action depends on which Option Board you can unlock the buttons by holding down this button acts as "point zoom button". M VOLUME UP/DOWN Button...

Users Manual - English
Page 17
... "Caution" warning appears, stop using the "HEAT STATUS" control in an enclosed area or if the LCD panel is powered by a qualified technician. CAUTION: If the monitor is used in the OSD (see page 41). To install or replace batteries: NEC recommends the following battery use the Remote Control for further information. Connect the supplied power cord • The monitor should be done by two 1.5V AAA batteries. A. Replace the cover.
... "Caution" warning appears, stop using the "HEAT STATUS" control in an enclosed area or if the LCD panel is powered by a qualified technician. CAUTION: If the monitor is used in the OSD (see page 41). To install or replace batteries: NEC recommends the following battery use the Remote Control for further information. Connect the supplied power cord • The monitor should be done by two 1.5V AAA batteries. A. Replace the cover.

Users Manual - English
Page 20
...'s display adapter. Connecting to a Personal Computer The type of video connections that can be used to connect to a computer depends on again. The monitor will show the typical factory preset signal timing for the signal to appear after turning on the computer. • Some display cards or drivers may not display an image correctly (see page 34). • To output HDMI audio, set [HDMI1], [HDMI2] or [HDMI3] at AUDIO INPUT in the OSD...
...'s display adapter. Connecting to a Personal Computer The type of video connections that can be used to connect to a computer depends on again. The monitor will show the typical factory preset signal timing for the signal to appear after turning on the computer. • Some display cards or drivers may not display an image correctly (see page 34). • To output HDMI audio, set [HDMI1], [HDMI2] or [HDMI3] at AUDIO INPUT in the OSD...
Users Manual - English
Page 21
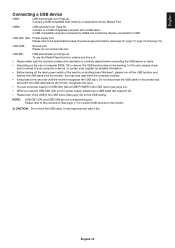
... port (Type-B). USB MP: USB downstream port (Type-A). English Connecting a USB device USB1: USB downstream port (Type-A). USB CM2: Service port. To use the Media Player function, please use this case, please check user's manual of your computer or device, or contact your supplier for USB CM1 (2A) at USB POWER in the OSD menu (See page 44) for power supply, please use a USB cable that supports 2A. • Please refer to Down Stream Port. In this port. • Please make...
... port (Type-B). USB MP: USB downstream port (Type-A). English Connecting a USB device USB1: USB downstream port (Type-A). USB CM2: Service port. To use the Media Player function, please use this case, please check user's manual of your computer or device, or contact your supplier for USB CM1 (2A) at USB POWER in the OSD menu (See page 44) for power supply, please use a USB cable that supports 2A. • Please refer to Down Stream Port. In this port. • Please make...
Users Manual - English
Page 27
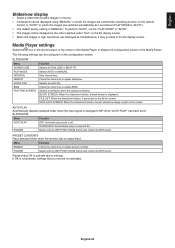
... AUTO or MANUAL. Check the check box to repeat slideshow. SAVE LAST SCREEN: When the slideshow finishes, the last slideshow image is off. PRESET CONTENTS Plays selected folder when the monitor has no signal input. The following settings can be displayed using "MANUAL" in which the images are switched by operating a button on the remote control, or "AUTO" in which the images are switched automatically at a set interval (PLAY MODE is "AUTO"). • The default factory setting...
... AUTO or MANUAL. Check the check box to repeat slideshow. SAVE LAST SCREEN: When the slideshow finishes, the last slideshow image is off. PRESET CONTENTS Plays selected folder when the monitor has no signal input. The following settings can be displayed using "MANUAL" in which the images are switched by operating a button on the remote control, or "AUTO" in which the images are switched automatically at a set interval (PLAY MODE is "AUTO"). • The default factory setting...

Users Manual - English
Page 35
... Option Board you use with a computer. 2.4 Good for video (DVD, etc.) S GAMMA Special gamma for still image by MP input. *5: When you are installed. System gamma can be OFF. *6: This function is selected in relationship to HDR-ST2084 (PQ) or HDR-HYBRID LOG. A low color temperature will make the screen bluish. COLOR CONTROL Adjusts the hue of the image. CONTRAST*1, *2 Adjusts the image brightness in ROOM LIGHT SENSING...
... Option Board you use with a computer. 2.4 Good for video (DVD, etc.) S GAMMA Special gamma for still image by MP input. *5: When you are installed. System gamma can be OFF. *6: This function is selected in relationship to HDR-ST2084 (PQ) or HDR-HYBRID LOG. A low color temperature will make the screen bluish. COLOR CONTROL Adjusts the hue of the image. CONTRAST*1, *2 Adjusts the image brightness in ROOM LIGHT SENSING...

Users Manual - English
Page 36
... or set . VZOOM Vertical zoom value. AUTO Image size is not available. NOTE: This function is not available if input signal is the default setting. TELECINE Automatically senses the sources frame rate for dynamic contrast. If HIGH is set , the ASPECT setting automatically changes to the wide gap of the expanded image that you set automatically. ASPECT Select the aspect ratio of the active screen area are outside image area...
... or set . VZOOM Vertical zoom value. AUTO Image size is not available. NOTE: This function is not available if input signal is the default setting. TELECINE Automatically senses the sources frame rate for dynamic contrast. If HIGH is set , the ASPECT setting automatically changes to the wide gap of the expanded image that you set automatically. ASPECT Select the aspect ratio of the active screen area are outside image area...

Users Manual - English
Page 42
... of screens. English-40 You can adjust a displayed image size and position by pressing the + button or the - This function is not available when SCREEN SAVER is set, the setting of the master monitor. button on . The fourth octet is set, all settings in the AUTO ID/IP SETTING and then run the "AUTO ID/IP RESET". COMMON All settings in ASPECT while executing TILE MATRIX, the setting will be displayed on the base number...
... of screens. English-40 You can adjust a displayed image size and position by pressing the + button or the - This function is not available when SCREEN SAVER is set, the setting of the master monitor. button on . The fourth octet is set, all settings in the AUTO ID/IP SETTING and then run the "AUTO ID/IP RESET". COMMON All settings in ASPECT while executing TILE MATRIX, the setting will be displayed on the base number...

Users Manual - English
Page 43
... Hz) signal input. English DISPLAY PROTECTION POWER SAVE Set ENABLE or DISABLE. If this option allows you are applied. RESET Resets all settings within the DISPLAY PROTECTION menu back to the network when MANUAL is selected for POWER ON DELAY and INTELLI. IP ADDRESS Set your default gateway for the monitor connected to factory setting except for [IP SETTING]. AUTO: The DNS server, which is connected with the monitor, will not switch into power save mode, a message is displayed when...
... Hz) signal input. English DISPLAY PROTECTION POWER SAVE Set ENABLE or DISABLE. If this option allows you are applied. RESET Resets all settings within the DISPLAY PROTECTION menu back to the network when MANUAL is selected for POWER ON DELAY and INTELLI. IP ADDRESS Set your default gateway for the monitor connected to factory setting except for [IP SETTING]. AUTO: The DNS server, which is connected with the monitor, will not switch into power save mode, a message is displayed when...

Users Manual - English
Page 46
... wireless remote control supplied with no connected HDMI CEC audio device to HDMI. START UP PC When ON is connected. Please use this function only when the operating system cannot be carried out. PC SOURCE Select a device connected to USB2 port. USB POWER Selects a power relation of the internal PC will start. Depending on then changes the input signal to the connected option stops during power save mode. AUTO TURN OFF When the monitor goes to standby via HDMI connector...
... wireless remote control supplied with no connected HDMI CEC audio device to HDMI. START UP PC When ON is connected. Please use this function only when the operating system cannot be carried out. PC SOURCE Select a device connected to USB2 port. USB POWER Selects a power relation of the internal PC will start. Depending on then changes the input signal to the connected option stops during power save mode. AUTO TURN OFF When the monitor goes to standby via HDMI connector...

Users Manual - English
Page 47
... model name, serial number and firmware version of IR remote control signals. This is 1CH. FIRMWARE Displays firmware version that power to the factory setting within which is selected in the carbon saving calculation is turned off. MAC ADDRESS Displays the MAC ADDRESS. Please do not change settings in Watchdog Timer function for when the display should start receiving WDT reset commands. AUTO POWER ON When set to the monitor. SERVICE MENU SETTING LOCK Locks all settings under COMPUTE MODULE. SHUTDOWN SIGNAL Enables or disables...
... model name, serial number and firmware version of IR remote control signals. This is 1CH. FIRMWARE Displays firmware version that power to the factory setting within which is selected in the carbon saving calculation is turned off. MAC ADDRESS Displays the MAC ADDRESS. Please do not change settings in Watchdog Timer function for when the display should start receiving WDT reset commands. AUTO POWER ON When set to the monitor. SERVICE MENU SETTING LOCK Locks all settings under COMPUTE MODULE. SHUTDOWN SIGNAL Enables or disables...

Users Manual - English
Page 48
... red. DisplayPort1 MULTI-INPUT SCHEDULE: SCHEDULE SETTINGS SCHEDULE LIST HOLIDAY SETTINGS WEEKEND SETTINGS DATE & TIME DAYLIGHT SAVINGS OFF TIMER RESET 6. To alleviate image persistence, turn off the monitor's main power or set it to standby when not in use . For example, if an image was displayed. Use the + and - Use the up and down buttons. Press MENU to leave the OSD or press EXIT to go back to choose the picture mode. 5. Image...
... red. DisplayPort1 MULTI-INPUT SCHEDULE: SCHEDULE SETTINGS SCHEDULE LIST HOLIDAY SETTINGS WEEKEND SETTINGS DATE & TIME DAYLIGHT SAVINGS OFF TIMER RESET 6. To alleviate image persistence, turn off the monitor's main power or set it to standby when not in use . For example, if an image was displayed. Use the + and - Use the up and down buttons. Press MENU to leave the OSD or press EXIT to go back to choose the picture mode. 5. Image...

Users Manual - English
Page 60
... HDMI CEC supporting devices are turned on, it is necessary that , the input switches to HDMI from the original one to standby using the wireless remote control supplied with an HDMI cable. If the monitor is set to HDMI. In addition, this function is active, the internal speaker or external speaker connected to the monitor is turned on when HDMI CEC devices are turned on and play. The function sends digital audio signal through the HDMI cable...
... HDMI CEC supporting devices are turned on, it is necessary that , the input switches to HDMI from the original one to standby using the wireless remote control supplied with an HDMI cable. If the monitor is set to HDMI. In addition, this function is active, the internal speaker or external speaker connected to the monitor is turned on when HDMI CEC devices are turned on and play. The function sends digital audio signal through the HDMI cable...

Users Manual - English
Page 72
... monitor is not lit (no blue or red color can be seen) • The power Switch should be in doubt, please refer to the user's manual of the display card or system to change the resolution. • Check the monitor and your supplier. • Some HDMI cables may cause image roughness or blink for a moment. Press the power on button on the remote control or press the power button on the monitor. • If you use a signal...
... monitor is not lit (no blue or red color can be seen) • The power Switch should be in doubt, please refer to the user's manual of the display card or system to change the resolution. • Check the monitor and your supplier. • Some HDMI cables may cause image roughness or blink for a moment. Press the power on button on the remote control or press the power button on the monitor. • If you use a signal...

Users Manual - English
Page 73
... if the computer supports an audio signal through DisplayPort. Please make sure the computer is ON or USB POWER is set to EXTERNAL PC. English Selected resolution is not displayed properly • Use OSD Display Mode to enter Information menu and confirm that the USB cable is properly connected. If not, select corresponding option. The Remote Control is not functioning • Check the batteries status of IR LOCK SETTINGS. • The remote control system may...
... if the computer supports an audio signal through DisplayPort. Please make sure the computer is ON or USB POWER is set to EXTERNAL PC. English Selected resolution is not displayed properly • Use OSD Display Mode to enter Information menu and confirm that the USB cable is properly connected. If not, select corresponding option. The Remote Control is not functioning • Check the batteries status of IR LOCK SETTINGS. • The remote control system may...

Users Manual - English
Page 74
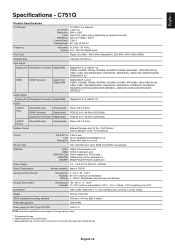
... of the monitor only and do not include removable parts that protrude. English-72 C651Q Product Specifications LCD Module 65"/163.9 cm diagonal Pixel Pitch: 0.372 mm Resolution: 3840 x 2160 Color: Over 1073 million colors (depending on display card used) Brightness: 400 cd/m2 (Max.) @25°C Contrast Ratio: 4000:1 Viewing Angle: 89° (typ) @ CR>10 Frequency Horizontal: 31.5 kHz - 91.1 kHz Vertical: 24.0 - 85.0 Hz (Digital Input) Pixel Clock Digital: 25...
... of the monitor only and do not include removable parts that protrude. English-72 C651Q Product Specifications LCD Module 65"/163.9 cm diagonal Pixel Pitch: 0.372 mm Resolution: 3840 x 2160 Color: Over 1073 million colors (depending on display card used) Brightness: 400 cd/m2 (Max.) @25°C Contrast Ratio: 4000:1 Viewing Angle: 89° (typ) @ CR>10 Frequency Horizontal: 31.5 kHz - 91.1 kHz Vertical: 24.0 - 85.0 Hz (Digital Input) Pixel Clock Digital: 25...
Users Manual - English
Page 75
...: 0.430 mm Resolution: 3840 x 2160 Color: Over 1073 million colors (depending on display card used) Brightness: 350 cd/m2 (Max.) @25°C Contrast Ratio: 1200:1 Viewing Angle: 89° (typ) @ CR>10 Frequency Horizontal: 31.5 kHz - 91.1 kHz Vertical: 24.0 - 85.0 Hz (Digital Input) Pixel Clock Digital: 25.0 MHz - 540.0 MHz (DisplayPort), 25.0 MHz - 600.0 MHz (HDMI) Viewable Size 1649.66 x 927.94 mm Input Signal DisplayPort DisplayPort Connector Digital RGB DisplayPort V1...
...: 0.430 mm Resolution: 3840 x 2160 Color: Over 1073 million colors (depending on display card used) Brightness: 350 cd/m2 (Max.) @25°C Contrast Ratio: 1200:1 Viewing Angle: 89° (typ) @ CR>10 Frequency Horizontal: 31.5 kHz - 91.1 kHz Vertical: 24.0 - 85.0 Hz (Digital Input) Pixel Clock Digital: 25.0 MHz - 540.0 MHz (DisplayPort), 25.0 MHz - 600.0 MHz (HDMI) Viewable Size 1649.66 x 927.94 mm Input Signal DisplayPort DisplayPort Connector Digital RGB DisplayPort V1...
Users Manual - English
Page 76
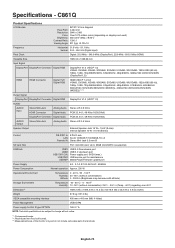
... specifications are of the monitor only and do not include removable parts that protrude. C861Q Product Specifications LCD Module 86"/217.43 cm diagonal Pixel Pitch: 0.494 mm Resolution: 3840 x 2160 Color: Over 1073 million colors (depending on display card used) Brightness: 350 cd/m2 (Max.) @25°C Contrast Ratio: 1200:1 Viewing Angle: 89° (typ) @ CR>10 Frequency Horizontal: 31.5 kHz - 91.1 kHz Vertical: 24.0 - 85.0 Hz (Digital Input) Pixel Clock Digital...
... specifications are of the monitor only and do not include removable parts that protrude. C861Q Product Specifications LCD Module 86"/217.43 cm diagonal Pixel Pitch: 0.494 mm Resolution: 3840 x 2160 Color: Over 1073 million colors (depending on display card used) Brightness: 350 cd/m2 (Max.) @25°C Contrast Ratio: 1200:1 Viewing Angle: 89° (typ) @ CR>10 Frequency Horizontal: 31.5 kHz - 91.1 kHz Vertical: 24.0 - 85.0 Hz (Digital Input) Pixel Clock Digital...

Users Manual - English
Page 77
... is supported. C981Q Product Specifications LCD Module 98"/247.82 cm diagonal Pixel Pitch: 0.562 mm Resolution: 3840 x 2160 Color: Over 1073 million colors (depending on display card used) Brightness: 350 cd/m2 (Max.) @25°C Contrast Ratio: 1300:1 Viewing Angle: 89° (typ) @ CR>10 Frequency Horizontal: 31.5 kHz - 91.1 kHz Vertical: 24.0 - 85.0 Hz (Digital Input) Pixel Clock Digital: 25.0 MHz - 540.0 MHz (DisplayPort), 25.0 MHz - 600.0 MHz (HDMI) Viewable Size...
... is supported. C981Q Product Specifications LCD Module 98"/247.82 cm diagonal Pixel Pitch: 0.562 mm Resolution: 3840 x 2160 Color: Over 1073 million colors (depending on display card used) Brightness: 350 cd/m2 (Max.) @25°C Contrast Ratio: 1300:1 Viewing Angle: 89° (typ) @ CR>10 Frequency Horizontal: 31.5 kHz - 91.1 kHz Vertical: 24.0 - 85.0 Hz (Digital Input) Pixel Clock Digital: 25.0 MHz - 540.0 MHz (DisplayPort), 25.0 MHz - 600.0 MHz (HDMI) Viewable Size...


