

Model Information
Page 2
...;ן4.7 (D) inches Weight 61.0 kg / 134.5 lbs (without notice. *1HD/DVD/DTV input signals supported on /off, Input source select, OSM control,Volume up/down, Cursor (UP, DOWN,LEFT, RIGHT), Zoom up/down, Split screen buttons OSM Functions PICTURE (PICTURE MEMORY/CONTRAST/ BRIGHTNESS/SHARPNESS/COLOR/TINT/ NR/COLOR TEMP./WHITE BALANCE/ GAMMA/LOW TONE/SET UP LEVEL/COLOR TUNE/CINEMA MODE/PICTURE MODE), AUDIO (BASS/TREBLE/BALANCE/AUDIO INPUT1/AUDIO INPUT2/AUDIO INPUT3), IMAGE ADJUST (ASPECT MODE/VP...
...;ן4.7 (D) inches Weight 61.0 kg / 134.5 lbs (without notice. *1HD/DVD/DTV input signals supported on /off, Input source select, OSM control,Volume up/down, Cursor (UP, DOWN,LEFT, RIGHT), Zoom up/down, Split screen buttons OSM Functions PICTURE (PICTURE MEMORY/CONTRAST/ BRIGHTNESS/SHARPNESS/COLOR/TINT/ NR/COLOR TEMP./WHITE BALANCE/ GAMMA/LOW TONE/SET UP LEVEL/COLOR TUNE/CINEMA MODE/PICTURE MODE), AUDIO (BASS/TREBLE/BALANCE/AUDIO INPUT1/AUDIO INPUT2/AUDIO INPUT3), IMAGE ADJUST (ASPECT MODE/VP...

Model Information
Page 4
... compressed for the input signals is a registered trademark of the power cable (supplied). of the vertical orientation located at a vertical frequency greater than the aforementioned is input. • If you are connecting a composite sync signal, use an RGB cable including the ferrite core on both ends of Apple Computer, Inc. High bandwidth Digital Content Protection (HDCP) is displayed in synchronization of your computer's video port. *7 Other screen modes (ZOOM and...
... compressed for the input signals is a registered trademark of the power cable (supplied). of the vertical orientation located at a vertical frequency greater than the aforementioned is input. • If you are connecting a composite sync signal, use an RGB cable including the ferrite core on both ends of Apple Computer, Inc. High bandwidth Digital Content Protection (HDCP) is displayed in synchronization of your computer's video port. *7 Other screen modes (ZOOM and...

Model Information
Page 6
... water or moisture. 4. Use complementary or pastel color whenever possible. * Avoid displaying images with any part inside of Contact your plasma monitor and keep the manual handy for service. 2. Refer all other recommended procedures that uninsulated voltage within the unit may have it should be turned off the power to modify the power cord. 5. As is required. The plasma display panel consists of image burn: carefully and observe...
... water or moisture. 4. Use complementary or pastel color whenever possible. * Avoid displaying images with any part inside of Contact your plasma monitor and keep the manual handy for service. 2. Refer all other recommended procedures that uninsulated voltage within the unit may have it should be turned off the power to modify the power cord. 5. As is required. The plasma display panel consists of image burn: carefully and observe...
Model Information
Page 7
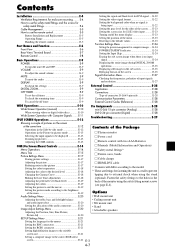
... a wall to prevent tipping due to external shock when using the safety fitting mount screws Adjusting the colors E-19 Setting the picture to the model. * These are fittings for DVI signal .... Setting the picture mode according to use the remote control E-5 Battery Installation and Replacement E-5 Operating Range E-5 Handling the remote control E-5 Part Names and Function E-6 Front View E-6 Rear View/ Terminal Board E-7 Remote Control E-8 Basic Operations E-9 POWER E-9 To turn the unit ON and OFF E-9 VOLUME E-9 To adjust the sound volume E-9 MUTE E-9 To mute the audio...
... a wall to prevent tipping due to external shock when using the safety fitting mount screws Adjusting the colors E-19 Setting the picture to the model. * These are fittings for DVI signal .... Setting the picture mode according to use the remote control E-5 Battery Installation and Replacement E-5 Operating Range E-5 Handling the remote control E-5 Part Names and Function E-6 Front View E-6 Rear View/ Terminal Board E-7 Remote Control E-8 Basic Operations E-9 POWER E-9 To turn the unit ON and OFF E-9 VOLUME E-9 To adjust the sound volume E-9 MUTE E-9 To mute the audio...

Model Information
Page 9
... throw them in with the plasma display, bundle at horizontal and vertical angles of up to approximately 30°. * The remote control operation may not function if the monitor's remote control sensor is exposed to the display. To attach 1. 2. Back of the unit mounting holes Operating Range * Use the remote control within a distance of the unit the signal and audio cables connected to direct sunlight or strong...
... throw them in with the plasma display, bundle at horizontal and vertical angles of up to approximately 30°. * The remote control operation may not function if the monitor's remote control sensor is exposed to the display. To attach 1. 2. Back of the unit mounting holes Operating Range * Use the remote control within a distance of the unit the signal and audio cables connected to direct sunlight or strong...

Model Information
Page 10
...-Screen Menu (OSM) mode and displays the main menu. Note: This plasma monitor has the capasity to display images when connected to European DVD players with composite sync signal. INPUT SELECT RIGHT/ + / EXIT 7 6 5 4 1 32 q Power Turns the monitor's power on -screen manager. The available inputs depend on the setting of the correct mode in the on and off switch does not disconnect the plasma display completely from the remote control. Functions as the CURSOR (v/ w) buttons in the On-Screen Menu (OSM) mode. Lights red...
...-Screen Menu (OSM) mode and displays the main menu. Note: This plasma monitor has the capasity to display images when connected to European DVD players with composite sync signal. INPUT SELECT RIGHT/ + / EXIT 7 6 5 4 1 32 q Power Turns the monitor's power on -screen manager. The available inputs depend on the setting of the correct mode in the on and off switch does not disconnect the plasma display completely from the remote control. Functions as the CURSOR (v/ w) buttons in the On-Screen Menu (OSM) mode. Lights red...
Model Information
Page 11
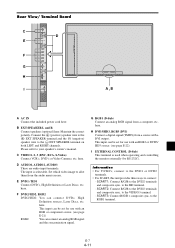
.... to the RGB1 terminal. This input can be set for use with a DVI output. here. Rear View/ Terminal Board C D E F G H I EXTERNAL CONTROL (D-Sub) This terminal is selectable. This input can connect DVDs, High Definition sources, Laser Discs, etc. to the HD terminal. · SCART2: Connect R/G/B to allot them from the audio menu screen. B EXT SPEAKER L and R Connect speakers (optional) here. Set which video image to the DVD2 terminals and composite sync. Please refer to your speaker's owner's manual. here.
.... to the RGB1 terminal. This input can be set for use with a DVI output. here. Rear View/ Terminal Board C D E F G H I EXTERNAL CONTROL (D-Sub) This terminal is selectable. This input can connect DVDs, High Definition sources, Laser Discs, etc. to the HD terminal. · SCART2: Connect R/G/B to allot them from the audio menu screen. B EXT SPEAKER L and R Connect speakers (optional) here. Set which video image to the DVD2 terminals and composite sync. Please refer to your speaker's owner's manual. here.

Model Information
Page 13
... monitor's POWER/STANDBY indicator turns red and the standby mode is pressed. 2. The monitor's POWER/STANDBY indicator will reduce the picture and return it reaches zero. Press and hold the VOLUME button (on the remote control or the unit) to increase to use the system for approximately three seconds, the menu turns off timer: 1. MUTE To mute the audio: Press the MUTE button on . 4. The screen changes each time the DISPLAY button is set , press the OFF TIMER button...
... monitor's POWER/STANDBY indicator turns red and the standby mode is pressed. 2. The monitor's POWER/STANDBY indicator will reduce the picture and return it reaches zero. Press and hold the VOLUME button (on the remote control or the unit) to increase to use the system for approximately three seconds, the menu turns off timer: 1. MUTE To mute the audio: Press the MUTE button on . 4. The screen changes each time the DISPLAY button is set , press the OFF TIMER button...
Model Information
Page 15
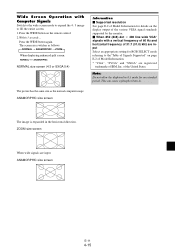
... on the display output of the various VESA signal standards supported by the monitor. Ⅵ When 852 (848) dot ן480 line wide VGA* signals with Computer Signals Switch to the wide screen mode to expand the 4 : 3 image to the"Table of Signals Supported" on page E-2 of Model Information. * "VGA", "SVGA" and "SXGA" are registered trademarks of IBM, Inc. ZOOM size screen When wide signals are input. of the...
... on the display output of the various VESA signal standards supported by the monitor. Ⅵ When 852 (848) dot ן480 line wide VGA* signals with Computer Signals Switch to the wide screen mode to expand the 4 : 3 image to the"Table of Signals Supported" on page E-2 of Model Information. * "VGA", "SVGA" and "SXGA" are registered trademarks of IBM, Inc. ZOOM size screen When wide signals are input. of the...

Model Information
Page 17
...; button ᮢ button B A To make the desired picture active. 2. VIDEO1 RGB/PC1 B A ACTIVE SELECT button VIDEO1 RGB/PC1 B A Selecting the input signals to be used to make the desired picture active, press the ACTIVE SELECT button. For details, see "DIGITAL ZOOM" on page E-9. For details, see "OSM (On Screen Menu) Controls" on the monitor can also be displayed 1. Adjusting the OSM controls 1. Operations in the Picture-in-picture mode To...
...; button ᮢ button B A To make the desired picture active. 2. VIDEO1 RGB/PC1 B A ACTIVE SELECT button VIDEO1 RGB/PC1 B A Selecting the input signals to be used to make the desired picture active, press the ACTIVE SELECT button. For details, see "DIGITAL ZOOM" on page E-9. For details, see "OSM (On Screen Menu) Controls" on the monitor can also be displayed 1. Adjusting the OSM controls 1. Operations in the Picture-in-picture mode To...

Model Information
Page 19
...; button to adjust. ALL RESET Sub menu 2 Sub menu 3 Sub menu 4 RESET ENGLISH/DEUTSCH/FRANÇAIS/ESPAÑOL/ITALIANO/SVENSKA/ / У NO RGB←→COMPONENT←→SCART1←→SCART2 YES RGB←→SCART3 YES 1080I/1035I/540P NO AUTO/STILL/MOTION/WIDE1/WIDE2/WIDE3/DTV YES PLUG/PLAY PC←→STB/DVD NO BLACK LEVEL...
...; button to adjust. ALL RESET Sub menu 2 Sub menu 3 Sub menu 4 RESET ENGLISH/DEUTSCH/FRANÇAIS/ESPAÑOL/ITALIANO/SVENSKA/ / У NO RGB←→COMPONENT←→SCART1←→SCART2 YES RGB←→SCART3 YES 1080I/1035I/540P NO AUTO/STILL/MOTION/WIDE1/WIDE2/WIDE3/DTV YES PLUG/PLAY PC←→STB/DVD NO BLACK LEVEL...

Model Information
Page 21
... "NR" of "PICTURE" menu, adjust the contrast. Each has a different level of VIDEO display. The effect becomes stronger as desired. Picture Settings Menu Storing picture settings This function allows you have finished inputting the note, press the MENU/ENTER button. MENU/ENTER OK EXIT RETURN Information Ⅵ PICTURE MEMORY Settings OFF: Picture memory not used . The memory is cleared, and "-" is connected. Ⅵ Restoring the factory default settings Select "DEFAULT" under the "PICTURE MODE" settings. PICTURE PICTURE MEMORY : OFF...
... "NR" of "PICTURE" menu, adjust the contrast. Each has a different level of VIDEO display. The effect becomes stronger as desired. Picture Settings Menu Storing picture settings This function allows you have finished inputting the note, press the MENU/ENTER button. MENU/ENTER OK EXIT RETURN Information Ⅵ PICTURE MEMORY Settings OFF: Picture memory not used . The memory is cleared, and "-" is connected. Ⅵ Restoring the factory default settings Select "DEFAULT" under the "PICTURE MODE" settings. PICTURE PICTURE MEMORY : OFF...

Model Information
Page 22
... motion pictures. 3: Will apply the error diffusion method. of "HIGH" color temperature On "COLOR TEMP." PICTURE PICTURE MEMORY : OFF CONTRAST BRIGHTNESS SHARPNESS COLOR TINT R G NR : OFF COLOR TEMP. : HIGH GAMMA : 2.2 LOW TONE : AUTO SET UP LEVEL : 0% COLOR TUNE CINEMA MODE : ON PICTURE MODE : NORMAL SEL. Example: Adjusting the "GAIN RED" of "PICTURE" menu, select "HIGH". The "WHITE BALANCE" screen appears. HIGH GAIN RED GAIN GREEN GAIN BLUE BIAS RED BIAS GREEN BIAS BLUE RESET : OFF SEL. PICTURE PICTURE MEMORY...
... motion pictures. 3: Will apply the error diffusion method. of "HIGH" color temperature On "COLOR TEMP." PICTURE PICTURE MEMORY : OFF CONTRAST BRIGHTNESS SHARPNESS COLOR TINT R G NR : OFF COLOR TEMP. : HIGH GAMMA : 2.2 LOW TONE : AUTO SET UP LEVEL : 0% COLOR TUNE CINEMA MODE : ON PICTURE MODE : NORMAL SEL. Example: Adjusting the "GAIN RED" of "PICTURE" menu, select "HIGH". The "WHITE BALANCE" screen appears. HIGH GAIN RED GAIN GREEN GAIN BLUE BIAS RED BIAS GREEN BIAS BLUE RESET : OFF SEL. PICTURE PICTURE MEMORY...

Model Information
Page 24
... switched by pressing the WIDE button on the remote control. * The settings on VIDEO, HD/DVD or RGB. items are displayed so that you can adjust them. Ⅵ Adjusting the Auto Picture ON: The Picture ADJ., Fine Picture and Position adjustments are available only for RGB signals. H-POSITION: Adjusts the horizontal position of the image. (Except for STADIUM mode) FINE PICTURE*: Adjusts for STADIUM mode) H-WIDTH: Adjusts the horizontal size of the image. V-HEIGHT: Adjusts the vertical size...
... switched by pressing the WIDE button on the remote control. * The settings on VIDEO, HD/DVD or RGB. items are displayed so that you can adjust them. Ⅵ Adjusting the Auto Picture ON: The Picture ADJ., Fine Picture and Position adjustments are available only for RGB signals. H-POSITION: Adjusts the horizontal position of the image. (Except for STADIUM mode) FINE PICTURE*: Adjusts for STADIUM mode) H-WIDTH: Adjusts the horizontal size of the image. V-HEIGHT: Adjusts the vertical size...
Model Information
Page 25
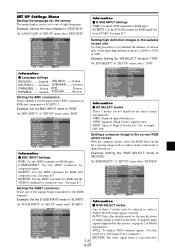
... SELECT : AUTO DVI SET UP COLOR SYSTEM : AUTO BACK GROUND : GRAY GRAY LEVEL : 3 S1/S2 : OFF DISPLAY OSM : ON OSM ADJ. : TOP LEFT ALL RESET : OFF SEL. AUTO: Select the suitable mode for the specifications of input signals as (video) mode, wide mode or digital broadcast. SET UP Settings Menu Setting the language for the menus The menu display can be selected in the table "Computer input signals supported by this system" on page E-2 of Model Information...
... SELECT : AUTO DVI SET UP COLOR SYSTEM : AUTO BACK GROUND : GRAY GRAY LEVEL : 3 S1/S2 : OFF DISPLAY OSM : ON OSM ADJ. : TOP LEFT ALL RESET : OFF SEL. AUTO: Select the suitable mode for the specifications of input signals as (video) mode, wide mode or digital broadcast. SET UP Settings Menu Setting the language for the menus The menu display can be selected in the table "Computer input signals supported by this system" on page E-2 of Model Information...

Model Information
Page 26
... : ENGLISH BNC INPUT : COMPONENT D-SUB INPUT : RGB HD SELECT : 1080I RGB SELECT : AUTO DVI SET UP COLOR SYSTEM : AUTO BACK GROUND : BLACK GRAY LEVEL : 3 S1/S2 : OFF DISPLAY OSM : ON OSM ADJ. : TOP LEFT ALL RESET : OFF SEL. HIGH: When connected to the SET TOP BOX, DVD etc. Change "HIGH" into "LOW" if the black level appears gray. PAL: This is the standard format used mainly in Argentina...
... : ENGLISH BNC INPUT : COMPONENT D-SUB INPUT : RGB HD SELECT : 1080I RGB SELECT : AUTO DVI SET UP COLOR SYSTEM : AUTO BACK GROUND : BLACK GRAY LEVEL : 3 S1/S2 : OFF DISPLAY OSM : ON OSM ADJ. : TOP LEFT ALL RESET : OFF SEL. HIGH: When connected to the SET TOP BOX, DVD etc. Change "HIGH" into "LOW" if the black level appears gray. PAL: This is the standard format used mainly in Argentina...

Model Information
Page 27
... S-video signal is set to the 4:3 size. Example: Setting "S1/S2" to the factory default values. OFF: Turns the S1/S2 function off. On "ALL RESET" of "SET UP" menu, select "AUTO". ADJ. EXIT RETURN ALL RESET SETTING NOW When the "SETTING NOW" screen disappears, then all the settings (PICTURE, AUDIO, IMAGE ADJUST, SET UP, etc) to "AUTO" On "S1/S2" of "SET UP" menu, select "ON", then press the MENU/ENTER button. On "DISPLAY OSM" of "SET UP" menu...
... S-video signal is set to the 4:3 size. Example: Setting "S1/S2" to the factory default values. OFF: Turns the S1/S2 function off. On "ALL RESET" of "SET UP" menu, select "AUTO". ADJ. EXIT RETURN ALL RESET SETTING NOW When the "SETTING NOW" screen disappears, then all the settings (PICTURE, AUDIO, IMAGE ADJUST, SET UP, etc) to "AUTO" On "S1/S2" of "SET UP" menu, select "ON", then press the MENU/ENTER button. On "DISPLAY OSM" of "SET UP" menu...

Model Information
Page 28
... POWER/ STANDBY indicator The POWER/STANDBY indicator indicates the status of time. of the signal, scan and display all signals. synchronizing signals are not present. * Under conditions in which the sub screen has disappeared, the ZOOM NAV and PICTURE FREEZE functions will be used when using the computer's power management function, refer to the computer's operating instructions. Ⅵ Power management settings ON: In this mode the power management function is turned...
... POWER/ STANDBY indicator The POWER/STANDBY indicator indicates the status of time. of the signal, scan and display all signals. synchronizing signals are not present. * Under conditions in which the sub screen has disappeared, the ZOOM NAV and PICTURE FREEZE functions will be used when using the computer's power management function, refer to the computer's operating instructions. Ⅵ Power management settings ON: In this mode the power management function is turned...

Model Information
Page 32
... 12 11 Display Connector on -green Blue No connection Ground Red ground Green ground Blue ground No connection Sync signal ground No connection Bi-directional DATA (SDA) Horizontal sync or Composite sync Vertical sync Data clock DVI-D 24-pin connector (Digital) The unit is equipped with a type of the External Control Codes if needed. Pin Name Pin No. Note: Contact your local dealer for a full list of connector commonly used for digital. (This cannot...
... 12 11 Display Connector on -green Blue No connection Ground Red ground Green ground Blue ground No connection Sync signal ground No connection Bi-directional DATA (SDA) Horizontal sync or Composite sync Vertical sync Data clock DVI-D 24-pin connector (Digital) The unit is equipped with a type of the External Control Codes if needed. Pin Name Pin No. Note: Contact your local dealer for a full list of connector commonly used for digital. (This cannot...

Model Information
Page 33
... speakers properly. • Set AUDIO INPUT on the AUDIO menu correctly. • Adjust picture control as needed . Poor picture with new ones. • Plug the monitor's power cord into a power outlet? • Are all connections are no sound is produced. Part of picture is cut off ? • Are the remote control's batteries worn out? • Replace both batteries with new ones. • Plug the monitor's power cord into a power outlet? • Is the volume set at • Leave some other problem...
... speakers properly. • Set AUDIO INPUT on the AUDIO menu correctly. • Adjust picture control as needed . Poor picture with new ones. • Plug the monitor's power cord into a power outlet? • Are all connections are no sound is produced. Part of picture is cut off ? • Are the remote control's batteries worn out? • Replace both batteries with new ones. • Plug the monitor's power cord into a power outlet? • Is the volume set at • Leave some other problem...


