
User Manual
Page 3
...matériel brouilleur du Canada. Microsoft Windows screen shots are used to , the implied warranties of their respective owners. © Motorola, Inc. 2003 All other product or service... WR850G, WE800G, WA840G, WN825G, WPCI810G, and BR700 comply with Part 15 of the Canadian Interference Causing Equipment Regulations. Motorola provides this device must accept any time. Motorola may...all requirements of FCC Rules. Copyright © 2003 by permission of Conformity Motorola, Inc., Broadband Communications Sector, 101 Tournament Drive, Horsham, PA 19044, 1-215-323-1000, declares ...
...matériel brouilleur du Canada. Microsoft Windows screen shots are used to , the implied warranties of their respective owners. © Motorola, Inc. 2003 All other product or service... WR850G, WE800G, WA840G, WN825G, WPCI810G, and BR700 comply with Part 15 of the Canadian Interference Causing Equipment Regulations. Motorola provides this device must accept any time. Motorola may...all requirements of FCC Rules. Copyright © 2003 by permission of Conformity Motorola, Inc., Broadband Communications Sector, 101 Tournament Drive, Horsham, PA 19044, 1-215-323-1000, declares ...

User Manual
Page 4
... Home Network Diagram 1-5 Router Physical Description 1-6 Back of Router ...1-6 Front of Router ...1-8 LED Description 1-8 Section 2:Installation 2-1 Hardware Setup ...2-1 Router Physical Installation 2-1 Horizontal Installation ...2-1 Vertical Installation ...2-2 Wall Mount Installation 2-2 Electrical Connection to Router 2-6 Easy Software Setup 2-6 Manual Software Setup 2-6 Connection to Router 2-7 Configure Your Computers 2-8 Configuring Windows 98SE and ME 2-9 Configuring Windows 2000 2-11 Configuring Windows XP 2-13 Log In...
... Home Network Diagram 1-5 Router Physical Description 1-6 Back of Router ...1-6 Front of Router ...1-8 LED Description 1-8 Section 2:Installation 2-1 Hardware Setup ...2-1 Router Physical Installation 2-1 Horizontal Installation ...2-1 Vertical Installation ...2-2 Wall Mount Installation 2-2 Electrical Connection to Router 2-6 Easy Software Setup 2-6 Manual Software Setup 2-6 Connection to Router 2-7 Configure Your Computers 2-8 Configuring Windows 98SE and ME 2-9 Configuring Windows 2000 2-11 Configuring Windows XP 2-13 Log In...

User Manual
Page 21
... "talk" to configure the network settings for that PC. 2-8 SECTION 2, INSTALLATION Windows 2000 ! This section includes information on configuring computers with the following operating systems: ! Windows XP Determine the operating system for your network and follow the steps to the router. Windows 98SE ! SECTION 2 INSTALLATION You have to configure each computer you are including...
... "talk" to configure the network settings for that PC. 2-8 SECTION 2, INSTALLATION Windows 2000 ! This section includes information on configuring computers with the following operating systems: ! Windows XP Determine the operating system for your network and follow the steps to the router. Windows 98SE ! SECTION 2 INSTALLATION You have to configure each computer you are including...
User Manual
Page 22
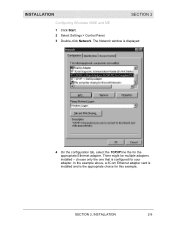
choose only the one that is configured for this example. In the example above, a 3Com Ethernet adapter card is installed and is displayed: 4 On the configuration tab, select the TCP/IP line the for the appropriate Ethernet adapter. INSTALLATION SECTION 2 Configuring Windows 98SE and ME 1 Click Start. 2 Select Settings > Control Panel. 3 Double-click Network. SECTION 2, INSTALLATION 2-9 The Network window is the appropriate choice for your adapter. There might be multiple adapters installed -
choose only the one that is configured for this example. In the example above, a 3Com Ethernet adapter card is installed and is displayed: 4 On the configuration tab, select the TCP/IP line the for the appropriate Ethernet adapter. INSTALLATION SECTION 2 Configuring Windows 98SE and ME 1 Click Start. 2 Select Settings > Control Panel. 3 Double-click Network. SECTION 2, INSTALLATION 2-9 The Network window is the appropriate choice for your adapter. There might be multiple adapters installed -
User Manual
Page 23
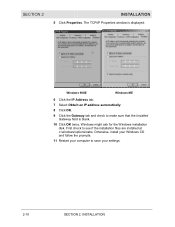
SECTION 2 INSTALLATION 5 Click Properties. Windows might ask for the Windows installation disk. First check to save your settings. 2-10 SECTION 2, INSTALLATION Otherwise, install your Windows CD and follow the prompts. 11 Restart your computer to see if the installation files are installed at c:\windows\options\cabs. The TCP/IP Properties window is displayed: Windows 98SE Windows ME 6 Click the IP Address tab. 7 Select Obtain an IP address automatically. 8 Click OK. 9 Click the Gateway tab and check to make sure that the Installed Gateway field is blank. 10 Click OK twice.
SECTION 2 INSTALLATION 5 Click Properties. Windows might ask for the Windows installation disk. First check to save your settings. 2-10 SECTION 2, INSTALLATION Otherwise, install your Windows CD and follow the prompts. 11 Restart your computer to see if the installation files are installed at c:\windows\options\cabs. The TCP/IP Properties window is displayed: Windows 98SE Windows ME 6 Click the IP Address tab. 7 Select Obtain an IP address automatically. 8 Click OK. 9 Click the Gateway tab and check to make sure that the Installed Gateway field is blank. 10 Click OK twice.

User Manual
Page 24
Double-click Local Area Connection. 4 Click the Properties button. INSTALLATION SECTION 2 Configuring Windows 2000 1 Click Start. 2 Select Settings. 3 Select Control Panel. Double-click Network and Dial-Up Connections. SECTION 2, INSTALLATION 2-11
Double-click Local Area Connection. 4 Click the Properties button. INSTALLATION SECTION 2 Configuring Windows 2000 1 Click Start. 2 Select Settings. 3 Select Control Panel. Double-click Network and Dial-Up Connections. SECTION 2, INSTALLATION 2-11

User Manual
Page 26
If you have retained the default interface for Windows 2000. 1 Click Start. 2 Select Settings. 3 Select Control Panel. 4 Double-click Network and Dial-Up Connections. SECTION 2, INSTALLATION 2-13 Configuring Windows XP This configuration assumes you are running the 'Classic' interface, please follow the instructions for Windows XP. INSTALLATION SECTION 2 6 Highlight Internet Protocol (TCP/IP) and click the Properties button. 7 Select Obtain an IP address automatically. Click OK twice to exit and save your settings. 8 Restart your computer to save your settings.
If you have retained the default interface for Windows 2000. 1 Click Start. 2 Select Settings. 3 Select Control Panel. 4 Double-click Network and Dial-Up Connections. SECTION 2, INSTALLATION 2-13 Configuring Windows XP This configuration assumes you are running the 'Classic' interface, please follow the instructions for Windows XP. INSTALLATION SECTION 2 6 Highlight Internet Protocol (TCP/IP) and click the Properties button. 7 Select Obtain an IP address automatically. Click OK twice to exit and save your settings. 8 Restart your computer to save your settings.
User Manual
Page 35
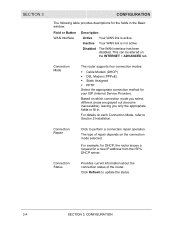
... active. Disabled The WAN interface has been disabled. This can be altered on each Connection Mode, refer to fill in the Basic window: Field or Button WAN Interface Description Active Your WAN link is not active. DSL Modem (PPPoE) ! Static Assigned ! Connection Repair... method for a new IP address from the ISP's DHCP server. Based on the connection mode selected. For example, for DHCP, the router issues a request for your ISP (Internet Service Provider). Click Refresh to perform a connection repair operation. SECTION 3 CONFIGURATION The following table ...
... active. Disabled The WAN interface has been disabled. This can be altered on each Connection Mode, refer to fill in the Basic window: Field or Button WAN Interface Description Active Your WAN link is not active. DSL Modem (PPPoE) ! Static Assigned ! Connection Repair... method for a new IP address from the ISP's DHCP server. Based on the connection mode selected. For example, for DHCP, the router issues a request for your ISP (Internet Service Provider). Click Refresh to perform a connection repair operation. SECTION 3 CONFIGURATION The following table ...

User Manual
Page 61
Time Zone Select your settings, 1 Click Backup. 2 From the pop-up window, choose the destination for Daylight Savings Time, select to have the unit adjust automatically for the file. 3 Enter a descriptive file name. To backup your local... click Browse and navigate to it. 2 Click Restore to cancel changes. Auto Daylight Adjust If you to its original configuration; SECTION 3 CONFIGURATION To reset the router to adjust time settings. Field Current Time Description The current time is enabled. 3-30 SECTION 3, CONFIGURATION The default is EST. To access the screen, click...
Time Zone Select your settings, 1 Click Backup. 2 From the pop-up window, choose the destination for Daylight Savings Time, select to have the unit adjust automatically for the file. 3 Enter a descriptive file name. To backup your local... click Browse and navigate to it. 2 Click Restore to cancel changes. Auto Daylight Adjust If you to its original configuration; SECTION 3 CONFIGURATION To reset the router to adjust time settings. Field Current Time Description The current time is enabled. 3-30 SECTION 3, CONFIGURATION The default is EST. To access the screen, click...

User Manual
Page 62
... time, select to view events (network activity, when it occurred, and a textual description) that occur on your settings or CANCEL to the router. Event Log The Event Log window enables you to enable this feature. Or, enter the host name or IP address for synchronization. The default is enabled. SECTION 3, CONFIGURATION 3-31...
... time, select to view events (network activity, when it occurred, and a textual description) that occur on your settings or CANCEL to the router. Event Log The Event Log window enables you to enable this feature. Or, enter the host name or IP address for synchronization. The default is enabled. SECTION 3, CONFIGURATION 3-31...
User Manual
Page 65
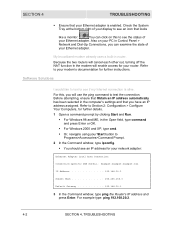
...my Internet connection is enabled. Refer to Section 2: Configuration > Configure Your Computers, for your router. For example type: ping 192.168.20.2. 4-2 SECTION 4, TROUBLESHOOTING For Windows 98 and ME, in router. IP Address 192.168.20.2 Subnet Mask 255.255.255.0 Default Gateway 192.168.20... command prompt by clicking Start and Run. ! For this to Programs>Accessories>Command Prompt. 2 In the Command window, type ipconfig. ! SECTION 4 TROUBLESHOOTING ! My broadband modem already uses a built-in the Open field, type command and press Enter or OK. !
...my Internet connection is enabled. Refer to Section 2: Configuration > Configure Your Computers, for your router. For example type: ping 192.168.20.2. 4-2 SECTION 4, TROUBLESHOOTING For Windows 98 and ME, in router. IP Address 192.168.20.2 Subnet Mask 255.255.255.0 Default Gateway 192.168.20... command prompt by clicking Start and Run. ! For this to Programs>Accessories>Command Prompt. 2 In the Command window, type ipconfig. ! SECTION 4 TROUBLESHOOTING ! My broadband modem already uses a built-in the Open field, type command and press Enter or OK. !

User Manual
Page 66
...: 192.168.20.3 and using a subnet mask of 192.168.20.1). I cannot access the Configuration Utility for more the 5 seconds. In the Command window, type ping and your PC. ! If you can verify the ISP's IP address at the Default Gateway field on the Internet > Basic screen. ! ... the router's user settings, including User ID, Password, IP Address, and Subnet mask. If you do this IP address. ! For example, type: ping 192.168.20.2. ! To do NOT receive a reply, try from a different computer to verify that the IP address of the problem. 4 In the Command window, type...
...: 192.168.20.3 and using a subnet mask of 192.168.20.1). I cannot access the Configuration Utility for more the 5 seconds. In the Command window, type ping and your PC. ! If you can verify the ISP's IP address at the Default Gateway field on the Internet > Basic screen. ! ... the router's user settings, including User ID, Password, IP Address, and Subnet mask. If you do this IP address. ! For example, type: ping 192.168.20.2. ! To do NOT receive a reply, try from a different computer to verify that the IP address of the problem. 4 In the Command window, type...
User Guide
Page 3
... of Microsoft Corporation. FCC Certification The WR850G/GP, WE800G, WA840G/GP, WN825G/...Wireless Devices In some situations or environments, the use of their respective owners. MOTOROLA and the Stylized M Logo are not liable for a particular purpose. FCC Declaration of Conformity Motorola, Inc., Broadband...Wireless Ethernet Compatibility Alliance, Inc. Microsoft, Windows, Windows Me, Windows XP, Windows 95, Windows 98, Windows NT, Windows 2000, DirectX, MSN, and NetMeeting are used to make changes in any derivative work (such as Class B digital devices. Copyright © 2005 Motorola...
... of Microsoft Corporation. FCC Certification The WR850G/GP, WE800G, WA840G/GP, WN825G/...Wireless Devices In some situations or environments, the use of their respective owners. MOTOROLA and the Stylized M Logo are not liable for a particular purpose. FCC Declaration of Conformity Motorola, Inc., Broadband...Wireless Ethernet Compatibility Alliance, Inc. Microsoft, Windows, Windows Me, Windows XP, Windows 95, Windows 98, Windows NT, Windows 2000, DirectX, MSN, and NetMeeting are used to make changes in any derivative work (such as Class B digital devices. Copyright © 2005 Motorola...
User Guide
Page 4
... Description ...1-8 Section 2: Installation 2-1 Physical Installation of the WR850 2-1 Positioning Your Router for Optimal Wireless Performance 2-1 Hardware Setup ...2-2 Antenna Installation ...2-2 Physical Placement...2-2 Electrical Connection ...2-6 Establishing Your First Connection to Communicate with the WR850 2-11 Configuring Windows 98SE and ME 2-12 Configuring Windows 2000 ...2-14 Configuring Windows XP ...2-17 Section 3: Configuration 3-1 Accessing the Web-Based Configuration Utility...
... Description ...1-8 Section 2: Installation 2-1 Physical Installation of the WR850 2-1 Positioning Your Router for Optimal Wireless Performance 2-1 Hardware Setup ...2-2 Antenna Installation ...2-2 Physical Placement...2-2 Electrical Connection ...2-6 Establishing Your First Connection to Communicate with the WR850 2-11 Configuring Windows 98SE and ME 2-12 Configuring Windows 2000 ...2-14 Configuring Windows XP ...2-17 Section 3: Configuration 3-1 Accessing the Web-Based Configuration Utility...
User Guide
Page 23
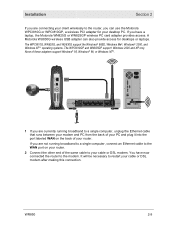
... Reset Power LAN 4 3 2 1 WAN Antenna 1 If you are currently running broadband to a single computer, connect an Ethernet cable to the WAN port on your router. 2 Connect the other end of the same cable to a single computer, unplug ...Windows® 95, Windows® 98, or Windows NT®. Installation Section 2 If you are connecting your client wirelessly to restart your cable or DSL modem after making this connection. A Motorola WU830G wireless USB adapter can use the Motorola WPCI810G or WPCI810GP, a wireless PCI adapter for desktops or laptops. None of your router...
... Reset Power LAN 4 3 2 1 WAN Antenna 1 If you are currently running broadband to a single computer, connect an Ethernet cable to the WAN port on your router. 2 Connect the other end of the same cable to a single computer, unplug ...Windows® 95, Windows® 98, or Windows NT®. Installation Section 2 If you are connecting your client wirelessly to restart your cable or DSL modem after making this connection. A Motorola WU830G wireless USB adapter can use the Motorola WPCI810G or WPCI810GP, a wireless PCI adapter for desktops or laptops. None of your router...
User Guide
Page 25
...on configuring computers with the following operating systems: ƒ Windows® 98SE ƒ Windows Me® ƒ Windows® 2000 ƒ Windows XP™ Determine the operating system for each PC's network settings to communicate with the router. To do this, you may need to configure each ...adjust any other changes to making any and all configuration options as "commonly used" or "recommended". This section includes information on your wireless network, and re-connect securely to the WR850, prior to the WR850. Installation Section 2 5 Once the PC is recommended that ...
...on configuring computers with the following operating systems: ƒ Windows® 98SE ƒ Windows Me® ƒ Windows® 2000 ƒ Windows XP™ Determine the operating system for each PC's network settings to communicate with the router. To do this, you may need to configure each ...adjust any other changes to making any and all configuration options as "commonly used" or "recommended". This section includes information on your wireless network, and re-connect securely to the WR850, prior to the WR850. Installation Section 2 5 Once the PC is recommended that ...

User Guide
Page 26
Section 2 Configuring Windows 98SE and ME 1 Click Start. 2 Select Settings > Control Panel. 3 Double-click Network. choose only the one that is configured for the appropriate wired or wireless Ethernet adapter on your adapter. Installation 4 On the Configuration tab, select the TCP/IP line the for your PC. In the example above, a 3Com Ethernet adapter card is installed and is displayed. The Network window is the appropriate choice. 2-12 WR850 There may be multiple adapters installed -
Section 2 Configuring Windows 98SE and ME 1 Click Start. 2 Select Settings > Control Panel. 3 Double-click Network. choose only the one that is configured for the appropriate wired or wireless Ethernet adapter on your adapter. Installation 4 On the Configuration tab, select the TCP/IP line the for your PC. In the example above, a 3Com Ethernet adapter card is installed and is displayed. The Network window is the appropriate choice. 2-12 WR850 There may be multiple adapters installed -

User Guide
Page 27
Section 2 Windows 98SE Windows ME 6 Click the IP Address tab. 7 Select Obtain an IP address automatically. 8 Click OK. 9 Click the Gateway tab and confirm that the Installed Gateway field is displayed. Windows may ask for the Windows Installation disk. First check to save your settings. WR850 2-13 Installation 5 Click Properties. The TCP/IP Properties window is blank. 10 Click OK twice. Otherwise, load your Windows CD and follow the prompts. 11 Restart your computer to see if the installation files are installed at c:\windows\options\cabs.
Section 2 Windows 98SE Windows ME 6 Click the IP Address tab. 7 Select Obtain an IP address automatically. 8 Click OK. 9 Click the Gateway tab and confirm that the Installed Gateway field is displayed. Windows may ask for the Windows Installation disk. First check to save your settings. WR850 2-13 Installation 5 Click Properties. The TCP/IP Properties window is blank. 10 Click OK twice. Otherwise, load your Windows CD and follow the prompts. 11 Restart your computer to see if the installation files are installed at c:\windows\options\cabs.

User Guide
Page 28
Section 2 Installation Configuring Windows 2000 1 Click Start. 2 Select Settings. 3 Select Control Panel. 4 Double-click Network and Dial-Up Connections. 5 Double-click the Local Area Connection appropriate for your wired or wireless Ethernet adapter. 6 Click Properties. 2-14 WR850
Section 2 Installation Configuring Windows 2000 1 Click Start. 2 Select Settings. 3 Select Control Panel. 4 Double-click Network and Dial-Up Connections. 5 Double-click the Local Area Connection appropriate for your wired or wireless Ethernet adapter. 6 Click Properties. 2-14 WR850

User Guide
Page 29
WR850 2-15 Section 2 7 Ensure the box next to Internet Protocol (TCP/IP) is displayed. Installation The Local Area Properties window is selected. 8 Click to highlight Internet Protocol (TCP/IP) and click Properties.
WR850 2-15 Section 2 7 Ensure the box next to Internet Protocol (TCP/IP) is displayed. Installation The Local Area Properties window is selected. 8 Click to highlight Internet Protocol (TCP/IP) and click Properties.

