
User Manual
Page 3
...! Registration is an important step. Product registration is not required for your purchase of your Motorola product require an update or other service. Registering helps us facilitate warranty service and permits us to contact you will need to confirm warranty status. ... receipt for warranty coverage. For product-related questions, call: 1-800-353-2729 in the USA 1-888-390-6456 TTY (Text Telephone) On the Web: www.motorola.com/talkabout 1 To register your product on your records. Introduction Introduction Congratulations on -line, visit www...
...! Registration is an important step. Product registration is not required for your purchase of your Motorola product require an update or other service. Registering helps us facilitate warranty service and permits us to contact you will need to confirm warranty status. ... receipt for warranty coverage. For product-related questions, call: 1-800-353-2729 in the USA 1-888-390-6456 TTY (Text Telephone) On the Web: www.motorola.com/talkabout 1 To register your product on your records. Introduction Introduction Congratulations on -line, visit www...
User Manual
Page 4
... . . .12 Battery Meter 13 Using the Desk Stand Charger (Optional Accessory 13 Attaching the Belt Clip 15 Removing the Belt Clip 15 Turning Your Radio On and Off . . . . .15 Setting the Volume 15 Setting a Channel 16 Channels and Frequencies 16 Weather Channels and Frequencies .17 Talking ... Removing Channels from the Scan List (Nuisance Delete Feature 21 Handsfree Use Without Accessories (iVox 22 Handsfree Use With Accessories (VOX 22 Weather (Model T5950 Only 23 Turning Weather Channel Reception On and Off 23 Setting the Weather Channel 24 Turning Keypad Beeps On/Off . . . . . 24...
... . . .12 Battery Meter 13 Using the Desk Stand Charger (Optional Accessory 13 Attaching the Belt Clip 15 Removing the Belt Clip 15 Turning Your Radio On and Off . . . . .15 Setting the Volume 15 Setting a Channel 16 Channels and Frequencies 16 Weather Channels and Frequencies .17 Talking ... Removing Channels from the Scan List (Nuisance Delete Feature 21 Handsfree Use Without Accessories (iVox 22 Handsfree Use With Accessories (VOX 22 Weather (Model T5950 Only 23 Turning Weather Channel Reception On and Off 23 Setting the Weather Channel 24 Turning Keypad Beeps On/Off . . . . . 24...
User Manual
Page 5
Transmit and Receive Procedure Your two-way radio contains a transmitter and a receiver. Exposure to Radio Frequency Energy Your Motorola radio is important because the radio generates measurable RF energy exposure only when transmitting (in user guides published prior to December 1, 2002... and international standards and guidelines regarding exposure of Federal Regulations; 47 CFR part 2 sub- Read This Information Before Using Your Radio. part J 3 Safety and General Information Safety and General Information Important Information on Safe and Efficient Operation. To control your ...
Transmit and Receive Procedure Your two-way radio contains a transmitter and a receiver. Exposure to Radio Frequency Energy Your Motorola radio is important because the radio generates measurable RF energy exposure only when transmitting (in user guides published prior to December 1, 2002... and international standards and guidelines regarding exposure of Federal Regulations; 47 CFR part 2 sub- Read This Information Before Using Your Radio. part J 3 Safety and General Information Safety and General Information Important Information on Safe and Efficient Operation. To control your ...
User Manual
Page 6
...• International Commission on Non-Ionizing Radiation Protection (ICNIRP) 1998 • Ministry of Human Exposure to Radio Frequency Electromagnetic Fields in the Frequency Range from the lips. 4 Human Exposure) Standard 2001 (applicable to the following procedures. To ... (April 11, 2001) "additional requirements for SMR, cellular, and PCS product certification." Two-Way Radio Operation When using your radio as a traditional two-way radio, hold the antenna when the radio is within the guidelines set forth in a vertical position with the microphone 1 to 2 inches (2.5...
...• International Commission on Non-Ionizing Radiation Protection (ICNIRP) 1998 • Ministry of Human Exposure to Radio Frequency Electromagnetic Fields in the Frequency Range from the lips. 4 Human Exposure) Standard 2001 (applicable to the following procedures. To ... (April 11, 2001) "additional requirements for SMR, cellular, and PCS product certification." Two-Way Radio Operation When using your radio as a traditional two-way radio, hold the antenna when the radio is within the guidelines set forth in a vertical position with the microphone 1 to 2 inches (2.5...
User Manual
Page 7
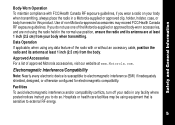
... Facilities To avoid electromagnetic interference and/or compatibility conflicts, turn off your body when transmitting, always place the radio in any data feature of the Motorola-supplied or approved body-worn accessories, and are not using equipment that is susceptible to external RF energy. 5... Approved Accessories For a list of non-Motorola-approved accessories may be using the radio held in the normal use one of the radio with FCC/Health Canada RF exposure guidelines, if you wear a radio on your radio in a Motorola-supplied or approved clip, holder, holster, case,...
... Facilities To avoid electromagnetic interference and/or compatibility conflicts, turn off your body when transmitting, always place the radio in any data feature of the Motorola-supplied or approved body-worn accessories, and are not using equipment that is susceptible to external RF energy. 5... Approved Accessories For a list of non-Motorola-approved accessories may be using the radio held in the normal use one of the radio with FCC/Health Canada RF exposure guidelines, if you wear a radio on your radio in a Motorola-supplied or approved clip, holder, holster, case,...
User Manual
Page 8
...assist you may interfere with pacemakers should: • ALWAYS keep the radio more than 6 inches (15 cm) from RF energy. Food and Drug Administration. Hearing Aids Some digital wireless radios may want to consult your hearing aid manufacturer to discuss alternatives. ... interference is adequately shielded from their pacemaker when the radio is turned ON. • Not carry the radio in accordance with the independent research by, and recommendations of a radio must be maintained between a handheld wireless radio and a pacemaker. Safety and General Information Aircraft When...
...assist you may interfere with pacemakers should: • ALWAYS keep the radio more than 6 inches (15 cm) from RF energy. Food and Drug Administration. Hearing Aids Some digital wireless radios may want to consult your hearing aid manufacturer to discuss alternatives. ... interference is adequately shielded from their pacemaker when the radio is turned ON. • Not carry the radio in accordance with the independent research by, and recommendations of a radio must be maintained between a handheld wireless radio and a pacemaker. Safety and General Information Aircraft When...

User Manual
Page 9
... driving and to the road. • Use handsfree operation, if available. • Pull off your radio prior to entering any area with a potentially explosive atmosphere, unless it is a radio type especially qualified for use of the vehicle. Safety and General Use While Driving Safety and General Information .... Operational Warnings For Vehicles with great force and cause serious injury to occupants of radios in the area where you would normally be propelled with an Air Bag Do not place a portable radio in the area over an air bag or in such areas. Sparks in a potentially...
... driving and to the road. • Use handsfree operation, if available. • Pull off your radio prior to entering any area with a potentially explosive atmosphere, unless it is a radio type especially qualified for use of the vehicle. Safety and General Use While Driving Safety and General Information .... Operational Warnings For Vehicles with great force and cause serious injury to occupants of radios in the area where you would normally be propelled with an Air Bag Do not place a portable radio in the area over an air bag or in such areas. Sparks in a potentially...
User Manual
Page 10
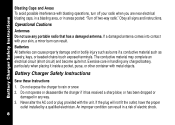
... electrical circuit (short circuit) and become quite hot. Do not expose the charger to rain or snow. 2. If a damaged antenna comes into contact with your radio when you are near electrical blasting caps, in a blasting area, or in a risk of electric shock. 8 Battery Charger Safety Instructions Save these Instructions 1. Never alter... or plug provided with the unit. Battery Charger Safety Instructions Blasting Caps and Areas To avoid possible interference with blasting operations, turn off two-way radio." Operational Cautions Antennas Do not use any portable...
... electrical circuit (short circuit) and become quite hot. Do not expose the charger to rain or snow. 2. If a damaged antenna comes into contact with your radio when you are near electrical blasting caps, in a blasting area, or in a risk of electric shock. 8 Battery Charger Safety Instructions Save these Instructions 1. Never alter... or plug provided with the unit. Battery Charger Safety Instructions Blasting Caps and Areas To avoid possible interference with blasting operations, turn off two-way radio." Operational Cautions Antennas Do not use any portable...
User Manual
Page 12
...Changes or modifications not expressly approved by Motorola may be prohibited. 10 Note: Use of the Federal Communications Commission (FCC). FCC Licensing Information FCC Licensing Information Your Motorola radio operates on General Mobile Radio Service (GMRS) frequencies and is subject to the Rules... and Regulations of this radio outside the country where it was intended to be distributed is ...
...Changes or modifications not expressly approved by Motorola may be prohibited. 10 Note: Use of the Federal Communications Commission (FCC). FCC Licensing Information FCC Licensing Information Your Motorola radio operates on General Mobile Radio Service (GMRS) frequencies and is subject to the Rules... and Regulations of this radio outside the country where it was intended to be distributed is ...
User Manual
Page 14
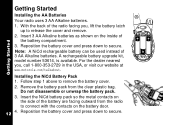
... Battery Pack 1. Getting Started Getting Started Installing the AA Batteries Your radio uses 3 AA Alkaline batteries. 1. Note: A NiCd rechargeable battery can be used instead of the radio facing you , call 1-800-353-2729 in the USA, or visit our website at www.motorola.com/talkabout. Reposition the battery cover and press down to secure... clear plastic bag. With the back of 3 AA Alkaline batteries. For the dealer nearest you , lift the battery latch up to remove the battery cover. 2. A rechargeable battery upgrade kit, model number 53614, is available.
... Battery Pack 1. Getting Started Getting Started Installing the AA Batteries Your radio uses 3 AA Alkaline batteries. 1. Note: A NiCd rechargeable battery can be used instead of the radio facing you , call 1-800-353-2729 in the USA, or visit our website at www.motorola.com/talkabout. Reposition the battery cover and press down to secure... clear plastic bag. With the back of 3 AA Alkaline batteries. For the dealer nearest you , lift the battery latch up to remove the battery cover. 2. A rechargeable battery upgrade kit, model number 53614, is available.
User Manual
Page 15
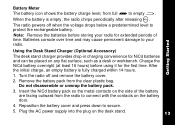
..., from full d to your radio for the first time. Turn the radio off when the voltage drops below a predetermined level to secure. 5. The radio powers off and remove the battery cover. 2. Reposition the battery cover and press down to protect the rechargeable battery. When the battery is... fully charged within 14 hours. 1. Charge the NiCd battery overnight (at least 16 hours) before storing your radio. Plug the AC power supply into the plug on any flat surface...
..., from full d to your radio for the first time. Turn the radio off when the voltage drops below a predetermined level to secure. 5. The radio powers off and remove the battery cover. 2. Reposition the battery cover and press down to protect the rechargeable battery. When the battery is... fully charged within 14 hours. 1. Charge the NiCd battery overnight (at least 16 hours) before storing your radio. Plug the AC power supply into the plug on any flat surface...
User Manual
Page 16
...contacts inside the charger, then insert the battery pack into a standard wall outlet. Plug the AC power supply into one of the charging pockets. With a radio facing forward, slide it into a standard wall outlet. 7. Do not disassemble or unwrap the battery pack. 2. Notes: • When moving between hot..., do not charge the battery until the battery temperature acclimates (usually about 20 minutes). • For optimal battery life, remove the radio or battery from the charger pockets. 8. Remove the charger pocket inserts from the charger within 16 hours. Do not store the...
...contacts inside the charger, then insert the battery pack into a standard wall outlet. Plug the AC power supply into one of the charging pockets. With a radio facing forward, slide it into a standard wall outlet. 7. Do not disassemble or unwrap the battery pack. 2. Notes: • When moving between hot..., do not charge the battery until the battery temperature acclimates (usually about 20 minutes). • For optimal battery life, remove the radio or battery from the charger pockets. 8. Remove the charger pocket inserts from the charger within 16 hours. Do not store the...
User Manual
Page 17
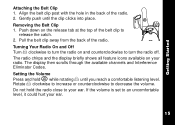
... the catch. 2. Align the belt clip post with the hole in the back of the radio. Pull the belt clip away from the back of the radio. 2. Setting the Volume Press and hold the radio close to an uncomfortable level, it could hurt your ear. Push down on your... radio. Turning Your Radio On and Off Turn P clockwise to turn the radio on and counterclockwise to decrease the volume. Rotate P clockwise to increase or counterclockwise to turn the radio off. The display then scrolls through the available channels and Interference...
... the catch. 2. Align the belt clip post with the hole in the back of the radio. Pull the belt clip away from the back of the radio. 2. Setting the Volume Press and hold the radio close to an uncomfortable level, it could hurt your ear. Push down on your... radio. Turning Your Radio On and Off Turn P clockwise to turn the radio on and counterclockwise to decrease the volume. Rotate P clockwise to increase or counterclockwise to turn the radio off. The display then scrolls through the available channels and Interference...
User Manual
Page 18
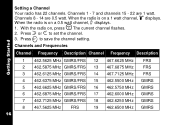
... MHz FRS 4 462.6375 MHz GMRS/FRS 15 462.5500 MHz GMRS 5 462.6625 MHz GMRS/FRS 16 462.5750 MHz GMRS 6 462.6875 MHz GMRS/FRS 17 462.6000 MHz GMRS 7 462.7125 MHz GMRS/FRS 18 462.6250 MHz GMRS 8 467.5625 MHz FRS 16 19 462.6500 MHz GMRS When the radio is on a 0.5 watt channel, y ...displays. 1. Press ] or [ to save the channel setting. The current channel flashes. 2. Channels 1 - 7 and channels 15 - 22 are 0.5 watt. When the radio is on , ...
... MHz FRS 4 462.6375 MHz GMRS/FRS 15 462.5500 MHz GMRS 5 462.6625 MHz GMRS/FRS 16 462.5750 MHz GMRS 6 462.6875 MHz GMRS/FRS 17 462.6000 MHz GMRS 7 462.7125 MHz GMRS/FRS 18 462.6250 MHz GMRS 8 467.5625 MHz FRS 16 19 462.6500 MHz GMRS When the radio is on a 0.5 watt channel, y ...displays. 1. Press ] or [ to save the channel setting. The current channel flashes. 2. Channels 1 - 7 and channels 15 - 22 are 0.5 watt. When the radio is on , ...
User Manual
Page 20
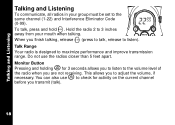
... and Interference Eliminator Code (0-99). 2299 To talk, press and hold M. Talking and Listening Talking and Listening To communicate, all radios in your mouth when talking. Hold the radio 2 to adjust the volume, if necessary. Do not use J to check for 3 seconds allows you to listen to the ...volume level of the radio when you finish talking, release M (press to talk, release to listen). You can also use the radios closer than 5 feet apart. Monitor Button Pressing and holding J for activity on the current channel...
... and Interference Eliminator Code (0-99). 2299 To talk, press and hold M. Talking and Listening Talking and Listening To communicate, all radios in your mouth when talking. Hold the radio 2 to adjust the volume, if necessary. Do not use J to check for 3 seconds allows you to listen to the ...volume level of the radio when you finish talking, release M (press to talk, release to listen). You can also use the radios closer than 5 feet apart. Monitor Button Pressing and holding J for activity on the current channel...

User Manual
Page 21
...prevent accidental transmissions and save the code setting. Codes 39-99 are the standard codes that appear on a radio that uses Interference Eliminator Codes to 0 on other FRS/GMRS radios. You can quickly reach the code you to select the code. 3. Note: You must set the ...Interference Eliminator Code to communicate with radios that do not have Interference Eliminator Codes. Codes 1-38 are additional digital codes ...
...prevent accidental transmissions and save the code setting. Codes 39-99 are the standard codes that appear on a radio that uses Interference Eliminator Codes to 0 on other FRS/GMRS radios. You can quickly reach the code you to select the code. 3. Note: You must set the ...Interference Eliminator Code to communicate with radios that do not have Interference Eliminator Codes. Codes 1-38 are additional digital codes ...
User Manual
Page 22
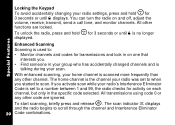
... changed channels and is no longer displayed. If you . • Find someone in on one that interests you activate scan while your radio's Interference Eliminator Code is set to when you started to scan. All other code are locked. All transmissions using code 0 or any ...other channel. Special Features Locking the Keypad To avoid accidentally changing your radio settings, press and hold \ for 3 seconds or until f displays. To unlock the radio, press and hold \ for activity on and off, adjust the volume, receive, transmit, send a call...
... changed channels and is no longer displayed. If you . • Find someone in on one that interests you activate scan while your radio's Interference Eliminator Code is set to when you started to scan. All other code are locked. All transmissions using code 0 or any ...other channel. Special Features Locking the Keypad To avoid accidentally changing your radio settings, press and hold \ for 3 seconds or until f displays. To unlock the radio, press and hold \ for activity on and off, adjust the volume, receive, transmit, send a call...
User Manual
Page 23
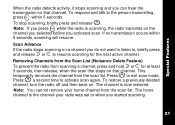
... the scan first stops on that channel. If no transmission occurs within 5 seconds. Scan Advance If the radio stops scanning on that channel. To restore a previously deleted channel, turn the radio off and then back on the channel you selected before you activated scan. Press J a second time to... The channel is the channel your home channel from the scan list. Note: If you press M while the radio is scanning, the radio transmits on . Note: You cannot remove your radio was set to activate scan again. The home channel is now restored. To stop scanning, briefly press and release...
... the scan first stops on that channel. If no transmission occurs within 5 seconds. Scan Advance If the radio stops scanning on that channel. To restore a previously deleted channel, turn the radio off and then back on the channel you selected before you activated scan. Press J a second time to... The channel is the channel your home channel from the scan list. Note: If you press M while the radio is scanning, the radio transmits on . Note: You cannot remove your radio was set to activate scan again. The home channel is now restored. To stop scanning, briefly press and release...
User Manual
Page 24
... the use the iVox feature to transmit handsfree without the need for accessory port location). 2. Turn the radio on the radio. To temporarily disable iVox, press M. To turn the radio off , press Mor remove the audio accessory. 22 Handsfree Use With Accessories (VOX) You can use .... Once VOX is a short delay between the time you speak. 1. Note: There is turned on, the radio detects your voice and transmits when you start talking and when the radio transmits. There is a short delay before the transmission is turned on the display. 3. g flashes intermittently. 4....
... the use the iVox feature to transmit handsfree without the need for accessory port location). 2. Turn the radio on the radio. To temporarily disable iVox, press M. To turn the radio off , press Mor remove the audio accessory. 22 Handsfree Use With Accessories (VOX) You can use .... Once VOX is a short delay between the time you speak. 1. Note: There is turned on, the radio detects your voice and transmits when you start talking and when the radio transmits. There is a short delay before the transmission is turned on the display. 3. g flashes intermittently. 4....

User Manual
Page 25
... Weatheradio logo provide an endorsement or implied endorsement by the United States National Oceanic and Atmospheric Administration (NOAA) Weather Radio and Environment Canada Weatheradio. Weather (Model T5950 Only) Weather (Model T5950 Only) Your radio can tune in Canada to cover specific areas and service may be limited. The use of the NOAA logo does...
... Weatheradio logo provide an endorsement or implied endorsement by the United States National Oceanic and Atmospheric Administration (NOAA) Weather Radio and Environment Canada Weatheradio. Weather (Model T5950 Only) Weather (Model T5950 Only) Your radio can tune in Canada to cover specific areas and service may be limited. The use of the NOAA logo does...


