User Guide
Page 3
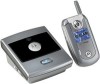
SD7501/02 User Guide Table of Contents Important Safety Instructions viii Welcome ...1 Handset Overview ...2 Handset Charger Overview 3 SD7501 Main Menu Display Overview 4 SD7501 Caller ID Display Overview 4 SD7502 Main Menu Display Overview 5 SD7502 Caller ID Display Overview 6 Battery Safety Instructions 7 Installing the Handset Battery 8 Selecting a Location for Your Handset Charger 9 Connecting the Handset Charger 10 Charging the Handset Battery 10 How to Use this Guide ...11 Registering a New Handset 12 i
SD7501/02 User Guide Table of Contents Important Safety Instructions viii Welcome ...1 Handset Overview ...2 Handset Charger Overview 3 SD7501 Main Menu Display Overview 4 SD7501 Caller ID Display Overview 4 SD7502 Main Menu Display Overview 5 SD7502 Caller ID Display Overview 6 Battery Safety Instructions 7 Installing the Handset Battery 8 Selecting a Location for Your Handset Charger 9 Connecting the Handset Charger 10 Charging the Handset Battery 10 How to Use this Guide ...11 Registering a New Handset 12 i
User Guide
Page 16
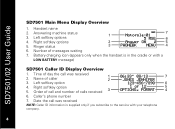
... waiting 7. SD7501/02 User Guide SD7501 Main Menu Display Overview 1. Left softkey options 4. Number of caller 3. Left softkey option 4. Right softkey options 5. Right softkey option 5. Battery charging icon (appears only when the handset is supplied only if you subscribe to the service with a LOW...
... waiting 7. SD7501/02 User Guide SD7501 Main Menu Display Overview 1. Left softkey options 4. Number of caller 3. Left softkey option 4. Right softkey options 5. Right softkey option 5. Battery charging icon (appears only when the handset is supplied only if you subscribe to the service with a LOW...
User Guide
Page 17
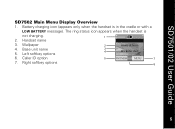
SD7501/02 User Guide SD7502 Main Menu Display Overview 1. Base unit name 5. Handset name 3. Left softkey options 2 HANDSET-B-03 3 4 MY BASE UNIT 6. Caller ID option 5 PHONEBK cid MENU 7 7. Battery charging icon (appears only when the handset is not charging. 1 2. The ring status icon appears when the handset is in the cradle or with a LOW BATTERY message). Wallpaper 4. Right softkey options 6 5 5
SD7501/02 User Guide SD7502 Main Menu Display Overview 1. Base unit name 5. Handset name 3. Left softkey options 2 HANDSET-B-03 3 4 MY BASE UNIT 6. Caller ID option 5 PHONEBK cid MENU 7 7. Battery charging icon (appears only when the handset is not charging. 1 2. The ring status icon appears when the handset is in the cradle or with a LOW BATTERY message). Wallpaper 4. Right softkey options 6 5 5
User Guide
Page 18
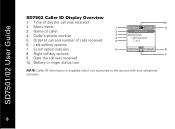
Name of 5 6 OPTIONS FORMAT 8 7 NOTE: Caller ID information is supplied only if you subscribe to the service with your telephone company. 6 6 Scroll option indicator 8. Caller's phone number 5. Right softkey options 9. Order of calls received 6. Date the call was received 2. Time of day the call and number of call was received 10. SD7501/02 User Guide SD7502 Caller ID Display Overview 1. Left softkey options 7. Battery or ringer status icon 10 1 02:10pm 12/28 9 2 Recent Calls 3 MOTOROLA 4 1-800-xxx-xxxx 5 1 of caller 4. Menu name 3.
Name of 5 6 OPTIONS FORMAT 8 7 NOTE: Caller ID information is supplied only if you subscribe to the service with your telephone company. 6 6 Scroll option indicator 8. Caller's phone number 5. Right softkey options 9. Order of calls received 6. Date the call was received 2. Time of day the call and number of call was received 10. SD7501/02 User Guide SD7502 Caller ID Display Overview 1. Left softkey options 7. Battery or ringer status icon 10 1 02:10pm 12/28 9 2 Recent Calls 3 MOTOROLA 4 1-800-xxx-xxxx 5 1 of caller 4. Menu name 3.
User Guide
Page 19
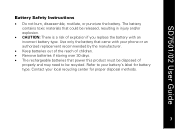
... must be disposed of children. • Remove batteries if storing over 30 days. • The rechargeable batteries that could be recycled. SD7501/02 User Guide Battery Safety Instructions • Do not burn, disassemble, mutilate, or puncture the battery. Use only the battery that came with an incorrect battery type. Contact your battery's label for proper disposal methods. 7 7
... must be disposed of children. • Remove batteries if storing over 30 days. • The rechargeable batteries that could be recycled. SD7501/02 User Guide Battery Safety Instructions • Do not burn, disassemble, mutilate, or puncture the battery. Use only the battery that came with an incorrect battery type. Contact your battery's label for proper disposal methods. 7 7

User Guide
Page 20
Replace the battery door. 6. Attach the belt clip (optional). 8 8 Insert the battery into the receptacle. (Make sure the black wire is on the indentation and sliding downward. 3. Remove the battery door by pressing down on the right.) 4. Remove any stickers or inserts, if present. 2. SD7501/02 User Guide Installing the Handset Battery 1. Plug the battery connector into the battery compartment. 5.
Replace the battery door. 6. Attach the belt clip (optional). 8 8 Insert the battery into the receptacle. (Make sure the black wire is on the indentation and sliding downward. 3. Remove the battery door by pressing down on the right.) 4. Remove any stickers or inserts, if present. 2. SD7501/02 User Guide Installing the Handset Battery 1. Plug the battery connector into the battery compartment. 5.

User Guide
Page 22
... you press the keys), charge the handset. 10 10 NOTE: The handset charger does not require a phone line. Charging the Handset Battery To charge the battery, place the handset in use to place the handset in its charger when not in the charger's handset cradle. After the initial charge..., a maintenance charge of the charger. 2. NOTE: If your handset displays a LOW BATTERY message, or the handset appears inactive, (the LCD is 10-12 hours. Be sure to insure maximum daily performance. SD7501/02 User Guide Connecting ...
... you press the keys), charge the handset. 10 10 NOTE: The handset charger does not require a phone line. Charging the Handset Battery To charge the battery, place the handset in use to place the handset in its charger when not in the charger's handset cradle. After the initial charge..., a maintenance charge of the charger. 2. NOTE: If your handset displays a LOW BATTERY message, or the handset appears inactive, (the LCD is 10-12 hours. Be sure to insure maximum daily performance. SD7501/02 User Guide Connecting ...
User Guide
Page 27
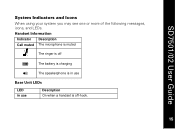
Handset Information Indicator Description Call muted The microphone is muted The ringer is off E The battery is charging v The speakerphone is in use Base Unit LEDs LED in use Description On when a handset is off-hook. 1155 SD7501/02 User Guide System Indicators and Icons When using your system you may see one or more of the following messages, icons, and LEDs.
Handset Information Indicator Description Call muted The microphone is muted The ringer is off E The battery is charging v The speakerphone is in use Base Unit LEDs LED in use Description On when a handset is off-hook. 1155 SD7501/02 User Guide System Indicators and Icons When using your system you may see one or more of the following messages, icons, and LEDs.
User Guide
Page 47
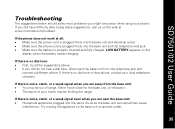
...hear a dial tone, disconnect the base unit from the base unit: • You may be out of your local telephone company. LOW BATTERY appears on the display when the battery needs charging. If there is properly inserted and fully charged. Either move closer to another outlet. If you might encounter while using... plugged into the base unit and the telephone wall jack. • Make sure the battery is no dial tone on that phone, contact your home may be limiting the range. If the phone does not work at www.motorola.com/cordless. If there is no dial tone: • First, try all : &#...
...hear a dial tone, disconnect the base unit from the base unit: • You may be out of your local telephone company. LOW BATTERY appears on the display when the battery needs charging. If there is properly inserted and fully charged. Either move closer to another outlet. If you might encounter while using... plugged into the base unit and the telephone wall jack. • Make sure the battery is no dial tone on that phone, contact your home may be limiting the range. If the phone does not work at www.motorola.com/cordless. If there is no dial tone: • First, try all : &#...

User Guide
Page 48
...with the base. 36 36 If it does not seem to re-establish its base. Wait a few minutes. 4. Disconnect the handset and base backup battery. 3. Connect power to the base. 2. If you still hear other calls while using your phone: • Disconnect your local telephone company. Re-install... the battery. 6. Wait approximately 60 seconds for Your Cordless Phone If the handset or base unit does not seem to the base unit. Disconnect the power...
...with the base. 36 36 If it does not seem to re-establish its base. Wait a few minutes. 4. Disconnect the handset and base backup battery. 3. Connect power to the base. 2. If you still hear other calls while using your phone: • Disconnect your local telephone company. Re-install... the battery. 6. Wait approximately 60 seconds for Your Cordless Phone If the handset or base unit does not seem to the base unit. Disconnect the power...

User Guide
Page 49
... unless otherwise provided for below. • Decorative Accessories and Cases. Applies only to new Motorola Products, Accessories, and Software purchased by this limited warranty. Only batteries whose fully charged capacity falls below . Subject to the consumer, whichever is a consumer's exclusive...and applies as defined above, unless otherwise provided for below. Periodic maintenance, repair, and replacement of their rated capacity and batteries that leak are covered by consumers in the United States or Canada What Does this Warranty Cover? Decorative covers, bezels, PhoneWrap...
... unless otherwise provided for below. • Decorative Accessories and Cases. Applies only to new Motorola Products, Accessories, and Software purchased by this limited warranty. Only batteries whose fully charged capacity falls below . Subject to the consumer, whichever is a consumer's exclusive...and applies as defined above, unless otherwise provided for below. Periodic maintenance, repair, and replacement of their rated capacity and batteries that leak are covered by consumers in the United States or Canada What Does this Warranty Cover? Decorative covers, bezels, PhoneWrap...


