User Manual
Page 11
...'s RF exposure guidelines, place the base unit at least one phone in your local recycling center for battery type. ITC03-201 9 Battery Safety Instructions • Do not burn, disassemble, mutilate, or puncture the battery. Because cordless phones operate on or near a TV, microwave oven, or VCR....the unit. 9. Contact your home that is a risk of the cordless phone on electricity, you replace the battery with an incorrect battery type. Use only the power supply that power this unit. The battery contains toxic materials that could be released, resulting in explosion. •...
...'s RF exposure guidelines, place the base unit at least one phone in your local recycling center for battery type. ITC03-201 9 Battery Safety Instructions • Do not burn, disassemble, mutilate, or puncture the battery. Because cordless phones operate on or near a TV, microwave oven, or VCR....the unit. 9. Contact your home that is a risk of the cordless phone on electricity, you replace the battery with an incorrect battery type. Use only the power supply that power this unit. The battery contains toxic materials that could be released, resulting in explosion. •...
User Manual
Page 12
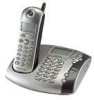
Contents Getting Started 13 Powering the Base Station 14 Setting Up the Charging Bases 15 Installing Batteries in the Handsets 15 Charging the Handsets 16 Phone Line Connection 16 Wall Mounting the Base Station 17 Using the Displays 19 Handset Display 19 Base Station Display 19 Using the Soft ...Keys 20 Using the Navigation Key 20 Setting Up Your Phone 21 Registering a Handset 21 Personalizing Your Phone System 22 Setting the Ring Tone and Ring Volume 22 Naming a Handset or Base Station 24 Entering Text on the ...
Contents Getting Started 13 Powering the Base Station 14 Setting Up the Charging Bases 15 Installing Batteries in the Handsets 15 Charging the Handsets 16 Phone Line Connection 16 Wall Mounting the Base Station 17 Using the Displays 19 Handset Display 19 Base Station Display 19 Using the Soft ...Keys 20 Using the Navigation Key 20 Setting Up Your Phone 21 Registering a Handset 21 Personalizing Your Phone System 22 Setting the Ring Tone and Ring Volume 22 Naming a Handset or Base Station 24 Entering Text on the ...
User Manual
Page 15
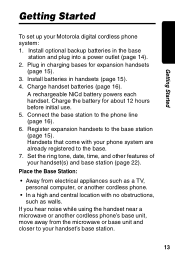
... 22). Set the ring tone, date, time, and other features of your phone system are already registered to your Motorola digital cordless phone system: 1. Install optional backup batteries in handsets (page 15). 4. A rechargeable NiCd battery powers each handset. Charge the battery for expansion handsets (page 15). 3. Install batteries in the base station and plug into a power outlet (page 14...
... 22). Set the ring tone, date, time, and other features of your phone system are already registered to your Motorola digital cordless phone system: 1. Install optional backup batteries in handsets (page 15). 4. A rechargeable NiCd battery powers each handset. Charge the battery for expansion handsets (page 15). 3. Install batteries in the base station and plug into a power outlet (page 14...
User Manual
Page 17
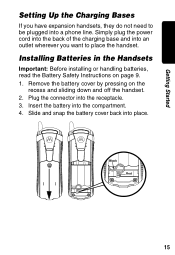
..., they do not need to place the handset. Plug the connector into place. Slide and snap the battery cover back into the receptacle. 3. Black Red 15 Installing Batteries in the Handsets Important: Before installing or handling batteries, read the Battery Safety Instructions on the recess and sliding down and off the handset. 2. Remove the...
..., they do not need to place the handset. Plug the connector into place. Slide and snap the battery cover back into the receptacle. 3. Black Red 15 Installing Batteries in the Handsets Important: Before installing or handling batteries, read the Battery Safety Instructions on the recess and sliding down and off the handset. 2. Remove the...
User Manual
Page 18
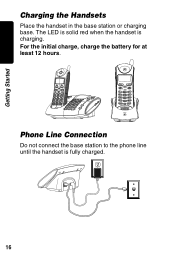
For the initial charge, charge the battery for at least 12 hours. charge Phone Line Connection Do not connect the base station to the phone line until the handset is charging. The LED is solid red when the handset is fully charged. 16 Getting Started Charging the Handsets Place the handset in the base station or charging base.
For the initial charge, charge the battery for at least 12 hours. charge Phone Line Connection Do not connect the base station to the phone line until the handset is charging. The LED is solid red when the handset is fully charged. 16 Getting Started Charging the Handsets Place the handset in the base station or charging base.
User Manual
Page 21
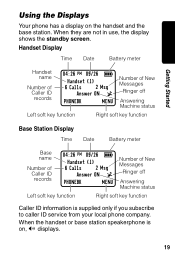
Getting Started Using the Displays Your phone has a display on , V displays. 19 Handset Display Time Date Battery meter Handset name Number of Caller ID records 04:26 PM 09/26 9 Handset (1) 6 Calls 2 Msg Answer ON ^ PHONEBK MENU Number of New Messages Ringer ...off Answering Machine status Left soft key function Right soft key function Base Station Display Time Date Battery meter Base name Number of Caller ID records 04:26 PM 09/26 9 Handset (1) 6 Calls 2 Msg Answer ON ^ PHONEBK MENU Number of New Messages Ringer...
Getting Started Using the Displays Your phone has a display on , V displays. 19 Handset Display Time Date Battery meter Handset name Number of Caller ID records 04:26 PM 09/26 9 Handset (1) 6 Calls 2 Msg Answer ON ^ PHONEBK MENU Number of New Messages Ringer ...off Answering Machine status Left soft key function Right soft key function Base Station Display Time Date Battery meter Base name Number of Caller ID records 04:26 PM 09/26 9 Handset (1) 6 Calls 2 Msg Answer ON ^ PHONEBK MENU Number of New Messages Ringer...


