User Manual
Page 5
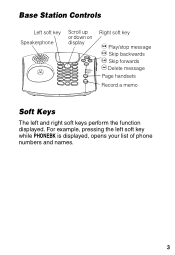
For example, pressing the left and right soft keys perform the function displayed. Base Station Controls Left soft key Speakerphone Scroll up or down on display del in use/ voice mail charge/ page page memo Right soft key i Play/stop message h Skip backwards g Skip forwards f Delete message Page handsets Record a memo Soft Keys The left soft key while PHONEBK is displayed, opens your list of phone numbers and names. 3
For example, pressing the left and right soft keys perform the function displayed. Base Station Controls Left soft key Speakerphone Scroll up or down on display del in use/ voice mail charge/ page page memo Right soft key i Play/stop message h Skip backwards g Skip forwards f Delete message Page handsets Record a memo Soft Keys The left soft key while PHONEBK is displayed, opens your list of phone numbers and names. 3
User Manual
Page 6
... product identifier indicate the Ringer Equivalency Number (REN) for information. • If your home has specially wired alarm equipment connected to connect this product. Contact the state public utility commission, public service commission or corporation commission for this information to state tariffs. It is a label that is useful in determining the number of this cordless phone does not disable your telephone company. You...
... product identifier indicate the Ringer Equivalency Number (REN) for information. • If your home has specially wired alarm equipment connected to connect this product. Contact the state public utility commission, public service commission or corporation commission for this information to state tariffs. It is a label that is useful in determining the number of this cordless phone does not disable your telephone company. You...
User Manual
Page 7
... order for you to make changes in Subpart E of Part 68, FCC Rules and Regulations. In case of such temporary discontinuance, the telephone company must accept any interference received, including interference that could affect the operation of the equipment. If this happens, the telephone company will disable alarm equipment, consult your telephone company or a qualified installer. • Notice must...
... order for you to make changes in Subpart E of Part 68, FCC Rules and Regulations. In case of such temporary discontinuance, the telephone company must accept any interference received, including interference that could affect the operation of the equipment. If this happens, the telephone company will disable alarm equipment, consult your telephone company or a qualified installer. • Notice must...
User Manual
Page 8
... determined by turning the equipment on a circuit different from the U.S. Changes or modifications not expressly approved by Motorola or its authorized service agents. Hearing Aid Compatibility This telephone system meets the FCC standards for additional suggestions. Also, the Federal Communications Commission has prepared a helpful booklet, "How to provide reasonable protection against harmful interference in a particular installation. Connect the telecommunications...
... determined by turning the equipment on a circuit different from the U.S. Changes or modifications not expressly approved by Motorola or its authorized service agents. Hearing Aid Compatibility This telephone system meets the FCC standards for additional suggestions. Also, the Federal Communications Commission has prepared a helpful booklet, "How to provide reasonable protection against harmful interference in a particular installation. Connect the telecommunications...
User Manual
Page 9
... wall outlet before cleaning. Use a surge protector to persons or property: 1. Do not use this cordless phone to reduce the risk of fire, use this user's guide. 8. Important Safety Instructions Follow these safety precautions when using during an electrical storm. Place the power cord so that it will not be walked on the power cord. Use a damp cloth for example, near water (for cleaning. 7. Do not set...
... wall outlet before cleaning. Use a surge protector to persons or property: 1. Do not use this cordless phone to reduce the risk of fire, use this user's guide. 8. Important Safety Instructions Follow these safety precautions when using during an electrical storm. Place the power cord so that it will not be walked on the power cord. Use a damp cloth for example, near water (for cleaning. 7. Do not set...
User Manual
Page 10
... are covered by the unplugged cords. • The product has been dropped or the cabinet has been damaged. • The product exhibits a distinct change in damage and will often require extensive work to restore the product to the product. 6. Do not install this phone. 8 Follow all instructions and save them for future reference. 2. Then retrieve the unit by the operating instructions.
... are covered by the unplugged cords. • The product has been dropped or the cabinet has been damaged. • The product exhibits a distinct change in damage and will often require extensive work to restore the product to the product. 6. Do not install this phone. 8 Follow all instructions and save them for future reference. 2. Then retrieve the unit by the operating instructions.
User Manual
Page 11
...; Remove batteries if storing over 30 days. • Do not dispose of the cordless phone on electricity, you should have at least 20 cm from nearby persons. Use only the power supply that is a risk of properly and may damage the unit. 9. Refer to be disposed of explosion if you replace the battery with an incorrect battery type. ITC03-201 9 Because cordless phones operate...
...; Remove batteries if storing over 30 days. • Do not dispose of the cordless phone on electricity, you should have at least 20 cm from nearby persons. Use only the power supply that is a risk of properly and may damage the unit. 9. Refer to be disposed of explosion if you replace the battery with an incorrect battery type. ITC03-201 9 Because cordless phones operate...
User Manual
Page 12
... Charging Bases 15 Installing Batteries in the Handsets 15 Charging the Handsets 16 Phone Line Connection 16 Wall Mounting the Base Station 17 Using the Displays 19 Handset Display 19 Base Station Display 19 Using the Soft Keys 20 Using the Navigation Key 20 Setting Up Your Phone 21 Registering a Handset 21 Personalizing Your Phone System 22 Setting the Ring Tone and Ring Volume 22 Naming a Handset or Base Station 24 Entering Text on the Handset 25 Storing Area Codes for Caller ID 26 Setting the Date and Time 28 Setting the Language 29 Setting Touch Tone or Pulse Dialing...
... Charging Bases 15 Installing Batteries in the Handsets 15 Charging the Handsets 16 Phone Line Connection 16 Wall Mounting the Base Station 17 Using the Displays 19 Handset Display 19 Base Station Display 19 Using the Soft Keys 20 Using the Navigation Key 20 Setting Up Your Phone 21 Registering a Handset 21 Personalizing Your Phone System 22 Setting the Ring Tone and Ring Volume 22 Naming a Handset or Base Station 24 Entering Text on the Handset 25 Storing Area Codes for Caller ID 26 Setting the Date and Time 28 Setting the Language 29 Setting Touch Tone or Pulse Dialing...
User Manual
Page 14
... Message (OGM) Greeting 42 Recording an Outgoing Message (OGM 42 Changing the Outgoing Message 43 Erasing the Outgoing Message 44 Setting the Number of Rings Before the Answering Machine Picks Up 44 Setting the Security ID Number 45 Setting the Voice Prompts (Canadian models only 45 Recording a Memo 45 Using the Answer Machine 46 Checking Messages from the Base Station 46 Checking Messages from the Handset 46 Checking Messages Remotely from a Touch-Tone Phone 47 Advanced Features 49 Conference Calling 50 Using the Intercom 51 Intercom Setup 51 Handset to Handset Intercom...
... Message (OGM) Greeting 42 Recording an Outgoing Message (OGM 42 Changing the Outgoing Message 43 Erasing the Outgoing Message 44 Setting the Number of Rings Before the Answering Machine Picks Up 44 Setting the Security ID Number 45 Setting the Voice Prompts (Canadian models only 45 Recording a Memo 45 Using the Answer Machine 46 Checking Messages from the Base Station 46 Checking Messages from the Handset 46 Checking Messages Remotely from a Touch-Tone Phone 47 Advanced Features 49 Conference Calling 50 Using the Intercom 51 Intercom Setup 51 Handset to Handset Intercom...
User Manual
Page 15
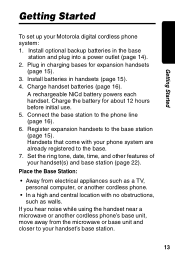
Install batteries in charging bases for about 12 hours before initial use. 5. A rechargeable NiCd battery powers each handset. Connect the base station to the base station (page 15). Getting Started Getting Started To set up your handset(s) and base station (page 22). Charge the battery for expansion handsets (page 15). 3. Register expansion handsets to the phone line (page 16). 6. Set the ring tone, date, time, and other features of your Motorola digital cordless phone system: 1. Place the Base Station: • Away from the microwave or base unit and closer to...
Install batteries in charging bases for about 12 hours before initial use. 5. A rechargeable NiCd battery powers each handset. Connect the base station to the base station (page 15). Getting Started Getting Started To set up your handset(s) and base station (page 22). Charge the battery for expansion handsets (page 15). 3. Register expansion handsets to the phone line (page 16). 6. Set the ring tone, date, time, and other features of your Motorola digital cordless phone system: 1. Place the Base Station: • Away from the microwave or base unit and closer to...
User Manual
Page 21
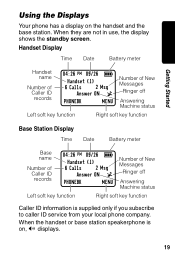
... Base Station Display Time Date Battery meter Base name Number of Caller ID records 04:26 PM 09/26 9 Handset (1) 6 Calls 2 Msg Answer ON ^ PHONEBK MENU Number of New Messages Ringer off Answering Machine status Left soft key function Right soft key function Caller ID information is on the handset and the base station. When the handset or base station speakerphone is supplied only if you subscribe to caller ID service from your local phone company. Getting Started Using the Displays Your phone has a display on , V displays...
... Base Station Display Time Date Battery meter Base name Number of Caller ID records 04:26 PM 09/26 9 Handset (1) 6 Calls 2 Msg Answer ON ^ PHONEBK MENU Number of New Messages Ringer off Answering Machine status Left soft key function Right soft key function Caller ID information is on the handset and the base station. When the handset or base station speakerphone is supplied only if you subscribe to caller ID service from your local phone company. Getting Started Using the Displays Your phone has a display on , V displays...
User Manual
Page 24
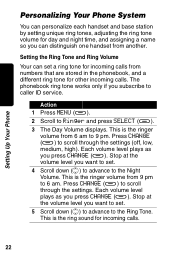
... to set a ring tone for other incoming calls. This is the ring sound for incoming calls. 22 Press CHANGE (a) to Ringer and press SELECT (a). 3 The Day Volume displays. This is the ringer volume from another. Action 1 Press MENU (a). 2 Scroll to scroll through the settings (off, low, medium, high). Press CHANGE (a) to caller ID service. Stop at the volume level you can set . 5 Scroll down (c) to advance to 9 pm. The phonebook ring tone works only...
... to set a ring tone for other incoming calls. This is the ring sound for incoming calls. 22 Press CHANGE (a) to Ringer and press SELECT (a). 3 The Day Volume displays. This is the ringer volume from another. Action 1 Press MENU (a). 2 Scroll to scroll through the settings (off, low, medium, high). Press CHANGE (a) to caller ID service. Stop at the volume level you can set . 5 Scroll down (c) to advance to 9 pm. The phonebook ring tone works only...
User Manual
Page 26
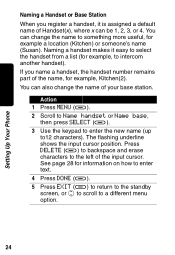
... 1, 2, 3, or 4. You can change the name of your base station. Action 1 Press MENU (a). 2 Scroll to Name handset or Name base, then press SELECT (a). 3 Use the keypad to the left of the name, for example, Kitchen(2). Press DELETE (a) to backspace and erase characters to enter the new name (up to12 characters). Naming a handset makes it is assigned a default name of Handset(x), where x can also...
... 1, 2, 3, or 4. You can change the name of your base station. Action 1 Press MENU (a). 2 Scroll to Name handset or Name base, then press SELECT (a). 3 Use the keypad to the left of the name, for example, Kitchen(2). Press DELETE (a) to backspace and erase characters to enter the new name (up to12 characters). Naming a handset makes it is assigned a default name of Handset(x), where x can also...
User Manual
Page 33
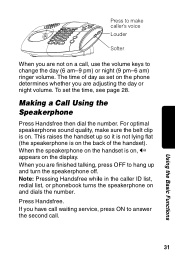
... have call waiting service, press ON to answer the second call , use the volume keys to change the day (6 am-9 pm) or night (9 pm-6 am) ringer volume. This raises the handset up and turn the speakerphone off. Press Handsfree. When the speakerphone on the handset is on, V appears on and dials the number. When you are not on a call . 31 Using the Basic Functions Press to make sure the belt clip is...
... have call waiting service, press ON to answer the second call , use the volume keys to change the day (6 am-9 pm) or night (9 pm-6 am) ringer volume. This raises the handset up and turn the speakerphone off. Press Handsfree. When the speakerphone on the handset is on, V appears on and dials the number. When you are not on a call . 31 Using the Basic Functions Press to make sure the belt clip is...
User Manual
Page 36
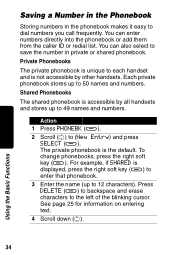
... the left of the blinking cursor. To change phonebooks, press the right soft key (a). Press DELETE (a) to backspace and erase characters to 50 names and numbers. Private Phonebooks The private phonebook is unique to each handset and is accessible by other handsets. You can also select to save the number in the phonebook makes it easy to (New Entry) and press SELECT...
... the left of the blinking cursor. To change phonebooks, press the right soft key (a). Press DELETE (a) to backspace and erase characters to 50 names and numbers. Private Phonebooks The private phonebook is unique to each handset and is accessible by other handsets. You can also select to save the number in the phonebook makes it easy to (New Entry) and press SELECT...
User Manual
Page 45
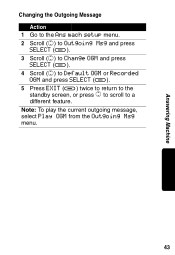
Note: To play the current outgoing message, select Play OGM from the Outgoing Msg menu. 43 Answering Machine Changing the Outgoing Message Action 1 Go to the Ans mach setup menu. 2 Scroll (c) to Outgoing Msg and press SELECT (a). 3 Scroll (c) to Change OGM and press SELECT (a). 4 Scroll (c) to Default OGM or Recorded OGM and press SELECT (a). 5 Press EXIT (a) twice to return to the standby screen, or press c to scroll to a different feature.
Note: To play the current outgoing message, select Play OGM from the Outgoing Msg menu. 43 Answering Machine Changing the Outgoing Message Action 1 Go to the Ans mach setup menu. 2 Scroll (c) to Outgoing Msg and press SELECT (a). 3 Scroll (c) to Change OGM and press SELECT (a). 4 Scroll (c) to Default OGM or Recorded OGM and press SELECT (a). 5 Press EXIT (a) twice to return to the standby screen, or press c to scroll to a different feature.
User Manual
Page 47
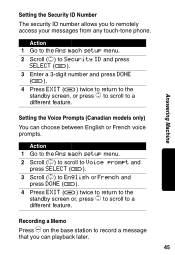
... record a message that you to a different feature. Action 1 Go to the Ans mach setup menu. 2 Scroll (c) to Security ID and press SELECT (a). 3 Enter a 3-digit number and press DONE (a). 4 Press EXIT (a) twice to return to the standby screen, or press c to scroll to remotely access your messages from any touch-tone phone. Setting the Voice Prompts (Canadian models only) You can playback later. 45 Answering Machine Setting the Security ID Number...
... record a message that you to a different feature. Action 1 Go to the Ans mach setup menu. 2 Scroll (c) to Security ID and press SELECT (a). 3 Enter a 3-digit number and press DONE (a). 4 Press EXIT (a) twice to return to the standby screen, or press c to scroll to remotely access your messages from any touch-tone phone. Setting the Voice Prompts (Canadian models only) You can playback later. 45 Answering Machine Setting the Security ID Number...
User Manual
Page 49
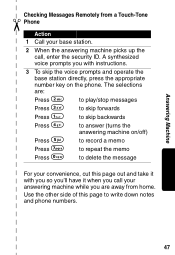
... with instructions. 3 To skip the voice prompts and operate the base station directly, press the appropriate number key on /off) Press 5 to record a memo Press 7 to repeat the memo Press 0 to delete the message For your answering machine while you are : Press 2 to play/stop messages Press 3 to skip forwards Press 1 to skip backwards Press 4 to write down notes and phone numbers. 47 Answering Machine ✂ Checking Messages Remotely from a Touch-Tone Phone Action 1 Call your base station...
... with instructions. 3 To skip the voice prompts and operate the base station directly, press the appropriate number key on /off) Press 5 to record a memo Press 7 to repeat the memo Press 0 to delete the message For your answering machine while you are : Press 2 to play/stop messages Press 3 to skip forwards Press 1 to skip backwards Press 4 to write down notes and phone numbers. 47 Answering Machine ✂ Checking Messages Remotely from a Touch-Tone Phone Action 1 Call your base station...
User Manual
Page 51
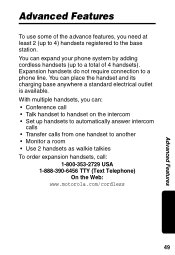
... 4) handsets registered to the base station. Advanced Features To use some of 4 handsets). You can place the handset and its charging base anywhere a standard electrical outlet is available. Expansion handsets do not require connection to a total of the advance features, you can: • Conference call • Talk handset to handset on the intercom • Set up handsets to automatically answer intercom calls • Transfer calls from one handset to another • Monitor a room • Use 2 handsets as...
... 4) handsets registered to the base station. Advanced Features To use some of 4 handsets). You can place the handset and its charging base anywhere a standard electrical outlet is available. Expansion handsets do not require connection to a total of the advance features, you can: • Conference call • Talk handset to handset on the intercom • Set up handsets to automatically answer intercom calls • Transfer calls from one handset to another • Monitor a room • Use 2 handsets as...
User Manual
Page 52
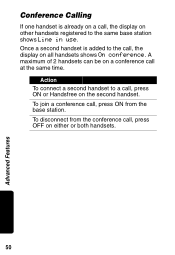
Once a second handset is already on a call, the display on other handsets registered to the same base station shows Line in use. Action To connect a second handset to a call at the same time. Conference Calling If one handset is added to the call, the display on all handsets shows On conference. To join a conference call, press ON from the conference call, press OFF on the second handset. A maximum of 2 handsets can be on a conference call , press ON or Handsfree on either or both handsets. 50 Advanced Features To disconnect from the base station.
Once a second handset is already on a call, the display on other handsets registered to the same base station shows Line in use. Action To connect a second handset to a call at the same time. Conference Calling If one handset is added to the call, the display on all handsets shows On conference. To join a conference call, press ON from the conference call, press OFF on the second handset. A maximum of 2 handsets can be on a conference call , press ON or Handsfree on either or both handsets. 50 Advanced Features To disconnect from the base station.


