
User Guide
Page 5
... make changes in Subpart E of Part 68, FCC Rules and Regulations. If this cordless phone does not disable your telephone company or a qualified installer. • Notice must : 1. Promptly notify you the opportunity to correct the situation; 3. FCC and Interference Information • If your home has specially wired alarm equipment connected to the telephone line, ensure the installation of this happens, the telephone company will disable...
... make changes in Subpart E of Part 68, FCC Rules and Regulations. If this cordless phone does not disable your telephone company or a qualified installer. • Notice must : 1. Promptly notify you the opportunity to correct the situation; 3. FCC and Interference Information • If your home has specially wired alarm equipment connected to the telephone line, ensure the installation of this happens, the telephone company will disable...

User Guide
Page 8
.... Caution: To reduce the risk of the phone unblocked. Ensure that proper ventilation is required, contact the Motorola address found in the vicinity of this product near water (for cleaning. 7. If service or repair work is provided at the installation site. 2. Do not set the phone on . 5. Do not overload wall outlets and extension cords. 9. Use a surge protector to report a gas leak...
.... Caution: To reduce the risk of the phone unblocked. Ensure that proper ventilation is required, contact the Motorola address found in the vicinity of this product near water (for cleaning. 7. If service or repair work is provided at the installation site. 2. Do not set the phone on . 5. Do not overload wall outlets and extension cords. 9. Use a surge protector to report a gas leak...

User Guide
Page 9
... instructions marked on an unstable cart, stand, or table. Do not place this product on the product. 3. Do not use chemicals or cleaning agents to the product. 6. This product may result in performance. Then retrieve the unit by the operating instructions. Follow all instructions and save them for future reference. 2. Important Safety Instructions Unplug this cordless phone immediately from the wall...
... instructions marked on an unstable cart, stand, or table. Do not place this product on the product. 3. Do not use chemicals or cleaning agents to the product. 6. This product may result in performance. Then retrieve the unit by the operating instructions. Follow all instructions and save them for future reference. 2. Important Safety Instructions Unplug this cordless phone immediately from the wall...
User Guide
Page 10
... the base unit at least one phone in your home that power this unit. Use only the power supply that came with an incorrect battery type. Caution: To maintain compliance with this product must be released, resulting in injury. • Caution: There is not cordless in case the power in your phone or an authorized replacement recommended by the manufacturer. • Keep batteries out of...
... the base unit at least one phone in your home that power this unit. Use only the power supply that came with an incorrect battery type. Caution: To maintain compliance with this product must be released, resulting in injury. • Caution: There is not cordless in case the power in your phone or an authorized replacement recommended by the manufacturer. • Keep batteries out of...
User Guide
Page 11
...Instructions 6 Getting Started 12 Powering the Base Station and Phone Line Connection 13 Wall Mounting the Base Station 14 Base Station Controls 16 Expansion Handset Controls 16 Using the Soft Keys 17 Using the Navigation Key 17 Using the Displays 18 Base Station Display 18 Expansion Handset Display 18 Setting Up Your Phone and Expansion Handsets . . . 19 Installing Batteries in the Handsets 19 Charging the Expansion Handsets 20 Registering an Expansion Handset 20 Personalizing Your Phone System 21 Setting the Ring Tone and Ring Volume 21 Naming the Base Station or an Expansion...
...Instructions 6 Getting Started 12 Powering the Base Station and Phone Line Connection 13 Wall Mounting the Base Station 14 Base Station Controls 16 Expansion Handset Controls 16 Using the Soft Keys 17 Using the Navigation Key 17 Using the Displays 18 Base Station Display 18 Expansion Handset Display 18 Setting Up Your Phone and Expansion Handsets . . . 19 Installing Batteries in the Handsets 19 Charging the Expansion Handsets 20 Registering an Expansion Handset 20 Personalizing Your Phone System 21 Setting the Ring Tone and Ring Volume 21 Naming the Base Station or an Expansion...

User Guide
Page 12
... 32 Calling a Number from the Phonebook 34 Editing a Phonebook Entry 34 Deleting a Phonebook Entry 35 Inserting Pauses in a Number 35 Using Caller ID 35 Reviewing the List of Caller ID Calls 36 Store a Caller ID Number in the Phonebook . . . . . 37 Deleting Caller ID Calls 38 Answering Machine 39 Setting Up the Answering Machine 39 Turning the Answering Machine On or Off 39 Outgoing Message (OGM) Greeting 40 Recording an Outgoing Message (OGM 40 Changing the Outgoing Message 40...
... 32 Calling a Number from the Phonebook 34 Editing a Phonebook Entry 34 Deleting a Phonebook Entry 35 Inserting Pauses in a Number 35 Using Caller ID 35 Reviewing the List of Caller ID Calls 36 Store a Caller ID Number in the Phonebook . . . . . 37 Deleting Caller ID Calls 38 Answering Machine 39 Setting Up the Answering Machine 39 Turning the Answering Machine On or Off 39 Outgoing Message (OGM) Greeting 40 Recording an Outgoing Message (OGM 40 Changing the Outgoing Message 40...

User Guide
Page 13
... Setting the Security ID Number 42 Setting the Voice Prompts (Canadian models only 43 Recording a Memo 43 Using the Answer Machine 43 Checking Messages from the Base Station . . . . . 43 Checking Messages from an Expansion Handset 44 Checking Messages Remotely from a Touch-Tone Phone 45 Advanced Features 47 Conference Calling 48 Using the Intercom 49 Intercom Setup 49 Handset to Handset Intercom 50 Transferring a Call from One Handset to Another . . . 51 Unannounced Transfer 51 Announced Transfer 51 Using the Handset as a Walkie Talkie 52 Monitoring a Room 53 Motorola...
... Setting the Security ID Number 42 Setting the Voice Prompts (Canadian models only 43 Recording a Memo 43 Using the Answer Machine 43 Checking Messages from the Base Station . . . . . 43 Checking Messages from an Expansion Handset 44 Checking Messages Remotely from a Touch-Tone Phone 45 Advanced Features 47 Conference Calling 48 Using the Intercom 49 Intercom Setup 49 Handset to Handset Intercom 50 Transferring a Call from One Handset to Another . . . 51 Unannounced Transfer 51 Announced Transfer 51 Using the Handset as a Walkie Talkie 52 Monitoring a Room 53 Motorola...
User Guide
Page 14
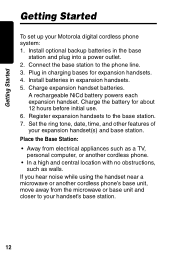
...Install batteries in charging bases for about 12 hours before initial use. 6. Set the ring tone, date, time, and other features of your Motorola digital cordless phone system: 1. Charge expansion handset batteries. A rechargeable NiCd battery powers each expansion handset. Getting Started Getting Started To set up your expansion handset(s) and base station. Place the Base Station: • Away from the microwave or base unit and closer to your handset's base station. 12 Plug in expansion handsets. 5. Register expansion handsets to the phone line. 3. Connect the base...
...Install batteries in charging bases for about 12 hours before initial use. 6. Set the ring tone, date, time, and other features of your Motorola digital cordless phone system: 1. Charge expansion handset batteries. A rechargeable NiCd battery powers each expansion handset. Getting Started Getting Started To set up your expansion handset(s) and base station. Place the Base Station: • Away from the microwave or base unit and closer to your handset's base station. 12 Plug in expansion handsets. 5. Register expansion handsets to the phone line. 3. Connect the base...

User Guide
Page 20
... Ringer off Caller ID records Answer ON ^ Answering PHONEBK MENU Machine status Left soft key function Right soft key function Expansion Handset Display Time Date Battery meter Number of Handset name 04:26 PM 09/26 9 New Handset (1) Messages Number of them. Expansion handsets have a display on the base station. The base station and expansion handsets, when not in use, show the standby screen. Base Station Display Time Date Battery meter Number of Base name 04:26 PM 09/26 Base (1) 9 New Messages Number of 6 Calls 2 Msg Ringer off Answering Machine Left soft key...
... Ringer off Caller ID records Answer ON ^ Answering PHONEBK MENU Machine status Left soft key function Right soft key function Expansion Handset Display Time Date Battery meter Number of Handset name 04:26 PM 09/26 9 New Handset (1) Messages Number of them. Expansion handsets have a display on the base station. The base station and expansion handsets, when not in use, show the standby screen. Base Station Display Time Date Battery meter Number of Base name 04:26 PM 09/26 Base (1) 9 New Messages Number of 6 Calls 2 Msg Ringer off Answering Machine Left soft key...
User Guide
Page 22
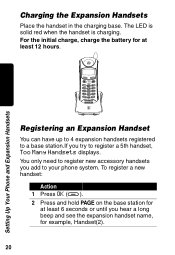
... handset, Too Many Handsets displays. The LED is solid red when the handset is charging. Setting Up Your Phone and Expansion Handsets Charging the Expansion Handsets Place the handset in the charging base. To register a new handset: Action 1 Press OK (a). 2 Press and hold PAGE on the base station for at least 12 hours. For the initial charge, charge the battery for example, Handset(2). 20 charge Registering an Expansion Handset You can have up to 4 expansion handsets registered to a base station.If you hear a long beep...
... handset, Too Many Handsets displays. The LED is solid red when the handset is charging. Setting Up Your Phone and Expansion Handsets Charging the Expansion Handsets Place the handset in the charging base. To register a new handset: Action 1 Press OK (a). 2 Press and hold PAGE on the base station for at least 12 hours. For the initial charge, charge the battery for example, Handset(2). 20 charge Registering an Expansion Handset You can have up to 4 expansion handsets registered to a base station.If you hear a long beep...

User Guide
Page 23
... Phone and Expansion Handsets Personalizing Your Phone System You can set a ring tone for incoming calls from numbers that are stored in the phonebook, and a different ring tone for other incoming calls. The phonebook ring tone works only if you want to set . 4 Scroll down (c) to advance to distinguish one handset from another. Stop at the volume level you subscribe to scroll through the settings. Press CHANGE (a) to caller ID service from 6 am . This is the ringer volume...
... Phone and Expansion Handsets Personalizing Your Phone System You can set a ring tone for incoming calls from numbers that are stored in the phonebook, and a different ring tone for other incoming calls. The phonebook ring tone works only if you want to set . 4 Scroll down (c) to advance to distinguish one handset from another. Stop at the volume level you subscribe to scroll through the settings. Press CHANGE (a) to caller ID service from 6 am . This is the ringer volume...
User Guide
Page 24
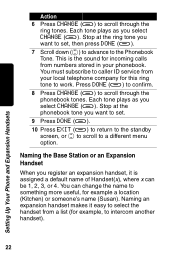
... as you want to set , then press DONE (a). 7 Scroll down (c) to advance to the Phonebook Tone. Naming an expansion handset makes it is the sound for incoming calls from numbers stored in your local telephone company for this ring tone to select the handset from your phonebook. Naming the Base Station or an Expansion Handset When you select CHANGE (a). Each tone plays as you register an expansion handset, it easy to work.
... as you want to set , then press DONE (a). 7 Scroll down (c) to advance to the Phonebook Tone. Naming an expansion handset makes it is the sound for incoming calls from numbers stored in your local telephone company for this ring tone to select the handset from your phonebook. Naming the Base Station or an Expansion Handset When you select CHANGE (a). Each tone plays as you register an expansion handset, it easy to work.

User Guide
Page 31
... set on the Base Station During a Call Press the volume up the handset. Making a Call Using an Expansion Handset The procedure for making one from the base station, you can use it in use the volume keys to answer the second call waiting service, press ON to change the day (6 am-9 pm) or night (9 pm-6 am) ringer volume. Using the Basic Functions 29 del in speakerphone mode and by picking up or volume down key on a call, use / voice mail charge/ page page memo Press to make caller's voice...
... set on the Base Station During a Call Press the volume up the handset. Making a Call Using an Expansion Handset The procedure for making one from the base station, you can use it in use the volume keys to answer the second call waiting service, press ON to change the day (6 am-9 pm) or night (9 pm-6 am) ringer volume. Using the Basic Functions 29 del in speakerphone mode and by picking up or volume down key on a call, use / voice mail charge/ page page memo Press to make caller's voice...

User Guide
Page 34
... left of the blinking cursor. Each private phonebook stores up to 12 characters). Press DELETE (a) to backspace and erase characters to (New Entry) and press SELECT (a). For example, if SHARED is the default. You can also select to save the number in the phonebook makes it easy to each handset and is accessible by other handsets or the base station. Shared Phonebooks...
... left of the blinking cursor. Each private phonebook stores up to 12 characters). Press DELETE (a) to backspace and erase characters to (New Entry) and press SELECT (a). For example, if SHARED is the default. You can also select to save the number in the phonebook makes it easy to each handset and is accessible by other handsets or the base station. Shared Phonebooks...

User Guide
Page 42
Answering Machine Outgoing Message (OGM) Greeting You can record a personal outgoing message greeting that plays when you receive a call and you receive a call. Recording an Outgoing Message (OGM) Action 1 Go to the Ans mach setup menu. 2 Scroll (c) to Outgoing Msg and press SELECT (a). 3 Scroll (c) to Record OGM and press SELECT (a). 4 Press YES (a) to Change OGM and press SELECT (a). 40 Changing the Outgoing Message Action 1 Go to the...
Answering Machine Outgoing Message (OGM) Greeting You can record a personal outgoing message greeting that plays when you receive a call and you receive a call. Recording an Outgoing Message (OGM) Action 1 Go to the Ans mach setup menu. 2 Scroll (c) to Outgoing Msg and press SELECT (a). 3 Scroll (c) to Record OGM and press SELECT (a). 4 Press YES (a) to Change OGM and press SELECT (a). 40 Changing the Outgoing Message Action 1 Go to the...

User Guide
Page 44
.... 42 To change it: Action 1 Go to the Ans mach setup menu. 2 Scroll (c) to Security ID and press SELECT (a). 3 Enter a 3-digit number and press DONE (a). 4 Press EXIT (a) twice to return to the standby screen, or press c to scroll to a different feature. Setting the Security ID Number The security ID number allows you to remotely access your messages from any touch-tone phone. The default ID is 123...
.... 42 To change it: Action 1 Go to the Ans mach setup menu. 2 Scroll (c) to Security ID and press SELECT (a). 3 Enter a 3-digit number and press DONE (a). 4 Press EXIT (a) twice to return to the standby screen, or press c to scroll to a different feature. Setting the Security ID Number The security ID number allows you to remotely access your messages from any touch-tone phone. The default ID is 123...

User Guide
Page 45
... the base station to record a message that you can choose between English or French voice prompts. Using the Answer Machine Checking Messages from the Base Station Action Press i Press g Press h Press f to play and stop messages to skip forward to skip backward to a different feature. Answering Machine Setting the Voice Prompts (Canadian models only) You can playback later. Action 1 Go to the Ans mach setup menu. 2 Scroll (c) to scroll to Voice prompt...
... the base station to record a message that you can choose between English or French voice prompts. Using the Answer Machine Checking Messages from the Base Station Action Press i Press g Press h Press f to play and stop messages to skip forward to skip backward to a different feature. Answering Machine Setting the Voice Prompts (Canadian models only) You can playback later. Action 1 Go to the Ans mach setup menu. 2 Scroll (c) to scroll to Voice prompt...
User Guide
Page 47
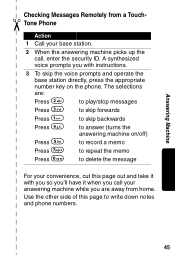
... operate the base station directly, press the appropriate number key on /off) Press 5 to record a memo Press 7 to repeat the memo Press 0 to answer (turns the answering machine on the phone. Use the other side of this page out and take it when you call your answering machine while you are : Press 2 to play/stop messages Press 3 to skip forwards Press 1 to skip backwards Press 4 to delete the message For your base station...
... operate the base station directly, press the appropriate number key on /off) Press 5 to record a memo Press 7 to repeat the memo Press 0 to answer (turns the answering machine on the phone. Use the other side of this page out and take it when you call your answering machine while you are : Press 2 to play/stop messages Press 3 to skip forwards Press 1 to skip backwards Press 4 to delete the message For your base station...

User Guide
Page 49
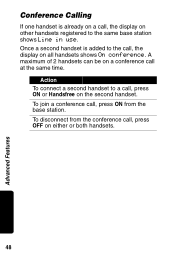
You can expand your phone system by adding cordless handsets (up to the base station. You can : • Conference call • Talk handset to handset on the intercom • Set up to 4) expansion handsets registered to a total of the advance features, you can place the handset and its charging base anywhere a standard electrical outlet is available. With multiple expansion handsets, you need at least 2 (up handsets to automatically answer intercom calls • Transfer calls from one handset to a phone line. Expansion handsets do...
You can expand your phone system by adding cordless handsets (up to the base station. You can : • Conference call • Talk handset to handset on the intercom • Set up to 4) expansion handsets registered to a total of the advance features, you can place the handset and its charging base anywhere a standard electrical outlet is available. With multiple expansion handsets, you need at least 2 (up handsets to automatically answer intercom calls • Transfer calls from one handset to a phone line. Expansion handsets do...
User Guide
Page 50
A maximum of 2 handsets can be on the second handset. Action To connect a second handset to a call, press ON or Handsfree on a conference call at the same time. To join a conference call, press ON from the conference call, press OFF on all handsets shows On conference. To disconnect from the base station. Once a second handset is already on a call, the display on other handsets registered to the same base station shows Line in use. Conference Calling If one handset is added to the call, the display on either or both handsets. 48 Advanced Features
A maximum of 2 handsets can be on the second handset. Action To connect a second handset to a call, press ON or Handsfree on a conference call at the same time. To join a conference call, press ON from the conference call, press OFF on all handsets shows On conference. To disconnect from the base station. Once a second handset is already on a call, the display on other handsets registered to the same base station shows Line in use. Conference Calling If one handset is added to the call, the display on either or both handsets. 48 Advanced Features


