

User Guide
Page 1
User's Guide L701 / L702 / L703 / L704 / L705 L701M / L702M / L703M / L704M / L705M DECT 6.0 Digital Cordless Phone with Answering machine Warning Use only the adapter and telephone line cord provided in the box.
User's Guide L701 / L702 / L703 / L704 / L705 L701M / L702M / L703M / L704M / L705M DECT 6.0 Digital Cordless Phone with Answering machine Warning Use only the adapter and telephone line cord provided in the box.

User Guide
Page 2
.... Please note that this equipment is not required for making emergency telephone calls when the power fails. For warranty service of your Motorola product, you who is necessary. Alternative arrangements should be made if emergency telephone call : US and Canada: 1-888-331-3383 On the...-recorded voice menu and outgoing announcements. **You must subscribe to your network provider's Caller ID or Call Waiting service for your new Motorola Phone! to confirm warranty status. For product-related questions, please call is calling and includes details of your dated sales receipt to your...
.... Please note that this equipment is not required for making emergency telephone calls when the power fails. For warranty service of your Motorola product, you who is necessary. Alternative arrangements should be made if emergency telephone call : US and Canada: 1-888-331-3383 On the...-recorded voice menu and outgoing announcements. **You must subscribe to your network provider's Caller ID or Call Waiting service for your new Motorola Phone! to confirm warranty status. For product-related questions, please call is calling and includes details of your dated sales receipt to your...
User Guide
Page 3
IMPORTANT Only use the telephone line cord supplied. Got everything? • Handset • Base • NiMH Rechargeable Battery Pack • Battery Door • Power Adapter • Telephone Line Cord • User's Guide • Quick Start Guide In multi-handset packs, you will need to set up your phone. This User's Guide provides you with power adapter units, additional rechargeable battery packs and battery doors. This equipment is not designed to emergency services. Alternative arrangements should be made for access to make your first call you will find one or more ...
IMPORTANT Only use the telephone line cord supplied. Got everything? • Handset • Base • NiMH Rechargeable Battery Pack • Battery Door • Power Adapter • Telephone Line Cord • User's Guide • Quick Start Guide In multi-handset packs, you will need to set up your phone. This User's Guide provides you with power adapter units, additional rechargeable battery packs and battery doors. This equipment is not designed to emergency services. Alternative arrangements should be made for access to make your first call you will find one or more ...
User Guide
Page 4
Getting to another handset ...19 3.14.3 Three-party conference call 20 3.15 Setting the dial mode 20 3.16 Setting the flash time 20 3.17 Setting the area code 21 3.18 Registration 21 3.18.1 Registering a handset 21 3.19 Resetting all settings 22 3.20 Paging/Finding a handset 22 3.21 Using your phone 9 3. Using the phone 14 3.1 Making a call 14 3.2 Speed dial calling 14 3.3 Answering a call 14 3.4 Ending a call 14 3.5 Adjusting volume 14 3.6 Muting a call 15 3.7 Dialing from the redial list 15 3.8 Dialing from the calls list 15 3.9 Adding an entry to the phonebook 15 3.10 ...
Getting to another handset ...19 3.14.3 Three-party conference call 20 3.15 Setting the dial mode 20 3.16 Setting the flash time 20 3.17 Setting the area code 21 3.18 Registration 21 3.18.1 Registering a handset 21 3.19 Resetting all settings 22 3.20 Paging/Finding a handset 22 3.21 Using your phone 9 3. Using the phone 14 3.1 Making a call 14 3.2 Speed dial calling 14 3.3 Answering a call 14 3.4 Ending a call 14 3.5 Adjusting volume 14 3.6 Muting a call 15 3.7 Dialing from the redial list 15 3.8 Dialing from the calls list 15 3.9 Adding an entry to the phonebook 15 3.10 ...
User Guide
Page 5
3.21.1 Playing messages 22 3.21.2 Turning on or off the answering machine 23 3.21.3 Setting the announcement mode ...........23 3.21.4 Setting the number of rings 23 3.21.5 Announcement 24 3.21.6 Recording a memo 24 3.21.7 Call screening on/off 25 3.21.8 Deleting all old messages 25 3.21.9 Remote access 25 3.21.10Setting the security code 26 4. General information 28 5 Help 27 5.
3.21.1 Playing messages 22 3.21.2 Turning on or off the answering machine 23 3.21.3 Setting the announcement mode ...........23 3.21.4 Setting the number of rings 23 3.21.5 Announcement 24 3.21.6 Recording a memo 24 3.21.7 Call screening on/off 25 3.21.8 Deleting all old messages 25 3.21.9 Remote access 25 3.21.10Setting the security code 26 4. General information 28 5 Help 27 5.
User Guide
Page 6
Getting started Any obstruction between the base and handset will automatically re-connect to the corded base. SIGNAL STRENGTH When out of range of excessive dust, moisture and low temperature. • Avoid other humid areas. If you are some important guidelines you should consider: • Avoid sources of noise and heat, such as motors, fluorescent lighting, microwave ovens, heating appliances and direct sunlight. • Avoid areas of the corded base, the screen shows OUT OF RANGE. Move back within the range area. WHICH POWER ADAPTER? The cordless handset will also reduce ...
Getting started Any obstruction between the base and handset will automatically re-connect to the corded base. SIGNAL STRENGTH When out of range of excessive dust, moisture and low temperature. • Avoid other humid areas. If you are some important guidelines you should consider: • Avoid sources of noise and heat, such as motors, fluorescent lighting, microwave ovens, heating appliances and direct sunlight. • Avoid areas of the corded base, the screen shows OUT OF RANGE. Move back within the range area. WHICH POWER ADAPTER? The cordless handset will also reduce ...
User Guide
Page 7
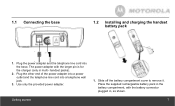
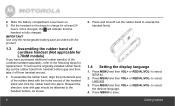
Plug the other end of the power adapter into a power outlet and the telephone line cord into the base. The power adapter with the battery connector plugged in multi- handset packs). 2. Place the supplied rechargeable battery pack in the battery compartment, with the larger pin is for the charger (only in , as shown. 1.1 Connecting the base 1.2 Installing and charging the handset battery pack 1. Use only the provided power adapter. 1. Getting started 7 Plug the power adapter and the telephone line cord into a telephone wall jack. 3. Slide off the battery compartment ...
Plug the other end of the power adapter into a power outlet and the telephone line cord into the base. The power adapter with the battery connector plugged in multi- handset packs). 2. Place the supplied rechargeable battery pack in the battery compartment, with the larger pin is for the charger (only in , as shown. 1.1 Connecting the base 1.2 Installing and charging the handset battery pack 1. Use only the provided power adapter. 1. Getting started 7 Plug the power adapter and the telephone line cord into a telephone wall jack. 3. Slide off the battery compartment ...
User Guide
Page 8
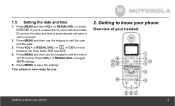
Press MENU and then VOL+ or REDIAL/VOL- Press MENU and then VOL+ or REDIAL/VOL- Put the handset on . 3. Once charged, the will indicate that the handset is fully charged. To assemble the rubber band, align the protuberant pins of the rubber band with the holes around . 1. to enwrap the handset firmly. 1.4 Setting the display language 1. To remove the originally installed rubber band, dig out the rubber band from handset bottom gap and then take it off from handset around of the cordless handset separately, refer to charge for replacement. Press and smooth out the rubber ...
Press MENU and then VOL+ or REDIAL/VOL- Press MENU and then VOL+ or REDIAL/VOL- Put the handset on . 3. Once charged, the will indicate that the handset is fully charged. To assemble the rubber band, align the protuberant pins of the rubber band with the holes around . 1. to enwrap the handset firmly. 1.4 Setting the display language 1. To remove the originally installed rubber band, dig out the rubber band from handset bottom gap and then take it off from handset around of the cordless handset separately, refer to charge for replacement. Press and smooth out the rubber ...
User Guide
Page 9
to select DATE&TIME. Getting to know your phone Overview of your handset Getting to your phone 9 If you're a subscriber to know your network's Caller ID service, the date and time is automatically set when a call is now ready for use. 2. Press VOL+ or REDIAL/VOL- 1.5 Setting the date and time 1. to toggle AM/PM settings. 5. Press MENU and then use the keypad to edit the time in 12 HR format. Press VOL+ or REDIAL/VOL- Press MENU to move between the input fields YEAR and DATE. 4. or or CID to save the settings. Press MENU and then use the keypad to edit the year...
to select DATE&TIME. Getting to know your phone Overview of your handset Getting to your phone 9 If you're a subscriber to know your network's Caller ID service, the date and time is automatically set when a call is now ready for use. 2. Press VOL+ or REDIAL/VOL- 1.5 Setting the date and time 1. to toggle AM/PM settings. 5. Press MENU and then use the keypad to edit the time in 12 HR format. Press VOL+ or REDIAL/VOL- Press MENU to move between the input fields YEAR and DATE. 4. or or CID to save the settings. Press MENU and then use the keypad to edit the year...
User Guide
Page 10
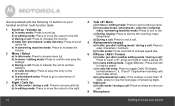
Get acquainted with the following 14 buttons on your phone b) In name editing mode: Toggle ABC/abc. b) In menu / editing mode: Press to insert a space. d) During a call: Press to end a call. 5 Alphanumeric keypad a) In idle / pre-dial / editing mode / during a call: Press to initiate an intercom call : Press to previous level. Press and hold to confirm and save the entry to insert a pause (P). b) In editing mode: Press to move the cursor to another handset. b) In editing mode: Press to move the cursor to the right. 10 4 Talk off / Back a) In menu / editing mode: ...
Get acquainted with the following 14 buttons on your phone b) In name editing mode: Toggle ABC/abc. b) In menu / editing mode: Press to insert a space. d) During a call: Press to end a call. 5 Alphanumeric keypad a) In idle / pre-dial / editing mode / during a call: Press to initiate an intercom call : Press to previous level. Press and hold to confirm and save the entry to insert a pause (P). b) In editing mode: Press to move the cursor to another handset. b) In editing mode: Press to move the cursor to the right. 10 4 Talk off / Back a) In menu / editing mode: ...
User Guide
Page 11
c) Calls List / phonebook / redial list entry: Press to answer a call with the speakerphone. d) During ringing: Press to make a call with the speakerphone. c) In phonebook list entry: If the number is more than 15 digits, press to view the previous page of remaining digits. 11 Scroll Down / Volume Down / Redial List a) In idle mode: Press to the previous level. b) In menu / phonebook entry mode: Press to exit to access the redial list. Press and hold to delete all characters / digits. d) During a call: Press to make a call with the speakerphone. 9 Speaker a) In idle / pre-...
c) Calls List / phonebook / redial list entry: Press to answer a call with the speakerphone. d) During ringing: Press to make a call with the speakerphone. c) In phonebook list entry: If the number is more than 15 digits, press to view the previous page of remaining digits. 11 Scroll Down / Volume Down / Redial List a) In idle mode: Press to the previous level. b) In menu / phonebook entry mode: Press to exit to access the redial list. Press and hold to delete all characters / digits. d) During a call: Press to make a call with the speakerphone. 9 Speaker a) In idle / pre-...
User Guide
Page 12
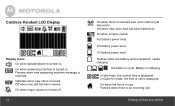
Off when new call is received. Full battery power level. 2/3 battery power level. 1/3 battery power level. Getting to . Indicates when new call has been viewed. Off when new voice mail has been listened to know your phone Flashes when low battery level is charging. Battery is detected, needs charging. In idle mode, the current time is turned on . In Caller ID mode, the time of call . Flashes when there is an incoming call is received new voice mail not yet listened to. Animation in use. Cordless Handset LCD Display Display Icons On when speakerphone is displayed....
Off when new call is received. Full battery power level. 2/3 battery power level. 1/3 battery power level. Getting to . Indicates when new call has been viewed. Off when new voice mail has been listened to know your phone Flashes when low battery level is charging. Battery is detected, needs charging. In idle mode, the current time is turned on . In Caller ID mode, the time of call . Flashes when there is an incoming call is received new voice mail not yet listened to. Animation in use. Cordless Handset LCD Display Display Icons On when speakerphone is displayed....
User Guide
Page 13
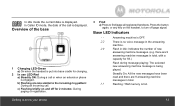
c) Flashing briefly on the handset, to turn off for 2 minutes: During paging or registration. 3 Find a) Press to find/page all registered handsets. Press the button again, or any key on and off page signal. Answering machine is OFF. 00 There is full. Overview of the base 1 Charging LED-Green a) On when the handset is put into base cradle for 59.) Flash during message playing: The selected new answering machine message is engaged. b) Flashing at a rate similar to know your phone 13 there are 9 answering machine messages in total. FF Flashing: TAM memory is no voice message ...
c) Flashing briefly on the handset, to turn off for 2 minutes: During paging or registration. 3 Find a) Press to find/page all registered handsets. Press the button again, or any key on and off page signal. Answering machine is OFF. 00 There is full. Overview of the base 1 Charging LED-Green a) On when the handset is put into base cradle for 59.) Flash during message playing: The selected new answering machine message is engaged. b) Flashing at a rate similar to know your phone 13 there are 9 answering machine messages in total. FF Flashing: TAM memory is no voice message ...
User Guide
Page 14
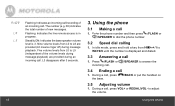
Nine volume levels from L0 to WXYZ/9 until the number is in progress. L3 disappears after 3 seconds. 14 3. Using the phone 3.1 Making a call . Using the phone An/09 LA L3 Flashing: Indicates an incoming call/recording of an incoming call 1. During a call , press VOL+ or REDIAL/VOL- to answer the 3.4 Ending a call . /SPEAKER to adjust the volume. In idle mode, press and hold a key from L0 to dial the phone number. 3.2 Speed dial calling 1. During a call , press /BACK or put the handset on the base. 3.5 Adjusting volume 1. Five volume levels from / /1 to L8 ...
Nine volume levels from L0 to WXYZ/9 until the number is in progress. L3 disappears after 3 seconds. 14 3. Using the phone 3.1 Making a call . Using the phone An/09 LA L3 Flashing: Indicates an incoming call/recording of an incoming call 1. During a call , press VOL+ or REDIAL/VOL- to answer the 3.4 Ending a call . /SPEAKER to adjust the volume. In idle mode, press and hold a key from L0 to dial the phone number. 3.2 Speed dial calling 1. During a call , press /BACK or put the handset on the base. 3.5 Adjusting volume 1. Five volume levels from / /1 to L8 ...
User Guide
Page 15
to select the entry you want to dial. 2. Using the phone 3.9 Adding an entry to format the dialing number. 3. Press . 2. to 16 characters long. Press CID and then VOL+ or REDIAL/VOL- Toggle the #/ /PAUSE/FORMAT key to the phonebook 1. Press MENU and then VOL+ or REDIAL/VOL- to scroll and select ADD. 3. During a call 1. Entries are stored in the room without your caller hearing you want to WXYZ/9. 4. Press MENU and then VOL+ or REDIAL/VOL- Press /MUTE again to unmute. 3.7 Dialing from / /1 to redial. 2. Press REDIAL/VOL- Press . 2. to select ...
to select the entry you want to dial. 2. Using the phone 3.9 Adding an entry to format the dialing number. 3. Press . 2. to 16 characters long. Press CID and then VOL+ or REDIAL/VOL- Toggle the #/ /PAUSE/FORMAT key to the phonebook 1. Press MENU and then VOL+ or REDIAL/VOL- to scroll and select ADD. 3. During a call 1. Entries are stored in the room without your caller hearing you want to WXYZ/9. 4. Press MENU and then VOL+ or REDIAL/VOL- Press /MUTE again to unmute. 3.7 Dialing from / /1 to redial. 2. Press REDIAL/VOL- Press . 2. to select ...

User Guide
Page 16
to scroll and select the entry you wish to 30 calls may charge a subscription for their Caller ID service. 3.12.1 Calls List The calls list contains details of the call. Press /FLASH or /SPEAKER to view the calls log, the icon on the other handsets remains on all handsets registered to dial. 2. NOTE • If the telephone number is not available for multi-pack use only). 16 Using the phone Entries are displayed in chronological order with A. NOTE • When the calls list is full, a new call replaces the oldest one handset is used to dial the number. Press and then...
to scroll and select the entry you wish to 30 calls may charge a subscription for their Caller ID service. 3.12.1 Calls List The calls list contains details of the call. Press /FLASH or /SPEAKER to view the calls log, the icon on the other handsets remains on all handsets registered to dial. 2. NOTE • If the telephone number is not available for multi-pack use only). 16 Using the phone Entries are displayed in chronological order with A. NOTE • When the calls list is full, a new call replaces the oldest one handset is used to dial the number. Press and then...
User Guide
Page 17
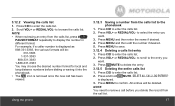
to delete the entry. 3.12.5 Deleting the entire calls list 1. Press MENU and then edit the number if desired. 5. Press /MUTE to browse the calls list. Press CID to enter the calls list. 2. is removed once the new call has been viewed. to select the entry you want . 3. Press CID to enter the calls list. 2. All entries will be deleted. Scroll VOL+ or REDIAL/VOL- Press MENU and then enter the name if desired. 4. Press VOL+ or REDIAL/VOL- Press and hold /MUTE. Press MENU to display the number in different format. 3.12.2 Viewing the calls list 1. NOTE • When ...
to delete the entry. 3.12.5 Deleting the entire calls list 1. Press MENU and then edit the number if desired. 5. Press /MUTE to browse the calls list. Press CID to enter the calls list. 2. is removed once the new call has been viewed. to select the entry you want . 3. Press CID to enter the calls list. 2. All entries will be deleted. Scroll VOL+ or REDIAL/VOL- Press MENU and then enter the name if desired. 4. Press VOL+ or REDIAL/VOL- Press and hold /MUTE. Press MENU to display the number in different format. 3.12.2 Viewing the calls list 1. NOTE • When ...
User Guide
Page 18
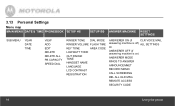
3.13 Personal Settings Menu map MAIN MENU DATE & TIME PHONEBOOK SETUP HS SETUP BS ANSWER MACHINE RESET SETTINGS SUB MENU YEAR DATE TIME VIEW ADD EDIT DELETE DELETE ALL PB CAPACITY SPEED DIAL RINGER TONE DIAL MODE RINGER VOLUME FLASH TIME KEY TONE AREA CODE LOW BATT TONE OUT RANGE TONE HANDSET NAME LANGUAGE LCD CONTRAST REGISTRATION ANSWERER ON (if CLR VOICE MAIL answering machine is off) ALL SETTINGS Or ANSWERER OFF (if answering machine is on) ANSWERER MODE RINGS TO ANSWER ANNOUNCEMNET RECORD MEMO CALL SCREENING DEL ALL OLD MSG REMOTE ACCESS SECURITY CODE 18 Using...
3.13 Personal Settings Menu map MAIN MENU DATE & TIME PHONEBOOK SETUP HS SETUP BS ANSWER MACHINE RESET SETTINGS SUB MENU YEAR DATE TIME VIEW ADD EDIT DELETE DELETE ALL PB CAPACITY SPEED DIAL RINGER TONE DIAL MODE RINGER VOLUME FLASH TIME KEY TONE AREA CODE LOW BATT TONE OUT RANGE TONE HANDSET NAME LANGUAGE LCD CONTRAST REGISTRATION ANSWERER ON (if CLR VOICE MAIL answering machine is off) ALL SETTINGS Or ANSWERER OFF (if answering machine is on) ANSWERER MODE RINGS TO ANSWER ANNOUNCEMNET RECORD MEMO CALL SCREENING DEL ALL OLD MSG REMOTE ACCESS SECURITY CODE 18 Using...
User Guide
Page 19
to the previous menu level or cancel an action. Press VOL+ or REDIAL/VOL- Your call is put on the base or charger. 3.14 Intercom This feature is an incoming external call the handset. 1. Press MENU. 2. Press /MUTE to go back to scroll through the menu. 3. During an external call . 3. Press MENU to another handset, and use the conference option. 3.14.1 Calling another handset 1. Press VOL+ or REDIAL/VOL- It allows you to make internal calls, transfer external calls from one handset to call . During an intercom call the handset. 4. Press VOL+ or REDIAL/VOL- ...
to the previous menu level or cancel an action. Press VOL+ or REDIAL/VOL- Your call is put on the base or charger. 3.14 Intercom This feature is an incoming external call the handset. 1. Press MENU. 2. Press /MUTE to go back to scroll through the menu. 3. During an external call . 3. Press MENU to another handset, and use the conference option. 3.14.1 Calling another handset 1. Press VOL+ or REDIAL/VOL- It allows you to make internal calls, transfer external calls from one handset to call . During an intercom call the handset. 4. Press VOL+ or REDIAL/VOL- ...
User Guide
Page 20
If the other handset answers by pressing /FLASH or /SPEAKER, press /BACK to transfer the call , press MENU on any handset will change this setting unless advised to do so. 1. Press /BACK on hold. 2. Press MENU to select TONE or PULSE. 4. Press MENU and then VOL+ or REDIAL/VOL- to select DIAL MODE. 3. to select SETUP BS. 2. Your caller is put on any handset to your country and network operator. Press MENU and then VOL+ or REDIAL/VOL- When the other handset does not answer, press / MUTE to talk to end a three-party conference call and leave the other handset answers ...
If the other handset answers by pressing /FLASH or /SPEAKER, press /BACK to transfer the call , press MENU on any handset will change this setting unless advised to do so. 1. Press /BACK on hold. 2. Press MENU to select TONE or PULSE. 4. Press MENU and then VOL+ or REDIAL/VOL- to select DIAL MODE. 3. to select SETUP BS. 2. Your caller is put on any handset to your country and network operator. Press MENU and then VOL+ or REDIAL/VOL- When the other handset does not answer, press / MUTE to talk to end a three-party conference call and leave the other handset answers ...