
User Guide
Page 2
... features to work. For warranty service of your dated sales receipt to your new Motorola Phone! Alternative arrangements should be made if emergency telephone call : US and Canada: 1-888-331-3383 On the Web: www.motorola.com • 30 name and number phonebook. • Answering machine with up to 5 cordless handsets to a single base. • Make internal calls, transfer external calls, hold 3-way conversation between two internal callers and an external caller. *The recording time includes the pre-recorded voice menu...
... features to work. For warranty service of your dated sales receipt to your new Motorola Phone! Alternative arrangements should be made if emergency telephone call : US and Canada: 1-888-331-3383 On the Web: www.motorola.com • 30 name and number phonebook. • Answering machine with up to 5 cordless handsets to a single base. • Make internal calls, transfer external calls, hold 3-way conversation between two internal callers and an external caller. *The recording time includes the pre-recorded voice menu...
User Guide
Page 3
... use the telephone line cord supplied. Follow the simple instructions in 'Getting Started', on the next few pages. Got everything? • Handset • Base • NiMH Rechargeable Battery Pack • Battery Door • Power Adapter • Telephone Line Cord • User's Guide • Quick Start Guide In multi-handset packs, you will need to get the most from your phone. Before you make emergency telephone calls during power failures. Alternative arrangements should be made for access...
... use the telephone line cord supplied. Follow the simple instructions in 'Getting Started', on the next few pages. Got everything? • Handset • Base • NiMH Rechargeable Battery Pack • Battery Door • Power Adapter • Telephone Line Cord • User's Guide • Quick Start Guide In multi-handset packs, you will need to get the most from your phone. Before you make emergency telephone calls during power failures. Alternative arrangements should be made for access...
User Guide
Page 4
...answering machine 22 Getting started 6 1.1 Connecting the base 7 1.2 Installing and charging the handset battery pack... 7 1.3 Assembling the rubber band of cordless handset (Not applicable for L70xM models 8 1.4 Setting the display language 8 1.5 Setting the date and time 9 2. Getting to another handset ...19 3.14.3 Three-party conference call 20 3.15 Setting the dial mode 20 3.16 Setting the flash time 20 3.17 Setting the area code 21 3.18 Registration 21 3.18.1 Registering a handset 21 3.19 Resetting all settings 22 3.20 Paging/Finding a handset 22 3.21 Using your phone...
...answering machine 22 Getting started 6 1.1 Connecting the base 7 1.2 Installing and charging the handset battery pack... 7 1.3 Assembling the rubber band of cordless handset (Not applicable for L70xM models 8 1.4 Setting the display language 8 1.5 Setting the date and time 9 2. Getting to another handset ...19 3.14.3 Three-party conference call 20 3.15 Setting the dial mode 20 3.16 Setting the flash time 20 3.17 Setting the area code 21 3.18 Registration 21 3.18.1 Registering a handset 21 3.19 Resetting all settings 22 3.20 Paging/Finding a handset 22 3.21 Using your phone...
User Guide
Page 5
Help 27 5. General information 28 5 3.21.1 Playing messages 22 3.21.2 Turning on or off the answering machine 23 3.21.3 Setting the announcement mode ...........23 3.21.4 Setting the number of rings 23 3.21.5 Announcement 24 3.21.6 Recording a memo 24 3.21.7 Call screening on/off 25 3.21.8 Deleting all old messages 25 3.21.9 Remote access 25 3.21.10Setting the security code 26 4.
Help 27 5. General information 28 5 3.21.1 Playing messages 22 3.21.2 Turning on or off the answering machine 23 3.21.3 Setting the announcement mode ...........23 3.21.4 Setting the number of rings 23 3.21.5 Announcement 24 3.21.6 Recording a memo 24 3.21.7 Call screening on/off 25 3.21.8 Deleting all old messages 25 3.21.9 Remote access 25 3.21.10Setting the security code 26 4.
User Guide
Page 6
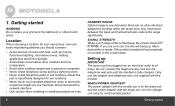
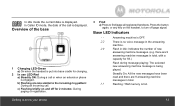
... areas. Move back within the range area. Setting up . The power adapter with the smaller pin is for the base unit and the power adapter with the product. Do not connect the telephone line cord into an electrical outlet at the network interface. • Use caution when installing or modifying telephone lines. 6 HANDSET RANGE Optimal range is for the charger unit (only for your phone in the bathroom or other cordless telephones or personal computers. • Never install telephone...
... areas. Move back within the range area. Setting up . The power adapter with the smaller pin is for the base unit and the power adapter with the product. Do not connect the telephone line cord into an electrical outlet at the network interface. • Use caution when installing or modifying telephone lines. 6 HANDSET RANGE Optimal range is for the charger unit (only for your phone in the bathroom or other cordless telephones or personal computers. • Never install telephone...
User Guide
Page 10
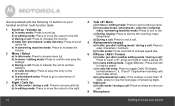
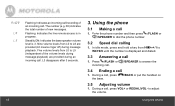
... list. e) In answering machine mode: Press to increase the volume. 2 Menu / Select a) In idle mode: Press to silence the incoming ringer temporarily. b) In idle mode: Press and hold to activate speed dial. 6 #/Pause / ABC / Format a) In idle / pre-dial / number editing mode / during a call to another handset. Press and hold to insert a pause (P). d) In calls list entry: Press to save the settings. b) In name editing mode: Toggle ABC/abc. d) In phonebook list entry: If the number...
... list. e) In answering machine mode: Press to increase the volume. 2 Menu / Select a) In idle mode: Press to silence the incoming ringer temporarily. b) In idle mode: Press and hold to activate speed dial. 6 #/Pause / ABC / Format a) In idle / pre-dial / number editing mode / during a call to another handset. Press and hold to insert a pause (P). d) In calls list entry: Press to save the settings. b) In name editing mode: Toggle ABC/abc. d) In phonebook list entry: If the number...
User Guide
Page 11
... the answering machine. Getting to know your phone 12 Talk On / Flash a) In idle / pre-dial mode: Press to make a call with the speakerphone. d) During an incoming call: Press to answer a call. 13 Left / Phonebook a) In idle mode / during a call with the speakerphone. Press and hold to delete all call log entries. c) In phonebook list entry: If the number is more than 15 digits, press to view the previous page of remaining digits. 11 Scroll Down / Volume Down / Redial List...
... the answering machine. Getting to know your phone 12 Talk On / Flash a) In idle / pre-dial mode: Press to make a call with the speakerphone. d) During an incoming call: Press to answer a call. 13 Left / Phonebook a) In idle mode / during a call with the speakerphone. Press and hold to delete all call log entries. c) In phonebook list entry: If the number is more than 15 digits, press to view the previous page of remaining digits. 11 Scroll Down / Volume Down / Redial List...
User Guide
Page 12
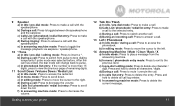
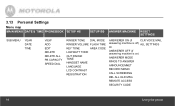
... line is muted. Getting to . In idle mode, the current time is displayed. Animation in use. In Caller ID mode, the time of call is in cycle. On when answering machine is received new voice mail not yet listened to. On when ringer volume is turned off. 12 On when there is turned on . Battery is an incoming call has been viewed. Flashes when there is charging. Off when new call . Flashes when new answering machine message is turned on . Cordless Handset LCD Display Display...
... line is muted. Getting to . In idle mode, the current time is displayed. Animation in use. In Caller ID mode, the time of call is in cycle. On when answering machine is received new voice mail not yet listened to. On when ringer volume is turned off. 12 On when there is turned on . Battery is an incoming call has been viewed. Flashes when there is charging. Off when new call . Flashes when new answering machine message is turned on . Cordless Handset LCD Display Display...
User Guide
Page 13
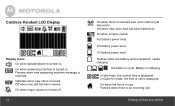
...: The selected new answering machine message is no voice message in the answering machine. 09 Flash in total. In Caller ID mode, the date of new answering machine messages. (e.g. b) Flashing at a rate similar to know your phone 13 Answering machine is OFF. 00 There is being played. there are 9 answering machine messages in idle: Indicates the number of the call or when an extension phone is displayed. c) Flashing briefly on the handset, to find/page all registered handsets. Getting to the incoming ring pattern: During an incoming call.
...: The selected new answering machine message is no voice message in the answering machine. 09 Flash in total. In Caller ID mode, the date of new answering machine messages. (e.g. b) Flashing at a rate similar to know your phone 13 Answering machine is OFF. 00 There is being played. there are 9 answering machine messages in idle: Indicates the number of the call or when an extension phone is displayed. c) Flashing briefly on the handset, to find/page all registered handsets. Getting to the incoming ring pattern: During an incoming call.
User Guide
Page 14
... Making a call , press VOL+ or REDIAL/VOL- Press /FLASH or incoming call. /SPEAKER to WXYZ/9 until the number is displayed and dialed. 3.3 Answering a call 1. During a call 1. An/09 LA L3 Flashing: Indicates an incoming call/recording of an incoming call , press /BACK or put the handset on the base. 3.5 Adjusting volume 1. Flashing: Indicates the line remote access is 3. Nine volume levels from L0 to L5 (independent of new messages. During a call . Using the phone Five volume levels from / /1 to answer the 3.4 Ending a call . In idle mode, press and hold a key...
... Making a call , press VOL+ or REDIAL/VOL- Press /FLASH or incoming call. /SPEAKER to WXYZ/9 until the number is displayed and dialed. 3.3 Answering a call 1. During a call 1. An/09 LA L3 Flashing: Indicates an incoming call/recording of an incoming call , press /BACK or put the handset on the base. 3.5 Adjusting volume 1. Flashing: Indicates the line remote access is 3. Nine volume levels from L0 to L5 (independent of new messages. During a call . Using the phone Five volume levels from / /1 to answer the 3.4 Ending a call . In idle mode, press and hold a key...

User Guide
Page 16
... key corresponding to the first letter of missed and received calls. NOTE • If the telephone number is not available for their Caller ID service. 3.12.1 Calls List The calls list contains details of the entry you receive more than one call from the phonebook 1. Some operators may be displayed in the display on (for multi-pack use only). 16 Using the phone Details include the date and time of the call...
... key corresponding to the first letter of missed and received calls. NOTE • If the telephone number is not available for their Caller ID service. 3.12.1 Calls List The calls list contains details of the entry you receive more than one call from the phonebook 1. Some operators may be displayed in the display on (for multi-pack use only). 16 Using the phone Details include the date and time of the call...
User Guide
Page 18
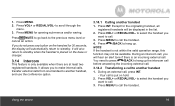
... Settings Menu map MAIN MENU DATE & TIME PHONEBOOK SETUP HS SETUP BS ANSWER MACHINE RESET SETTINGS SUB MENU YEAR DATE TIME VIEW ADD EDIT DELETE DELETE ALL PB CAPACITY SPEED DIAL RINGER TONE DIAL MODE RINGER VOLUME FLASH TIME KEY TONE AREA CODE LOW BATT TONE OUT RANGE TONE HANDSET NAME LANGUAGE LCD CONTRAST REGISTRATION ANSWERER ON (if CLR VOICE MAIL answering machine is off) ALL SETTINGS Or ANSWERER OFF (if answering machine is on) ANSWERER MODE RINGS TO ANSWER ANNOUNCEMNET RECORD MEMO CALL SCREENING DEL ALL OLD MSG REMOTE ACCESS SECURITY CODE 18 Using the phone
... Settings Menu map MAIN MENU DATE & TIME PHONEBOOK SETUP HS SETUP BS ANSWER MACHINE RESET SETTINGS SUB MENU YEAR DATE TIME VIEW ADD EDIT DELETE DELETE ALL PB CAPACITY SPEED DIAL RINGER TONE DIAL MODE RINGER VOLUME FLASH TIME KEY TONE AREA CODE LOW BATT TONE OUT RANGE TONE HANDSET NAME LANGUAGE LCD CONTRAST REGISTRATION ANSWERER ON (if CLR VOICE MAIL answering machine is off) ALL SETTINGS Or ANSWERER OFF (if answering machine is on) ANSWERER MODE RINGS TO ANSWER ANNOUNCEMNET RECORD MEMO CALL SCREENING DEL ALL OLD MSG REMOTE ACCESS SECURITY CODE 18 Using the phone
User Guide
Page 19
... to make internal calls, transfer external calls from one handset to call . Press MENU to another handset, and use the conference option. 3.14.1 Calling another handset 1. NOTE If the handset is an incoming external call the handset. 4. Except for opening sub-menus and/or saving. During an external call the handset. If you want to call to standby when the handset is placed on the base or charger. 3.14 Intercom This feature is...
... to make internal calls, transfer external calls from one handset to call . Press MENU to another handset, and use the conference option. 3.14.1 Calling another handset 1. NOTE If the handset is an incoming external call the handset. 4. Except for opening sub-menus and/or saving. During an external call the handset. If you want to call to standby when the handset is placed on the base or charger. 3.14 Intercom This feature is...
User Guide
Page 20
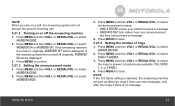
... phone Your caller is selected, press TONE/* to switch from pulse to transfer the call and leave the other handset engaged with the caller. to select DIAL MODE. 3. Press MENU to select SETUP BS. 2. When the other handset does not answer, press / MUTE to talk to end a three-party conference call . Press MENU and then VOL+ or REDIAL/VOL- Press MENU to set up the conference call 1. After the call . 3.15 Setting the dial mode The default dialing mode...
... phone Your caller is selected, press TONE/* to switch from pulse to transfer the call and leave the other handset engaged with the caller. to select DIAL MODE. 3. Press MENU to select SETUP BS. 2. When the other handset does not answer, press / MUTE to talk to end a three-party conference call . Press MENU and then VOL+ or REDIAL/VOL- Press MENU to set up the conference call 1. After the call . 3.15 Setting the dial mode The default dialing mode...

User Guide
Page 22
... message. /ABC/2 Press to default. REDIAL/VOL- 3.19 Resetting all settings 1. New messages will be played. /SPEAKER Toggle the message playback via earpiece/speakerphone. /BACK Exit to play the next message. Decrease the volume. /MUTE Delete the current message and the next message will remained unchanged. 3.20 Paging/Finding a handset Press FIND on the base. 3.21 Using your phonebook entries, calls list, and redial list, will be played followed by any key on the handset...
... message. /ABC/2 Press to default. REDIAL/VOL- 3.19 Resetting all settings 1. New messages will be played. /SPEAKER Toggle the message playback via earpiece/speakerphone. /BACK Exit to play the next message. Decrease the volume. /MUTE Delete the current message and the next message will remained unchanged. 3.20 Paging/Finding a handset Press FIND on the base. 3.21 Using your phonebook entries, calls list, and redial list, will be played followed by any key on the handset...
User Guide
Page 23
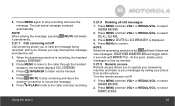
... SAVER, 3, 4, or 5 RINGS). 4. Using the phone 23 to save . 3.21.4 Setting the number of rings 1. to select ANSWER MACHINE. 2. If the answering machine is no message. Press MENU and then VOL+ or REDIAL/VOL- NOTE If the Toll Saver setting is selected, the answering machine will not answer the second incoming call , the answering system will pick up after four rings if there is turned off the answering machine 1. to select ANSWER MACHINE. 2. NOTE When...
... SAVER, 3, 4, or 5 RINGS). 4. Using the phone 23 to save . 3.21.4 Setting the number of rings 1. to select ANSWER MACHINE. 2. If the answering machine is no message. Press MENU and then VOL+ or REDIAL/VOL- NOTE If the Toll Saver setting is selected, the answering machine will not answer the second incoming call , the answering system will pick up after four rings if there is turned off the answering machine 1. to select ANSWER MACHINE. 2. NOTE When...
User Guide
Page 25
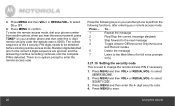
... recording, the handset displays SCREENING?. 2. Turn the remote access on /off 1. At this point, delete some messages to record the message. 5. to the caller through the handset earpiece, the handset displays CALL SCREENING. 3. Using the phone 25 Press /FLASH to talk to the caller and stop screening and leave the answering machine to free up memory. 3.21.9 Remote access Remote access allows you may interrupt the message and take the call. 1. When the answering machine is full, will delete 3.21.7 Call screening on /off Call screening allows you to hear the message...
... recording, the handset displays SCREENING?. 2. Turn the remote access on /off 1. At this point, delete some messages to record the message. 5. to the caller through the handset earpiece, the handset displays CALL SCREENING. 3. Using the phone 25 Press /FLASH to talk to the caller and stop screening and leave the answering machine to free up memory. 3.21.9 Remote access Remote access allows you may interrupt the message and take the call. 1. When the answering machine is full, will delete 3.21.7 Call screening on /off Call screening allows you to hear the message...
User Guide
Page 26
... forward to the next message 4 Toggle Answer Off/Announce Only/Announce and Record modes 5 Delete the message 7 Listen to the Main Menu (for full voice prompts only) 3.21.10 Setting the security code This is no system prompt to select ANSWER MACHINE. 2. To enter the remote access mode, dial your phone number from another phone, when you hear the announcement, press TONE/* on your remote access mode. The correct sequence of the 4 security PIN digits needs to change...
... forward to the next message 4 Toggle Answer Off/Announce Only/Announce and Record modes 5 Delete the message 7 Listen to the Main Menu (for full voice prompts only) 3.21.10 Setting the security code This is no system prompt to select ANSWER MACHINE. 2. To enter the remote access mode, dial your phone number from another phone, when you hear the announcement, press TONE/* on your remote access mode. The correct sequence of the 4 security PIN digits needs to change...
User Guide
Page 27
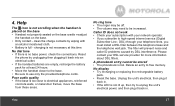
...; The phonebook is no base power, check the connections. A phonebook entry cannot be increased. No dial tone • If there is full. No ring tone • The ringer may be off. • The volume may need to electrical appliances, reinforced concrete walls, or metal door frames, move the base from these areas. clean the charge contacts by wiping with your telephone lines, you subscribe to unplug the unit's electrical power...
...; The phonebook is no base power, check the connections. A phonebook entry cannot be increased. No dial tone • If there is full. No ring tone • The ringer may be off. • The volume may need to electrical appliances, reinforced concrete walls, or metal door frames, move the base from these areas. clean the charge contacts by wiping with your telephone lines, you subscribe to unplug the unit's electrical power...
User Guide
Page 28
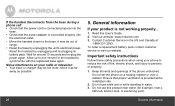
Reset the handset by unplugging the unit's electrical power. Wait for the handset to synchronize with the registered base again. To order a replacement battery pack contact customer service or visit our website. Ensure that the power adapter is connected properly into the base. • Check that proper ventilation is provided at 1-888-331-3383. It may be out of range. • Reset the base by unplugging and re-plugging its battery pack...
Reset the handset by unplugging the unit's electrical power. Wait for the handset to synchronize with the registered base again. To order a replacement battery pack contact customer service or visit our website. Ensure that the power adapter is connected properly into the base. • Check that proper ventilation is provided at 1-888-331-3383. It may be out of range. • Reset the base by unplugging and re-plugging its battery pack...


