User Manual
Page 5
Table of Contents iii Chapter 5 Cloning Mode 5-1 Entering Cloning Mode ...5-1 Cloning Using the Cloning Cable...5-1 Cloning by Sending a Contact ...5-3 Chapter 6 Troubleshooting 6-1 Chapter 7 Motorola Limited Warranty for the United States and Canada 7-3 What Does this Warranty Cover?...7-3 Products and Accessories ...7-3 Exclusions...7-3 Software...7-4 Who is Covered? ...7-4 How to Obtain Warranty Service or Other Information 7-4 Software Copyright Notice...7-4 Patent Notice ...7-5 Export Law Assurances...7-5 INDEX 9980384R89-O February 10, 2005
Table of Contents iii Chapter 5 Cloning Mode 5-1 Entering Cloning Mode ...5-1 Cloning Using the Cloning Cable...5-1 Cloning by Sending a Contact ...5-3 Chapter 6 Troubleshooting 6-1 Chapter 7 Motorola Limited Warranty for the United States and Canada 7-3 What Does this Warranty Cover?...7-3 Products and Accessories ...7-3 Exclusions...7-3 Software...7-4 Who is Covered? ...7-4 How to Obtain Warranty Service or Other Information 7-4 Software Copyright Notice...7-4 Patent Notice ...7-5 Export Law Assurances...7-5 INDEX 9980384R89-O February 10, 2005

User Manual
Page 23
... either over the air or with the RRDN5378 cloning cable) to your channel and PublicGroup number. One-to-many communication to all radios set to member radios. Requires adding all radio features. Begin speaking after the radio emits the talk permit tone. One-to-many communication to only radios in use Mike Jones Making a Call 1. Receiving a Call...
... either over the air or with the RRDN5378 cloning cable) to your channel and PublicGroup number. One-to-many communication to all radios set to member radios. Requires adding all radio features. Begin speaking after the radio emits the talk permit tone. One-to-many communication to only radios in use Mike Jones Making a Call 1. Receiving a Call...
User Manual
Page 44
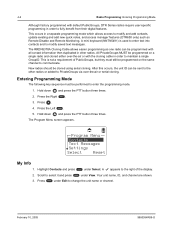
...programming mode which allows access to fully benefit from their digital features. Hold down and press the PTT button three times. Highlight Contacts and press under View. Scroll to PrivateGroups via over -the-air or with the cloning cable in order to change the unit name or channel.... and add new quick notes, and access manager features (DTR650 only) such as one radio can be sent to the other radios. This occurs in other radios or added to select it and press under Select. The RRDN5378A Cloning Cable allows easier programming as Remote Disable and Remote Monitoring. New...
...programming mode which allows access to fully benefit from their digital features. Hold down and press the PTT button three times. Highlight Contacts and press under View. Scroll to PrivateGroups via over -the-air or with the cloning cable in order to change the unit name or channel.... and add new quick notes, and access manager features (DTR650 only) such as one radio can be sent to the other radios. This occurs in other radios or added to select it and press under Select. The RRDN5378A Cloning Cable allows easier programming as Remote Disable and Remote Monitoring. New...
User Manual
Page 53
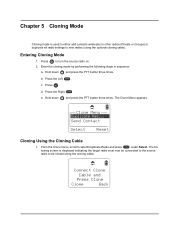
... to either add contacts wirelessly to other radios (Private or Groups) or duplicate all radio settings to new radios (using the cloning cable. Press the Left . Clone Menu Duplicate Rad... Chapter 5 Cloning Mode Cloning mode is displayed indicating the target radio must now be connected to the source radio to be cloned using the optional cloning cable). b. Press . Press the Right e. The fol...
... to either add contacts wirelessly to other radios (Private or Groups) or duplicate all radio settings to new radios (using the cloning cable. Press the Left . Clone Menu Duplicate Rad... Chapter 5 Cloning Mode Cloning mode is displayed indicating the target radio must now be connected to the source radio to be cloned using the optional cloning cable). b. Press . Press the Right e. The fol...
User Manual
Page 54
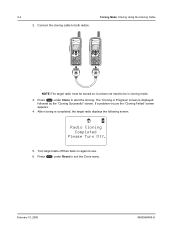
... be in Progress" screen is completed, the target radio displays the following screen. The "Cloning in cloning mode. 3. Radio Cloning Completed Please Turn Off. 5. Connect the cloning cable to be turned on again to exit the Clone menu. Press under Clone to start the cloning. 5-2 Cloning Mode: Cloning Using the Cloning Cable 2. If a problem occurs the "Cloning Failed" screen appears. 4. February 10, 2005 9980384R89-O Turn...
... be in Progress" screen is completed, the target radio displays the following screen. The "Cloning in cloning mode. 3. Radio Cloning Completed Please Turn Off. 5. Connect the cloning cable to be turned on again to exit the Clone menu. Press under Clone to start the cloning. 5-2 Cloning Mode: Cloning Using the Cloning Cable 2. If a problem occurs the "Cloning Failed" screen appears. 4. February 10, 2005 9980384R89-O Turn...
User Manual
Page 57
...PrivateGroups to Group Only. At least one radio (Private or Group call has been completed. Make sure that radio is out of range. Recharge or replace battery. Radios are too far apart or obstacles are too close together. Make sure clone cable is busy. Therefore, the number of PrivateGroups...Power Message not transmitted Cannot receive Private calls Cannot receive Public Group Cannot access Remote Monitor, Time or Remote Disable (DTR650 only) Time Update not received Limited talk range Message not received Poor audio quality Low batteries Cannot see all have been properly programmed...
...PrivateGroups to Group Only. At least one radio (Private or Group call has been completed. Make sure that radio is out of range. Recharge or replace battery. Radios are too far apart or obstacles are too close together. Make sure clone cable is busy. Therefore, the number of PrivateGroups...Power Message not transmitted Cannot receive Private calls Cannot receive Public Group Cannot access Remote Monitor, Time or Remote Disable (DTR650 only) Time Update not received Limited talk range Message not received Poor audio quality Low batteries Cannot see all have been properly programmed...
User Manual
Page 64
2 INDEX: Using the Cloning Cable 5-1 Sending a Contact 5-3 Charging Using the 1-7 Drop-in Charging Tray 1-6 Multi-Unit Charger 1-7 Plug-in Charger 1-6 Charging a Radio and Battery using a Multi-Unit Charger 1-7 Charging the Radio 1-6 Charging using the Drop-in Charging Tray 1-6 Charging using the...the Mini Keyboard 2-8 Contacts, Adding 4-1 D Deleting a Message 2-9 Deleting a Recent Call 2-12 Disconnecting the Mini Keyboard from the Radio 1-8 Display Options 1-4 Drop-in Charging Tray Charging 1-6 E Enabling Call Forwarding 3-2 Entering a Home Group Number (Private Calls Only...
2 INDEX: Using the Cloning Cable 5-1 Sending a Contact 5-3 Charging Using the 1-7 Drop-in Charging Tray 1-6 Multi-Unit Charger 1-7 Plug-in Charger 1-6 Charging a Radio and Battery using a Multi-Unit Charger 1-7 Charging the Radio 1-6 Charging using the Drop-in Charging Tray 1-6 Charging using the...the Mini Keyboard 2-8 Contacts, Adding 4-1 D Deleting a Message 2-9 Deleting a Recent Call 2-12 Disconnecting the Mini Keyboard from the Radio 1-8 Display Options 1-4 Drop-in Charging Tray Charging 1-6 E Enabling Call Forwarding 3-2 Entering a Home Group Number (Private Calls Only...

User Manual
Page 67
... 5-8 Speaker Volume Adjustment 2-1 Standard Yellow Function Green Function 1-10 Status Icons 1-4 Swivel Belt Holster 1-8 T Text Area 1-4 Text Messaging 4-7 Troubleshooting 6-1 Turning Your Radio On or Off 2-1 Types of Calls 2-3 U Using the Cloning Cable 5-1 Using Mini Keyboard Key Shortcuts 1-11 V Viewing a Contact 2-2 Viewing a Recent Call 2-11 W What Does this Warranty Cover 5-7 Exclusions 5-7 Products and Accessories...
... 5-8 Speaker Volume Adjustment 2-1 Standard Yellow Function Green Function 1-10 Status Icons 1-4 Swivel Belt Holster 1-8 T Text Area 1-4 Text Messaging 4-7 Troubleshooting 6-1 Turning Your Radio On or Off 2-1 Types of Calls 2-3 U Using the Cloning Cable 5-1 Using Mini Keyboard Key Shortcuts 1-11 V Viewing a Contact 2-2 Viewing a Recent Call 2-11 W What Does this Warranty Cover 5-7 Exclusions 5-7 Products and Accessories...


