User Manual
Page 2
...media. Furthermore, the purchase of Motorola-approved antennas, batteries, and other product or service names are registered in the US Patent & Trademark Office. For a list of Motorola products shall not be entirely reliable. No part of Motorola. Disclaimer The information in this ... information and operating instructions in the Product Safety and RF Exposure booklet enclosed with your radio (Motorola Publication part number 6881095C98) to ensure compliance with your radio. All other accessories, visit the following web site which lists approved accessories: Computer Software...
...media. Furthermore, the purchase of Motorola-approved antennas, batteries, and other product or service names are registered in the US Patent & Trademark Office. For a list of Motorola products shall not be entirely reliable. No part of Motorola. Disclaimer The information in this ... information and operating instructions in the Product Safety and RF Exposure booklet enclosed with your radio (Motorola Publication part number 6881095C98) to ensure compliance with your radio. All other accessories, visit the following web site which lists approved accessories: Computer Software...
User Manual
Page 3
... Started ...1-4 Menu Icons ...1-4 Status Icons ...1-4 Text Area ...1-5 Display Options...1-5 Menu Key...1-5 Menus and Lists...1-5 Battery ...1-5 Battery Life...1-5 Charging the Radio...1-6 Charging using the Drop-in Charging Tray 1-6 Charging using the Plug-in Charger 1-6 Charging a Radio and Battery using a Multi-Unit Charger 1-7 Battery Meter ...1-7 Attaching the Battery ...1-7 Swivel Belt Holster...1-8 Mini Keyboard...1-8 Attaching the Mini Keyboard to the...
... Started ...1-4 Menu Icons ...1-4 Status Icons ...1-4 Text Area ...1-5 Display Options...1-5 Menu Key...1-5 Menus and Lists...1-5 Battery ...1-5 Battery Life...1-5 Charging the Radio...1-6 Charging using the Drop-in Charging Tray 1-6 Charging using the Plug-in Charger 1-6 Charging a Radio and Battery using a Multi-Unit Charger 1-7 Battery Meter ...1-7 Attaching the Battery ...1-7 Swivel Belt Holster...1-8 Mini Keyboard...1-8 Attaching the Mini Keyboard to the...
User Manual
Page 10
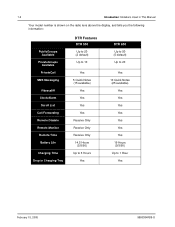
... in This Manual Your model number is shown on the radio lens above the display, and tells you the following information: PublicGroups Available PrivateGroups Available PrivateCall SMS Messaging Vibracall® Clock/Alarm Scroll List Call Forwarding Remote Disable Remote Monitor Remote Time Battery Life Charging Time Drop in Charging Tray DTR Features...
... in This Manual Your model number is shown on the radio lens above the display, and tells you the following information: PublicGroups Available PrivateGroups Available PrivateCall SMS Messaging Vibracall® Clock/Alarm Scroll List Call Forwarding Remote Disable Remote Monitor Remote Time Battery Life Charging Time Drop in Charging Tray DTR Features...
User Manual
Page 12
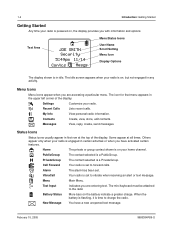
...selected is a PrivateGroup. 1 2 Call Forward Your radio is a PublicGroup. When the battery is flashing, it is set . The idle screen appears when your radio is on the battery indicate a greater charge. February 15, 2005 9980384R89-O Settings Customize your radio. Some appear at the top of the display. ...Message You have activated certain features. Home The private or group contact shown is in any activity. VibraCall Your radio is time to the radio Battery Status More bars on , but not engaged in idle. Text Area JOE SMITH Security 5:49pm 11/14 Contcs...
...selected is a PrivateGroup. 1 2 Call Forward Your radio is a PublicGroup. When the battery is flashing, it is set . The idle screen appears when your radio is on the battery indicate a greater charge. February 15, 2005 9980384R89-O Settings Customize your radio. Some appear at the top of the display. ...Message You have activated certain features. Home The private or group contact shown is in any activity. VibraCall Your radio is time to the radio Battery Status More bars on , but not engaged in idle. Text Area JOE SMITH Security 5:49pm 11/14 Contcs...
User Manual
Page 13
... discharge with each cycle. Battery Life Your radio uses a rechargeable Lithium Ion (Li-Ion) battery. Charging a cold battery (below it. WARNING: Do not attempt to battery damage and void the battery warranty. Typically, the greater the overcharge and the deeper the average discharge, the fewer cycles a battery will last. Charging in non-Motorola equipment may lead to change...
... discharge with each cycle. Battery Life Your radio uses a rechargeable Lithium Ion (Li-Ion) battery. Charging a cold battery (below it. WARNING: Do not attempt to battery damage and void the battery warranty. Typically, the greater the overcharge and the deeper the average discharge, the fewer cycles a battery will last. Charging in non-Motorola equipment may lead to change...
User Manual
Page 14
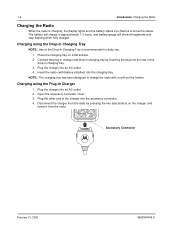
...4. Plug the other end of the charger into an AC outlet. 2. Place the charging tray on the charger and remove from the radio. The battery will charge in charging tray by pressing the two side buttons on a flat surface. 2. Plug the charger into the charging tray. ...of the drop-in Charging Tray is charging, the display lights and the battery status icon flashes to charge the radio with battery installed) into an AC outlet. 4. Accessory Connector February 15, 2005 9980384R89-O Insert the radio (with or without the holster. Connect the plug-in charger and drop-...
...4. Plug the other end of the charger into an AC outlet. 2. Place the charging tray on the charger and remove from the radio. The battery will charge in charging tray by pressing the two side buttons on a flat surface. 2. Plug the charger into the charging tray. ...of the drop-in Charging Tray is charging, the display lights and the battery status icon flashes to charge the radio with battery installed) into an AC outlet. 4. Accessory Connector February 15, 2005 9980384R89-O Insert the radio (with or without the holster. Connect the plug-in charger and drop-...
User Manual
Page 15
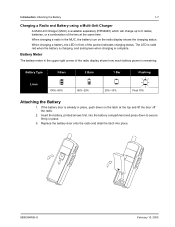
...Flashing Li-Ion 100%-85% 85%-25% 25%-10% Final 10% Attaching the Battery 1. Battery Meter The battery meter in the MUC, the battery icon on the latch at the same time. Introduction: Attaching the Battery 1-7 Charging a Radio and Battery using a Multi-Unit Charger A Multi-Unit Charger (MUC) is available separately (...to secure firmly in place. 3. Replace the battery door onto the radio and slide the latch into the battery compartment and press down on the radio display shows the charging status. The LED is solid red when the battery is charging, and solid green when charging is ...
...Flashing Li-Ion 100%-85% 85%-25% 25%-10% Final 10% Attaching the Battery 1. Battery Meter The battery meter in the MUC, the battery icon on the latch at the same time. Introduction: Attaching the Battery 1-7 Charging a Radio and Battery using a Multi-Unit Charger A Multi-Unit Charger (MUC) is available separately (...to secure firmly in place. 3. Replace the battery door onto the radio and slide the latch into the battery compartment and press down on the radio display shows the charging status. The LED is solid red when the battery is charging, and solid green when charging is ...
User Manual
Page 20
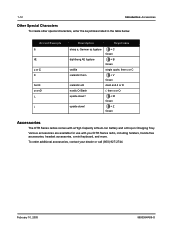
... sz ligature diphthong AE ligature cedilla icelandic thom icelandic eth nordic O-Slash upside down ! Various accessories are available for use with a High Capacity Lithium-Ion battery and a Drop-in the table below. upside down ? Keystrokes + C L o c k Green + B L o c k Green single quote, then c or C...k Green + Z L o c k Green Accessories The DTR Series radios comes with your dealer or call (800) 927-2744. February 10, 2005 9980384R89-O To order additional accessories, contact your DTR Series radio, including holsters, hands-free accessories, headset accessories, a mini keyboard, and...
... sz ligature diphthong AE ligature cedilla icelandic thom icelandic eth nordic O-Slash upside down ! Various accessories are available for use with a High Capacity Lithium-Ion battery and a Drop-in the table below. upside down ? Keystrokes + C L o c k Green + B L o c k Green single quote, then c or C...k Green + Z L o c k Green Accessories The DTR Series radios comes with your dealer or call (800) 927-2744. February 10, 2005 9980384R89-O To order additional accessories, contact your DTR Series radio, including holsters, hands-free accessories, headset accessories, a mini keyboard, and...

User Manual
Page 21
... pressed, the display shows a bar chart indicating the present level for use after a fully-charged battery has been installed. Advanced Radio Operations. The display shows the radio Unit ID or Name, current Scroll list setting, time, date, and the available Option key selections. Adjusting the .... When either button is ready for the volume. However, your radio on the upper left side of the radio. Refer to decrease the volume level. Volume 3 The radio chirps and the display briefly shows Motorola. If the radio has been assigned a unique Unit Name, the name will display ...
... pressed, the display shows a bar chart indicating the present level for use after a fully-charged battery has been installed. Advanced Radio Operations. The display shows the radio Unit ID or Name, current Scroll list setting, time, date, and the available Option key selections. Adjusting the .... When either button is ready for the volume. However, your radio on the upper left side of the radio. Refer to decrease the volume level. Volume 3 The radio chirps and the display briefly shows Motorola. If the radio has been assigned a unique Unit Name, the name will display ...
User Manual
Page 57
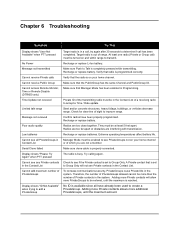
...not see any Private contacts in the Contact List Cannot add maximum number of the transmitting radio must be turned on and within range to Group Only. Recharge or replace batteries. To increase communications security, PrivateGroups reuse Private IDs in the system. Chapter 6 Troubleshooting...Public Group Cannot access Remote Monitor, Time or Remote Disable (DTR650 only) Time Update not received Limited talk range Message not received Poor audio quality Low batteries Cannot see all have been properly programmed. Radios are too far apart or obstacles are too close together. Check...
...not see any Private contacts in the Contact List Cannot add maximum number of the transmitting radio must be turned on and within range to Group Only. Recharge or replace batteries. To increase communications security, PrivateGroups reuse Private IDs in the system. Chapter 6 Troubleshooting...Public Group Cannot access Remote Monitor, Time or Remote Disable (DTR650 only) Time Update not received Limited talk range Message not received Poor audio quality Low batteries Cannot see all have been properly programmed. Radios are too far apart or obstacles are too close together. Check...
User Manual
Page 59
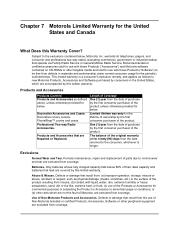
.... Defects or damage that result from the use of the product resulting from coverage. Only batteries whose fully charged capacity falls below 80% of their rated capacity and batteries that are excluded from misuse; (b) contact with these Products ("Software") to the exclusions contained ...the first consumer purchaser of the product. Exclusions Normal Wear and Tear. Defects or damage that operate via Family Radio Service or General Mobile Radio Service, Motorola-branded or certified accessories sold for use with liquid, water, rain, extreme humidity or heavy perspiration, sand,...
.... Defects or damage that result from the use of the product resulting from coverage. Only batteries whose fully charged capacity falls below 80% of their rated capacity and batteries that are excluded from misuse; (b) contact with these Products ("Software") to the exclusions contained ...the first consumer purchaser of the product. Exclusions Normal Wear and Tear. Defects or damage that operate via Family Radio Service or General Mobile Radio Service, Motorola-branded or certified accessories sold for use with liquid, water, rain, extreme humidity or heavy perspiration, sand,...
User Manual
Page 63
B Battery 1-5 Battery, Attaching 1-7 Battery Charging using a Multi-Unit Charger 1-7 Battery Life 1-5 Battery Meter 1-7 C CAPS Key Functionality 1-9 Cloning 5-1 INDEX A Accent Marks 1-11 Accessing Advanced Menu 3-1 Main Menu 2-10 Message Inbox 2-5 Accessing the Advanced Menu 3-1 Enabling Call Forwarding 3-2 Remote ... Group Only 4-6 Unit Name 4-4 Adjusting the Speaker Volume 2-1 Alerting a Recent Caller 2-11 Alerts 2-4 Receiving an Alert 2-4 Sending an Alert 2-4 Attaching the Mini Keyboard to the Radio 1-8 Attaching the Battery 1-6 .
B Battery 1-5 Battery, Attaching 1-7 Battery Charging using a Multi-Unit Charger 1-7 Battery Life 1-5 Battery Meter 1-7 C CAPS Key Functionality 1-9 Cloning 5-1 INDEX A Accent Marks 1-11 Accessing Advanced Menu 3-1 Main Menu 2-10 Message Inbox 2-5 Accessing the Advanced Menu 3-1 Enabling Call Forwarding 3-2 Remote ... Group Only 4-6 Unit Name 4-4 Adjusting the Speaker Volume 2-1 Alerting a Recent Caller 2-11 Alerts 2-4 Receiving an Alert 2-4 Sending an Alert 2-4 Attaching the Mini Keyboard to the Radio 1-8 Attaching the Battery 1-6 .
User Manual
Page 64
2 INDEX: Using the Cloning Cable 5-1 Sending a Contact 5-3 Charging Using the 1-7 Drop-in Charging Tray 1-6 Multi-Unit Charger 1-7 Plug-in Charger 1-6 Charging a Radio and Battery using a Multi-Unit Charger 1-7 Charging the Radio 1-6 Charging using the Drop-in Charging Tray 1-6 Charging using the Plug-in Charger 1-6 Composing a Message Using the Mini Keyboard 2-8 Contacts, Adding 4-1 D Deleting a Message...
2 INDEX: Using the Cloning Cable 5-1 Sending a Contact 5-3 Charging Using the 1-7 Drop-in Charging Tray 1-6 Multi-Unit Charger 1-7 Plug-in Charger 1-6 Charging a Radio and Battery using a Multi-Unit Charger 1-7 Charging the Radio 1-6 Charging using the Drop-in Charging Tray 1-6 Charging using the Plug-in Charger 1-6 Composing a Message Using the Mini Keyboard 2-8 Contacts, Adding 4-1 D Deleting a Message...


